You must log on to the site before you can start editing your home page. Only those users assigned to the User Role of Web Page Editor are allowed to edit the home page.
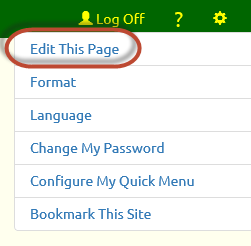 After logging on to the site, stay on the home page and click the
  icon in the upper right corner of the page to reveal the Tools menu, as shown at right.
If you are on the home page - or any other page that you can edit - you'll see "Edit This Page" at the top of the Tools menu. Select that option to begin editing the current page.
Once you are done editing the page, go back to the Tools menu. The top item will now be "Exit Page Edit".
Page Sections
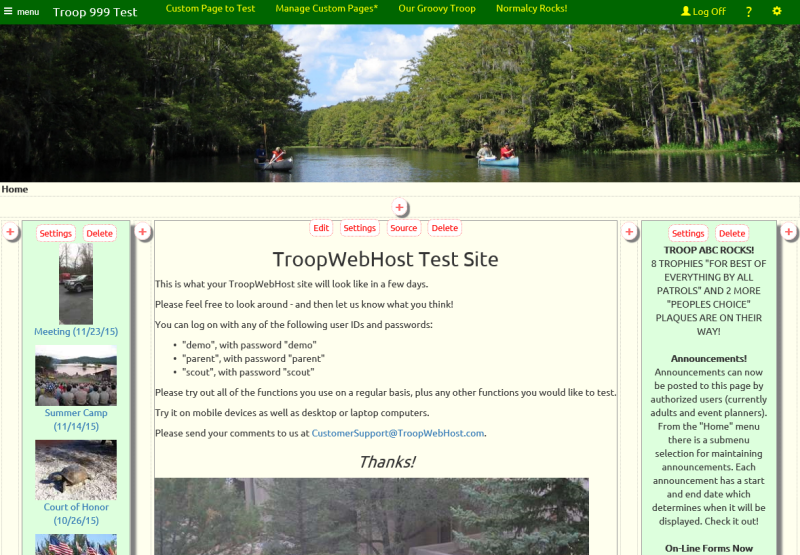
When you enter edit mode, you'll see the page divided into sections, as shown above.
There are two types of sections:
- Those containing text and images that you create.
- "Widgets" that display information from your troop's database.
The first type of section will have four buttons at the top:
- "Edit" will open the WYSIWYG editor for this section.
- "Settings" will let you change the width, background color and other parameters for this section.
- "Source" will allow you to edit the HTML source code for this section.
- "Delete" will delete this section permanently.
Widgets only have two buttons: "Settings" and "Delete".
The  buttons that you see scattered about the page will create a new section in that location.
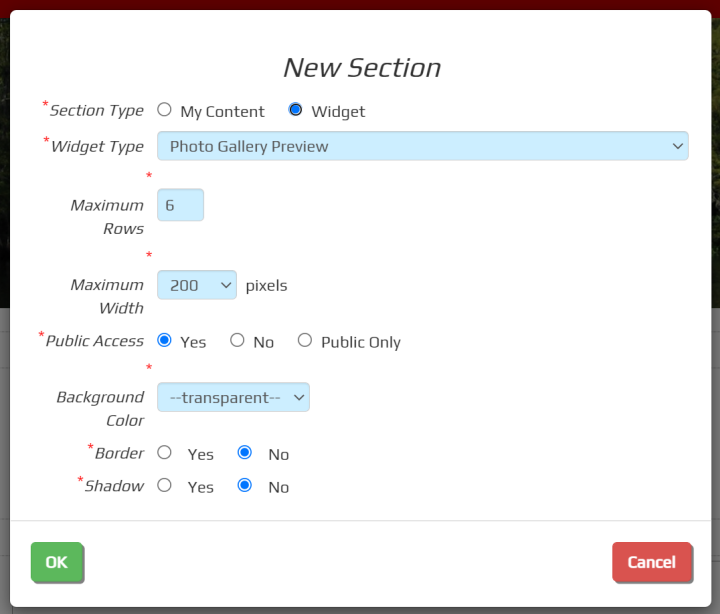
When you click the icon, the system will display this pop-up window with the settings for your new section.
Choose between "My Content" which will allow you to enter text and images, or "Widget" which will fill the section with information from your database.
If you select "Widget" you'll then choose the type of information you want to display in this section. Your choices currently include:
- Photo Gallery Preview, which displays the first photo from each of your most recent events which have photos.
- Announcements & Upcoming Events, which displays current announcements followed by a list of upcoming events.
- Announcements, which displays current announcements.
- Upcoming Events, which displays a list of upcoming events.
- Events You Can Sign Up For, which displays upcoming events that allow sign-up.
- Recent Events, which lists events that recently happened.
- Number Of Scouts At Each Rank, which shows a count of your current scouts at each rank.
- Our Eagle Scouts - including parents who earned Eagle, which displays a list of Eagle scout who either earned Eagle with your troop or who are adults who earned Eagle as a youth.
- Our Eagle Scouts - including parents who earned Eagle (name only), same as above, but without the photo.
- Scouts Who Earned Eagle Here, which lists scouts who earned Eagle as a member of your troop.
- Surveys, with links to currently available surveys.
- Our Scout Leaders will display the current scout leadership, sorted by position. We recommend you set Public Access to NO for this widget, as well as the next two.
- Our Scout Leaders - Girls Troop is intended for sites shared by a girl troop and boy troop, to display the girl troop leaders.
- Our Scout Leaders - Boys Troop is intended for sites shared by a girl troop and boy troop, to display the boy troop leaders.
- Our Adult Leaders - Standard, which lists the current adult leadership, sorted by position.
- Our Adult Leaders - Girl Troop and Boy Troop in One Site, which lists the adult leadership beginning with the positions shared by both troops, followed by the leaders in each troop.
- Contact Us Form, which displays a Contact Us form which visitors can use to send a message to selected troop leaders.
For any of these widgets you can specify the maximum number of entries that will be displayed. This can be used to limit the height of this section
The Maximum Width will default to an appropriate value for the type of section you've selected. For "My Content" sections, this can be used to adjust the height of the section.
Public Access determines whether the public can view this section without logging on. If you select "Public Only", the section will be visible before you log on, but not after.
The default Background Color is "transparent", but you can change this to any color you want. The drop down list gives you some standard choices, but if you select "Other" you'll have the opportunity to enter any RGB color you'd like. On most brosers other than Internet Explorer you should see a color picker.
Border will draw a border around this section and Shadow will create a shadow effect behind this section.
WYSIWYG Editor

Clicking the "Edit" button will open up the editor for that section, as shown above.
This is the same editor you use when you compose an e-mail message. It gives you control over font size, color, and other formatting. It is a popular open source editor called CKEditor.
You can drop images into this section and resize them by pulling on the lower right corner of the image.
Best of all, if you accidentally delete your work, the Restore button at the bottom of the editor window will let you pick an earlier version of this content.
Source
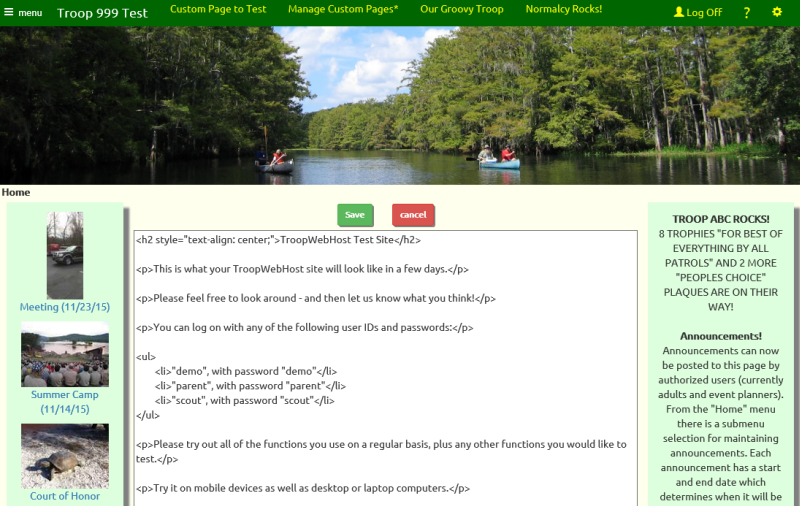
The "Source" button will display the raw HTML source code for this section, as shown above.
You can edit the HTML, or copy and paste HTML that you've compsed in another editor.
There is no limit on the number of characters you can enter or copy into this window.
Note: If you add complex HTML to a section using the "Source" function, do not subsequently use the "Edit" function to modify it. The WYSIWYG editor may modify your HTML and remove some of your code.