Site Appearance
The Site Appearance page allows you to change the way your website looks. It also allows you to set the maximum resolution of photos that you will upload to your Photo Gallery.
This page is only available to users with Site Administrator privileges. You can access it through Site Configuration → Site Appearance.
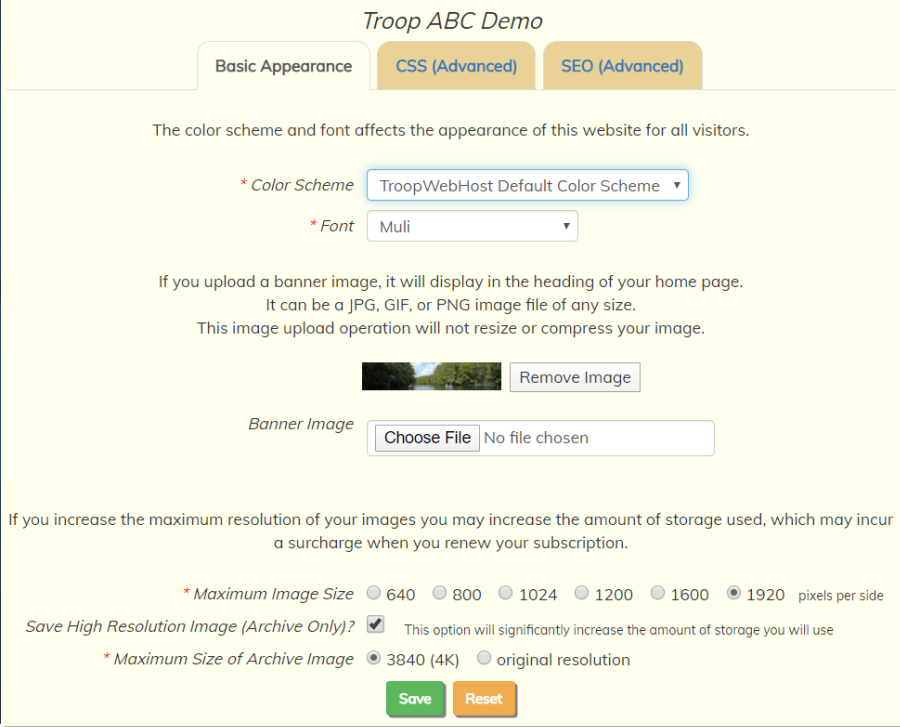
From this page, you can choose a Color Scheme from one of TroopWebHost's predefined color schemes. This will change the background colors of pages, as well as the color of page outlines and menu text.
You can select a Font from the list of popular Google Fonts. Your entire site will be rendered using the font you select.
You can also upload a banner image from your computer. This image will be displayed at the top of your home page.
Banner images can be of any size. Banner images must have the .jpg, .gif,or .png file extension.
To replace an existing banner image, you must do the following:
- Click Remove Image next to the old banner image.
- Click Save. This will delete the old banner image.
- Use the Browse or Choose File button (depending on what browser you are using) to find the new banner you wish to load.
- Click Save again to upload the new banner image.
The Maximum Image Size applies to the images you upload to your Photo Gallery. The system will resize your photos so that neither the height or width of the image will exceed the value you select here.
If you wish to use your TroopWebHost site as a repository for high resolution photos, check the box next to Save High Resolution Image (Archive Only). Then choose the maximum size for these archived images.
Please be aware that:
- The high resolution copy of the image will not be displayed in the Photo Gallery. It will only be available through the Download Photos page.
- Storing a large number of high resolution photos may cause your site to exceed the amount of free storage, causing you to pay a surcharge the next time you renew your TroopWebHost subscription.
Click the Save button to save your changes.
Note that the only function of the Reset button is to restore the selections from when the page was loaded, after the last save. It will not reload the page or undo a save.
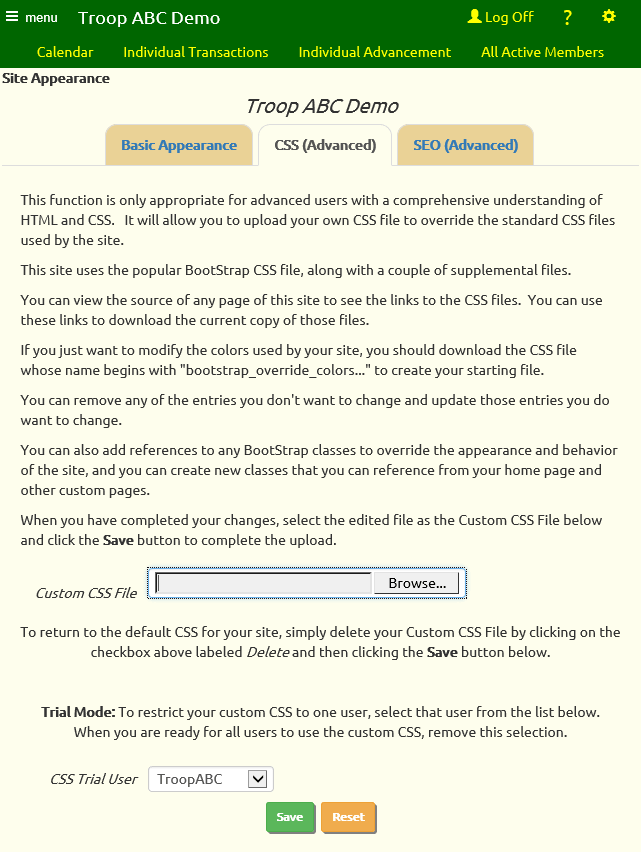
The CSS (Advanced) tab will take you to another page which allows you to replace the default CSS for your site. This is only for advanced users with experience in HTML and CSS.
The SEO (Advanced) tab will help you improve your site's visibility to search engines like Google.
Custom CSS
If you have extensive experience with HTML and CSS, you may wish to customize the appearance of your site by altering the default CSS.
This capability can be found by clicking the CSS (Advanced) tab on the Site Appearance page. This will take you to the page shown below.
There is a CSS file for each of the predefined color schemes. The names of these CSS files all begin with "bootstrap_override_colors..."
You may wish to download the CSS file for your color scheme as a starting point for your custom CSS.
Steps to download CSS File from Your TroopWebHost Site using Google Chrome or Microsoft Edge.
- Open your home page in your browser:
- Right-click → Inspect (Developer Tools).
- Go to the Network tab and reload the page.
- Filter by CSS to see all stylesheets the site is using.
- Click the file name. The names of these CSS files all begin with "bootstrap_override_colors...".
- Right-click the URL → Open in new tab.
- Use Save As (Ctrl+S / Cmd+S) to download the file to your computer.
Once you've downloaded the file you can edit it with NotePad or an HTML editor like Front Page or Coffee Cup.
Do not change the names of any of the classes, but do feel free to change the colors.
You only need to include those classes you wish to modify.
When you are ready to load your modifed CSS to the site, click the Browse button to select your CSS file, then click Save to upload the file.

Select your user ID from the CSS Trial User drop down list, as shown above, to prevent other users from seeing the effect of your custom URL while you are trying it out. Remove this selection when you are ready for all users to see the effect of your custom CSS.

If you want to return your site back to the default CSS settings, you can delete your custom CSS file from the site by checking the box labeled Delete as shown above, then click Save.
If you want to download a copy of your customized CSS file, click the Custom CSS File link.
SEO Tools
Search Engine Optimization (SEO) is the process by which you make your site rank higher in search engine results, especially Google, when people are looking for your site.
While there are no hard and fast rules for improving search engine results - and the rules do change from time to time - the SEO tab on the Site Appearance page may help you improve your site's visibility.
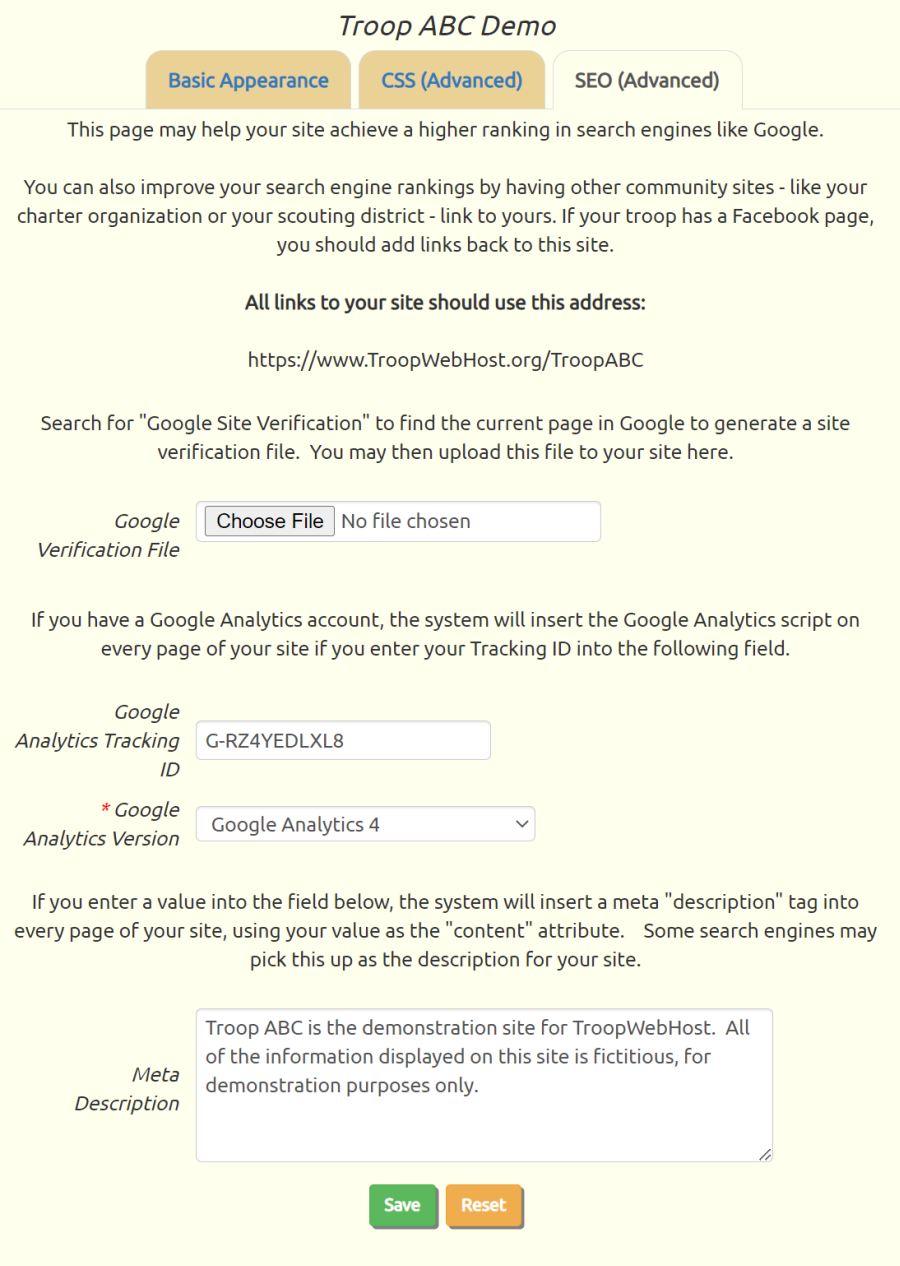
The first section of this page is based on the well-established rule that the more sites that link to yours, the higher your ranking will be.
It advises you to get other sites - especially sites from other organizations in your community - to link to your site. This could be your charter organization, or your scouting district. It could also be your troop's Facebook page.
In all cases you should link to the URL that is displayed on this page.
The second section of this page allows you to upload a Google Site Verification File to your troop's subdirectory. This is a critical step in getting Google to recognize your site.
The third section allows you to save your Google Analytics Tracking ID. When we see a Tracking ID for your troop we will add the Google Analytics script to every page of your site, with your Tracking ID inserted in the appropriate spot. This should make your site even more visible to Google.
The original version of Google Analytics was called "Universal Analytics". This version is no longer supported by Google after July 1, 2023.
The new version of Google Analytics is called "Google Analytics 4". This requires a new Google Tag, which you must generate from the Google Analytics website.
IMPORTANT! You cannot upgrade to Google Analytics 4 just by changing the selection on the Google Analytics Version drop down list. You must first log on to your Google Analytics account and issue a new Google Tag for your site. Then return to this page in TroopWebHost to copy this new tag value into the Google Analytics Tracking ID field. Then, and only then, should you select "Google Analytics 4" from the drop down list.
The last section allows you to provide a Meta Description for your site. This may be picked up by some search engines as the description they display for your site. Just enter the value you want placed in the "content" attribute; the system will generate the rest of the meta tag for you.
TroopWebHost User Forum
Join a conversation with Scouters around the world on the TroopWebHost User Forum, which can be accessed directly from your site!
This feature is available to any user with the Adult Leader or Site Administrator user role. You can make it available to those with other user roles by authorizing those roles for the "TroopWebHost User Forum" task using Assign Tasks To Roles.
Click the ![]() icon in the upper right corner of the page to
view the Help menu, as shown here:
icon in the upper right corner of the page to
view the Help menu, as shown here:
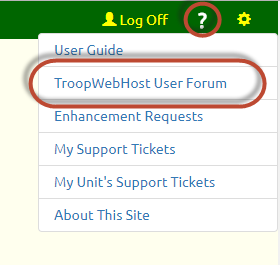
Click TroopWebHost User Forum to view the topics currently being discussed.
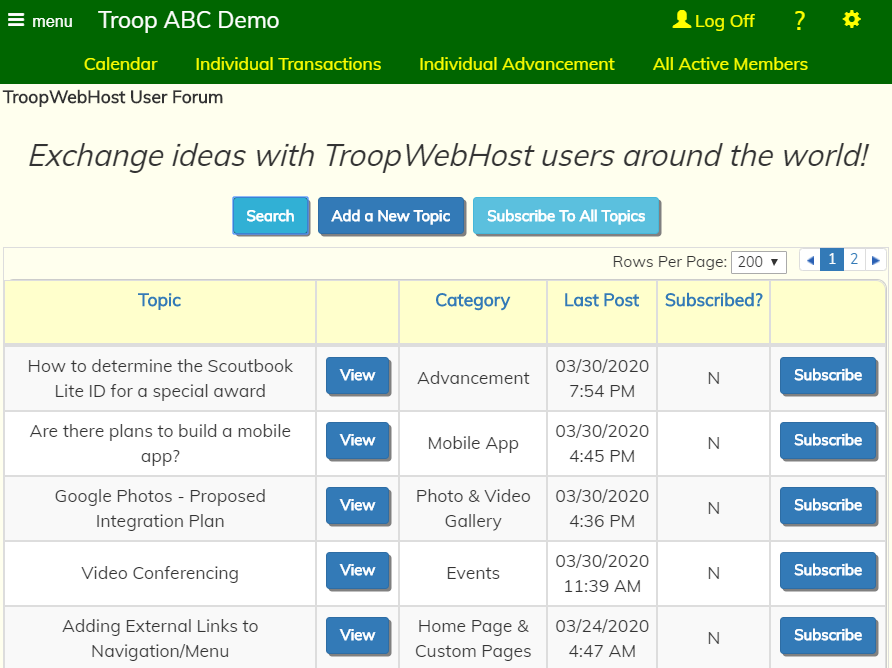
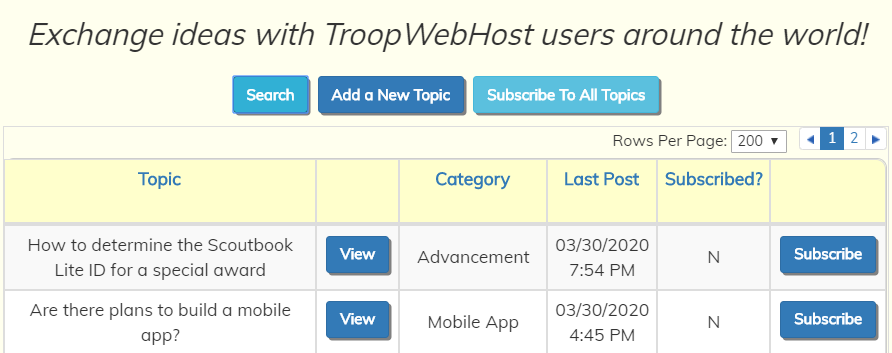
This list will show the topics with the most recent activity at the top. Use the Search button to find topics in a particular category, or with a title that contains a particular key word.
We recommend that you click Subscribe To All Topics to receive notifications whenever there is new activity on any of these topics. Scroll to the bottom of this page to see an example of the email you will receive.
Click Add a New Topic to start a new conversation.
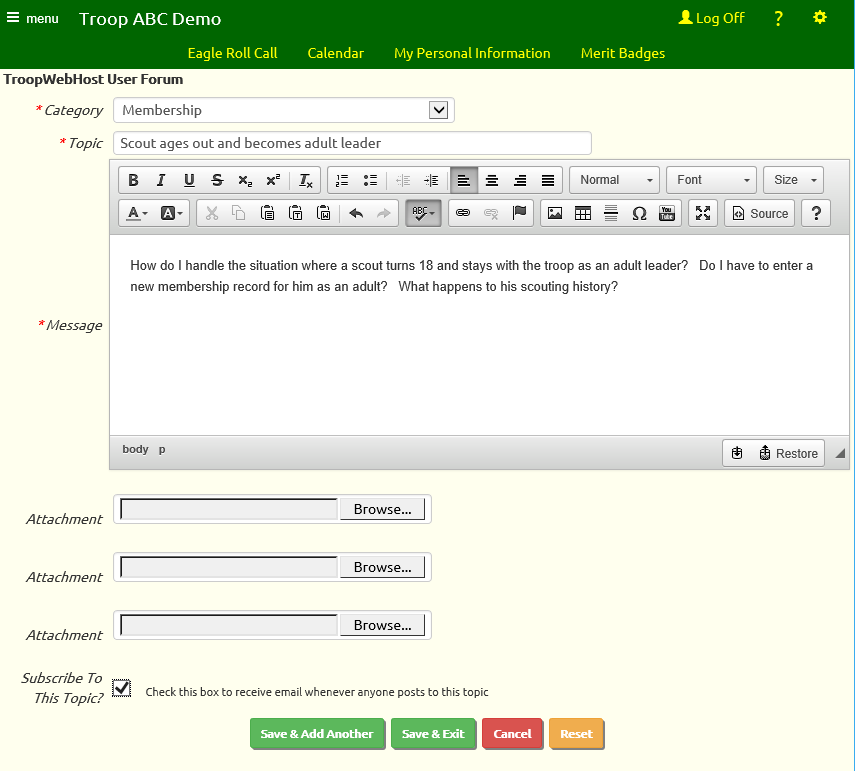
Choose a category from the drop down list, then enter a brief title that accurately describes the issue you want to discuss.
Use the WYSIWYG editor to compose your comment. You can drag and drop images into the message window to illustrate your points.
You can attach up to three documents to each post. Check the Subscribe To This Topic box to receive an e-mail whenever anyone posts to this topic.
Click Save & Exit to save your work.
Click the View button to view the entire history of a topic and add your own comment.

The posts are displayed in the order they were added. Scroll to the bottom of the page to add a new message. Click Save & Exit to save your work.
If you subscribe to a topic you will receive an email like this whenever a new message is posted.
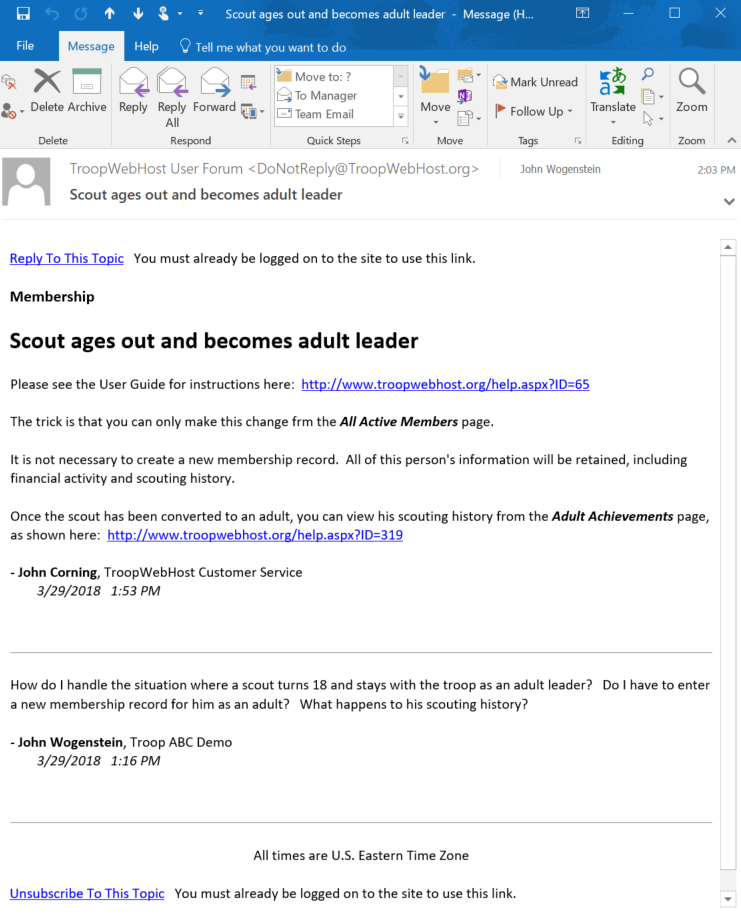
The email shows the most recent messages at the top, so you won't have to scroll all the way down to see the newest information.
Enhancement Requests
TroopWebHost welcomes your input! Our development priorities are driven by your enhancement requests.
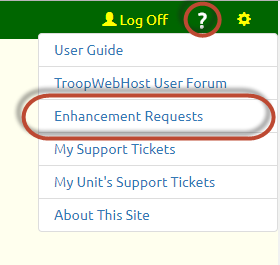
Please click the ![]() icon in the upper right corner of the page to view the Help menu, as shown here:
icon in the upper right corner of the page to view the Help menu, as shown here:
Select Enhancement Requests to view enhancements that have been requested by TroopWebHost users around the world, but not yet implemented.
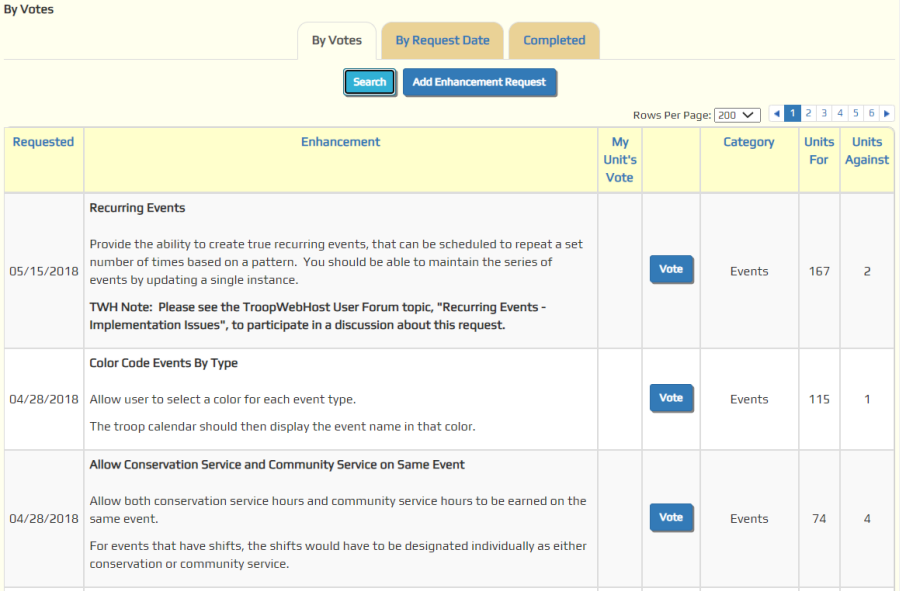
The tabs let you select the order in which the enhancements are displayed:
- By Votes shows the enhancements with the most YES votes at the top of the list
- By Request Date shows the most recently requested enhancements at the top
Select the Completed tab to view all previously requested enhancements that have been completed.
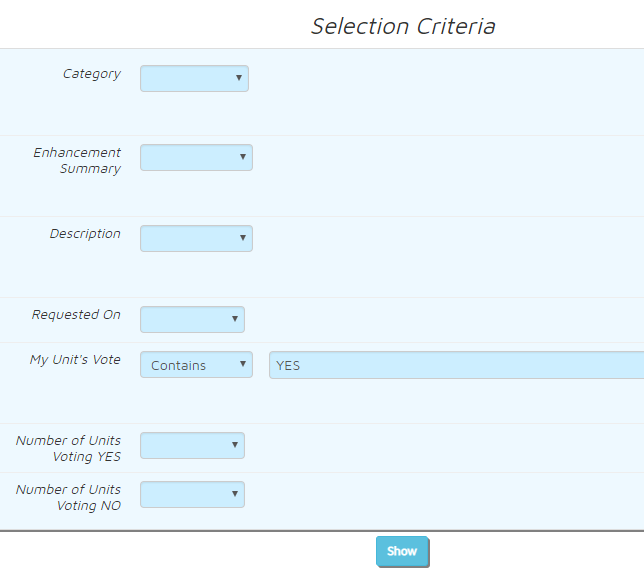
Use the Search button to narrow the list to a particular category, or to find enhancements where the description contains a particular key word, or to find enhancements you haven't yet voted on.
Use the Vote button to view other users' comments about this enhancement, and to vote for or against it. This will take you to a page that looks like this:
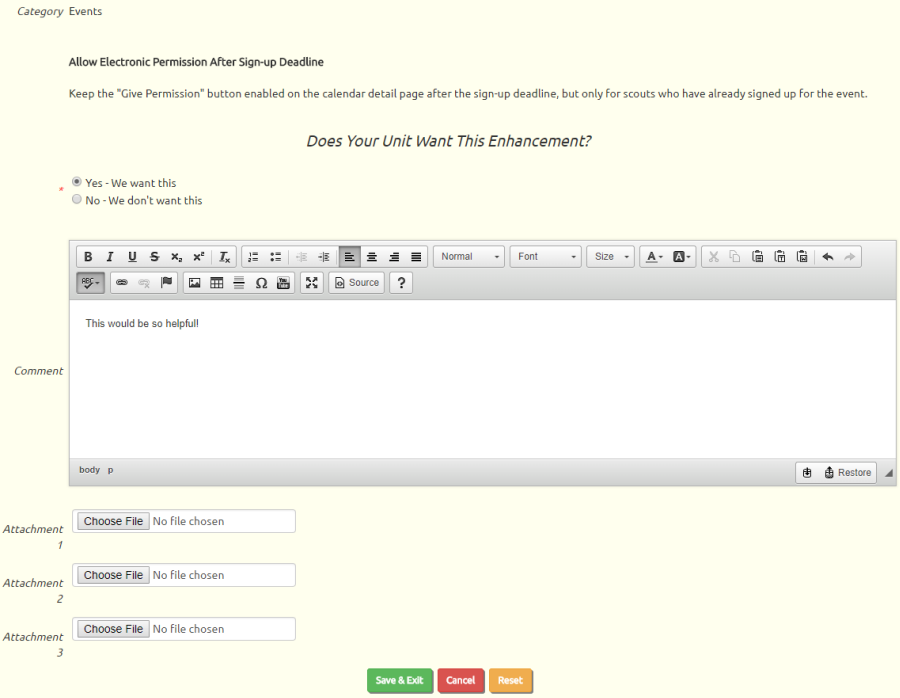
Scroll down to see other users' thoughts on this enhancement.
To vote, click one of the radio buttons indicating your preference. You may wish to add a comment indicating how your troop would benefit from this enhancement, or a suggestion as to how to improve the idea.
You may also upload as many as three documents to provide supporting materials for this request. Please be aware that these documents and your comments will be visible to other TroopWebHost users.
We only count one vote from each troop or crew, so voting multiple times will not improve the ranking of a request.
Back at the first page, click Add Enhancement Request to submit your idea on the form shown below.
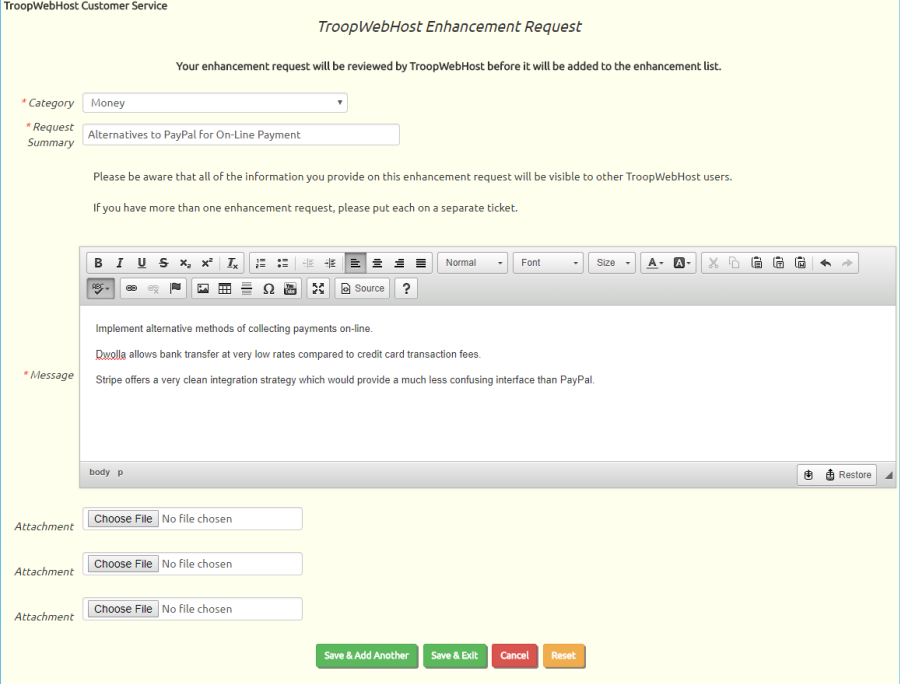
You must select a category from the drop down list, then enter a brief Request Summary that will appear as the title of your request.
The Message should contain a detailed description of the request. Explain how the modification will work and why it would be beneficial to your unit.
You may attach up to three documents providing background information. These documents and all of your comments will be visible to other TroopWebHost users.
Click Save & Exit to submit your request. It will not appear on the list of enhancement requests until after it has been reviewed by TroopWebHost support. If a similar request is already in the system, your request may be attached as a YES vote to the earlier request.
The Enhancement Requests page is available to any user with the Adult or Site Administrator user role. You can make it available to those with other user roles by authorizing those roles for the "TroopWebHost Support Ticket - Mine" task using Assign Tasks To Roles.
When an enhancement request is completed, all users who requested that enhancement - or voted YES - will receive an email announcing the availability of this new feature.
TroopWebHost Support Tickets
Having a problem with TroopWebHost? A question on how to do something? Or an idea for making it even better?
TroopWebHost has its own built-in customer service support ticket system for processing all of these issues.
To access it, please click the ![]() icon in the upper right corner of the page to
view the Help menu, as shown here:
icon in the upper right corner of the page to
view the Help menu, as shown here:
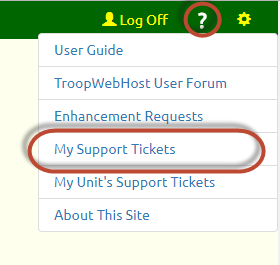
Select My Support Tickets to view all tickets that you've personally submitted.
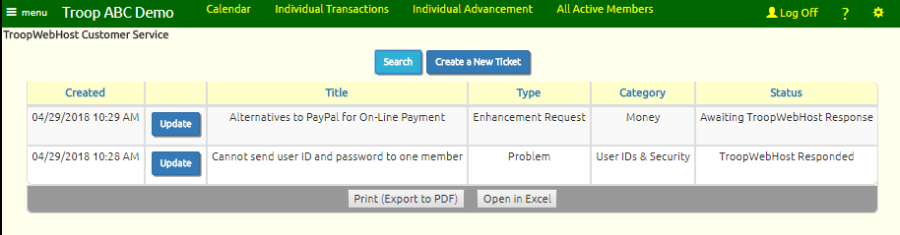
Tickets created most recently will appear at the top of the list.
To submit a new ticket, click Create a New Ticket. This will take you to this page:
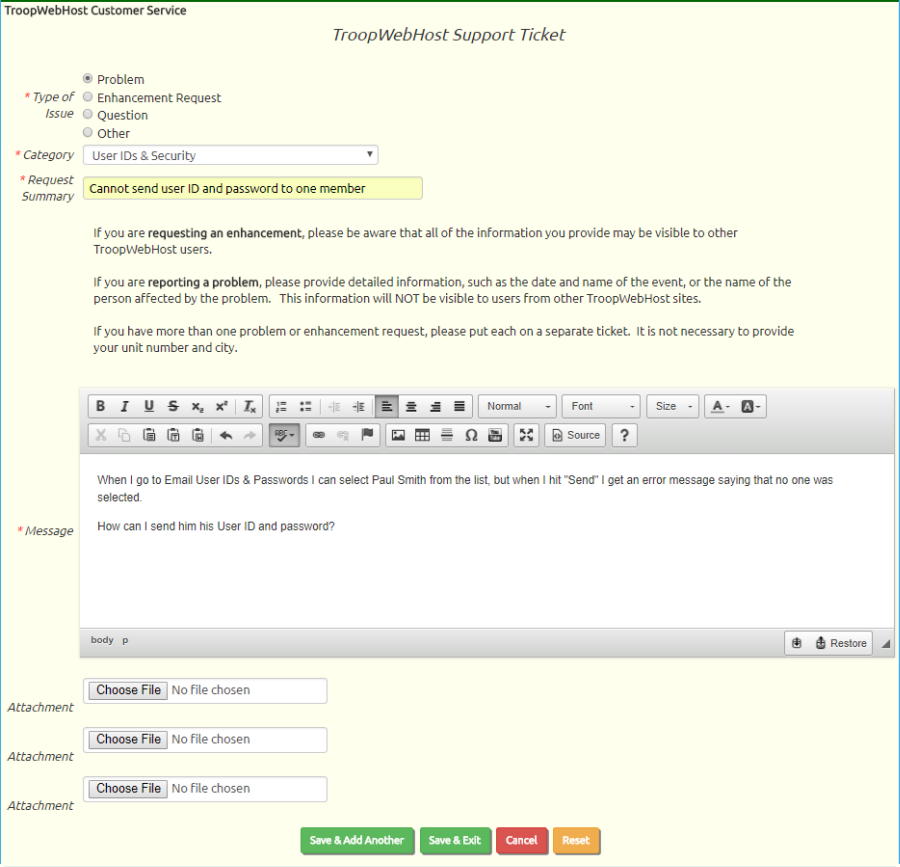
Select Type of Issue and Category from the choices provided.
Provide a concise summary of your request in the Request Summary. This will serve as the title for your request.
Provide a detailed description in the Message box. If you are reporting a problem, please provide details like the date and name of the event, or the name of the scout, or the date of the transaction in question.
If you are having trouble with an upload program, please attach the files you are trying to upload.
Click Save & Exit to submit your request.
In most cases, within 24 hours you should receive a response. An email will be sent to the email addresses that were on your membership record at the time you submitted the ticket. The message will look like this:
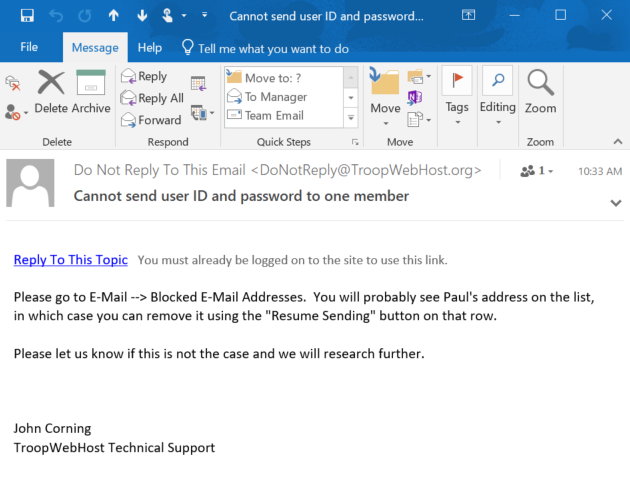
Do not reply to this email! Instead, click on the link at the top of the message to return to your ticket. This link will only work if you are already logged on to your site.
You can also view our response by returning to My Support Tickets and updating the ticket. This page will contain the complete history of our commuications, as illustrated here:
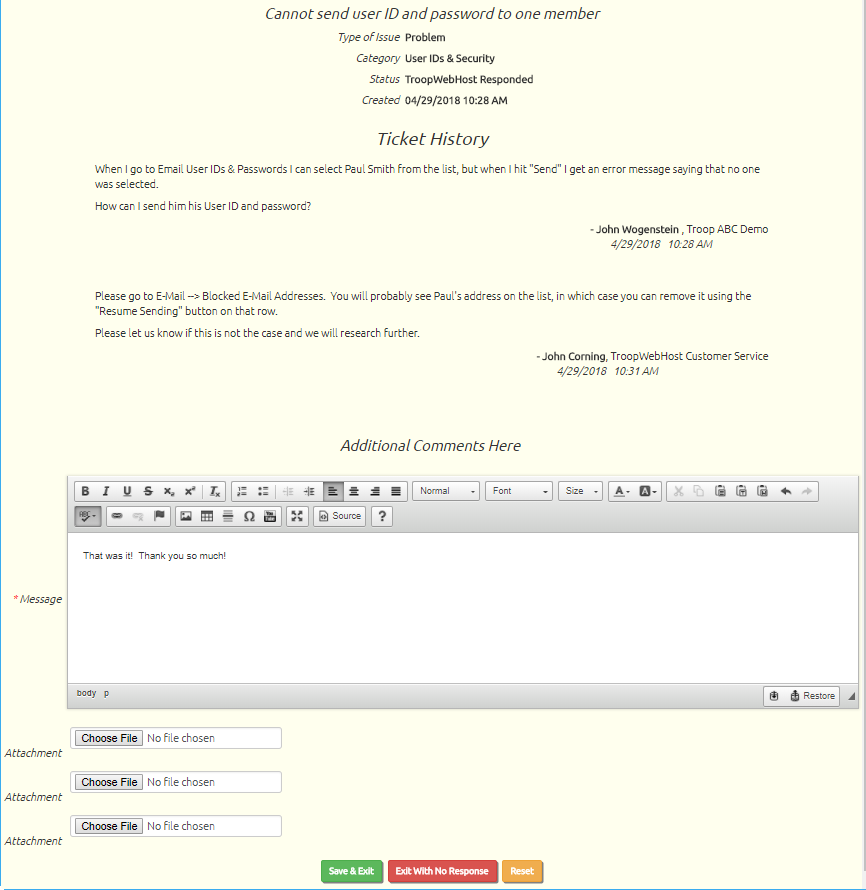
If the response satisfied your request, you do not need to do anything further. Simply click Exit With No Response.
If we requested further information, please respond in the Message box. If appropriate, attach additional documents, then click Save & Exit.
All of your tickets will remain on the list, allowing you to refer back as needed later.
The My Support Tickets page is available to any user with the Adult or Site Administrator user role. You can make it available to those with other user roles by authorizing those roles for the "TroopWebHost Support Ticket - Mine" task using Assign Tasks To Roles.
Site administrators are also authorized for My Unit's Support Tickets. This will allow them to view and update the support tickets submitted by any members of your troop or crew. You may authorize additional roles for this function with the "TroopWebHost Support Ticket - My Unit" task.
TroopWebHost Administrative Contacts
Once a month, TroopWebHost sends out an email to representatives of each troop and crew announcing our latest newsletter. And once a year when your annual TroopWebHost subscription is about to end, we send emails to these representatives to remind you to renew.
We encourage you to have at least three members of your unit selected to be TroopWebHost administrative contacts.
You can determine which members of your troop receive these communications by going to Administration → TroopWebHost Administrative Contacts.
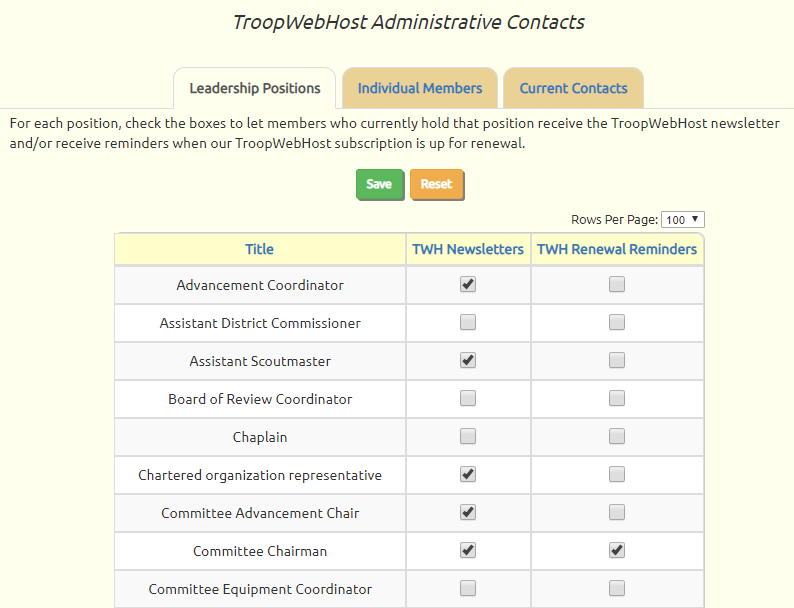
This page has three tabs. The first tab, as shown above, shows a list of your troop's adult leadership positions. For each position, click on the checkboxes to include the members who currently hold these positions on these messages.
When their leadership positions expire, or if they leave the troop, they will be automatically removed from the TroopWebHost mailing list.
The second tab allows you to select specific individuals to receive these communications, regardless of their current leadership position.

Use the checkboxes to select specific members to receive these communications. This will continue until you remove the checkboxes, or they remove the selections (as shown below), or they leave the troop.
The third tab displays a list of all members who will receive these communications, based on the selections on the first two tabs.
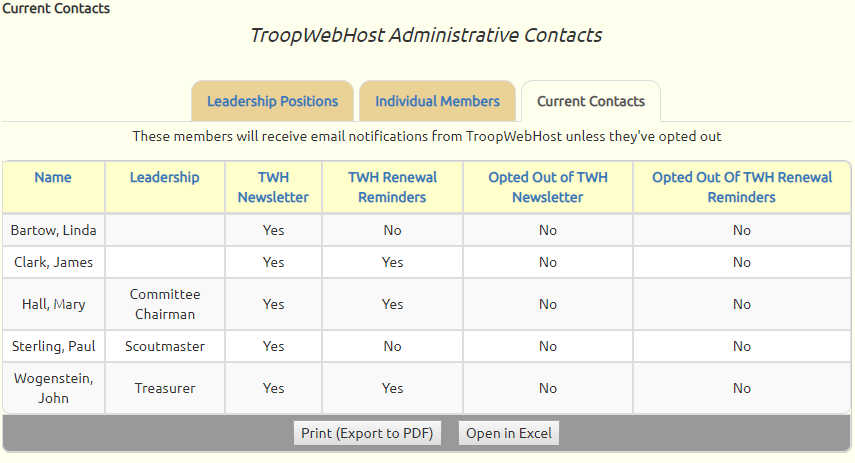
The "Opted Out" columns indicate whether this member has chosen to opt out of either of these communications. This will override any other selections that you have made for this individual.
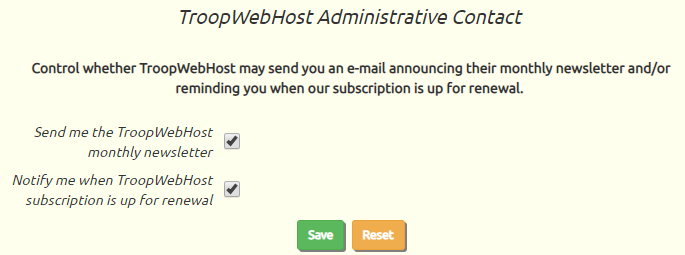
Adult members can control whether they personally receive these communications from the My Personal Information page. At the bottom of the page is the TroopWebHost Administrative Contact section, as shown here:
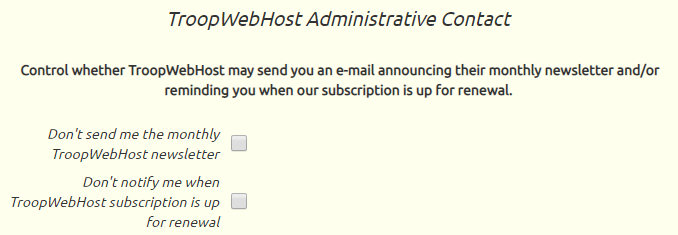
Members who are currently signed up for these communications based on their current leadership positions will have alternative checkboxes that allow them to opt out, as shown here:
For leaders who are authorized for the "Membership" user role, these same fields are also available on the Adult Leaders page. After clicking the Update button for a given member, scroll to the bottom of the page to find the TroopWebHost Administrative Contact section.
Database Backup
The Database Backup page allows you to download a complete backup of your TroopWebHost database. It is only accessible to users with Site Administrator privileges. You can access it through Administration → Database Backup.
When you click the Continue button, your download will begin. Keep in mind that this file contains all the information in your entire database, so the download may take several minutes to complete.
 You can load this backup to a local database for ad hoc reporting.
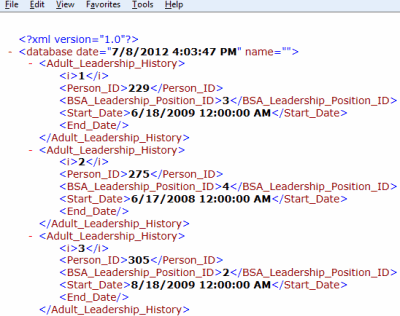
The backup file is in XML format, as illustrated at right. XML is an industry-standard markup language, often used to represent online data. XML is human-readable, and is convenient to use in software applications.
Depending on how much information you've entered into your TroopWebHost site, the XML file may grow too large for you to download. You may receive a "Time Out" message if this occurs. If this happens, please open a support ticket and we will be glad to copy your XML backup to a cloud storage account (like DropBox) to which you give us access.
Please note that this backup cannot be used to restore data to your TroopWebHost site. If you ever need to restore your database from a backup, we would use our internal backups, which we create on an regular, on-going basis.
TroopWebHost has two separate backup processes running in parallel.
The first process, which is managed by our hosting company, LiquidWeb, is called Acronis. It runs daily backups which are stored in an off-site location (in a different data center operated by LiquidWeb.)
The second process, which we manage ourselves, performs a full backup of every troop’s database every morning to a secondary disk drive on our database server. These backups are retained for 14 days. In addition, we run hourly incremental backups to that same drive which are retained for two days.
On request (via support ticket) we can restore your entire database to various points in time over the past two weeks. Obviously, any information entered into the system since that point in time would be lost.
Your documents and photos are stored in Microsoft Azure cloud storage, using their geographically redundant option. This means that two copies of each file are stored in each of two geographically dispersed data centers, for a total of four copies of each file. With this strategy in place we feel no need to backup these files.
Renew Subscription To TroopWebHost
The Renew Subscription page allows you to renew your subscription to TroopWebHost. It is only accessible to users with Site Administrator or Treasurer privileges. You can access it through Administration → Renew Subscription To TroopWebHost.
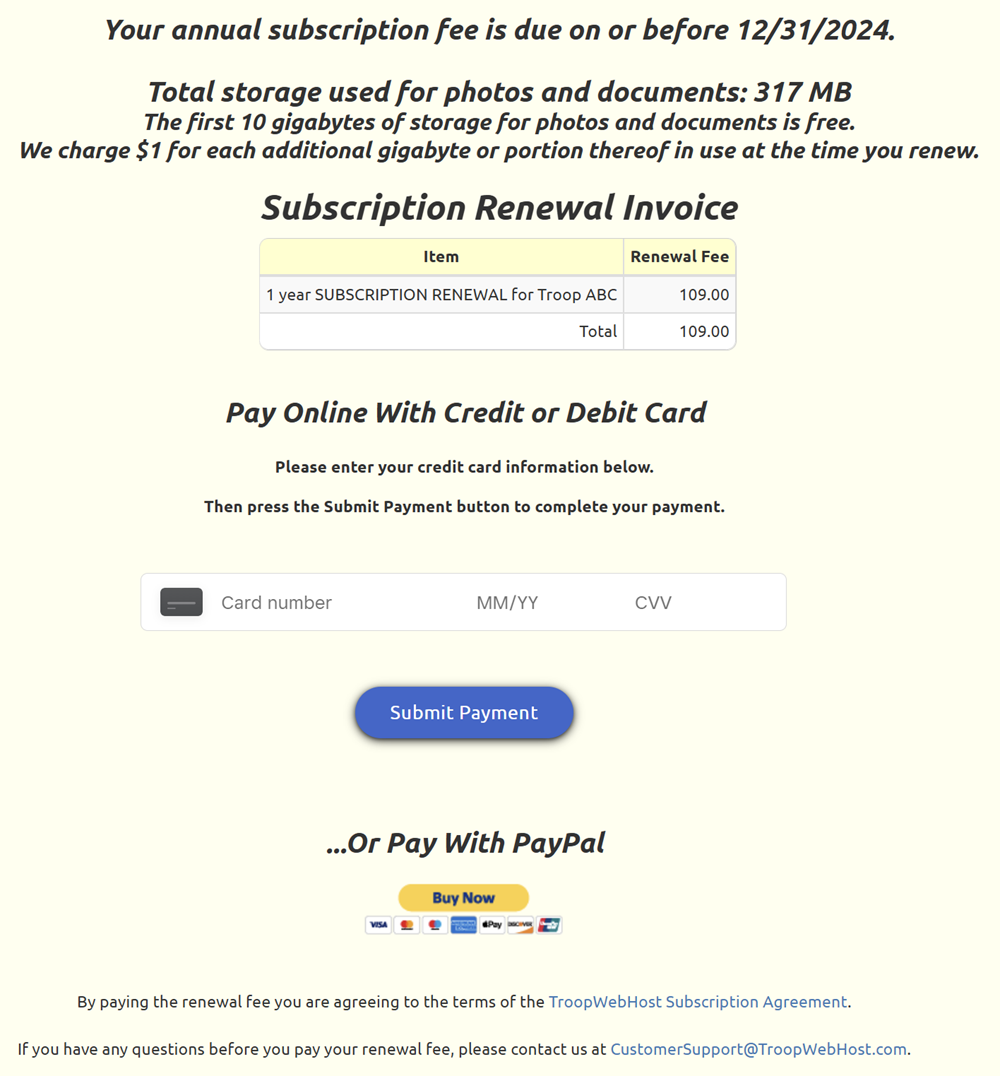
At the top of the page you will see how much storage you are currently using for photos and documents. TroopWebHost provides the first 10 gigabytes at no additional charge. If you are using more than 10 gigabytes at the time that you renew, you will be charged $1 per additional gigabyte; this covers your storage for the entire next year, even if you use additional storage during that year. You only pay for what you are using at the time of renewal.
There are two ways to renew your subscription:
- Credit / Debit Card
- PayPal
The easiest way to pay is by entering your credit card or debit card information on this page. Click the Submit button to complete the process.
Clicking the PayPal Buy Now button will direct your browser to the PayPal website. You can then log in to your PayPal account to complete the payment.
TroopWebHost no longer accepts payment by check.
You can renew your subscription up to six months before it expires. Any time you renew it, a full year will be added to your subscription.
Menu Configuration
The TroopWebHost Menu Configuration submenu allows you to manage your site's menus:
Configure Quick Menus
Before you log on to your site, at the top of the page you will see the public Quick Menu.

After you log on, you will see a different Quick Menu, that can be customized to each individual user. We will refer to that as the "private" Quick Menu.
By default, the items on all Quick Menu items are automatically set to the menu items that were used most frequently over the past month. For the public Quick Menu, these are the pages that were accessed most frequently by visitors who had not logged on. For the private Quick Menus, these are the pages that were accessed most frequently by that user.
You can override these selections by going to Administraion → Menu Configuration → Configure Quick Menus, which will display the screen shown below.
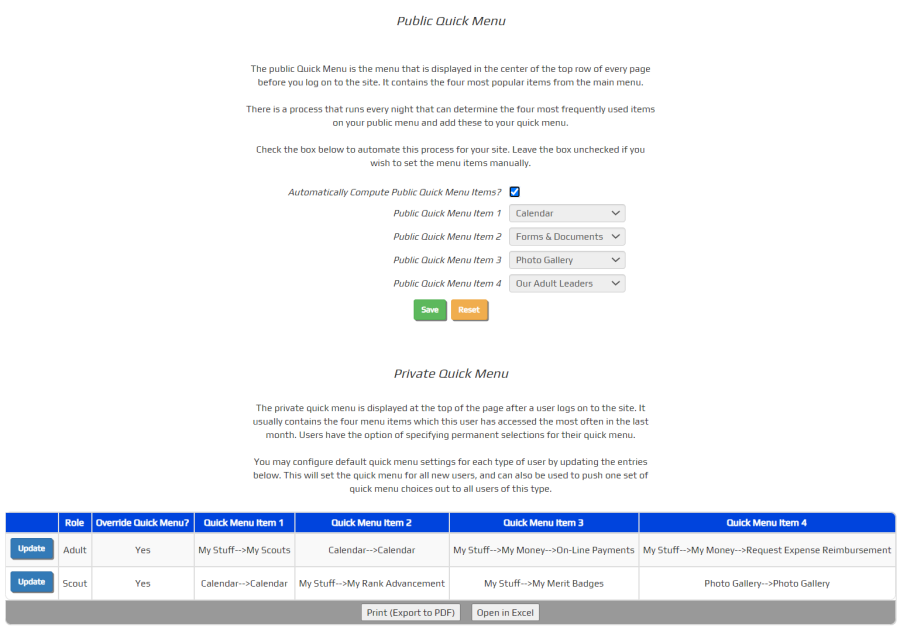
This page allows you to set the public and private Quick Menus to the specific items you want displayed.
To override the public Quick Menu, begin by unchecking the Automatically Compute Public Quick Menu Items checkbox. This will activate the four drop down boxes where you can select the items you wish to appear on the public Quick Menu.
Click Save to save your changes.
The lower half of this page controls the default selections for the private Quick Menus.
You'll see one row for each membership type. Click the Update button to configure the Quick Menu for that type of member.

Put a checkmark in Replace Quick Menu For All Users? if you want to force these Quick Menu selections to all users of this type, unless they've manually configured their own Quick Menu. If you leave this box unchecked, these Quick Menu selections will still be assigned to all new users, plus any users who haven't used the system in past month and who haven't configured their own Quick Menu. It will also be used to fill in the empty Quick Menu slots for those users with less than four menu items in their computed Quick Menu.
Use the drop down boxes to select the most important menu items for this type of user. Click Save & Exit to save your changes.
Override Default Public Access Settings
The Override Default Public Access Settings page allows you to:
- Make public page private, so you must log on to see them
- Make private pages accessible to the public without logging on
This page can be found at Administration → Menu Configuration → Override Default Public Access Settings.
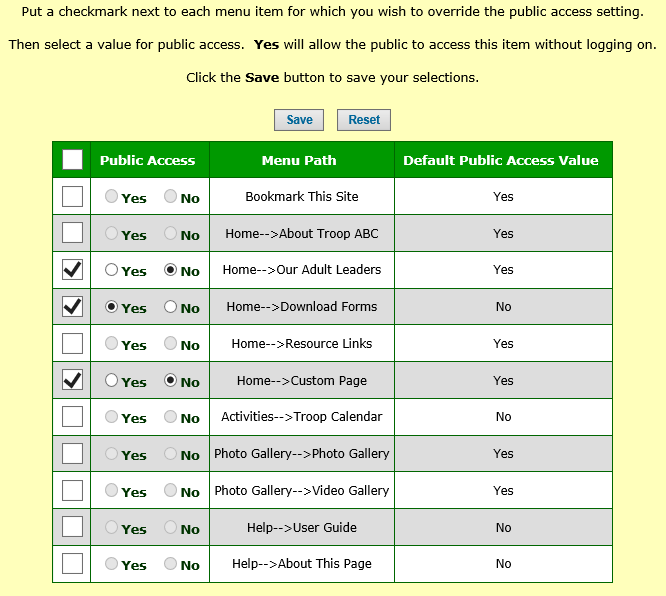
This page displays a limited list of menu items that includes:
- All items which by default are accessible to the public (except for the Home page)
- All items why are usually private, but are not restricted to a specific user role
The last column of the grid shows what the default value is for this item.
To override that value, put a checkmark in the first column of that row, then select either Yes or No as the new value for public access. Yes will allow the public to access this item without logging on. No will make this item hidden until the user logs on.
Then click Save to save your changes.
Disable Menu Items
Disable Menu Items lets you remove selected menu items from everyone's menu - including yours. It is only available to users with the Site Administrator role or roles that have been assigned the Maintain Site Configuration task.
To get to this page, go to Administration → Menu Configuration → Disable Menu Items.
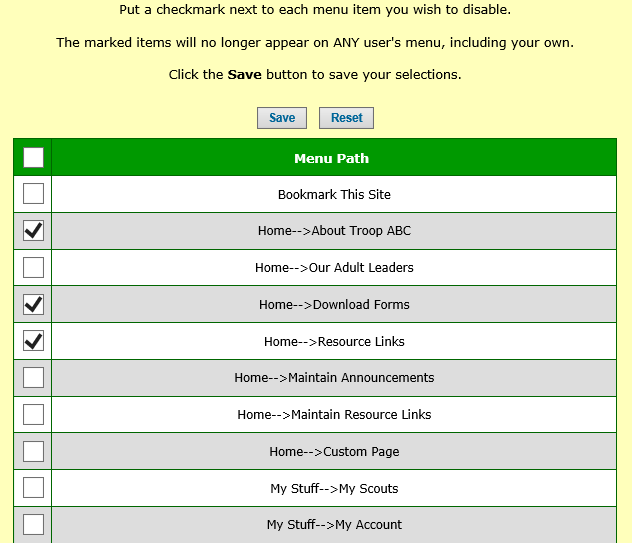
This page displays all of the menu items in your troop's site, with these exceptions:
- Upper level menu items, which are used to access a lower level menu (like "My Stuff")
- The Home page (you can't remove the Home page!)
- The Disable Menu Items page (the page you're on right now)
Put a checkmark in the box next to any item you want to remove from your menus.
Then click Save to save your changes.
This affects the menus of all users, including users with site administrator privileges.
If you want to restore a menu item, remove the checkmark and click Save again.
Security Configuration
The TroopWebHost Security Configuration menu allows you to customize your site's predefined User Roles to fit your troop's requirements. It also allows you to manage certain aspects of your site's menu.
It is accessed through Administration → Security Configuration.
This feature is intended for more advanced users. You will not need to modify your security configuration when initially setting up your site. It is only recommended that you use these pages if you have a specific change you want to make.
On a TroopWebHost site, each user can be given one or more User Roles. Each role can have a number of Authorized Tasks enabled for it. When a user is given a role, they gain access to every authorized task enabled for that role. This allows some users to have access to extra menu items and to modify important data. Roles - for example, Treasurer - therefore act as a layer between individual users and specific tasks - for example, View Financial Information and Maintain Financial information.
Some tasks may allow different levels of access to the same information. In the example above, the View Financial Information task allows a role to see monetary transactions on the website, but only roles with the Maintain Financial Information task can create and edit monetary transactions.
There are three pages available from the Security Configuration menu:
At times you may be interested in the tasks a specific role has, and at other times you may be interested in which roles allow a particular task. TroopWebHost allows you to easily work from both perspectives.
The Configure User Roles page allows you to create new roles and assign tasks to them. You can also edit or delete existing roles. Similarly, you can use the Assign Tasks To Roles page to select a task and choose which roles have access to it.
The Role Task Report will show which tasks are assigned to each role; conversely, the Task Role Report will show which roles allow each task.
The Set Default User Role page allows you to select the roles each scout and adult will start with when they are added to the database. Normally, you shouldn't need to change this.
The first two options on this submenu allow you to remove menu items that are not used by any members of your troop (including you) and to change whether certain pages are accessible to the public without logging on.
Configure User Roles
The Configure User Roles page allows you create new roles for your users and assign tasks to these roles. You can access it through Administration → Security Configuration → Configure User Roles.
This page contains a list of the roles set up for your troop, with descriptions of what each one does. The default roles should generally be sufficient for most troops' needs.
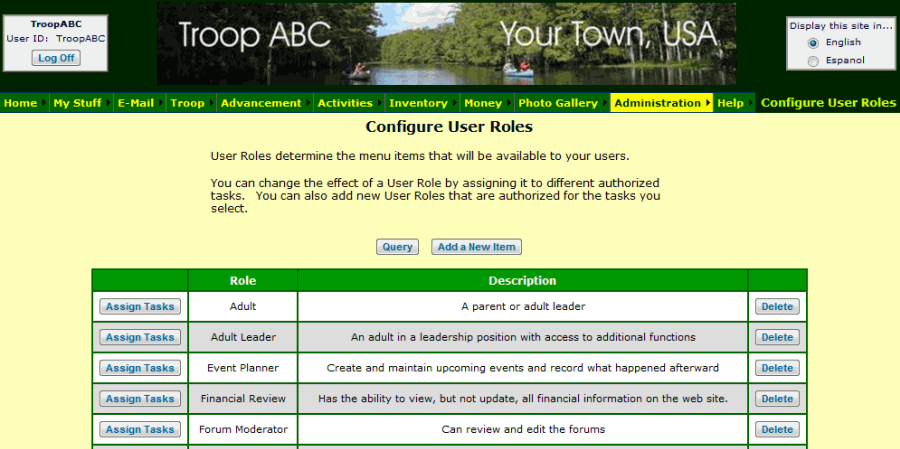
Clicking the Assign Tasks or Add a New Item buttons will open up an individual record.
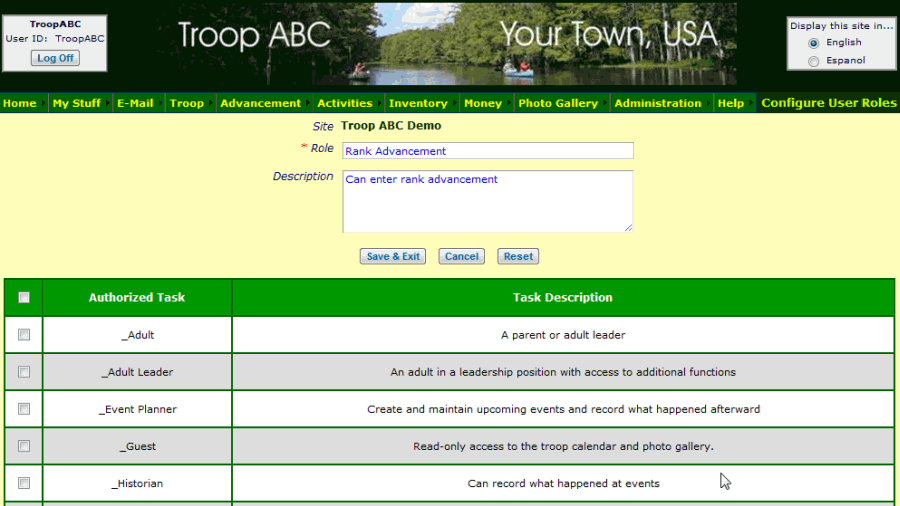
Here you can choose the name of the role, its description, and which Authorized Tasks are enabled for it.
Each Authorized Task has a corresponding Task Description, indicating what type of access that task provides.
Clicking the check box to the left of a task will enable it for the role you are editing.
"Legacy tasks" are those with an underscore at the front of their names (such as _Adult). These tasks are NOT defined in terms of other tasks. They typically authorize a range of capabilities that we considered to be appropriate for the user role of the same name, back when we originally developed TroopWebHost.
To assign an individual task to many roles at the same time, see Assign Tasks To Roles. To see a breakdown of your site's roles that lists what tasks are enabled for each, use the Role Task Report. To see what menu items are authorized by a given task, use the Task Menu Items Report.
Assign Tasks To Roles
The Assign Tasks To Roles page allows you to enable or disable a TroopWebHost task for many separate roles. You can access it through Administration → Security Configuration → Assign Tasks To Roles.
On this page, you will see a list of Authorized Tasks with Task Descriptions.
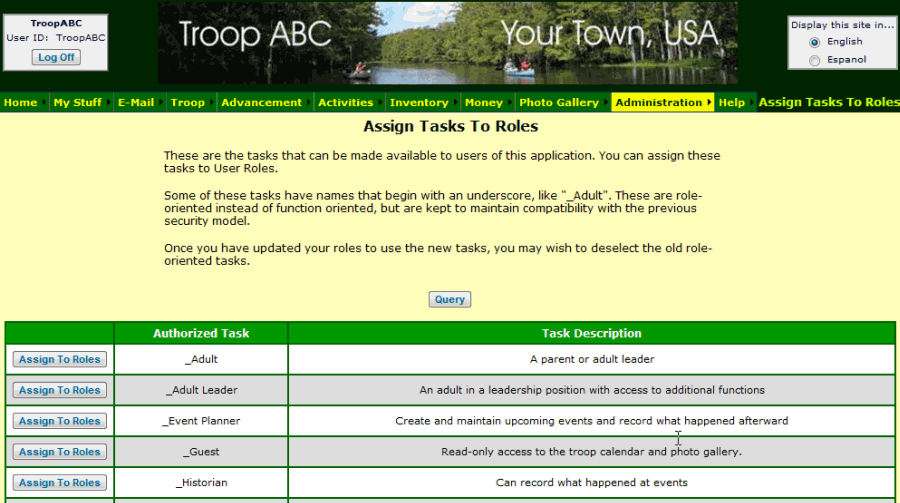
Clicking on the Assign To Roles button next to a task opens up a new page with a list of Roles.
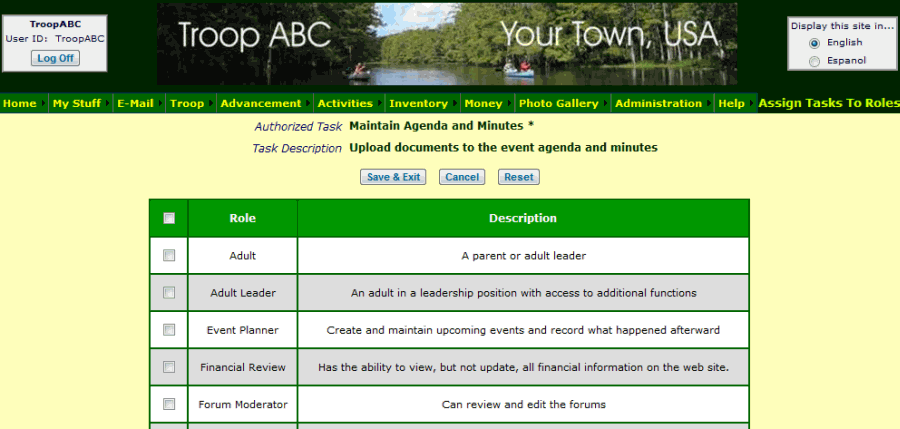
By clicking on the check box next to a Role, you can enable the currently selected task for that role.
You cannot create or edit tasks. Tasks are standard across all TroopWebHost sites. If you need a task that is not currently in our database, please request it via email at info@troopwebhost.com.
To add several tasks to the same role, see Configure User Roles.
To see a list showing which roles enable each task, use the Task Role Report.
Set Default User Role
When a user is added to TroopWebHost, they will start with a default role that you can set using the Set Default User Role page. It is accessible through Administration → Security Configuration → Set Default User Role.
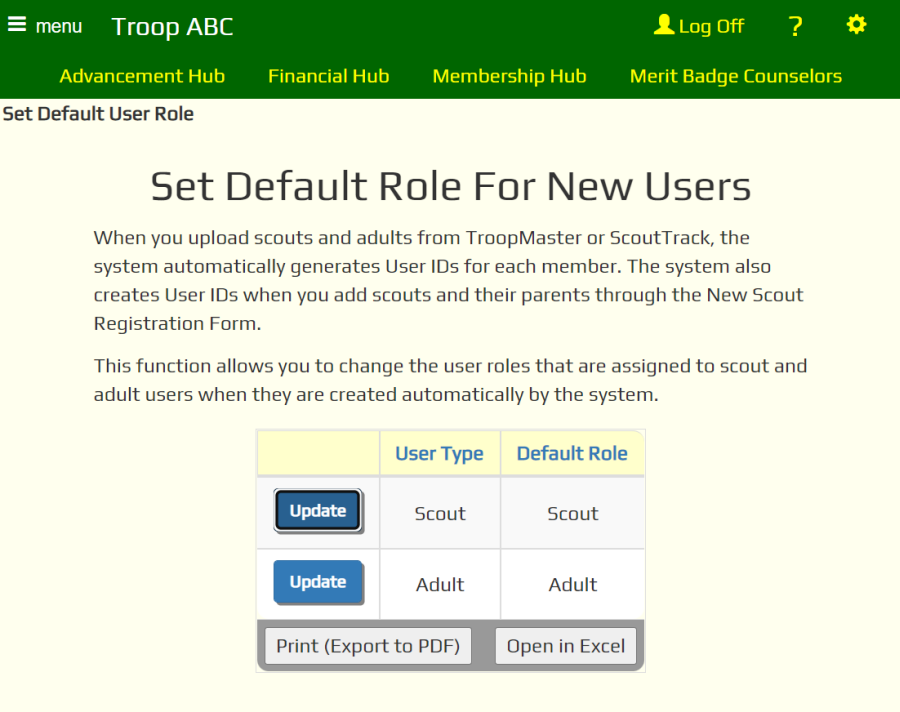
On this page, you will see two columns: User Type and Default Role. When a user is added to your site with one of these types, they will receive the corresponding default role.
For example, the New Scout Registration page allows you to enter information about a new scout and their parent or guardian. The scout will be given the role corresponding to the Scout user type, and the parent/guardian will be given the role corresponding to the Adult user type.
Usually you will not need to change these settings.
Security Reports
The TroopWebHost Security Reports submenu gives you a range of perspectives on your security data:
- User Permissions Report
- Menu Security Report
- User Role Menu Report
- Role Task Report
- Task Role Report
- Task Menu Report
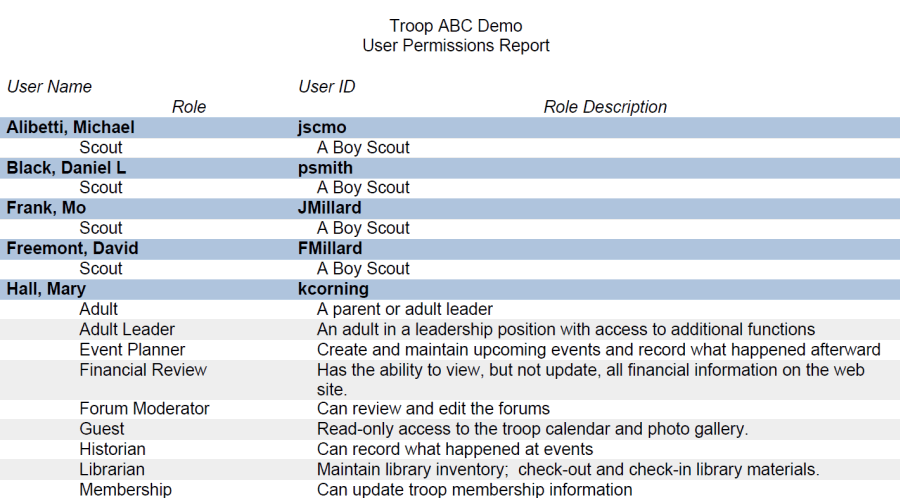
User Permission Report
To access this report, go to Administration → Security Reports → User Permissions Report.
It shows the user roles that are assigned to each user.
Here is a sample:
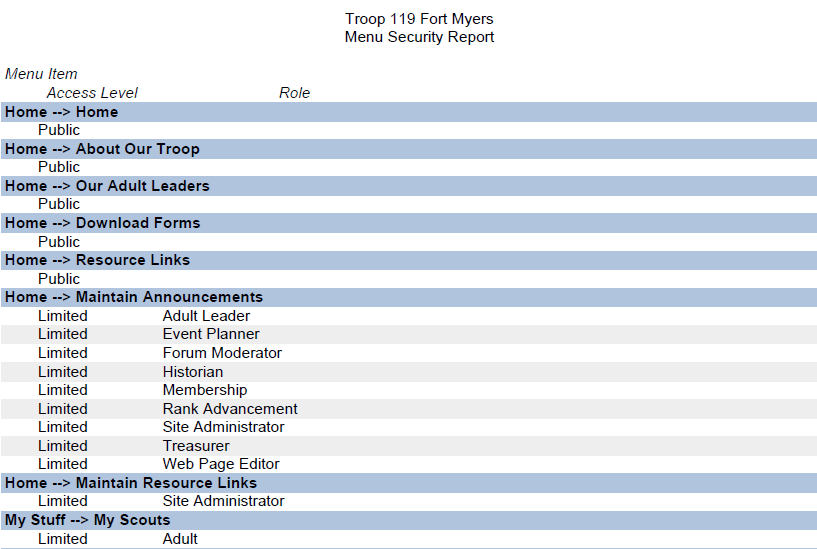
Menu Security Report
To access this report, go to Administration → Security Reports → Menu Security Report.
It shows the User Roles that are authorized to view each Menu Item.
This is what it looks like:
User Role Menu Report
To access this report, go to Administration → Security Reports → User Role Menu Report.
It shows the menu items that are authorized for each User Role.
Here is a sample:

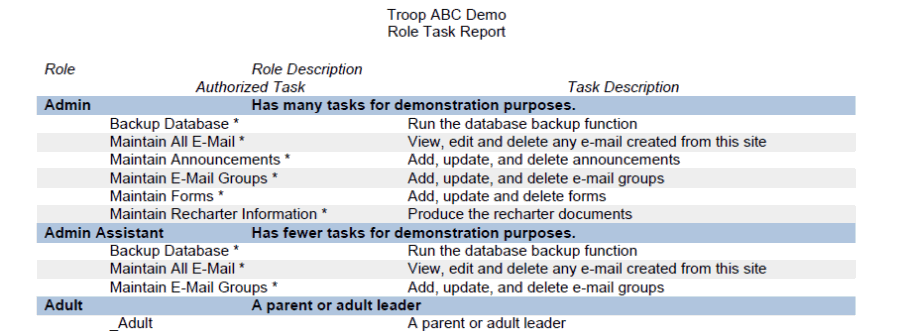
Role Task Report
The Role Task Report creates a PDF file listing which Authorized Tasks are enabled for each of your site's User Roles. It is accessible through Administration → Security Reports → Role Task Report.
This report serves to describe the capabilities of each role. To see a report that describes the level of access accorded to each task, use the Task Role Report.
A sample of the output from this report can be seen below.
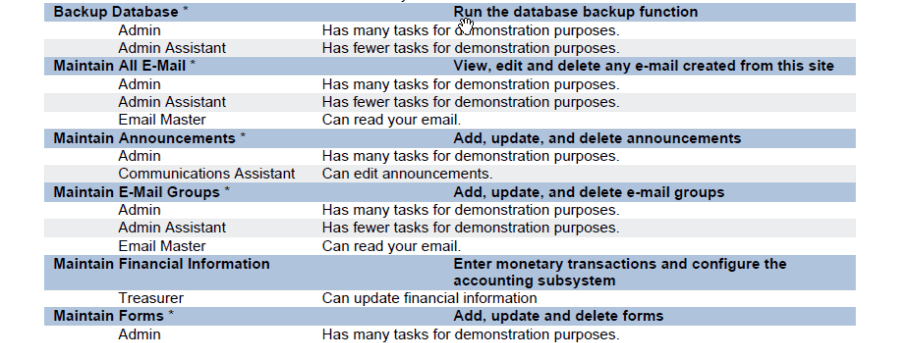
Task Role Report
The Task Role Report creates a PDF file listing which of your site's User Roles enable each TroopWebHost Authorized Task. It is accessible through Administration → Security Reports → Task Role Report.
This report shows which roles have access to each task. To see a summary of each role's capabilities, see the Role Task Report.
A sample of the output from this report can be seen below.
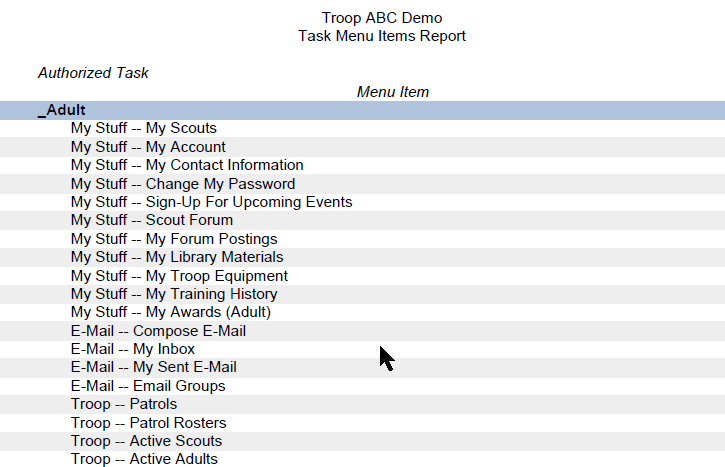
Task Menu Items Report
The Task Menu Items Report creates a PDF file listing each TroopWebHost Authorized Task and all of the Menu Items that are authorized for that task. It is accessible through Administration → Security Reports → Task Menu Items Report.
This report shows which menu items will be available to users who have been assigned a role that is authorized for that task.
A sample of the output from this report can be seen below.