Before you log on to your site, at the top of the page you will see the public Quick Menu.

After you log on, you will see a different Quick Menu, that can be customized to each individual user. We will refer to that as the "private" Quick Menu.
By default, the items on all Quick Menu items are automatically set to the menu items that were used most frequently over the past month. For the public Quick Menu, these are the pages that were accessed most frequently by visitors who had not logged on. For the private Quick Menus, these are the pages that were accessed most frequently by that user.
You can override these selections by going to Administraion → Menu Configuration → Configure Quick Menus, which will display the screen shown below.
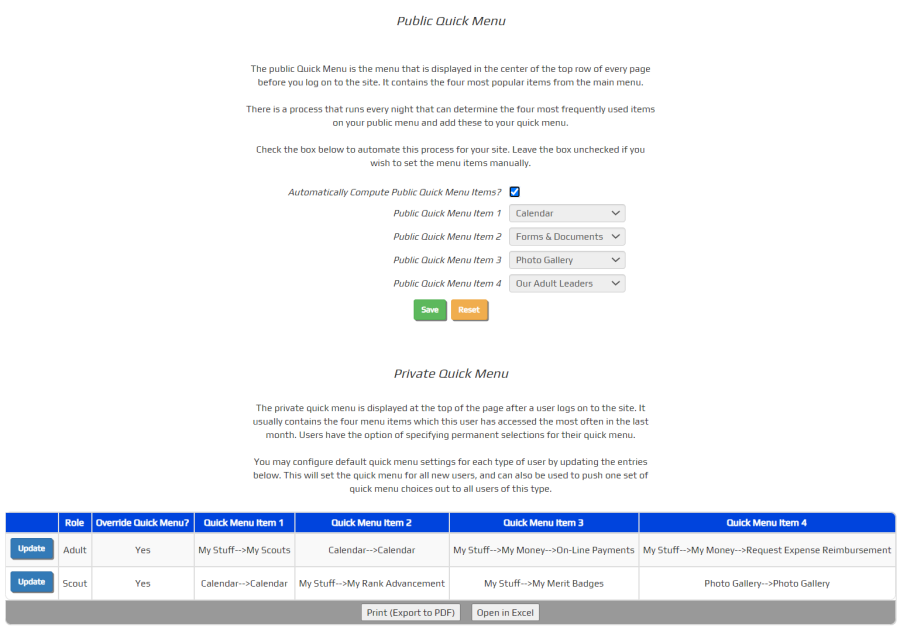
This page allows you to set the public and private Quick Menus to the specific items you want displayed.
To override the public Quick Menu, begin by unchecking the Automatically Compute Public Quick Menu Items checkbox. This will activate the four drop down boxes where you can select the items you wish to appear on the public Quick Menu.
Click Save to save your changes.
The lower half of this page controls the default selections for the private Quick Menus.
You'll see one row for each membership type. Click the Update button to configure the Quick Menu for that type of member.

Put a checkmark in Replace Quick Menu For All Users? if you want to force these Quick Menu selections to all users of this type, unless they've manually configured their own Quick Menu. If you leave this box unchecked, these Quick Menu selections will still be assigned to all new users, plus any users who haven't used the system in past month and who haven't configured their own Quick Menu. It will also be used to fill in the empty Quick Menu slots for those users with less than four menu items in their computed Quick Menu.
Use the drop down boxes to select the most important menu items for this type of user. Click Save & Exit to save your changes.