Selling Stuff
 Most scout troops
conduct at least one fundraising campaign every year that involves selling products to the public.
For many troops this means selling Trails End™ popcorn every fall.
Most scout troops
conduct at least one fundraising campaign every year that involves selling products to the public.
For many troops this means selling Trails End™ popcorn every fall.
Some troops also sell merchandise to their troop members, like troop t-shirts.
The Sales subsystem of TroopWebHost is intended to support both of these types of sales.
This subsystem includes the following capabilities for fundraisers:
- Create a sales campaign.
- Enter the items of merchandise that will be offered for sale.
- Enter the sales incentive prizes that will be available to the scouts.
- Have scouts enter their orders directly into the system.
- Have scouts select their sales prize and get their Personal URL for on-line sales.
- On-line fundraiser sales at a new website, www.ScoutSales.org.
- Sell merchandise directly to customers in a retail setting using our Booth Sales page.
- Enter, update and review all orders.
- Enter payments for orders on public sales campaigns.
- Maintain inventory of all products by entering inventory adjustments.
- Mark orders as being delivered by setting the delivered item quantity.
- Print reports that identify your top selling scouts.
- Print reports that consolidate the orders by item, scout, or patrol.
- Print order item detail reports to help scouts deliver their orders.
- Print inventory reports that show quantity on hand of all products.
On-line sales are designed to be promoted by your scouts, who will receive sales credit for sales initiated at their Personal URL. For your troop to offer on-line sales, you must:
- Configure your site to accept credit card payments via PayPal and/or Square.
- Create a Public Sales Campaign which has a monetary transaction type designated for credit card payments.
If you create a sales campaign to sell merchandise to your troop members, like troop t-shirts, you can authorize your adults and/or scouts for the Buy Stuff From Troop function. This will allow them to select the items they wish to order and pay for them, either by deducting the cost from their individual account (if they have sufficent funds on hand) or by using a credit card if you enabled Square or PayPal.
Before your members can use the Buy Stuff From Troop function, you need to:
- Configure your site to accept PayPal and/or Square.
- Create a Members Only Sales Campaign which has a monetary transaction type designated for credit card payments and another monetary transaction type designated for member payments.
- Update your security settings to let them access the Buy Stuff From Troop page.
You can also enter orders for troop merchandise from the Member Orders page. This page also allows you to create a monetary transaction to log the payment for each order.
The rest of the functions described above for fundraisers will work equally well for sales to troop members.
Please note that the default security configuration only makes the sales menu items available to site administrators. To make them available to the rest of your troop you will need to authorize your user roles for some additional tasks.
We'll show you how to do this on the next page of this chapter.
Authorize Users
Intially the sales functions are only visible to site administrators. To make them available to other members of your troop you will need to authorize some of your User Roles for the following tasks:
- Maintain Sales Campaigns will allow the user to add and update sales campaigns, including the items for sale and the incentive prizes.
- Maintain Sales Orders will allow the user to add and update orders sold by any member of the troop.
- Enter Payments For Merchandise Sales will allow the user to create monetary transactions linked to the orders they are paying for.
- Enter My Sales Orders (scouts) will allow a scout to enter their own orders on-line.
- Pick My Sales Prize (scouts) will allow a scout to select the prize they will win if they meet their sales goal. If you have set up your campaign to support on-line sales it will also show their Personal URL.
- Buy Stuff From Troop will allow a scout or adult to purchase items from a Members Only sales campaign, which can be charged to their account or paid for via credit card.
- View Sales Reports will allow the user to view any of the sales reports.
- Maintain Sales Inventory will allow the user to enter inventory transactions to track quantities of each item that are on order or are on hand.
- Maintain Sales Lookup Tables will allow the user to review and update a couple of supporting tables for this subsystem.
To authorize some of your leaders to manage sales campaigns, select Assign Tasks To Roles from the Security Configuration submenu on the Administration menu. Scroll down to the Maintain Sales Campaigns task, as shown below:

Click the Assign To Roles button to view a list of your user roles.
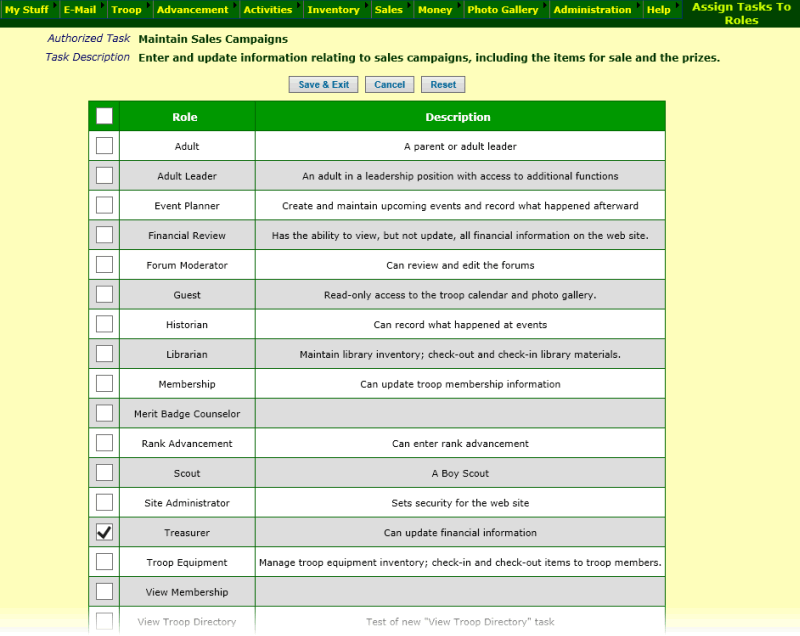
Click on the checkbox next to the user roles you wish to authorize to maintain sales campaigns. Then click Save & Exit to save your work.
To authorize leaders to enter and review sales orders, authorize the Maintain Sales Orders task for the appropriate user roles.
To allow them to generate sales reports, authorize the View Sales Reports task for the appropriate roles.
To allow a leader to enter payments for orders, authorize the Enter Payments For Merchandise Sales task.
You may find that you want to create new user roles for these capabilities. You can do this from the Configure User Roles page on the Security Configuration submenu on the Administration menu.
For example, you might want to create a Popcorn Kernel user role to manage this function.
If you do this, make sure you then assign the new role to the appropriate individuals. You can do this from the Users & Passwords page.
Allow Scouts To Enter Their Own Orders
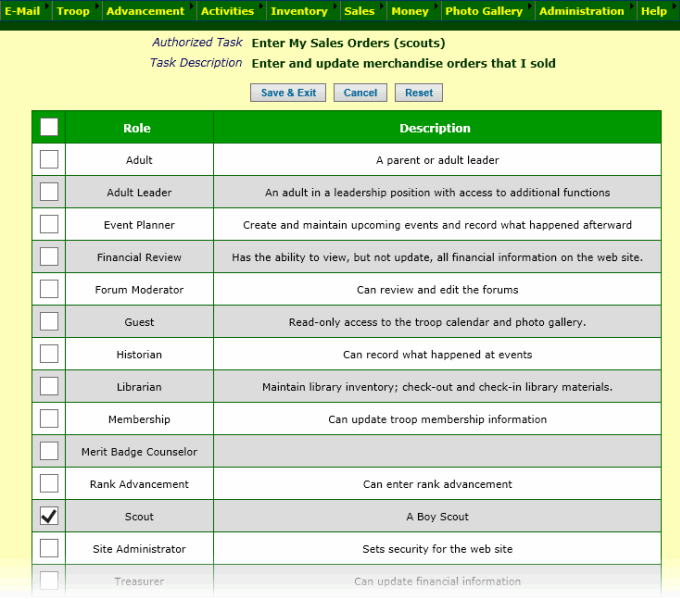
You may want to hold off on authorizing scouts to enter their orders on-line until you have your first sales campaign ready. But when you're ready to allow scouts to enter their own orders from the My Stuff menu, select Enter My Sales Orders (scouts) from the first Assign Tasks To Roles page.
This will add a new item to the My Stuff menu for all scouts: My Fundraiser Sales. This will allow them to enter and update their orders.

Click Assign to Roles as shown above. Then just click on the checkbox next to the Scout user role, as shown below, and click Save & Exit to save your work.
Allow Scouts To Select Their Sales Prize and View Their Personal URL for On-Line Sales
Once you have your sales campaign set up - including the list of incentive prizes - you can let your scouts see the prize list and pick their goal by authorizing the Scout user role for the Pick My Sales Prize (scouts) task.
This will give them access to the My Sales Prize & Personal URL item on the My Stuff menu.
If you have configured your sales campaign for on-line orders with PayPal or Square, this will also allow the scouts to view their Personal URL, which allows them to take orders on-line.
Allow Scouts and/or Adults To Purchase Items From The Troop
For Members Only sales campaigns, in which you are selling merchandise (like troop t-shirts) to members of your troop, you can allow scouts and adults to place their orders on-line using the Buy Stuff From Troop function.
This function is controlled by the Buy Stuff From Troop authorized task.
Use the Assign Tasks To Roles function to authorize this task for the Adult and Scout user roles, if you want both adults and scouts to be able to place orders.
Sales Campaigns
Sales campaigns define a group of products that are for sale during a specified time frame.
Some sales campaigns can be permanent, like sales of troop t-shirts to your members.
Other sales campaigns, like popcorn sales, will occur again and again. We recommend that you create a new sales campaign for popcorn sales - and other annual fundraisers - every year. Do not try to re-use the previous year's campaign, as that will include all of the orders from that year.
To create a sales campaign, go to Sales → Maintain Sales Campaigns → Sales Campaigns.
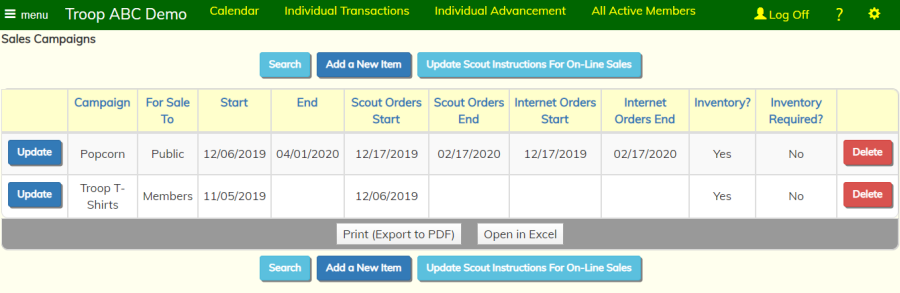
Note: we will talk about the Update Scout Instructions For On-Line Sales button at the bottom of this page.
Click the Add a New Item button to begin a new sales campaign.
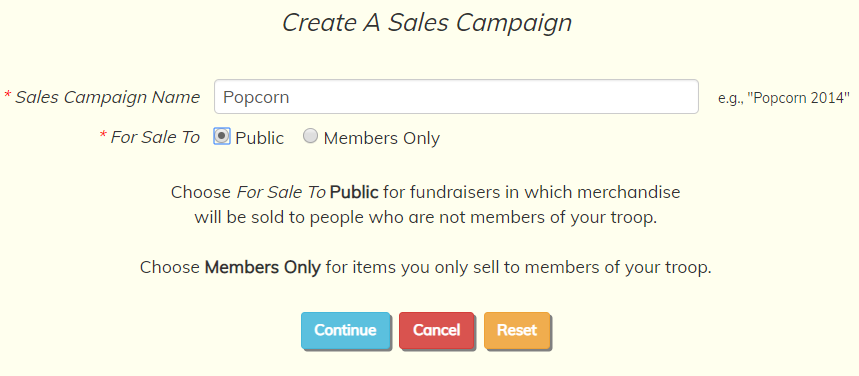
On this page you must choose whether this will be a Public campaign or Members Only campaign. You will not be allowed to change this later.
Public sales campaigns have these attributes:
- Primarily used for fundraisers.
- Scouts are selling merchandise to the general public.
- Scouts can be authorized to enter their own orders on-line.
- The public can order merchandise from scouts on-line at www.ScoutSales.org.
Members Only sales campaigns have these attributes:
- Not usually used for fundraisers.
- The troop is selling merchandise to members of the troop.
- Scouts and parents can order this merchandise using the Buy Stuff From Troop page on the My Stuff menu.
Click Continue to continue adding this campaign.
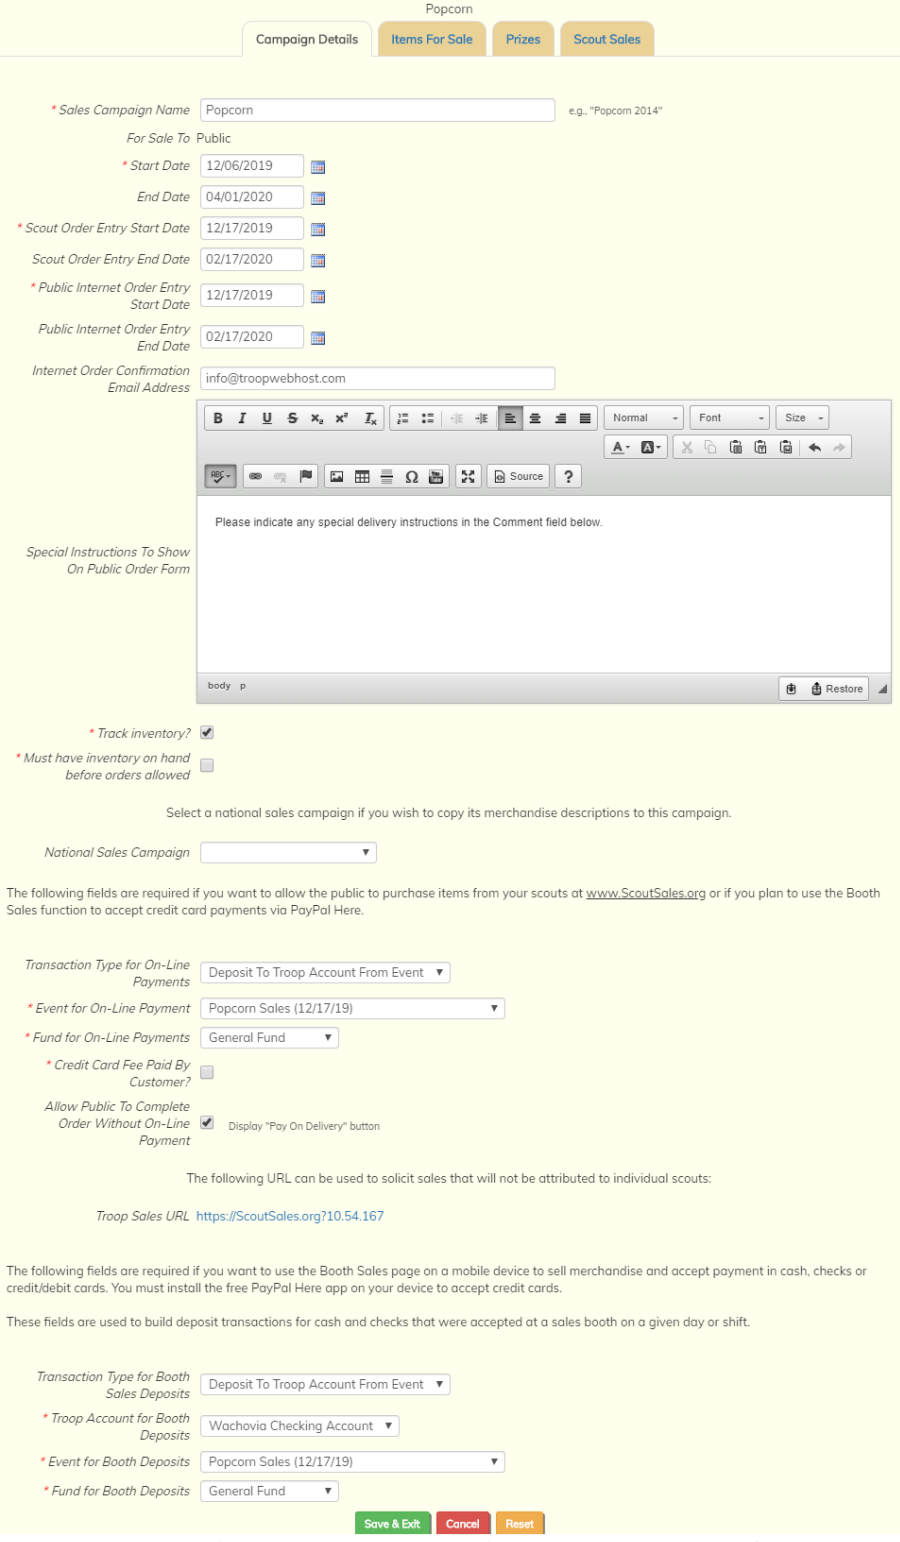
The Start Date and End Date define the overall period where you will be planning the campaign, entering orders, fulfilling orders, and running reports for this campaign. During this period this sales campaign will be visible on most of the Sales pages. Before or after this period, it will be more difficult to access the orders and payments for this campaign.
For annual campaigns like popcorn sales, this should start earlier than the actual selling start date and end a few months after the selling has completed. This will give you time on the front end to set up all of the merchandise and sales prizes. And by padding the end of the campaign it will give you time to wrap everything up.
If this is an open-ended campaign, like troop sales of t-shirts, you can leave the End Date empty. These campaigns will never expire.
The Scout Order Entry Start Date determines when scouts will be able to start entering orders on-line for this campaign, if you have authorized scouts for this function.
The Scout Order Entry End Date is the last day on which scouts will be able to enter orders on-line for this campaign. This may be left blank if this is an open-ended campaign.
The Scout Order Entry Start Date should usually be later than the campaign's Start Date and the Scout Order Entry End Date should usually be earlier than the campaign's End Date.
For Public campaigns, you can also set the dates when the public will be allowed to place orders at www.ScoutSales.org.
The Public Internet Order Entry Start Date is the first day on which the public can place orders.
The Public Internet Order Entry End Date is the last day on which the public can place orders on-line.
The Internet Order Confirmation Email Address can be the email address of the leader who is managing this campaign. The system will send a message to this email address every time a credit card payment is completed via PayPal or Square for an Internet order.
The Special Instructions To Show On Public Order Form may contain embedded HTML tags. These instructions will be displayed at the top of the public order form at ScoutSales.org.
If you wish to track inventory for this campaign, check the Track Inventory checkbox.
If you want to prevent orders from being entered until there is inventory on-hand, check the box Must have inventory on hand before orders allowed. Use the Inventory Adjustments screen to enter orders from your supplier.
If this is a popcorn sales campaign, select it from the National Sales Campaign dropdown list. This will give you an easy way to add the merchandise for this campaign on the next tab.
The next set of fields on this page must be filled in if you want your scouts to have a Personal URL that will allow them to sell products on-line at ScoutSales.org.
If you have configured your site to accept credit card payments via PayPal and/or Square and fill in this section, each scout will be assigned a Personal URL that he can view from the My Sales Prize & Personal URL page on the My Stuff menu.
The Transaction Type for On-Line Payments is the transaction type that will be used to post credit card payments for on-line sales.
If you select a transaction type that requires an event, the Event for On-Line Payments is the event that will be credited for these payments.
If you select a transaction type that requires a fund, the Fund for On-Line Payments is the fund that will be credited for these payments.
Check the box Credit Card Fee Paid By Customer if you want the estimated credit card processing fee to be added to the total amount due from the customer. If you leave this unchecked, the credit card fee will NOT be added to the total amount due, so the troop will end up receiving less than the total order amount.
Check the box Allow Public To Complete Order Without On-Line Payment if you want to give the ScoutSales.org order confirmation page a Pay On Delivery button. This allows the buyer to complete the order without paying for it on-line.
The next set of fields is required to enable the Booth Sales page, which supports merchandise sales in a retail setting where payment is accepted and merchandise given out at the same time.
The Booth Sales page allows you to create bank deposit transactions at the end of a shift. The fields in this section determine how those transactions will be created.
Transaction Type for Booth Sales Deposits is the transaction type that will be used when creating bank deposits from a merchandise booth.
Troop Account for Booth Deposits is the troop account to which these deposits will be credited.
Event for Booth Deposits is the event to which these deposits will be credited. This field will only be displayed if the selected transaction type requires an event.
Fund for Booth Deposits is the fund to which these deposits will be credited. This field will only be displayed if the selected transaction type requires a fund.
For Members Only campaigns, you will see two additional fields:
- Member Payment Transaction Type is the transaction type to be used when a member places an order from the Buy Stuff From Troop page and pays for it from his account.
- Always Allow Members To Charge To Their Account should be checked if you wish to allow members to charge an order to their account even if they do not have sufficient funds to pay for the order.
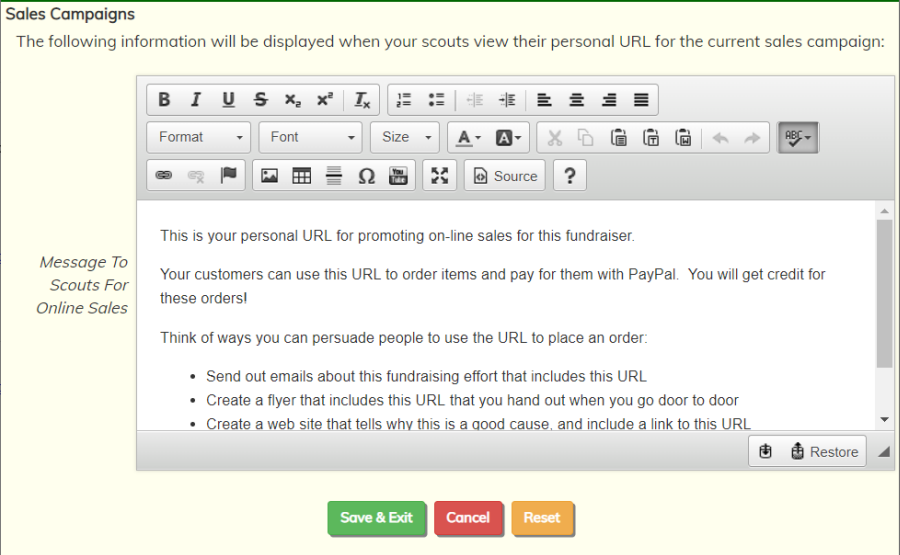
The Update Scout Instructions For On-Line Sales button that you saw on the opening page allows you to customize the instructions your scouts will see when they go to the My Sales Prize & Personal URL page.
The default text includes suggestions on how they might promote their Personal URL to prospective customers.
Merchandise
Once you've created a Sales Campaign you can start setting up the products you plan to sell.
You can do this from within the sales campaign by clicking on the Items For Sale tab.
Or you can maintain items for sale in all sales campaigns by selecting Merchandise Items from the Maintain Sales Campaigns submenu on the Sales menu.
If you click on the Items For Sale tab this page will display:
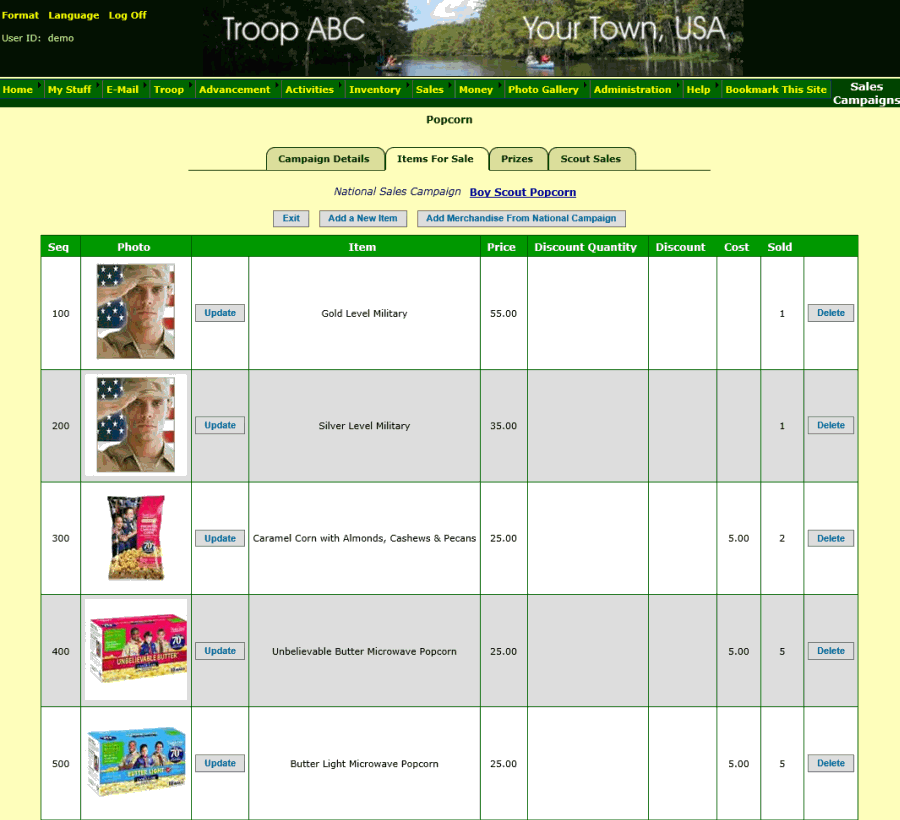
When you first create a Sale Campaign, this list will be empty.
If you selected a National Sales Campaign on the Campaign Details tab, you will see a link to that campaign at the top of the page. This link will allow you to view the merchandise descriptions that we have prepared for this campaign.
The Add Merchandise From National Campaign button will copy those items into this sales campaign. You will then be able to update the descriptions as needed.
Of course, you can also click Add a New Item to manually add a new item to offer for sale in this campaign.
The Item Name will be displayed on the order form. It should match the name on your paper order form, if you have one for this campaign.
The Description will only appear if the user clicks on a link when on the order form; this will display a page describing this item, which includes the lengthier description. This can contain HTML tags for formatting.
The Photo is optional, but highly recommended. A small "thumbnail" image will be displayed on the scout's order form and the public order form.
The Display Sequence Number determines the order in which this item will be displayed on the order form, relative to the other items for this campaign. Items with a lower number will be displayed before items with a higher number.
Click the Donation Only box for those items which do not require delivery of a physical product. These items will be excluded from some reports that are used to manage the delivery process.
The Price Per Unit is the amount you plan to charge for one of these items.
The Quantity Required For Discount is optional. If you enter it, the system will apply the Discount Percent to orders for this item when at least this many units have been ordered.
The Discount Percent is the percentage discount that will be computed on orders for this item if the quantity ordered exceeds the Quantity Required For Discount. It should be entered as a whole number between 0 and 100.
The Wholesale Cost Per Unit is optional. It will allow you to produce the Profit By Scout report that shows the gross profit produced by each scout's sales.
Click Save & Exit to save your work, or Save and Add Another to add the next item to this campaign.
When you've entered all of the items for this campaign, you can proceed to setting up the prizes for achieving certain sales levels, as shown on the next page.
Prizes
Prizes give your scouts additional incentive to achieve a high level of sales.
Prizes are an optional feature of a sales campaign. Each sales campaign can have any number of prizes defined.
Prizes can be added from within the sales campaign by clicking on the Prizes tab.
Or you can maintain a list of all prizes by going to Sales → Maintain Sales Campaings → Prizes, as shown below.
Click Add a New Item to add a new prize for this campaign.
The Prize Name will display when the scout is selecting his intended prize.
The Description will also display on that list. It should provide the details about this prize.
The Description will only appear if the user clicks on a link when on the order form; this will display a page describing this item, which includes the lengthier description.
The Photo is optional, but highly recommended to add to the appeal.
The Minimum Sales Required to Earn This Prize is the number of dollars worth of orders a scout must sell to earn this prize.
Click Save & Exit to save your work, or Save and Add Another to add the next item to this campaign.
Copy A Sales Campaign
Copy A Sales Campaign page allows you to make a copy of an existing sales campaign. The copy will include all of the merchandise items and sales prizes from the original sales campaign.
Go to Sales → Maintain Sales Campaigns → Copy A Sales Campaign to see the page shown below.
Select the sales campaign you wish to copy from the first drop down box.
Enter the name you wish to give your new sales campaign in the New Sales Campaign Name checkbox.
The Number of Months To Advance Dates will affect the starting and ending dates in the new sales campaign. The system will add the number of months you specified to the corresponding value in the old sales campaign.
Once you are sure all of these parameters are correct, click the Continue button to create the new sales campaign.
The system will take you to the Sales Campaigns page where you can view the new campaign.
Inventory Adjustments
Authorized users may enter inventory transactions for those Sales Campaigns that have been configured to track inventory, by selecting the Inventory Adjustments item on the Sales menu.
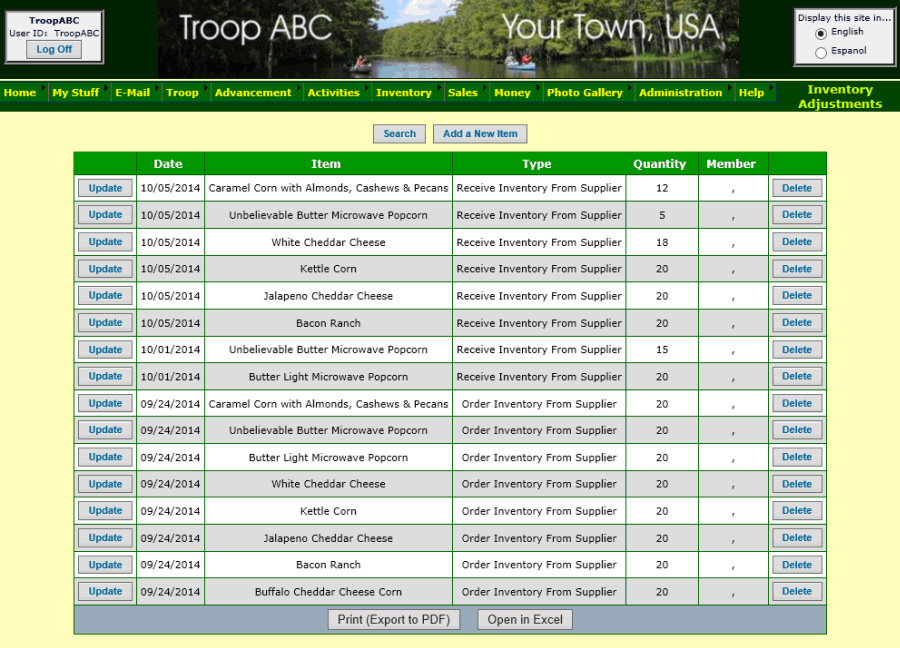
This page displays the inventory adjustments you have already entered.
Add an inventory adjustment whenever you:
- Order items from your supplier
- Receive items from your supplier
- Issue items to your troop members (e.g., for sales at a booth)
- Account for lost or damaged items
Click Add a New Item to enter a new inventory adjustment.
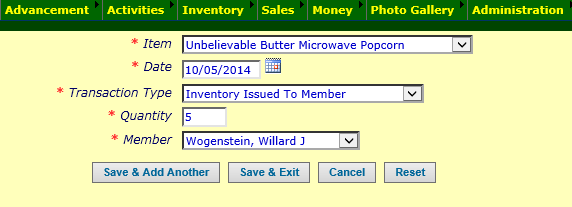
Select the item for which you are entering the adjustment.
The date is the date on which this event occurred.
The transaction type determines the effect of this adjustment, as controlled by the Inventory Transaction Type table.
The quantity is the number of units affected by this adjustment.
If you selected a transaction type that involves a troop member, you will be required to select a troop member from the dropdown box.
Click the Save & Add Another button or the Save & Exit button to save your work.
You can view your current inventory balances by selecting Merchandise Items from the Sales menu.
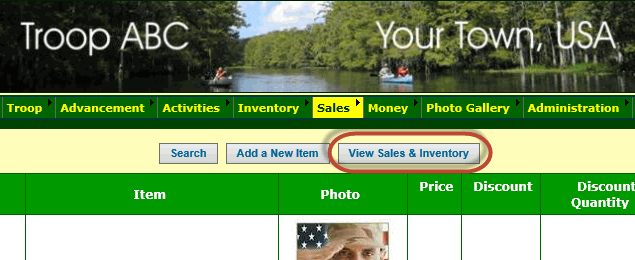
Click the View Sales & Inventory button to view an alternative version of this list.
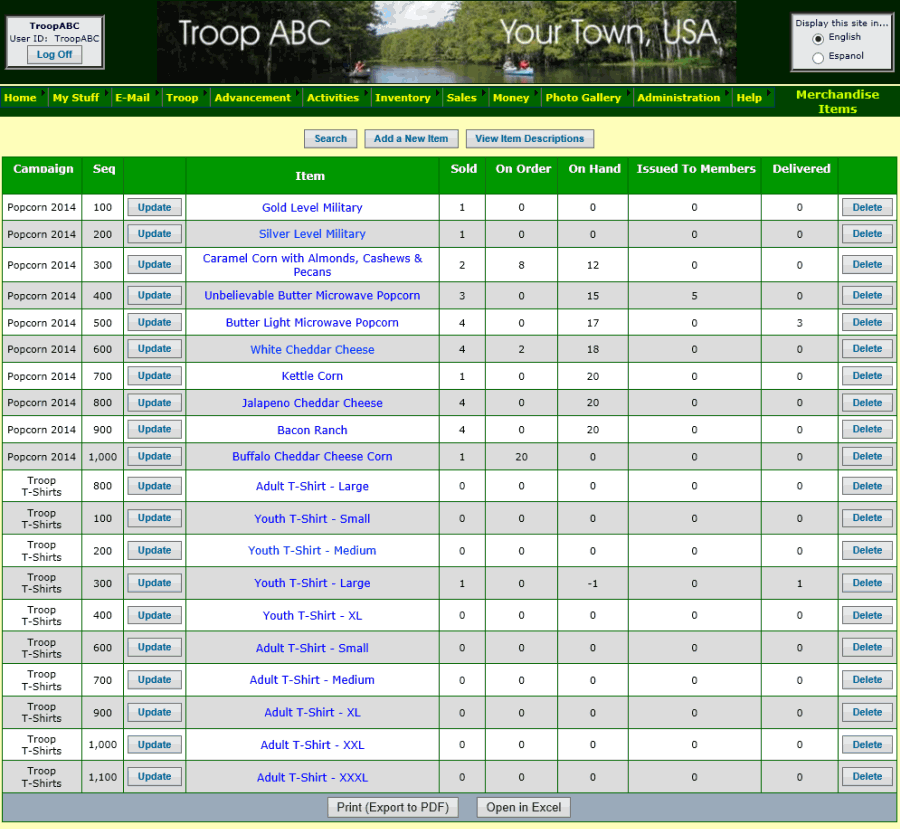
The following columns show the effect of your inventory adjustments:
- On Order shows how many items have been ordered from your supplier that have not yet been received.
- On Hand shows the number of items that have been received and not yet delivered to customers or issued to members.
- Issued To Members shows the number of items that have been issued to members and not yet delivered to customers.
You can view the transactions for an individual item by clicking Update next to that item.
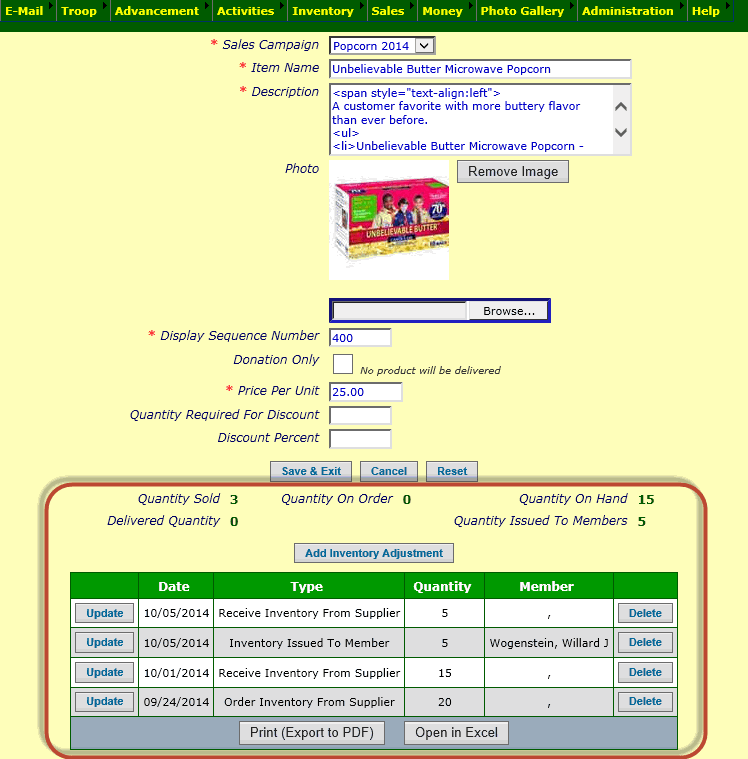
The area at the bottom of the page shows the balances for this item and the inventory adjustments.
You can also add, update, and delete inventory adjustments from this page.
Public Orders
Authorized users will be able to view, update, and add orders for any Public sales campaign using the Public Orders option on the Sales menu.
Click Add a New Item to begin entering a new order for a public sales campaign.
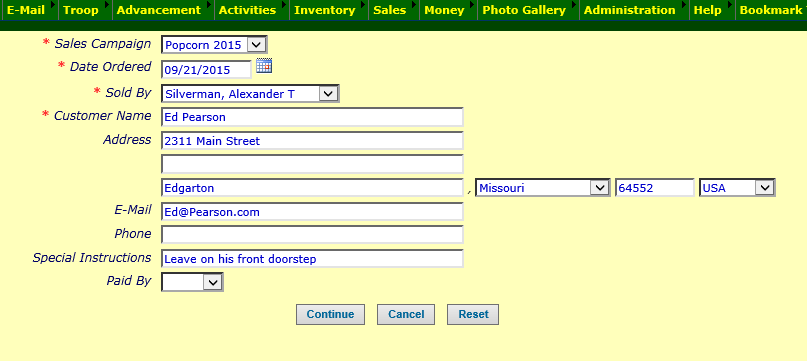
Begin by selecting the Sales Campaign for which this order is being created. The choices in this drop down list will be limited to the sales campaigns that are currently active, based on the Start Date and End Date for that campaign.
The Date Ordered will default to the day on which the order is being entered.
Sold By is the scout who took this order and will be given credit for the sale.
Customer Name is the person who is purchasing the product.
The Address is optional, but may be helpful when you need to deliver the order.
E-Mail and Phone are also optional, intended to provide other ways to contact this customer.
Special Instructions can be used to record any notes from the customer, such as delivery instructions.
Paid By is just a comment field that can be used to indicate how the customer paid for this order. The actual payment will be recorded from the Payments For Public Orders page.
Press Continue to proceed to the next page, where you will select the items that were ordered.
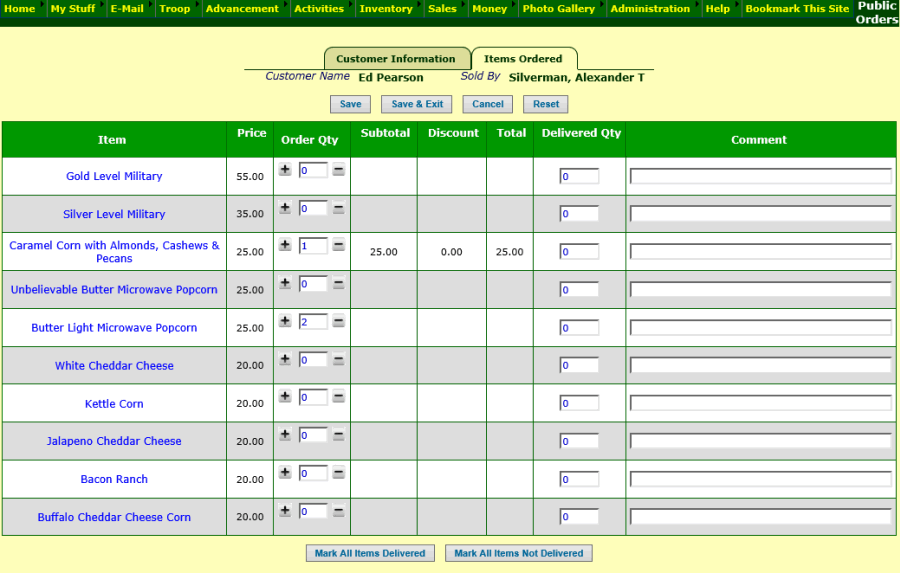
This page shows a list of all of the items available for this sales campaign.
Click the  button to order that item. Click it again to increase the quantity.
Click the  button to reduce the quantity.
Or you can simply enter the quantity into the field in between the two buttons.
If these items have been delivered, you can enter the quantity delivered into the Delivered Qty field.
Use the Mark All Items Delivered button to set the Delivery Qty equal to the Order Qty for all items ordered.
Use the Mark All Items Not Delivered button to set the Delivery Qty back to zero for all items.
Click Save to save this order and see the extended totals.
Click the Customer Information tab to review the rest of the information on this order and see the total amount for the order.
Click Save & Exit to return to the list of all orders.
Payments for Orders for Public Campaigns
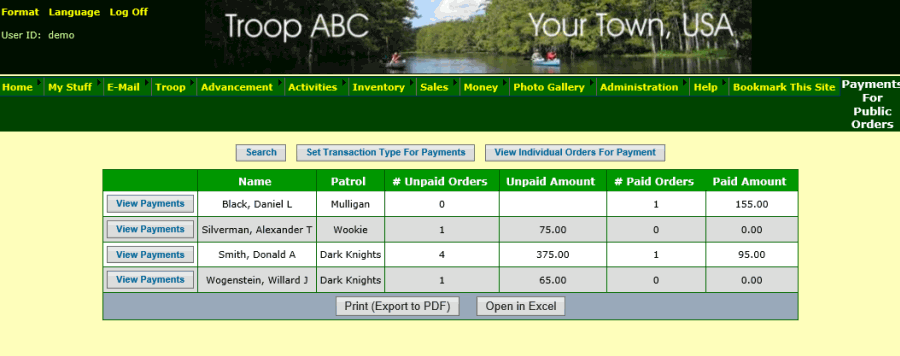
Authorized users may enter payments for orders in any current public sales campaign, by selecting Payments For Public Orders from the Sales menu.
This will display a list of all scouts who have sold one or more orders in any current public sales campaign, showing the number not yet paid and the number paid.
You can select any scout to process the payments they brought in. This allows you to accept payments that cover more than order.
You can also accept payments for individual orders by clicking the View Individual Orders For Payment button.
If you have not already set the default transaction type for order payments, you will see a message at the top of the page that looks like this:

If you see this message, click on the button Set Transaction Type For Payments to select your default transaction type.
If you plan to create an event for each fundraiser, then you should choose Deposit To Troop Account For Event as your default transaction type. Otherwise, Deposit To Troop Account is probably the best choice.
Once that has been set, click the View Payments button next to a scout for whom you wish to process payments.
This will bring up a page that shows payments already posted, plus orders that have not yet been paid.
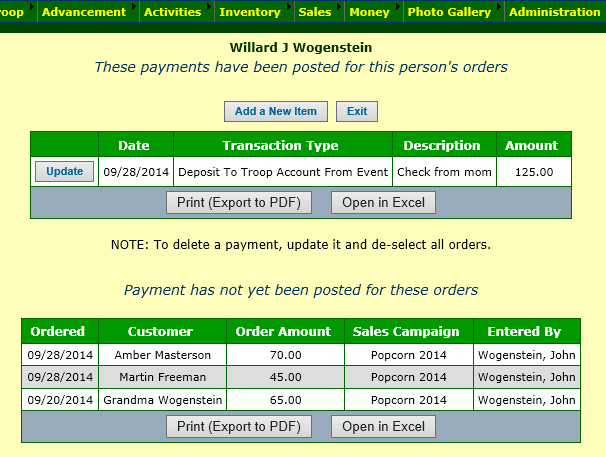
Note that there is no Delete button for payments. To delete a payment, update the payment and de-select the orders associated with it. This will set the payment amount to zero.
To add a payment, click Add a New Item.
This page displays a list of the orders sold by this scout for which payment has not yet been recorded.
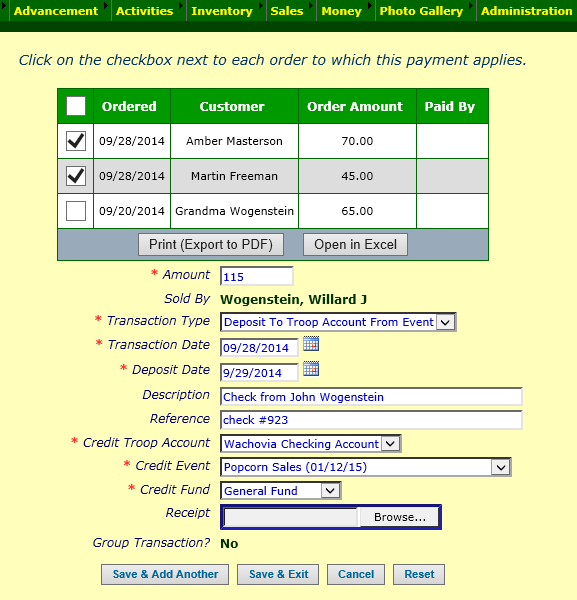
Begin by selecting the orders covered by this payment by clicking on the checkbox next to each of those orders.
Notice that the payment amount will be recalculated each time you select or de-select an order.
When you have selected the appropriate orders, verify that the payment amount matches the actual payment submitted. If not, you may need to review this order and make any necessary corrections before completing this payment.
If you set your default transaction type, the Transaction Type should be automatically selected on this page.
That, in turn, will determine the rest of the fields that must be entered on this page.
When the payment is complete, click Save & Add Another to continue to the next payment for this scout, or click Save & Exit to return to the previous page.
If you receive payment directly from customers for their orders, you can record those payments by pressing the View Individual Orders For Payment button. It will take you to a page that looks like this.
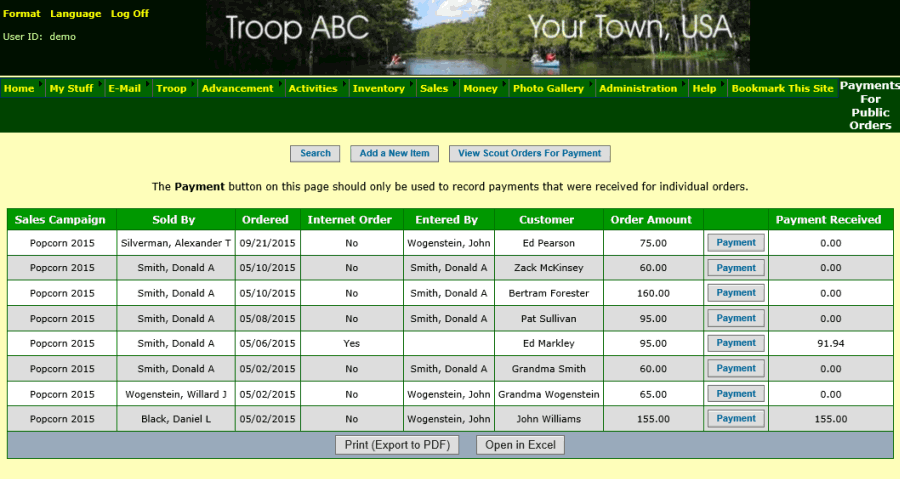
This page lets you to create or update a payment transaction for an individual order. It does not allow you to process a payment that covers more than one order.
Click the Payment button to create or update a payment transaction for that order.
Click View Scout Orders For Payment to return to the page where you can process payments from scouts.
Incomplete Internet Orders
It is possible for a member of the public to purchase an item from your troop at the ScoutSales.org site and complete payment with PayPal, but the order still shows as incomplete.
Usually this is because of a problem with the way you set up your PayPal configuration or your Sales Campaign:
- You may have entered the Notification URL incorrectly on the PayPal IPN Settings page.
- You might not have enabled Instant Payment Notification on the PayPal IPN Settings page.
- You might not have selected a transaction type for PayPal payments on the Sales Campaign.
- You might have changed the selected transaction type to require funds, without specifying a fund on the Sales Campaign.
On very rare occasions, the PayPal payment may not have been logged due to a communications error between the PayPal server and the TroopWebHost server.
If you discover that you have received a PayPal payment for an order, but the order does not show up on the Public Orders page, you may find it on the Incomplete Internet Orders page, which is on the Sales menu, as shown below.
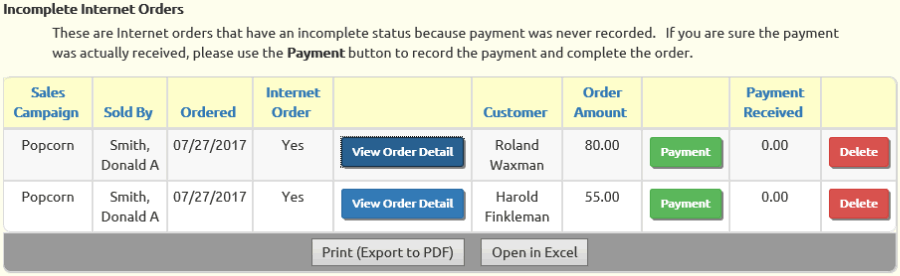
Not all of the orders on this page are legitimate orders! In fact, most are probably orders that were abandoned before the person completed the payment process. Many, if not all, of the orders on this page are truly incomplete and should be ingnored.
You should only be concerned with an order on this page if you know for a fact - by checking your PayPal payment history - that you actually did receive payment for this order.
Even then, you should be careful. Some PayPal payments - specifically e-check payments - can take several days to clear. Until they do, the associated order will show as incomplete.
But if you can confirm that payment was received for one of these orders, you can record the payment and mark the order complete by clicking the Payment button on that row. This will take you to the page shown below where you may enter a monetary transaction for this payment.
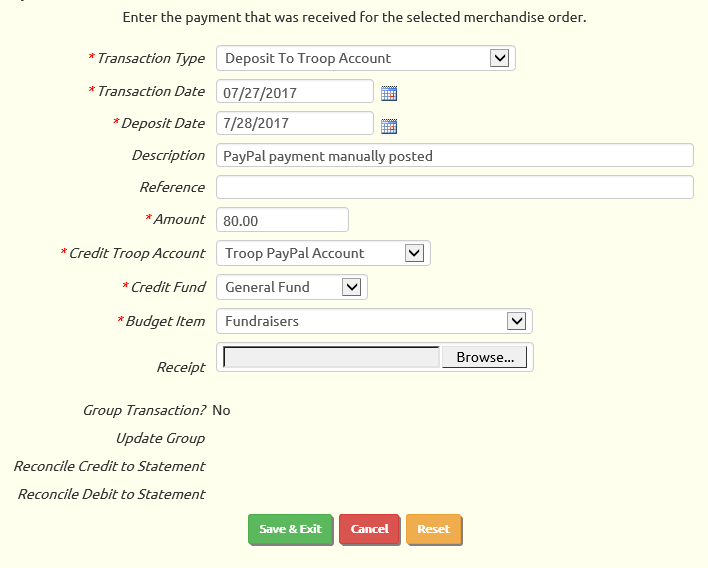
Enter the appropriate values on this page and click Save & Exit to record the payment. This will return you to the previous page, but the order you selected will no longer be on the list, since it is no longer incomplete.
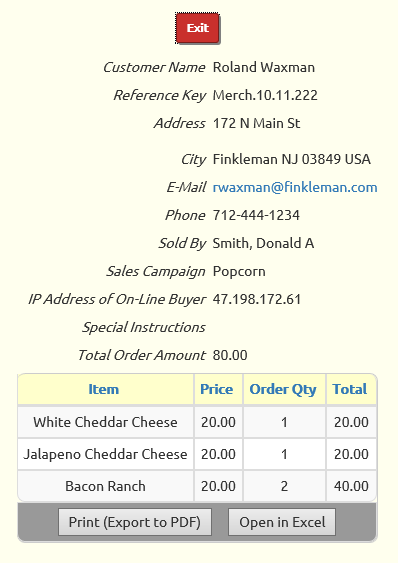 The Incomplete Internet Orders list
also has a View Order Detail button which will take you to the page shown at left.
The Incomplete Internet Orders list
also has a View Order Detail button which will take you to the page shown at left.
This shows you the contact information for the person who initiated the order.
It also shows the specific items that would have been on the order.
Press the Exit button to return to the Incomplete Internet Orders list.
Booth Sales
You may have the opportunity to sell items directly to your customers, in which you accept payment and give out the merchandise all at the same time.
Many troops have seasonal fundraisers, like Christmas Tree sales, that fit this description.
We call this a "Sales Booth Operation". Our Booth Sales function will help you track these sales and payments.
Booth sales have these characteristics:
- The customer pays for the item with cash, check, credit card, or debit card.
- You fulfill the order immediately by giving the merchandise to the customer.
- You have an Internet connected touch screen device available to record the sale.
- At the end of each shift, or when appropriate, you prepare bank deposits for cash and checks received.
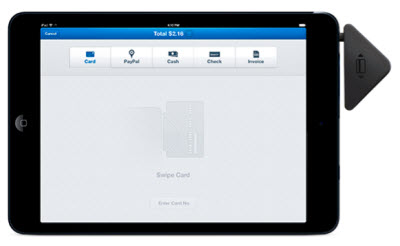
The Booth Sales function is designed to be used on an Internet connected mobile device, like a tablet or smartphone. All of the screen images below are from an iPad.
Before you can use the Booth Sales function, you must configure your sales campaign to specify a Transaction Type for Booth Sales Deposits.
Select Booth Sales from the Sales menu. This will open up a new tab in your browser in which you will enter your sales.
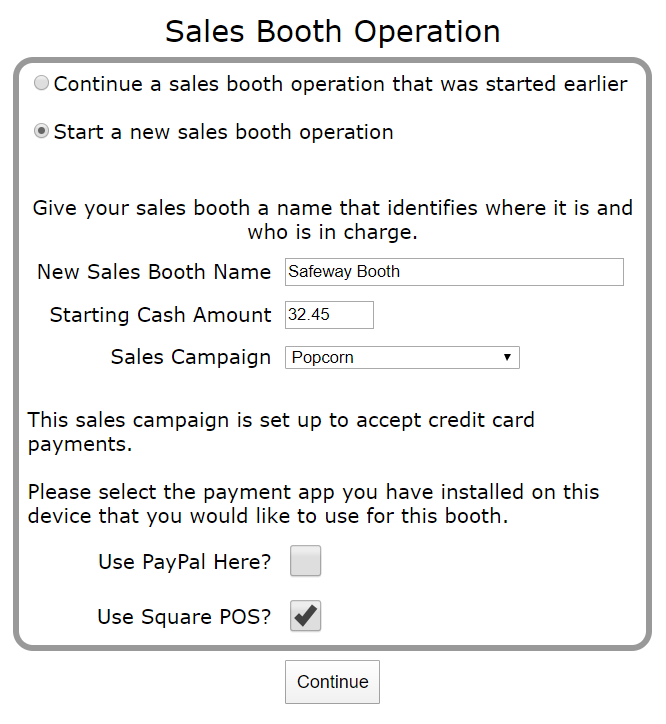
A "Sales Booth Operation" refers to a location where you will be selling merchandise over a period of time for a particular sales campaign. If you are selling Christmas Trees, you can probably create one sales booth operation to cover the entire fundraiser.
You can create a new sales booth operation by filling in the form shown above.
The Sales Booth Name should identify this operation and make it distinct from other sales booth operations you have underway.
 The Starting Cash Amount is the seed money that you put in your cash drawer when you began. The system assumes you will leave this much money in the cash drawer when you make your bank deposits at the end of each shift.
The Sales Campaign is the fundraiser associated with this booth.
If you select a sales campaign that is set up to accept credit card payments, you will be prompted for the type of credit card app you have installed on your device. The Booth Sales function can work with either of these apps:
- Square POS
- PayPal Here
Both of these apps are free, and their company will send you a free card scanner on request. They also offer devices that can read chips for a nominal fee.
Before you can accept credit card payments, you must:
- Set up your TroopWebHost site to accept payments via PayPal and/or accept payments via Square, and
- Configure your sales campaign to accept credit card payments.
Click the Continue button to begin selling!
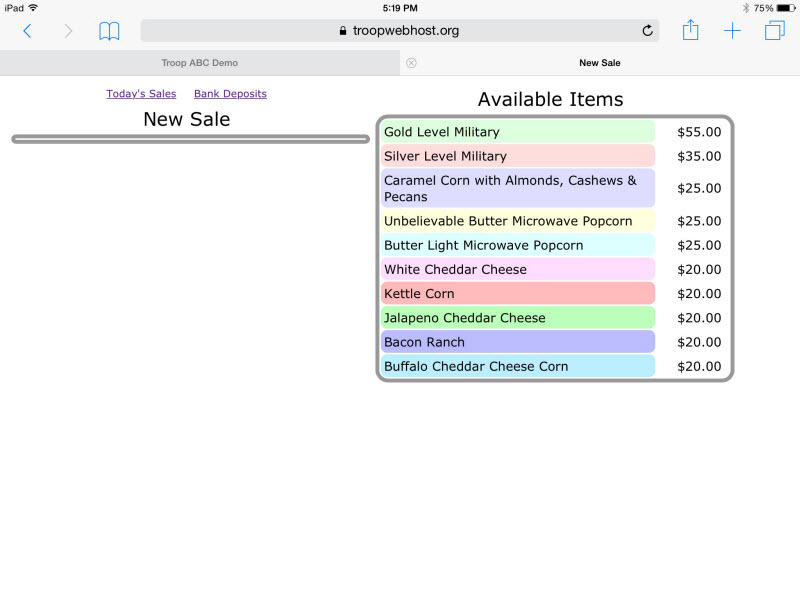
The New Sale page displays all of the items for this sales campaign on the right side of the screen. On smartphones this list will appear at the bottom of the screen.
Tap on an item to add it to this sale. Tap on it again to increase the quantity.

You can also adjust the quantity of an item by tapping on the + and - buttons.
When you are ready to process payment, tap on one of the buttons below the order.
Tap the Cash button to accept payment in cash.
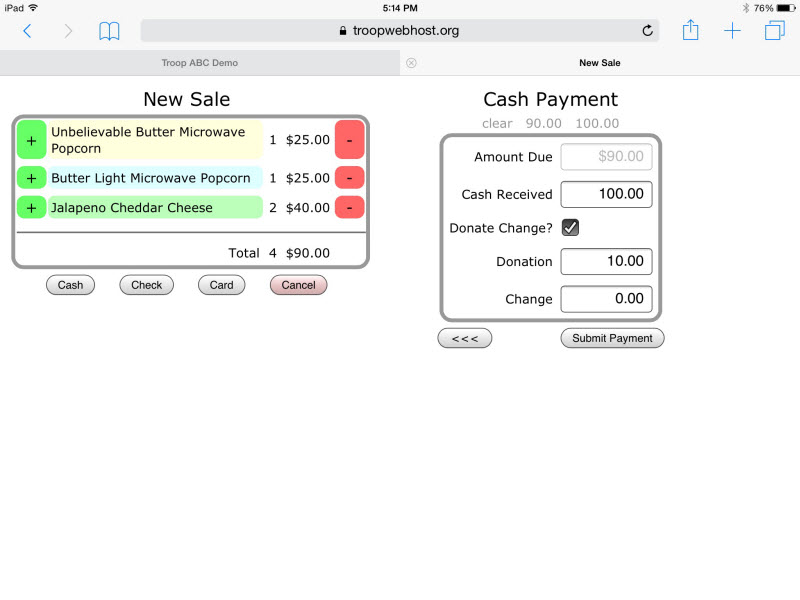
Right below the "Cash Payment" heading you will see several dollar amounts in grey. The first will be the exact amount of the order, followed by the next higher values in single dollars, fives, tens, twenties, fifties, and hundreds.
Tap on one of those values to accept that value as the Cash Received, or tap on the Cash Received field to enter this amount manually. Tap the "clear" link to clear out this field.
Tap the Donate Change? checkbox if the customer is donating the change. If the customer is donating a portion of the change, you can enter that value in the Donation field, and it will recalculate the Change amount.
Tap the Submit Payment button to complete this sale and start a new one.
Tap the Check button to accept payment by check.
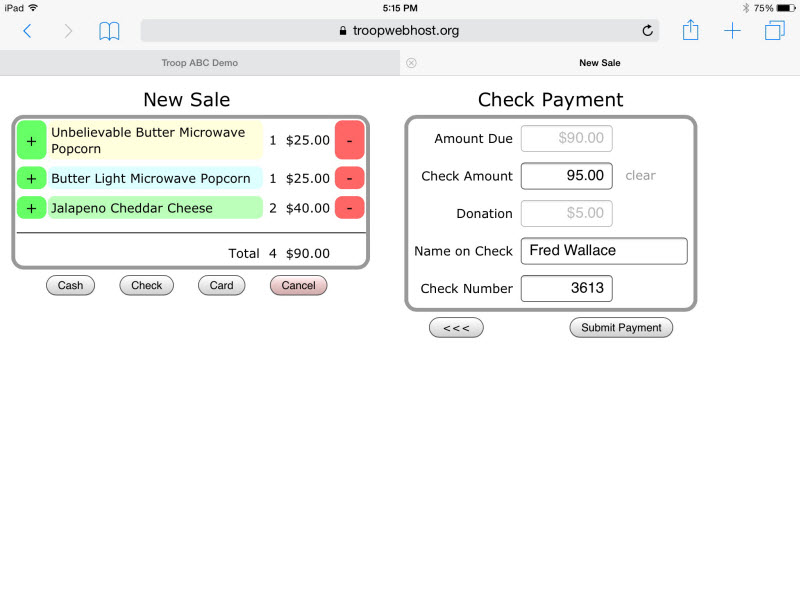
The Check Amount will default to the amount of the order, but if the customer writes the check for a larger amount (to include a donation) you can enter that value in this field.
You are not required to enter the Name on Check or Check Number, although this information may come in handy when you prepare your deposit slip later.
Tap the Submit Payment button to complete this sale and start a new one.
Tap the Card button to accept payment by credit card or debit card. This button is only available if you set up this sales booth operation for PayPal Here or Square POS.
The Card button will open up the selected payment app on your device. The following example shows PayPal Here, but Square POS operates in much the same way.
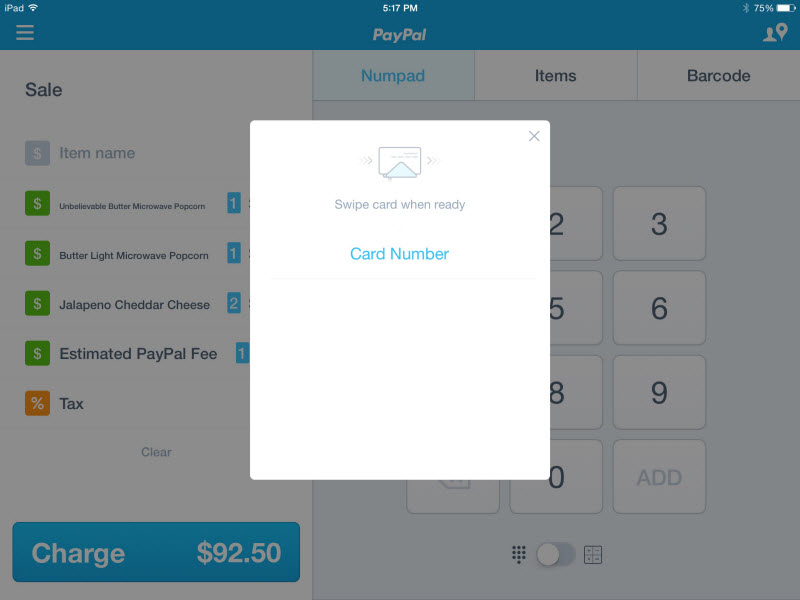
If you do not have your card reader plugged into the device, you will be prompted to do that now.
You may then scan the credit card as payment for this sale. Note that if this sales campaign is set up to require the customer to pay PayPal fees, the estimated fee will be added to the amount of the sale.
PayPal Here will then prompt you for the customer's signature. The customer can use his finger to write his signature on the screen, then tap the Done button.

PayPal Here will give you the option of sending an electronic receipt to the customer. After that it will display the completion page shown below.
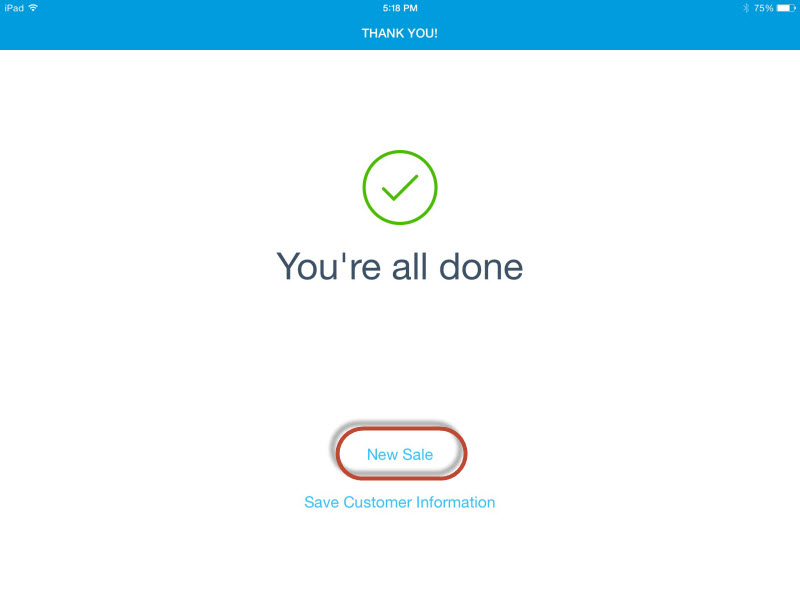
Tap the New Sale button to return to the Booth Sales page. (Square POS will return to the Booth Sales page automatically after a few seconds.)
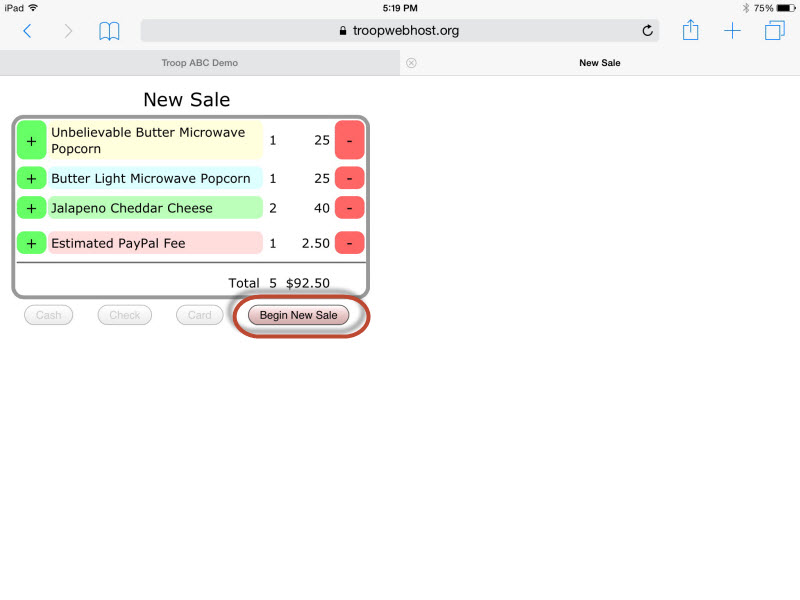
Tap the Begin New Sale button to be ready for your next customer.

Before you begin entering the next sale, notice the links in the upper left corner of the page (they will disappear once you begin the order.)
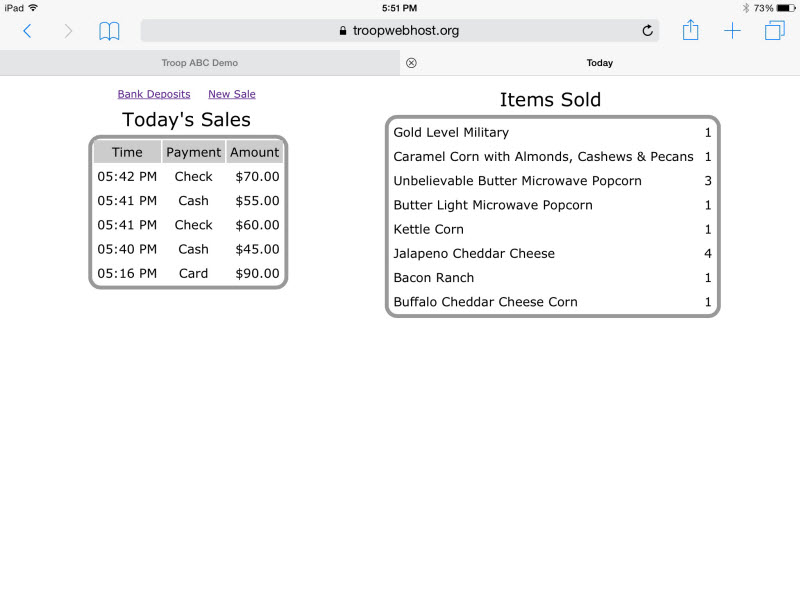
The Today's Sale link will display a summary of today's sales, as shown below.
The Bank Deposits link will take you to a page that helps you prepare your deposit slip at the end of your shift.

The Activity Summary section shows you a summary of payments accepted from the beginning of this sales booth operation.
The Checks To Deposit section lists all of the checks received since your last deposit.
The Prior Deposits section lists all previous deposits for this sales booth operation.
The New Deposit section allows you to submit a new deposit. This will create monetary transactions in the TroopWebHost accounting system for these deposits.
The Cash amount will default to the amount of cash currently on hand, less the starting amount. You may enter in a different value if you prefer.
The Checks amount is set to the amount of checks currently on hand. You cannot change this value.
Tap the Submit Deposit button to record this deposit and create one transaction for the cash deposit and another transaction for the check deposit.
Merchandise Booths
Merchandise booths are created when you begin a new sales booth operation using the Booth Sales page.
Merchandise booths represent a location where you sell merchandise directly to your customers over a period of time, accepting payment and giving out the merchandise at the same time.
Many troops have seasonal fundraisers in which they sell pumpkins or Christmas trees, where this function is useful.
The Merchandise Booths page allows you to view and update the booths that were created from the Booth Sales page. You'll find this on the Sales menu.
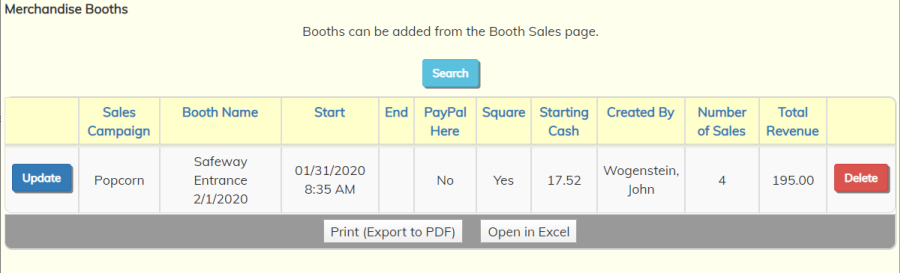
If a booth has not yet reported any sales, you can delete it with the Delete button.
Click the Update button to view the details of a given booth.
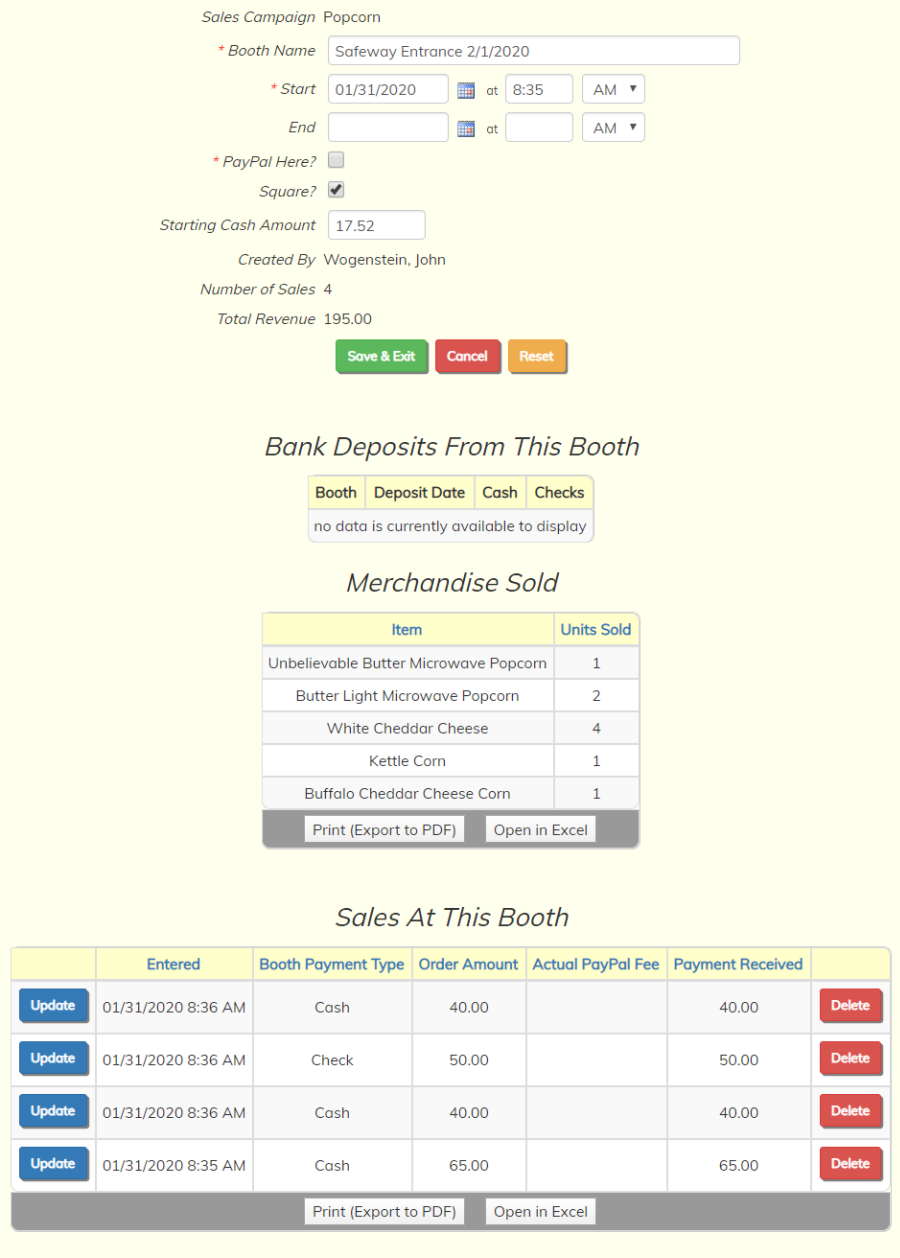
On this page you can modify the details of this booth.
The Booth Name should identify this operation and make it distinct from other sales booth operations you have underway.
The Start date was set to the date and time this booth began operation.
The End date should be set to the date on which this booth will no longer be in operation. This booth will no longer be presented as an option after this date.
PayPal Here? indicates whether you have PayPal Here installed on the device being used to record sales at this booth. PayPal Here is a free app available on most mobile devices. At your request, PayPal will send you a free credit card reader that will plug into the headphone outlet on your device.
Square? indicates whether you have the Square POS app installed on the device being used at this booth. Square POS is a free app available on most mobile devices. Square will also send you a free credit card reader on request.
You cannot select both PayPal and Square for the same booth. If you need to change the payment vendor you should create a new booth.
The Starting Cash Amount is the seed money that was in the cash drawer when this booth began operation. The system assumes you will leave this much money in the cash drawer when you make your bank deposits at the end of each shift.
Click Save & Exit to save any changes you've made to this information.
The Bank Deposits From This Booth grid shows all of the bank deposits that were made from this booth. The Booth Sales page allows the user to create bank deposits at the end of a shift.
The Sales At This Booth grid lists all of the sales that were completed at this booth.
Member Orders
Authorized users will be able to view, update, and add orders for any Members Only sales campaign using the Member Orders option on the Sales menu.
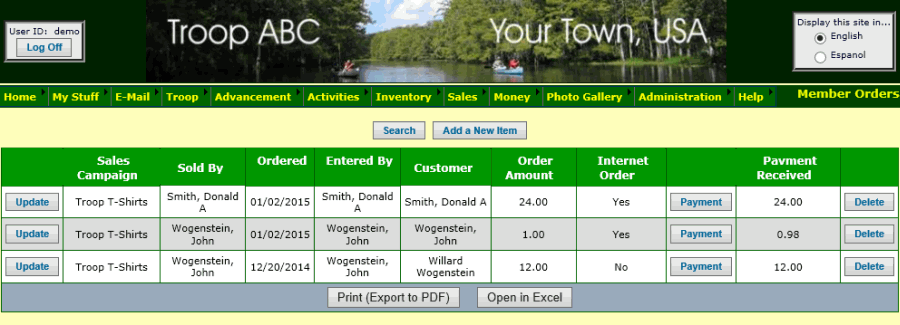
Click Add a New Item to begin entering a new order for a members only sales campaign. This process works exactly the same as for entering orders for public campaigns.
Click Update next to an order you wish to view and modify.
One of the important differences between orders for public campaigns and orders for members only campaigns has to do with the way payments are applied to orders.
Since your scouts may consolidate payments from multiple customers when they submit their orders for public campaigns, the Payments For Public Orders function is designed to allow you to link one payment to multiple orders.
For members only campaigns, we expect each order to have its own payment. This allows us to simplify payment processing for members only campaigns.
If you allow your members to place their own orders for members only campaigns using the Buy Stuff From Troop function, they will create the payment transaction themselves. An order entered by a member using that function is not considered complete until they pay for it, either out of their own account or using a credit card.
If you enter a new members only order from the Member Orders page, you will not be prompted for the payment information. However, you can use the Payment button on the initial page to add or update the payment transaction associated with this order. That will take you to the screen shown below.
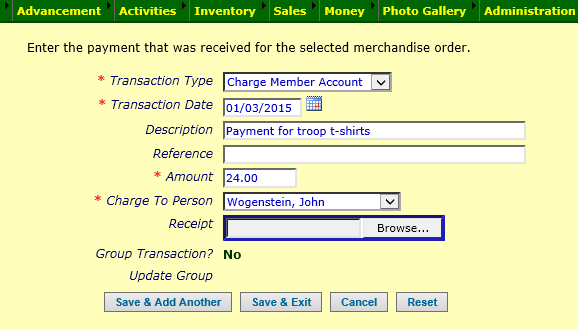
On this page, the Transaction Type drop down list is limited to the appropriate transaction types for paying for merchandise.
Fill out all of the required fields, then click Save & Exit to save your work.
The Payment Received for the order will be updated to match the transaction amount.
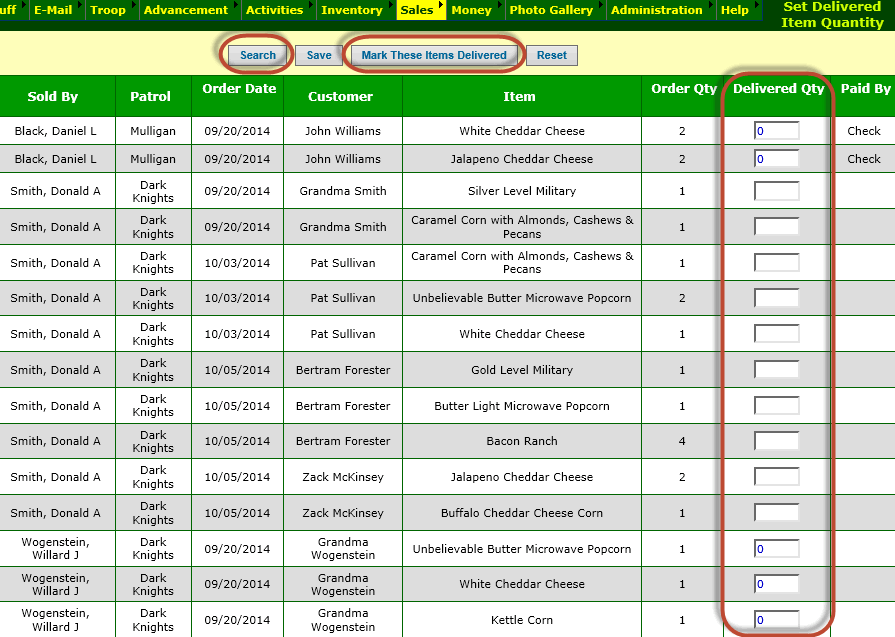
Set Delivered Item Quantity
For every item ordered, the system can keep track of the quantity delivered.
This can be updated when you enter or update the order, but you can also update the quantity delivered for a group of orders by selecting Set Delivered Item Quantity from the Sales menu.
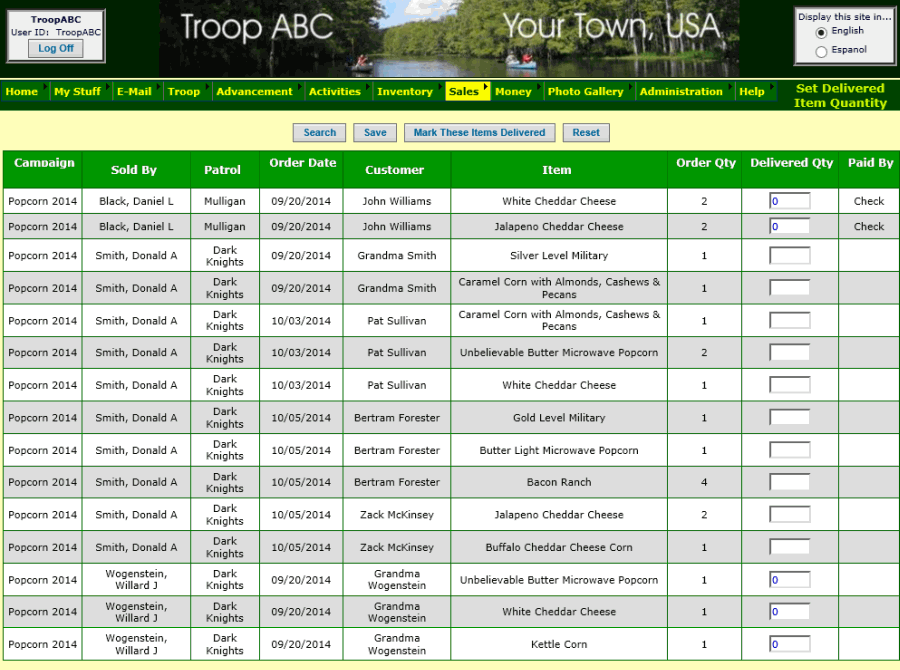
This page initially displays the items ordered that have not yet been delivered.
Use the Search button at the top of the page to select the items that have been delivered, based on the person who sold the order, type of item, or other criteria.
If all of the items currently displayed have been delivered, click the Mark These Items Delivered button to set all of the Delivered Quantity values equal to the Order Quantity. Then click the Save button to save your work. Don't be surprised when all of the items disappear from the list; that is because they have now been delivered.
Alternatively, you can update the delivered quantity for each individual item by typing into the fields in the Delivered Quantity column of the grid. Again, be sure to click Save when you're done.
Export Orders To Excel
Export Orders To Excel will create an Excel spreadsheet with all of your orders from a selected sales campaign.
Select Export Orders To Excel from the Sales menu to view a page like the one below.
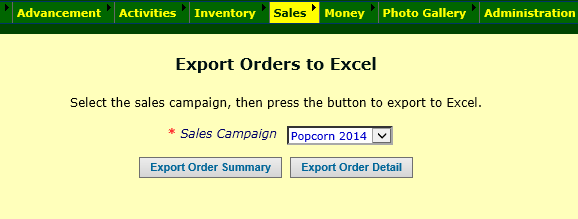
Select the Sales Campaign for which you want to export orders from the drop down box.
Click Export Order Summary to create an Excel spreadsheet with one row per order, with everything about the order except the individual line items.
Click Export Order Detail to create an Excel spreadsheet with one row for each line item on each order.
Top Sellers
As the orders start to flow in, you can motivate your troop by recognizing your top sellers.
Select Top Sellers from the Sales Reports submenu on the Sales menu to select one of the Top Sellers reports.
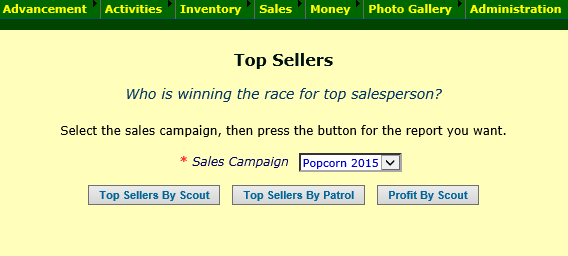
Select the Sales Campaign for which you want to report from the drop down box.
Then click the button for the report you want.
Top Sellers By Scout will list everyone in your troop who has completed at least one order, with the top salesperson at the top of the list.
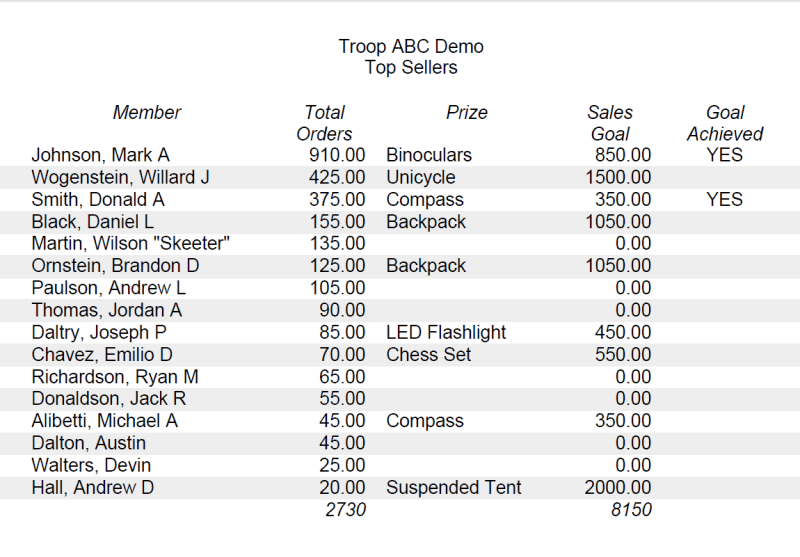
Top Sellers By Patol shows the same information organized by patrol, with the top seller in each patrol shown at the top of that patrol's list.

Profit By Scout shows the profit earned by each scout, based on the Wholesale Unit Cost entered for each item.
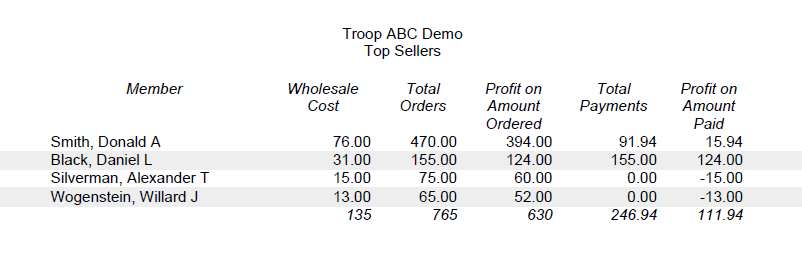
The Wholesale Cost column shows the total wholesale cost of all items sold by each scout.
Total Orders is the price charged to the customer for all items sold by each scout.
Profit on Amount Ordered is the difference between these first two columns.
Total Payments is the total amount of payments received to date for each scout's orders.
Profit on Amount Paid is the difference between the Total Payments column and the Wholesale Cost column. This can be negative if no payments have been processed yet for a scout's orders.
Consolidated Orders Reports
Once your orders have all been entered, the Consolidated Orders Reports will help you order the products from your supplier and distribute them to your scouts.
Select Consolidated Orders from the Sales Reports submenu on the Sales menu to see the page shown below.
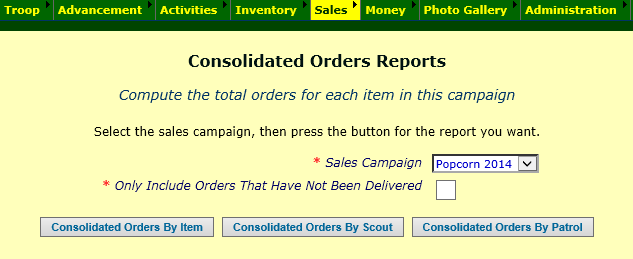
Select the Sales Campaign for which you want to report from the drop down box.
Click Only Include Orders That Have Not Been Delivered to omit orders that have already been delivered from the report.
Then click the button for the report you want.
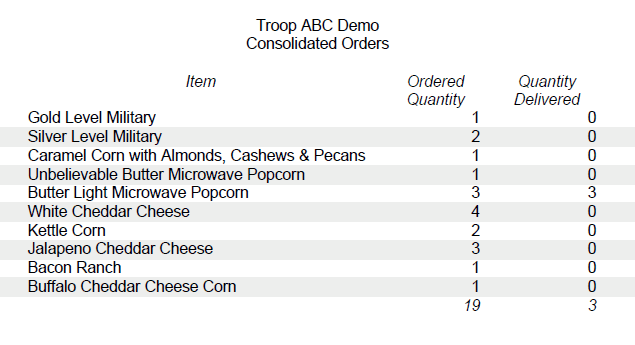
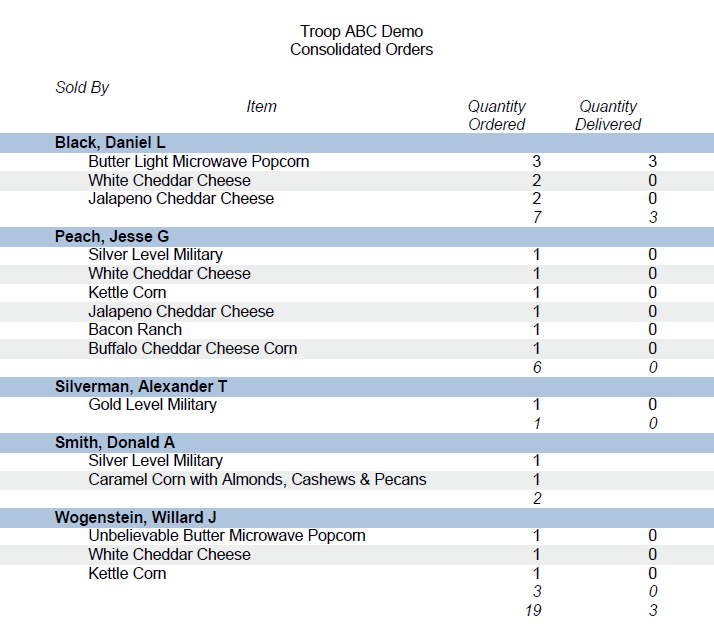
Consolidated Orders By Item is intended to help you place orders with your supplier. It shows the total number of units ordered for each item in this sales campaign.
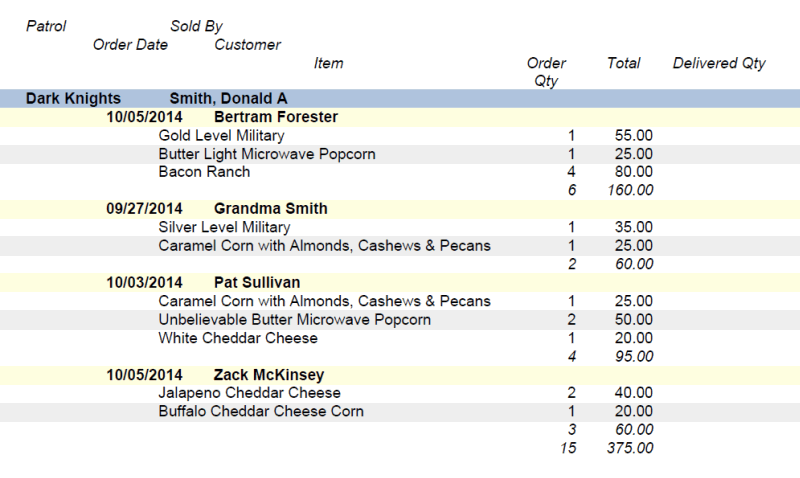
Consolidated Orders By Scout will help you distribute product to your scouts for delivery. For each scout, it shows the total number of units ordered for each item
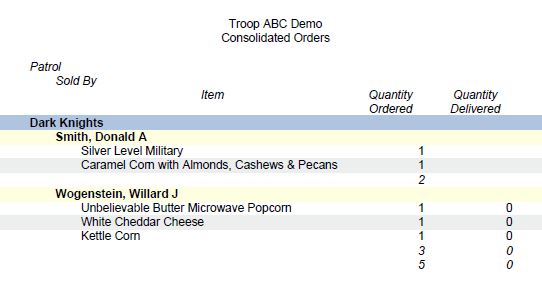
Consolidated Orders By Patrol is an alternative version of the previous report, organized by patrol. Each patrol will print on a separate page.
Order Item Detail
As you distribute the merchandise, it may be helpful to give each scout a list of their orders.
Select Order Item Detail from the Sales Reports submenu on the Sales menu to access these reports.
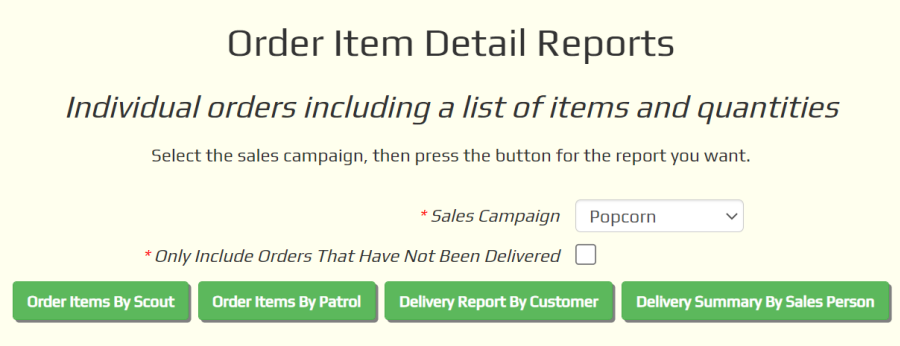
Select the Sales Campaign for which you want to report from the drop down box.
Click Only Include Orders That Have Not Been Delivered to omit orders that have already been delivered from the report.
Then click the button for the report you want.
Order Items By Scout will print one page for each member of your troop, listing each order with all of the items sold.
Order Items By Patol will also print one page for each scout, but will be sorted by patrol so you can easily distribute it by patrol.
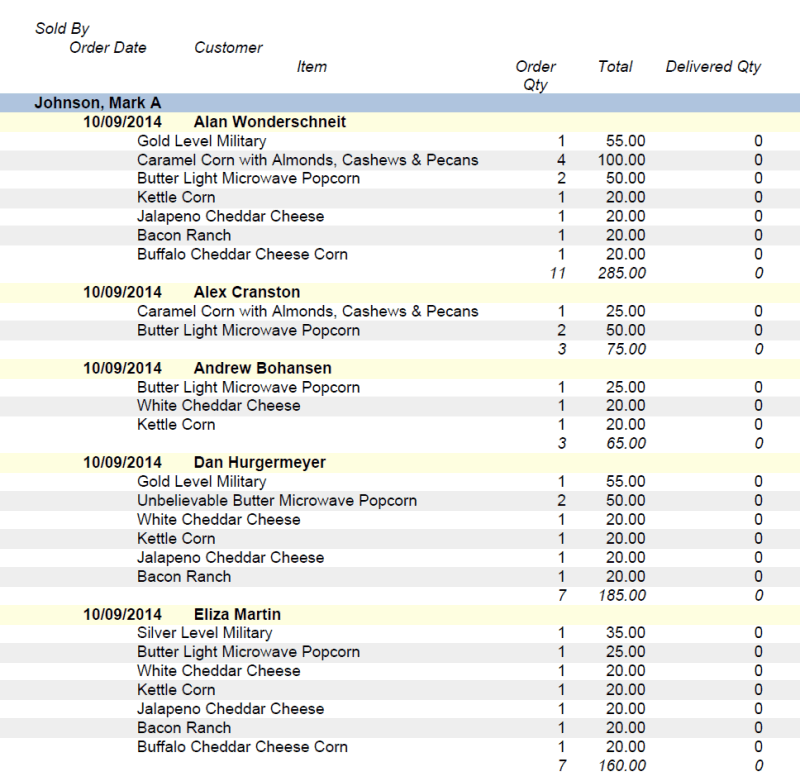
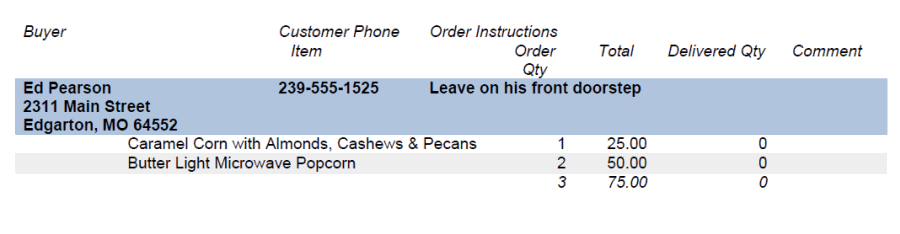
Delivery Report By Customer will print a separate page for each order, with the buyer's name, address, phone number, special instructions, and all items.
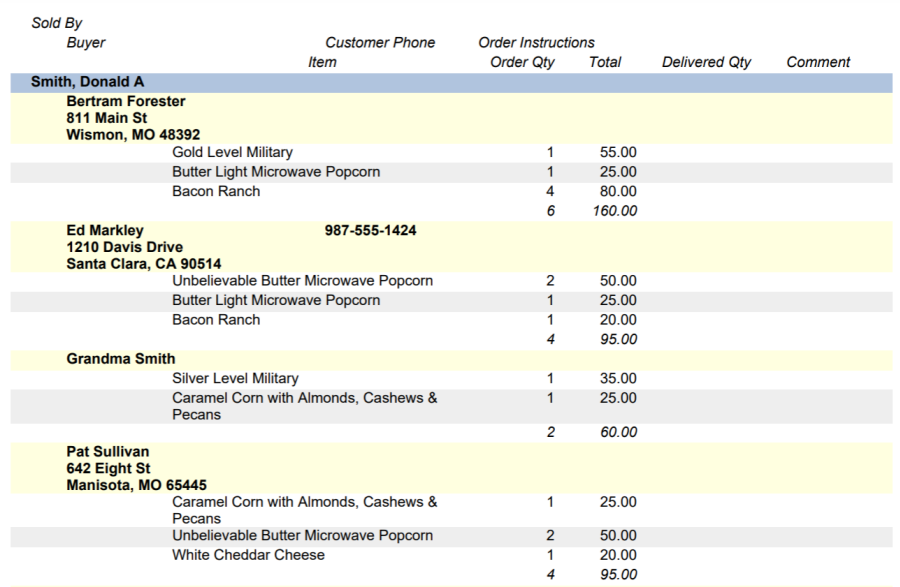
Delivery Summary By Sales Person will print all of the orders sold by each scout, with the buyer's name, address, phone number, special instructions, and all items. Regardless of whether you checked the Only Include Orders That Have Not Been Delivered box, it only includes those orders that have not yet been delivered
Merchandise Inventory
You can enter inventory adjustments when you order product from your supplier, receive product, and distribute it to your troop.
The results of these adjustments can be viewed in three Merchandise Inventory reports, which can be selected from the Sales Reports submenu on the Sales menu.
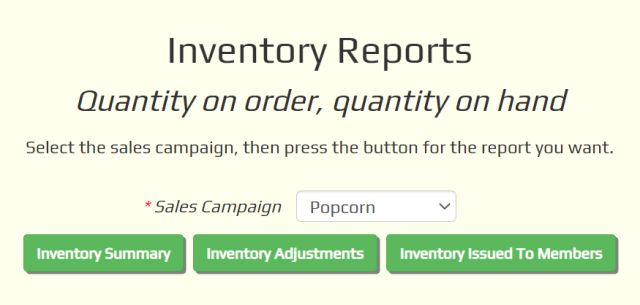
Select the Sales Campaign from the drop down box.
Then click the button for the report you want.
Inventory Summary will show each item in the current sales campaign, with the following statistics for that item:
- Quantity Ordered is total quantity ordered from the supplier, regardless of whether it has been received.
- On Order is the current quantity on order, based on the total quantity ordered minus the quantity received
- Quantity Received is the total quantity received from the supplier, regardless of whether it has been distributed.
- On Hand is the current quantity on hand, based on the total quantity received minus what has been issued to troop members or delivered to customers.
- Held By Members is the current quantity held by members, based on the total quantity issued to members minus what they have delivered to customers.
- Sold is the total number of units ordered by customers.
- Delivered is the total number of units delivered to customers.
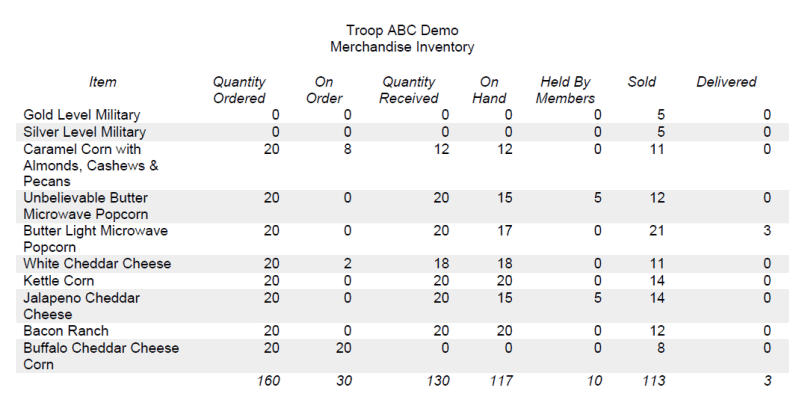
Inventory Adjustments shows you the inventory transactions that affected the summary totals.
![]()
If you are issuing merchandise inventory to your members, Inventory Issued To Members will help you keep track of where everything's at.
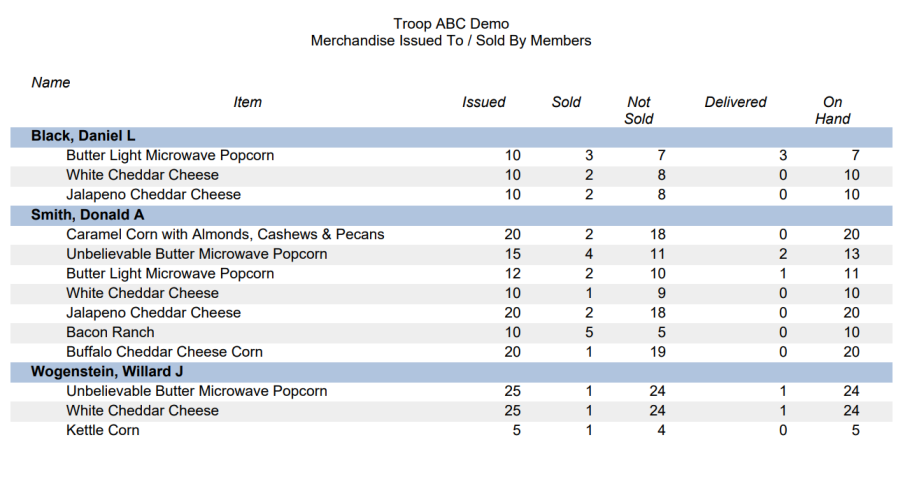
Issued is the quantity of each item that has been issued to that member, less any that have been returned.
Sold is the quantity sold by that member, which may include units that were not issued.
Not Sold is the quantity issued to a member that have not yet been sold.
Delivered is the quantity sold by this member that has been marked delivered
On Hand is the quantity issued less the quantity delivered.
Sales Lookup Tables
The Sales submenu on the Site Configuration menu has two items, neither of which will be used very frequently, if at all.
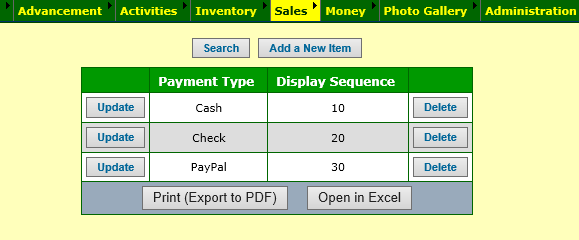
The Payment Types page allows you to maintain a list of Payment Types that can be used for accepting payment for an order.
The Display Sequence controls the order in which these options are displayed in a choice list.
The PayPal payment type will only be used for orders created on the www.ScoutSales.org website. Do not remove or change the name of this payment type if you plan to accept orders from the public on that site.
Inventory Transaction Types will be used to enter inventory transactions, which can affect three different inventory balances:
- Quantity on order from your supplier
- Quantity on hand
- Quantity being held by members of the troop
We recommend that you do not alter the default settings for these transaction types.
![]()
Sales FAQ
 We created a sales campaign, but when our scouts try to enter orders, the dropdown list for Sales Campaign is empty. Why is that?
Scouts can only enter orders for Public sales campaigns. Fundraisers should always be designated as Public sales campaign.
If this is a fundraiser, you may need to recreate this sales campaign as a Public sales campaign.
If this is not a fundraiser, your scouts should be able to order items using the Buy Stuff From Troop page.
The other possibility is that you are outside of the date range established for Scout Order Entry for this campaign. This can be corrected on the Sales Campaign page.
We want our scouts to be able to promote on-line sales, but they are not able to view their Personal URL. What did we do wrong?
For scouts to be able to view their Personal URL, you must do the following:
- Configure your site to accept PayPal payments.
- Make sure your Sales Campaign is a Public campaign with a monetary transaction type designated for PayPal payments.
- Authorize the Scout user role for the Pick My Sales Prize (scouts) task.
Isn't it risky to allow scouts to sell on-line? Does this make personally identifable information available on the Internet?
No. The public order form only identifies the scout by his first name and last initial. And this information is only available if the customer has entered in the numeric code that was part of the scout's Personal URL.
The public will NOT be able to view a list of scouts from whom to place an order. They must know the Personal URL of a scout to begin the process.
The Personal URL gives scouts a wonderful opportunity to learn first hand about e-commerce and Internet marketing.
A customer ordered a size XL t-shirt and then wanted to exchange it for a size XXL. How do I change the order?
If this was for a "Sales To Member" campaign, please go to Sales → Member Orders . If this was for a "Sales To Public" fundraiser, please go to Sales → Public Orders.
Find the order on the list and update it, then go to the "Items Ordered" tab where you can change the quantities for each item. Reduce the quantity for the item being returned and increase the quantity for the new item.
This will affect your inventory on hand quantity for both items. It will not affect the amount paid for the order.
Can we create a link on our home page to allow the public to order on-line?
Yes. You will find a "Troop Sales URL" displayed on the Sales Campaign page.
I'm using the Booth Sales program. When I complete a credit card payment with PayPal Here it doesn't return me to the New Sales page like it shows in the User Guide. What am I doing wrong?
Please disable the pop-up blocker in your browser. If that doesn't fix the problem, please open a Support Ticket..
When I accept a credit card payment using PayPal Here, it doesn't post to my monetary transactions How can I fix this?
Please check the Settings in PayPal Here and disable Tips. In some versions of PayPal Here the Tips setting will prevent the system from posting the payment correctly to TroopWebHost.