It's All About You
 Since your User ID is linked to your troop membership record, as soon as you log on the system knows who you are.
The My Stuff menu allows you to view and update information that is specific to you.
Since your User ID is linked to your troop membership record, as soon as you log on the system knows who you are.
The My Stuff menu allows you to view and update information that is specific to you.
Scouts will see different options on this menu than will be seen by adult troop members.
Options available from this menu:
| My Scouts | View information about the scouts to whom you are linked as parent or guardian |
| My Personal Information | View and update your troop membership record, including address, phone numbers, and e-mail addresses |
| My Skills and Interests | Indicate the areas in which you could be most useful to your troop |
| Change My Password | Change your password |
| My Account | View your account balance and transaction history |
| On-Line Payments | Pay money to the troop on-line using PayPal™ |
| Buy Stuff From Troop | Purchase items, like troop t-shirts, offered for sale to troop members |
| Request Expense Reimbursement | Submit a request to be reimbursed for items you purchased or the troop |
| Sign-Up For Events | View a list of upcoming events and indicate the ones you plan to attend |
| Sign-Up For Shifts | View a list of upcoming shifts and sign up for those you plan to work |
| Subscribe to Calendar | Subscribe to the troop calendar from Google Calendar and other calendar applications. |
| Surveys | Vote on current surveys and see the results of past surveys |
| Scout Forum | Participate in on-line discussions about topics posted by members of your troop |
| My Forum Posts | View and update comments that you have posted to the Scout Forum |
| My Library Materials | View library materials that you've checked out; check out additional library materials |
| My Troop Equipment | View troop equipment that you've checked out; check out additional troop equipment |
| My Rank Advancement (Scout) | Scouts can view their status and request sign off on rank requirements |
| My Merit Badges (Scout) | Scouts can view their status and request sign off on merit badge requirements |
| My Training History | View and update your adult training log |
| My Merit Badge Assignments | Merit Badge Counselors can view the merit badges they support, and the scouts being assisted with each |
| Approve Requests To Sign Off On Merit Badge Requirements | Merit Badge Counselors can view the merit badges they support, and the scouts being assisted with each |
| My Awards (Adult) | Adults may view their awards |
| My Fundraiser Sales | Scouts can enter their orders for fundraisers |
| My Sales Prize & Personal URL | Scouts participating in fundraisers may select their sales prize and use their personal URL to solicit on-line sales |
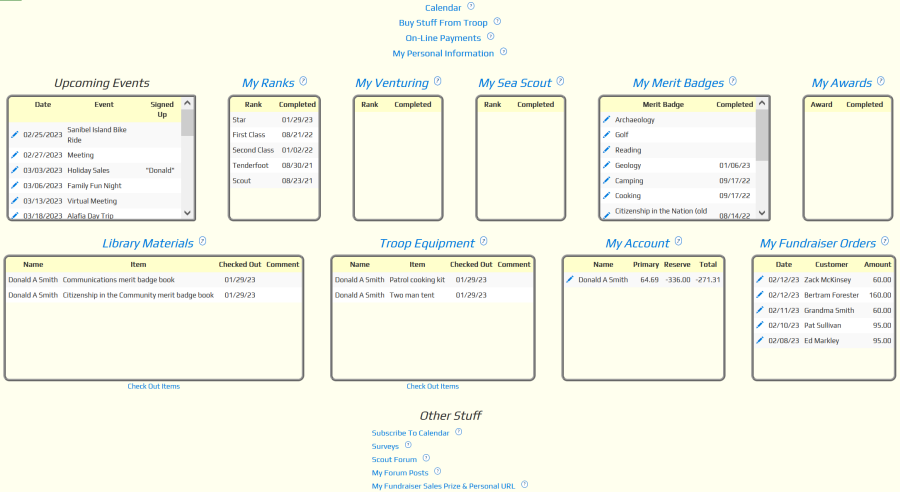
My Stuff Hub
Hub pages allow you to access information and functions for an entire subsystem of TroopWebHost.
There are two Hub pages for My Stuff, one for scouts and another for adults.
The My Stuff hub for scouts looks like this:
The My Stuff hub for adults looks like this:
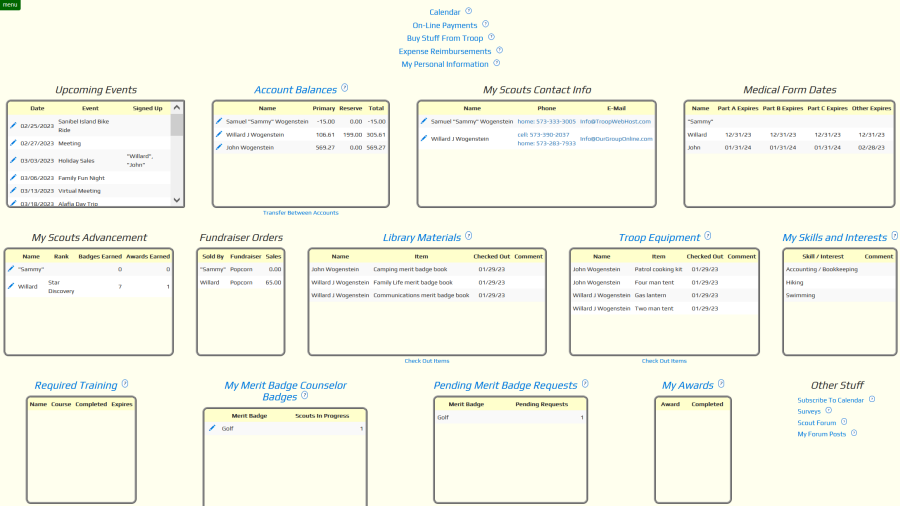
Both hubs allow the user to update their contact information and view their account balance. The My Stuff hub for scouts allows them to view their advancement information and fundraisers. The My Stuff hub for adults allows them to view their scout's information.
Change My Password
The Change My Password page lets you change your password.
You may access this page by clicking the cog icon ![]() in the upper right corner of the page to reveal the
Tools menu.
in the upper right corner of the page to reveal the
Tools menu.
Select Change My Password from the Tools menu to see the page shown below.
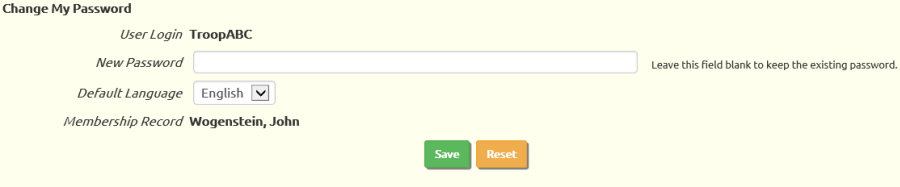
Type in your new password and press the Save button. You will notice that the same screen will redisplay. To go to another function, select it from the menu.
Passwords must meet these requirements:
- At least eight characters long
- Include at least one upper-case letter
- Include at least one lower-case letter
- Include at least one numeric digit or special character
Here are some valid passwords:
- INeed42$$
- WhatTime7AM
- Tony1234
- Troop$$$$
Here are some invalid passwords:
- 2Short
- NoNumbersOrSpecialCharacters
- nocaps=failure
- #NOLOWERCASE#
My Personal Information
My Personal Information lets you view and update your troop membership record.
To make changes, simply enter the new information and then scroll down to the bottom of the page to click the Save button. Just like the Change My Password screen, you will notice that the same screen will redisplay. To go to another function, select it from the menu.
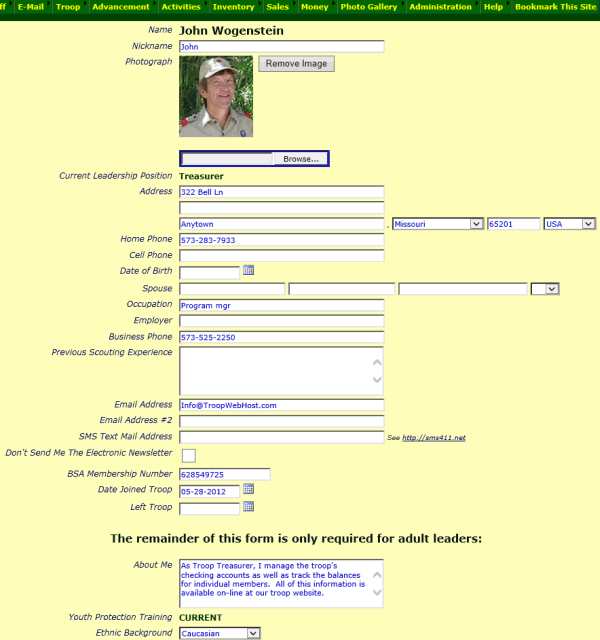 Scouts will see different types of information on this page than adults.
The sample shown at right is for an adult.
Scouts will see different types of information on this page than adults.
The sample shown at right is for an adult.
For example, scouts are not able to upload a personal photo (unless you've customized your security to authorize the Scout user role for the Scout Photo task.)
All troop members should be sure to keep the following information up to date on this page:
- Mailing Address
- Phone Numbers
- E-mail Addresses
- SMS Text Mail Address
If your troop is using the Automated Electronic Newsletter, individual members may opt out of receiving the newsletter by checking the Don't Send Me The Electronic Newsletter box.
For adults who hold leadership positions, some of the information on this screen will be displayed on the Our Adult Leaders page:
- Photograph. Click Browse to find a close-up photograph of yourself to share with the public
- About Me. These remarks will be displayed on the public website
Adult leaders who do not want to be listed on the Adult Leaders page should check off the box Don't include on public Adult Leaders page.
Every adult who will be driving scouts to campouts and other events should fill out the drivers license and vehicle insurance information at the bottom of the page. This information will be shown on the Tour Permit Worksheet which helps your leaders prepare their tour permit request.
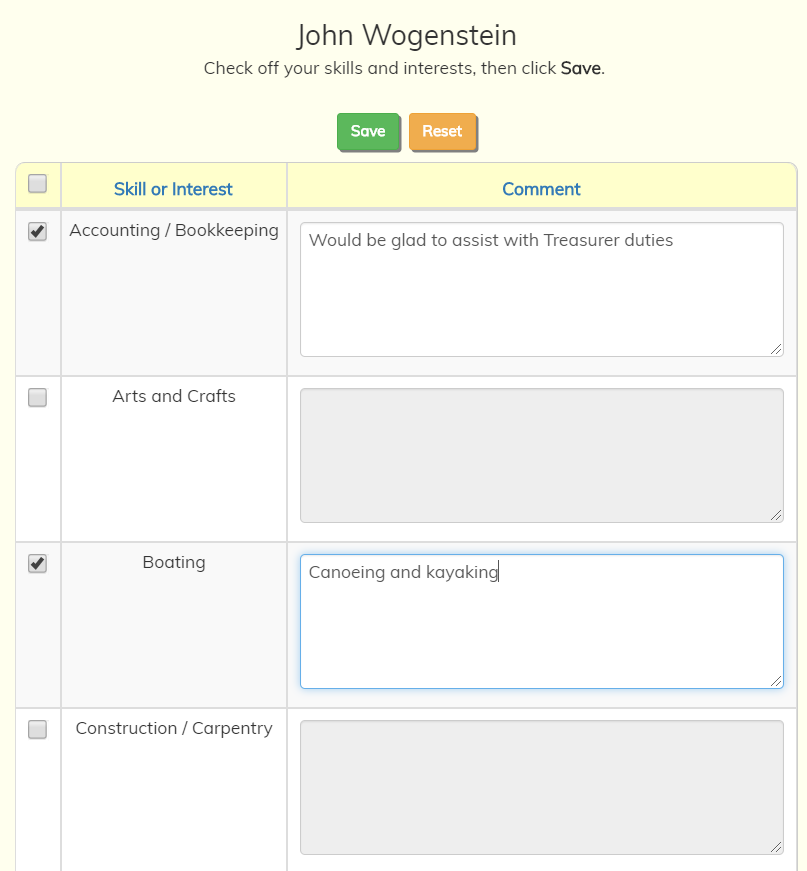
My Skills and Interests
My Skills and Interests lets you indicate the areas in which you could be most useful to your troop.
Simply check off those items that apply to you and write a comment with any useful details, then click Save to save your work.
My Scouts
Go to My Stuff → My Scouts to view a list of the scouts for whom you are a parent or guardian.
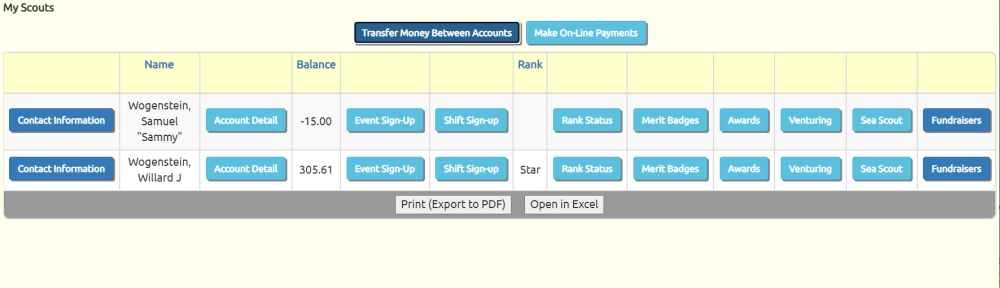
Contact Information will allow you to view or update your scout's membership record
Account Detail will allow you to view your scout's current account balance and transaction history
Event Sign-Up will let you sign up your scout for upcoming campouts and other events
Shift Sign-Up will let you sign up your scout for upcoming shifts
Rank Status lets you view all requirements for every scout rank and your scout's status on each
Merit Badges lets you view all merit badges your scout has earned or has begun
Awards shows all of the awards your scout has earned
Venturing shows your scout's progress on the Venturing ranks
Sea Scout shows your scout's progress on the Sea Scout ranks
Fundraisers allows you to see your scout's sales for any current fundraiser campaign, and print their orders for delivery.
Transfer Money Between Accounts will allow you to create a transaction to transfer money from one member of your family to another.
This will display a page like the one shown below:
![]()
This transaction will reduce the balance of the Charge To Person and increase the balance of the Credit To Person.
You should normally select the "Main" subaccount, unless you want to set aside funds for a specific purpose.
My Account
Go to My Stuff → My Money → My Account to view your current account balance and transaction history, as well as the balances for your scouts.

The Account Balance shown at the top is the sum of all of the transactions shown below.
A negative balance indicates that you are in arrears. A positive balance means that you have that much money in your account.
Negative transactions represent charges to your account. Positive transactions represent deposits to your account.
Click Transfer Between Accounts to transfer money between the accounts of your family members.
Click Make On-Line Payments to go to the On-Line Payments page.
Buy Stuff From Troop
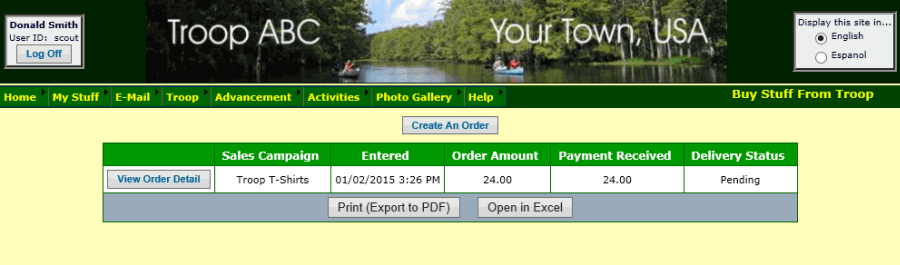
If your troop has created a Members Only sales campaign to sell items, like troop t-shirts, to troop members, you may be able to purchase these items on-line.
If you have been authorized for this function, you will see Buy Stuff From Troop on the My Money submenu on your My Stuff menu.
This will take you to the page shown below.
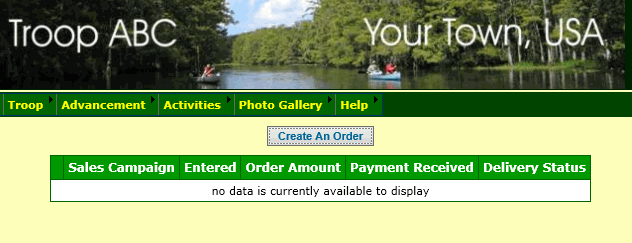
This page displays a list of items you've ordered in the past. The list will be empty if this is your first order.
Click Create an Order to begin the process. This will take you to a page that lists the items available for purchase.
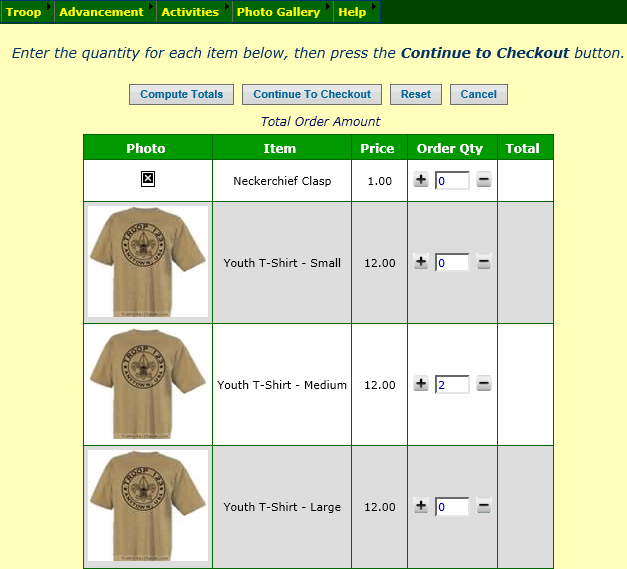
Use the plus (+) and minus (-) controls to set the quantity of each item you wish to order, or simply enter the quantity in the field.
To see the total cost of the order, press the Compute Totals button.
When you have finished selecting items, press the Continue To Checkout button.
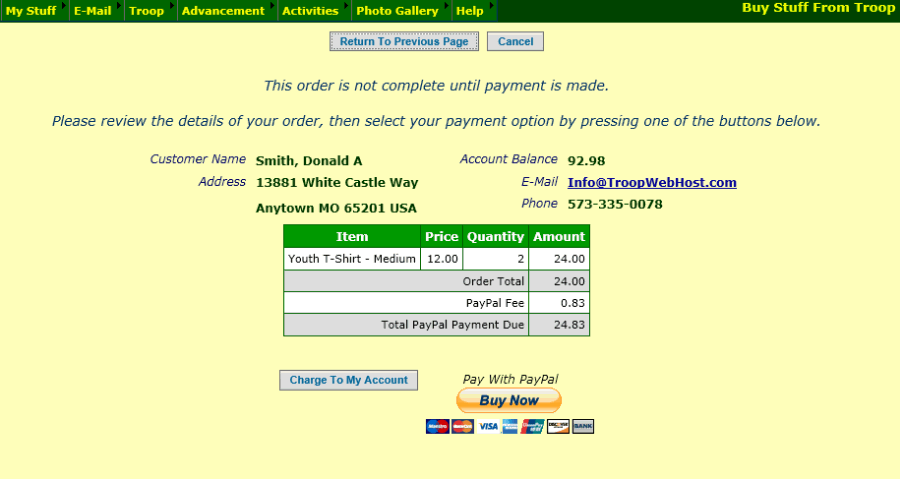
This page shows you the details of your order, along with your current account balance.
Your order will not be considered valid until you pay for it. You have two payment options:
- Pay for it using funds in your individual account. If you have sufficient funds on hand, you will see the Charge To My Account button at the bottom of the page.
- Pay for it using PayPal™. Click the Buy Now button to go to PayPal to complete the payment.
Before clicking either button, review the order for accuracy. Once you complete the payment, you will not be able to change this order.
If you click the Charge To My Account button the system will create a transaction to charge your account for the amount of this order.
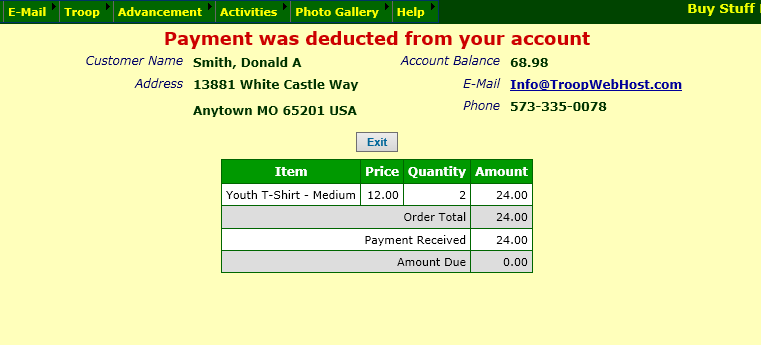
The balance shown on this page is your new balance after deducting the cost of this order.
Click the Exit button to complete this process.
This page now shows your order.
Important Note: When your site was configured, only your site administrator was authorized for this function. If you are not authorized, you will not see this option on your My Stuff menu.
Your site administrator may allow other users to subscribe to the calendar using a security configuration function: Assign Tasks To Roles
You can access this function from Administration → Security Configuration → Assign Tasks To Roles.
Click Update next to the authorized task "Buy Stuff From Troop" to see a page like the one shown below.
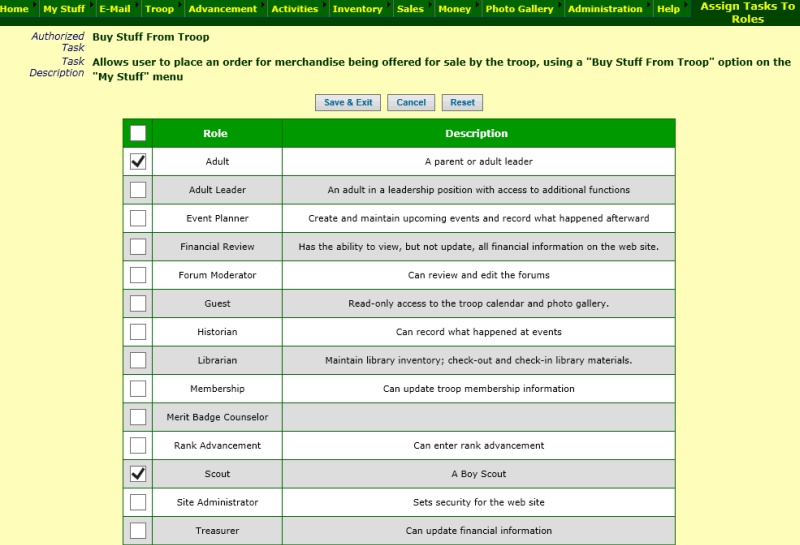
Click on the checkbox next to each User Role that you wish to authorize to purchase items from the troop. Click on the checkbox in the heading of the grid to authorize all User Roles for this task.
Then click Save & Exit to save your work.
On-Line Payments
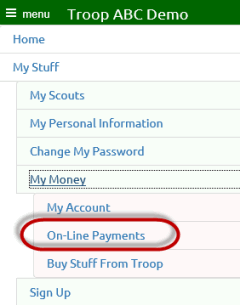 If your troop has configured your site to accept on-line payments via PayPal™ or Square, you will see an item on your My Stuff menu called On-Line Payments.
This will allow you to make credit or debit card payments to your troop.
Please be aware that, if your troop is using the default configuration, the payment processing vendor will deduct its fees from your payment, so that the amount that the troop receives (and which will be credited to your account) may be less than the amount you paid.
To begin, go to My Stuff → My Money → On-Line Payments to see a page like the one shown below. (If your troop has opted to absorb the credit card transaction fee, the screens you see will be slightly different than shown below.)
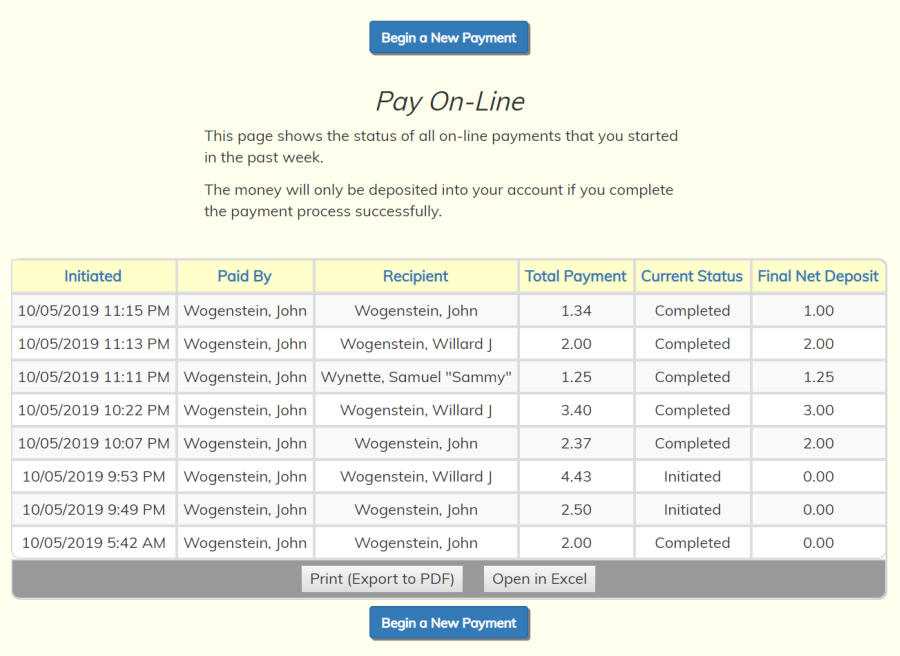
The grid on this page shows the status of recent payments that you started to make using this feature. The payment will not show up in your My Account transaction list until it has been successfully completed.
Click on Begin a New Payment to go to the screen below.
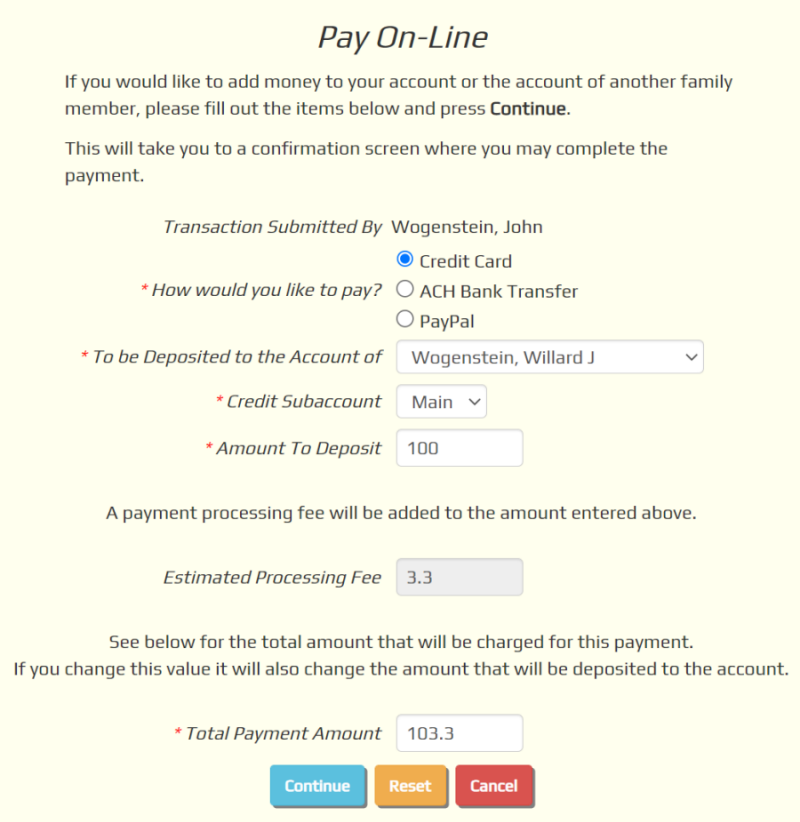
The page shown above may look different from what you see, depending on what options your site has configured.
So, for example, the you may not see all of the payment options shown for How Would You Like To Pay? Your site may not be configured for all of these options, which may include:
- Credit Card. If you choose this option, the next page will prompt you for your credit card details. This is the quickest and easiest payment method.
- ACH Bank Transfer. This payment method has the lowest fee for payments over $25. If you choose this option, you will be taken to a series of screens to access your bank account to authorize the transfer.
- PayPal. If you choose this option, the next page will display a button that will take you to the PayPal site. From there you can log on to your PayPal account, or make a credit card payment as a guest.
All of these services charge a fee for processing the payment. If your troop requires you to pay this fee, you will see the estimated fee in the lower portion of the page, as the Estimated Processing Fee. Below that you will see the Total Payment Amount, which includes that fee. This fee will vary depending on the payment method you select. Select a different payment method to see its fee.
On the other hand, if your troop has chosen to absorb the processing fee, you will just be charged the amount that you entered into the Amount To Deposit field.
Next, select yourself or one of your family members from the drop-down list To be Deposited to the Account of. Once your payment is approved, it will be applied to the balance of this person's account.
The Amount To Deposit is the amount you intend to deposit to your troop account.
The Estimated Processing Fee is the estimated amount of the fee that payment processing vendor charges for this service.
The Total Payment Amount is the amount that will be charged to your credit or debit card, or transferred from your PayPal account.
You can enter a new value in Total Payment Amount and the system will recalculate the estimated fee and amount to deposit to your account.

In the example shown above, the user entered 100 in the Amount To Deposit and the system calculated that this would require a payment of 103.30.
Click the Continue button to proceed.
If you chose the Credit Card payment option, you will see a page that looks like this:
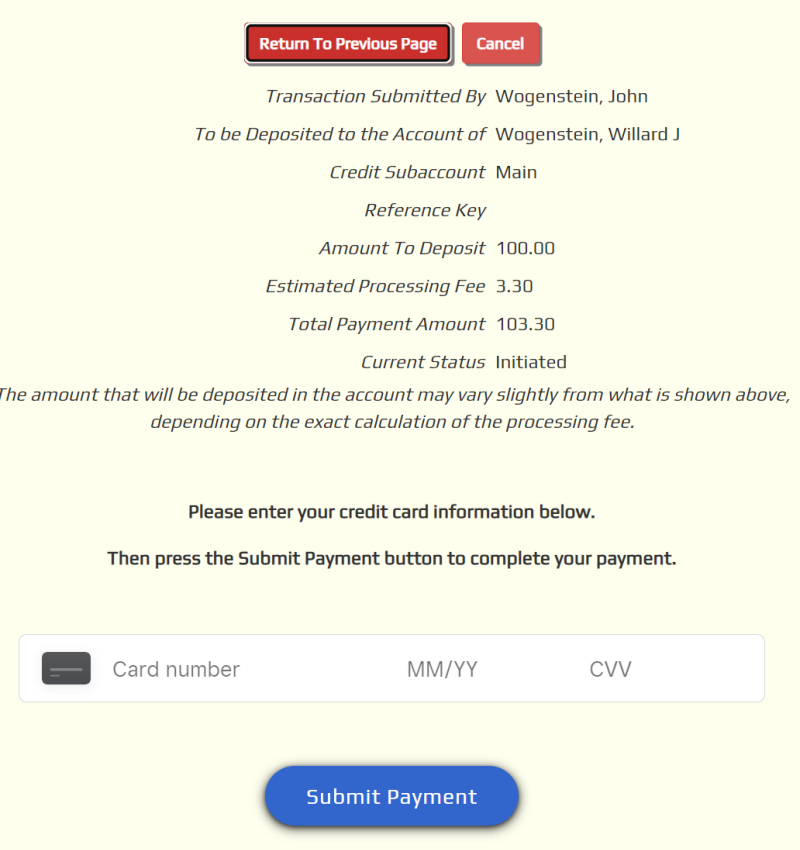
Enter your credit card number, expiration month and year, CVV (the 3 or 4 digit code on the back of your card), and your zip code, then click the Submit Payment button. If the payment is successful, you will be returned to the initial On-Line Payments page, where you will see this new payment at the top of the list.
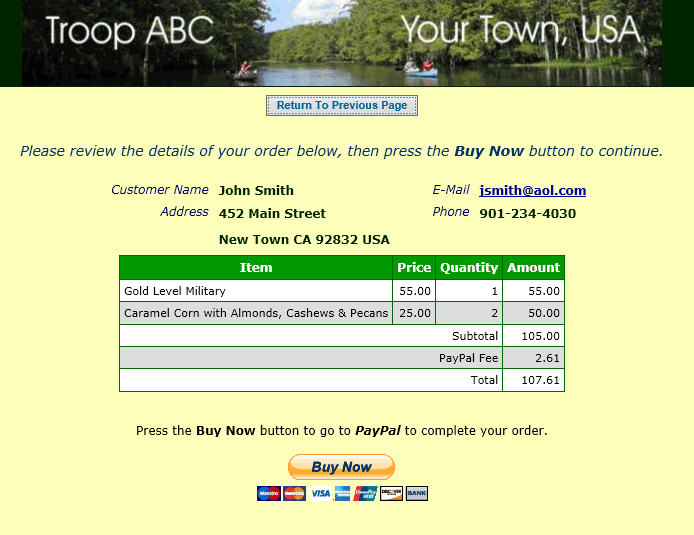
If you chose the PayPal payment option, you will see a page like this:
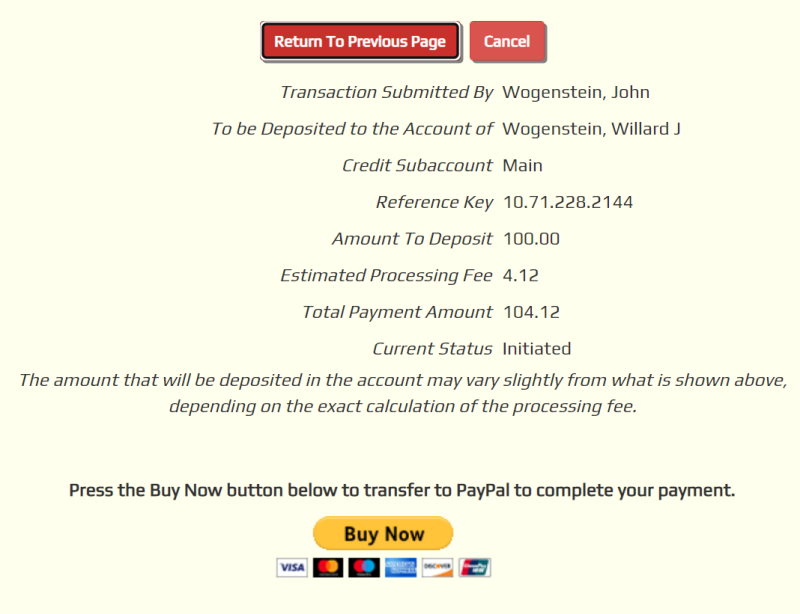
Click the Buy Now button to be transferred to the PayPal site to complete your payment. Good luck!
If you chose ACH Bank Transfer, you will see a page that looks like this:
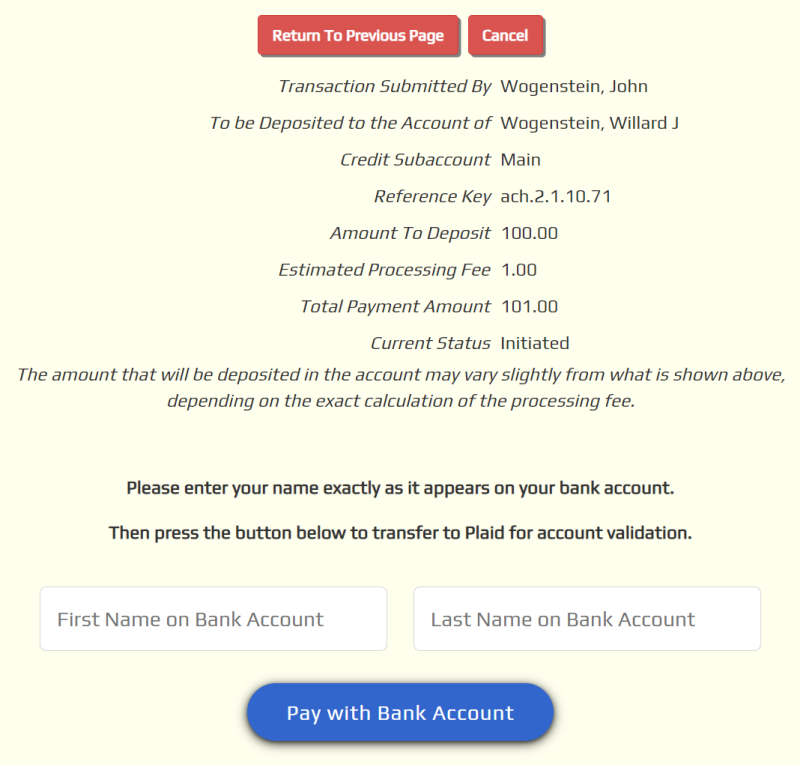
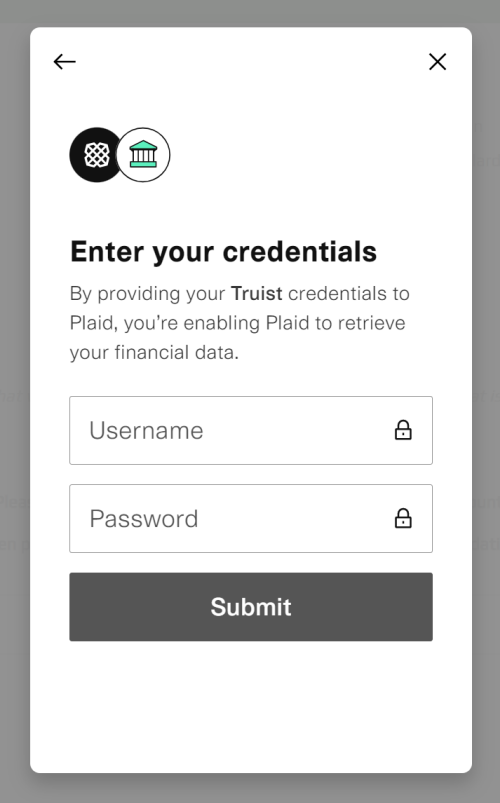
Here you will begin to identify your bank account by entering the first and last name of the primary bank account holder. Fill in these fields, then press the Pay With Bank Account button to continue.
You will then see a pop-up window appear in the middle of the page. The forms displayed in this pop-up window are coming from a company called Plaid. This information will not be seen by TroopWebHost, or by the Square credit card processing company that has arranged with Plaid to perform ACH bank transfers. This type of payment takes three days to process.
The company named Plaid has contracted with all of the major banking institutions in the United States to access their accounts for the purpose of performing ACH transfers. They operate under the strictest security standards to keep this information safe.
The first Plaid pop-up looks like this:
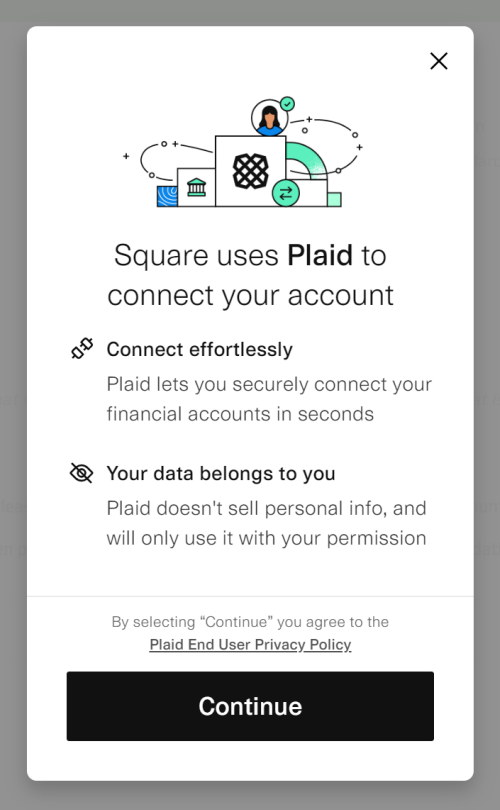
Press Continue to see a page where you will select your bank.
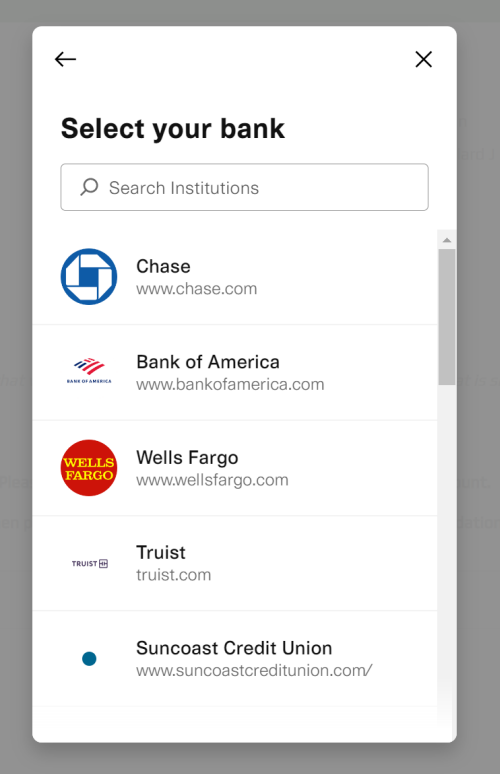
Scroll down the list to find your bank, or use the search box to filter the list.
You will then be asked to log on to your account at that bank. Enter the user ID and password that you would normally use when you do your on-line banking.
From this point, the process may vary depending on your bank. You may be asked to have a verification code sent to your phone. You may then be asked to select the specific account (e.g., checking vs. saving) from which you wish to transfer the money.
Once this process is completed you will return to the last TroopWebHost page you saw. Be patient! After a few seconds this will return to the list of your on-line payments, with your latest payment at the top.
Please note: ACH payments will take three business days to complete. This payment will not be credited to your account in TroopWebHost until that time.
On-Line Payments Status Information
ACH on-line payment - Square
"Initiated" payments represent those where a member started an online payment but did not complete the transaction. The members' bank account should not be charged. Those "initiated" payments will automatically disappear from the member's On-Line Payments page in seven days. They will still appear in the Money → Mange On-line Payments → On-Line Payment History but no action is necessary on them. These are here for reference only.
"Pending" payments represent those where a member started an online payment and completed the transaction in TroopWebHost. We are waiting for Square/Plaid to complete the processing for the transaction. "ACH payments take three business days to complete. This payment will not be credited to your account in TroopWebHost until that time.". If you do not see a transaction posted in TroopWebHost on a timely basis, the best place to start is to check your unit's Square account to see if the transaction was posted.
"Completed" payments are those where Square/Plaid has completed processing the ACH payment and the members' bank account was charged. The unit should have received the funds in your unit's bank account. Entries should be automatically made to credit the members account and the linked troop account in TroopWebHost.
The "Reference Key" for an ACH transaction should start out with "ACH". For example: "ach.2.1.1260.123"
Credit and Debit Card on-line payment - Square
"Initiated" payments represent those where a member started an online payment but did not complete the transaction. The card/account entered should not be charged. Those "initiated" payments will automatically disappear from the member's On-Line Payments page in seven days. They will still appear in the Money → Manage On-line Payments → On-Line Payment History but no action is necessary on them, there are here for reference only.
"Completed" payments are those where Square has completed processing the credit/debit card payment. The member was charged, and the unit should have received the funds.
The funds from credit/debit card transactions are available immediately, assuming the credit card transaction went through and was approved. The reason for this is the risk for the payment is assumed by the credit card company.
The "Reference Key" for a Square transaction where a debit or credit card was the payment form submitted by the member should start out with "Square". For example: "Square Jc8teItnZaArqHXZtIqPnwyiiUTRD
Request Expense Reimbursement
Go to My Stuff → My Money → Request Expense Reimbursement to submit a request to be reimbursed for an expense you incurred for a camping trip or other event.
This function must be enabled by your treasurer or site administrator before you see it on your menu.
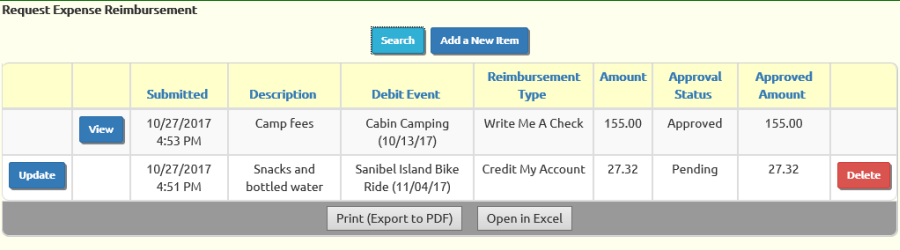
This page shows past requests that you've submitted. Requests that are still pending can be updated. Those that have been approved or rejected may be viewed.
Click Add a New Item to submit a new request.
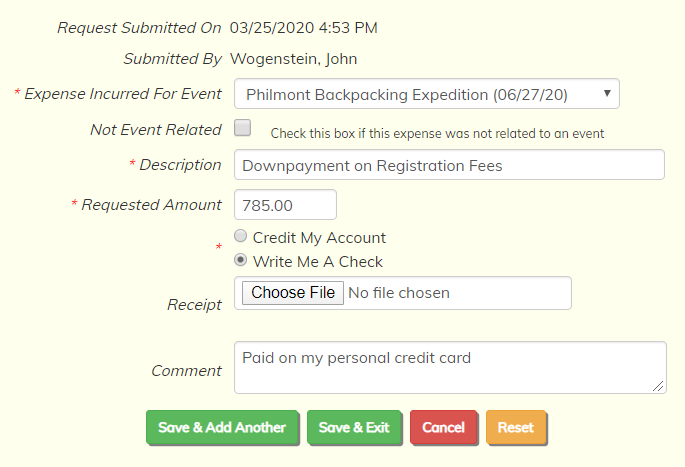
Begin by selecting the event for which the expense was incurred. If the expense was not for a specific event, click the Not Event Related checkbox directly below.
The Description should briefly describe the item that was purchased.
The Requested Amount is the amount you spent on this item.
You can be reimbursed in one of two ways:
- Select Credit My Account to have the treasurer issue a credit to your account, or that of a family member, for the amount of the expense.
- Select Write Me A Check to ask the treasurer to make a direct payment to you, typically in the form of a check.
If you choose Credit My Account, you will be able to select which member of your family whose account will be credited.
You may upload an image of the receipt for this purchase.
Use the Comment field to provide a further explanation of this request.
Click Save & Add Another or Save & Exit to save this request.
Sign Up For Upcoming Events
You can let the troop know that you plan to attend a future event by going to My Stuff → Sign Up → Sign-Up For Events.
This will display all of the events which allow sign-up that are on the calendar in the days ahead, as shown below.

Click on the Yes button next to each event you plan to attend. Click the No button next to the ones you do not plan to attend.
If this event allows guests, you may enter the number of guests you plan to bring in the box provided. You may wish to enter the names of your guests in the Comment field.
If you are an adult who plans to drive, you can indicate that by checking the box in the column labeled Driver? You will then be asked if you are driving both to and from the event, and the total number of seats in your vehicle. The number of seats will default to the number you provided on the My Personal Information page.
The Comment can also be used to note any special situations like "Need to leave early due to family commitment."
Be sure to press the Save button to save your work! The system will redisplay this page.
Sign Up For Upcoming Shifts
Your troop may set up Shifts for an upcoming event, like a Christmas tree fundraiser.
This lets the troop keep track of who will be working each shift.
Shifts may also be used to sign up for the type of food you are bringing to a potluck dinner, or the type of equipment you are bringing to an Eagle project.
You can sign up for upcoming shifts by selecting Sign-Up For Shifts from the Sign Up submenu on the My Stuff menu.
This will display all of the upcoming shifts, as shown below.
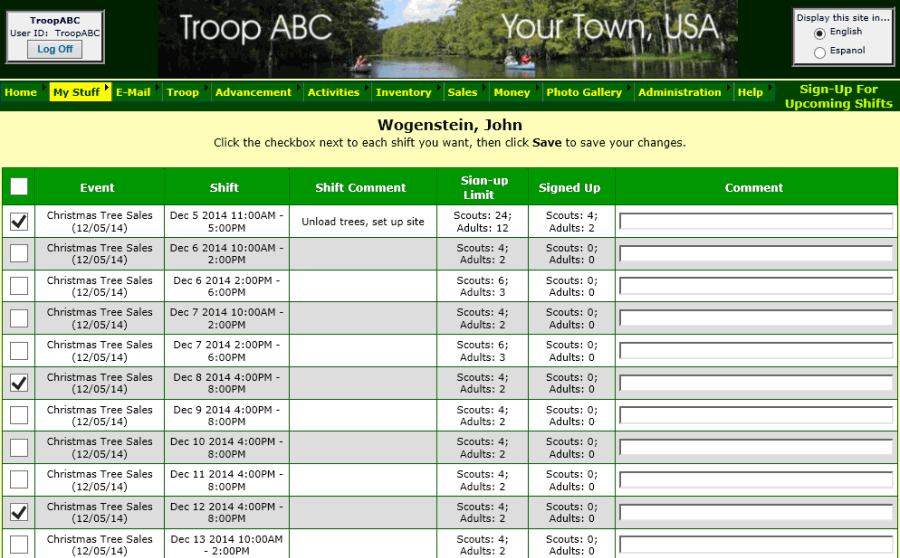
Click on the checkbox next to each shift you want to sign up for.
You may want to enter a comment if you have any special circumstances with regard to this shift.
Be sure to press the Save button (at the bottom of the page) to save your work! The system will then redisplay this page.
Surveys
If you see a list of open survey questions on your Home page, you can click on any of the questions to go to the Surveys page.
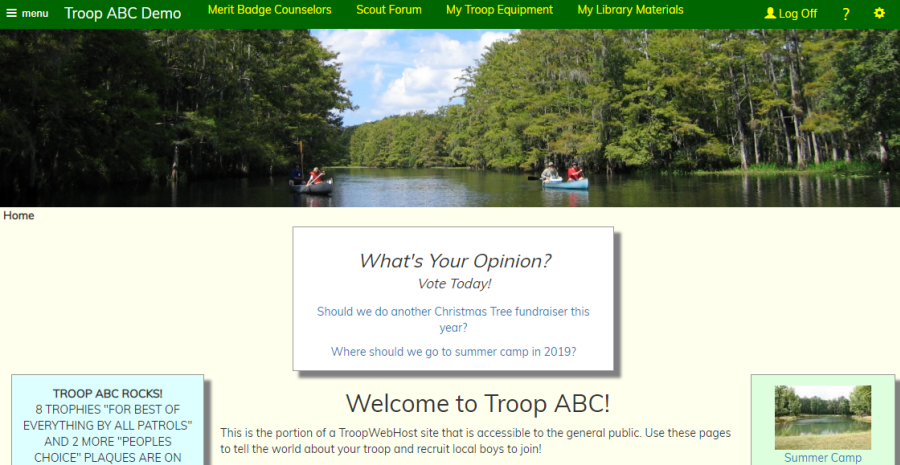
You can also go to My Stuff → Surveys to access this page.
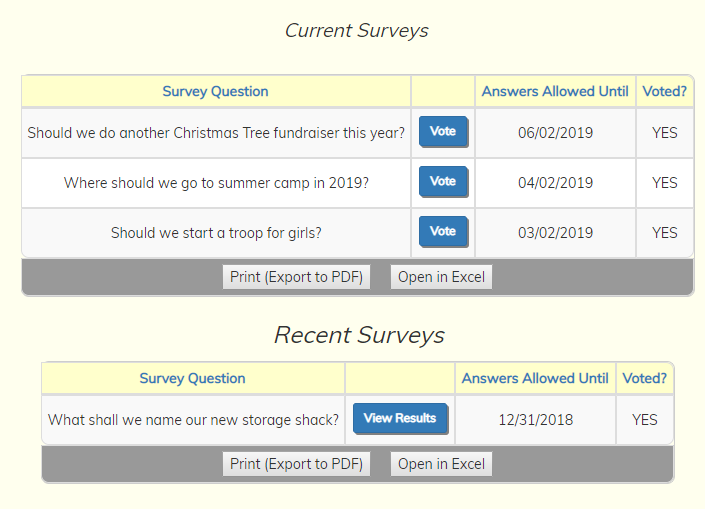
The first grid shows those questions that are currently open, meaning that you can still vote on them. Click the Vote button to respond to that question.
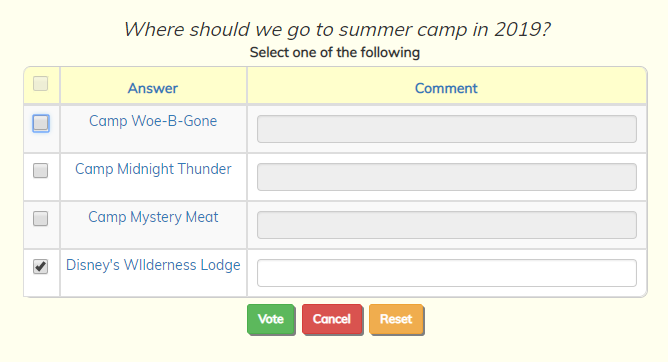
Put a checkmark next to the answer you favor. Some surveys may allow you to vote for more than one.
You can enter a comment next to the answer that you've voted for.
Click Vote to save your vote.
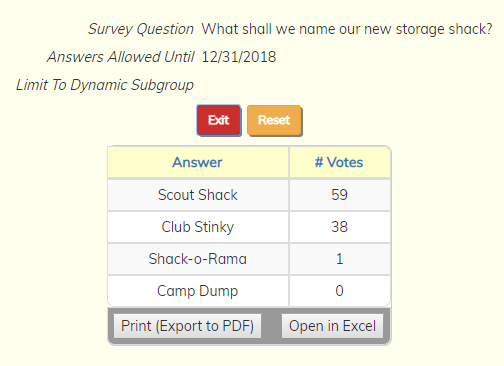
The second grid on the opening page allows you to see the results of surveys that are no longer open for voting. Click View Results to see the number of votes received by each answer.
Subscribe to Calendar
Authorized members of the troop can subscribe to your troop calendar from Google Calendar™ and other calendar software. This will cause Google Calendar, or whatever calendar you choose, to display events from your troop calendar.
To begin, select Subscribe to Calendar from the My Stuff menu.
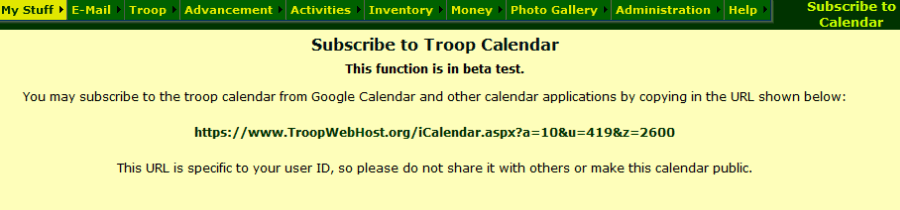
This page displays the URL that you can use to subscribe to your troop calendar.
This URL is specific to your User ID. If your User ID is terminated or if you become unauthorized for this function, your subscription will be disabled.
To subscribe to your troop calendar from Google Calendar™, please follow the instructions posted by Google here: http://support.google.com/calendar/bin/answer.py?hl=en&answer=37100. Follow the directions under the section titled "Use a link to add a public calendar".
To subscribe to your troop calendar from Yahoo! Calendar™, please follow the instructions posted by Yahoo here: https://help.yahoo.com/kb/SLN4707.html
To subscribe to your troop calendar from Hotmail™ (also known as Outlook.com), please follow the instructions posted by Microsoft here: http://windows.microsoft.com/en-us/windows/outlook/calendar-import-vs-subscribe?woldogcb=0
To subscribe to your troop calendar from an iPhone™ or iPad™, please see the instructions posted here: https://www.macrumors.com/how-to/subscribe-to-calendars-on-iphone-ipad/
Other tablets and smart phones will allow you to subscribe to calendars in a similar fashion.
Please be aware that calendar synchronization is not instantaneous. If you add an event to your calendar, we will make it available immediately from our URL. But Google Calendar, for example, may not pick it up until the next day. This is outside of our control and is purely a factor of how their calendar application has been designed.
Important Note: When your site was configured, only your site administrator was authorized to subscribe to the calendar. If you are not authorized, you will not see this option on your My Stuff menu.
Your site administrator may allow other users to subscribe to the calendar using a security configuration function: Assign Tasks To Roles
You can access this function from Administration → Security Configuration → Assign Tasks To Roles.
Click Update next to the authorized task "Subscribe to Calendar" to see a page like the one shown below.
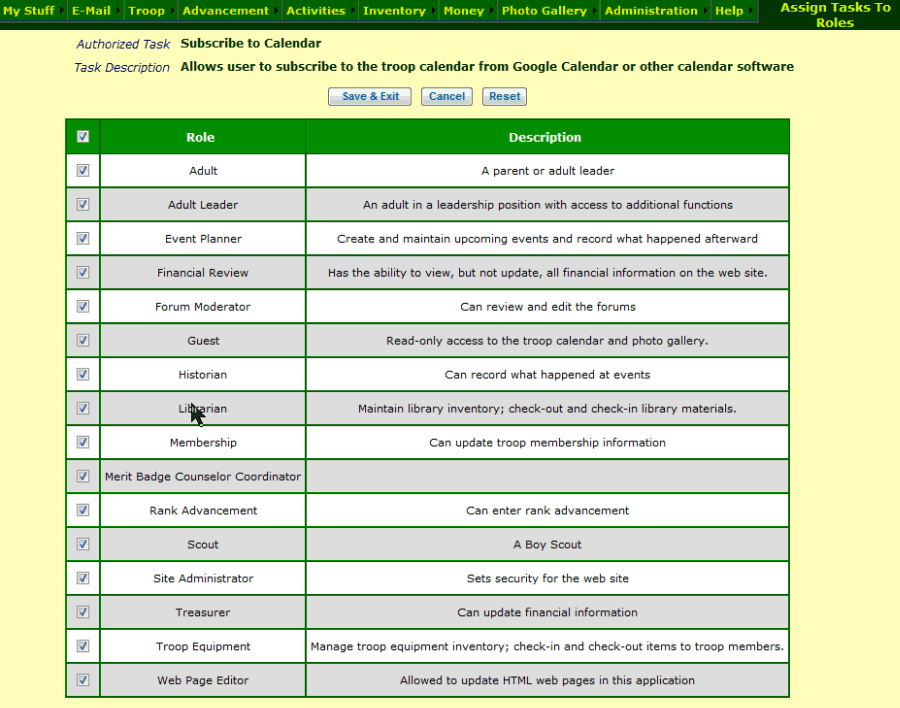
Click on the checkbox next to each User Role that you wish to authorize to subscribe to your troop calendar. Click on the checkbox in the heading of the grid to authorize all User Roles for this task.
Then click Save & Exit to save your work
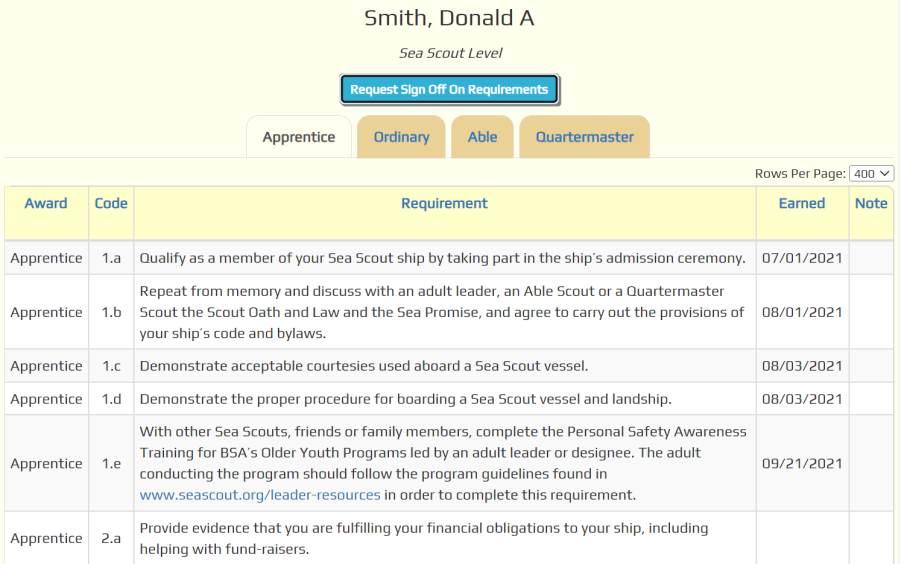
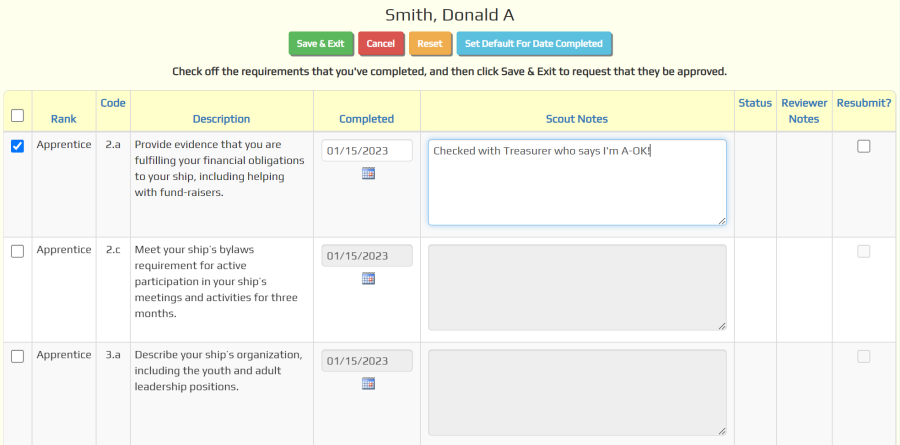
My Rank Advancement
Scouts can view their advancement status and request sign off on rank requirements by going to My Stuff → My Rank Advancement.
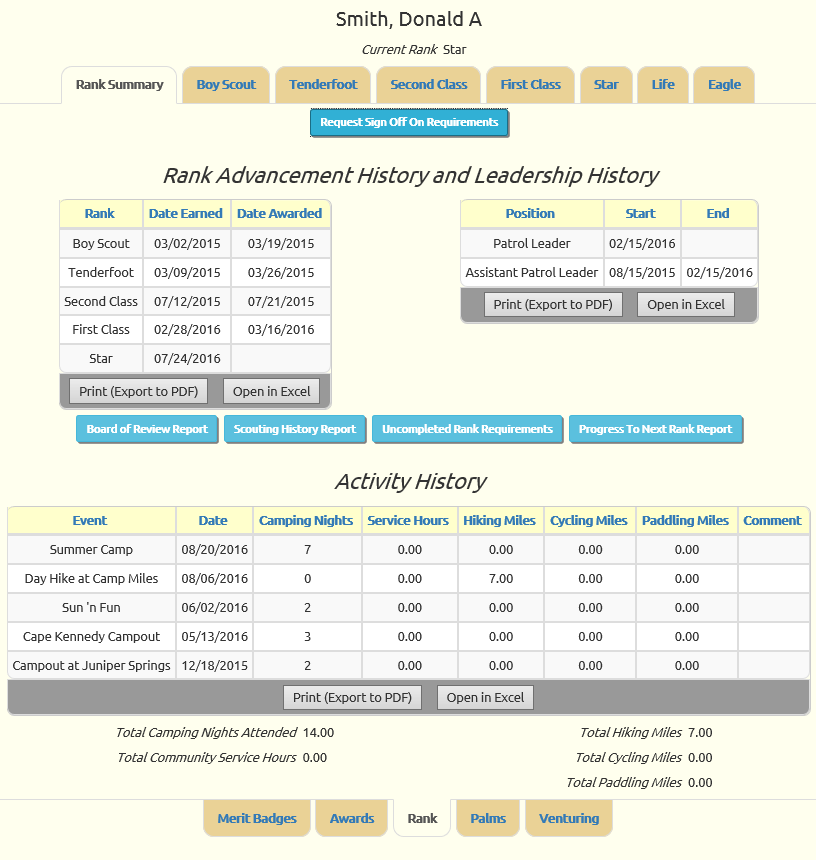
The first tab shows a summary of his status, including when he earned each rank, his leadership history, and participation in troop events.
Click on one of the other tabs to view the requirements for that rank and see which ones you've completed.
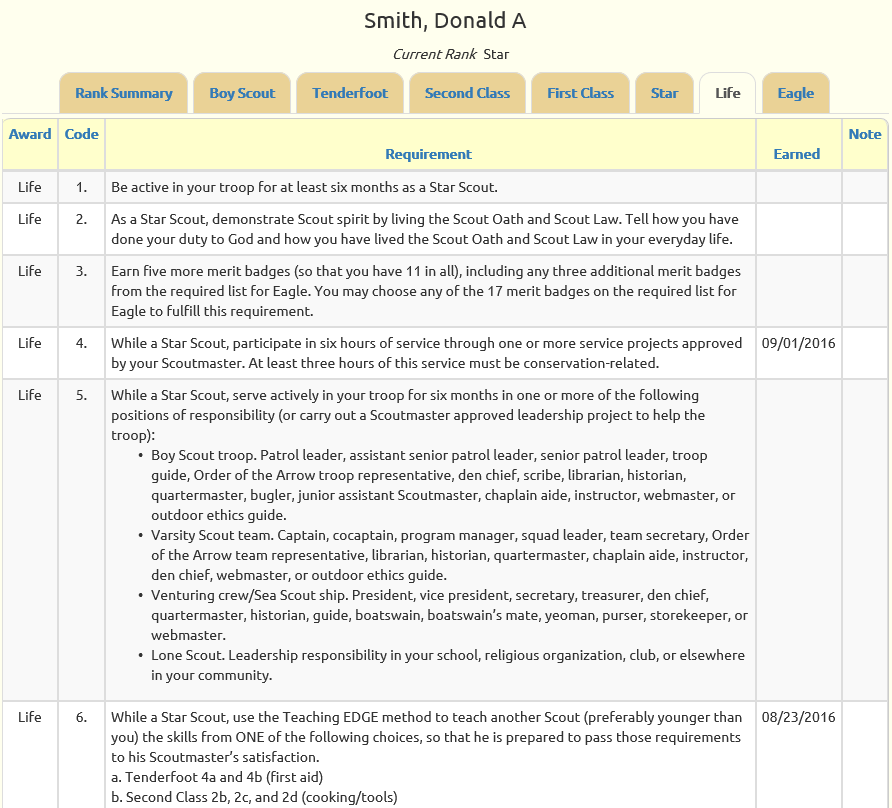
This helps you determine what you need to do to earn your next rank.
The Rank Summary tab has a button to Request Sign Off On Requirements:
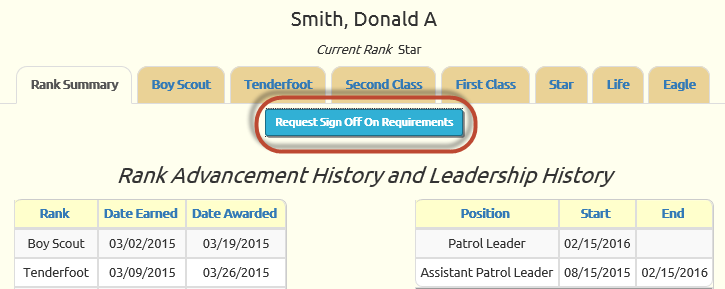
Press this button to view a list of outstanding requirements.
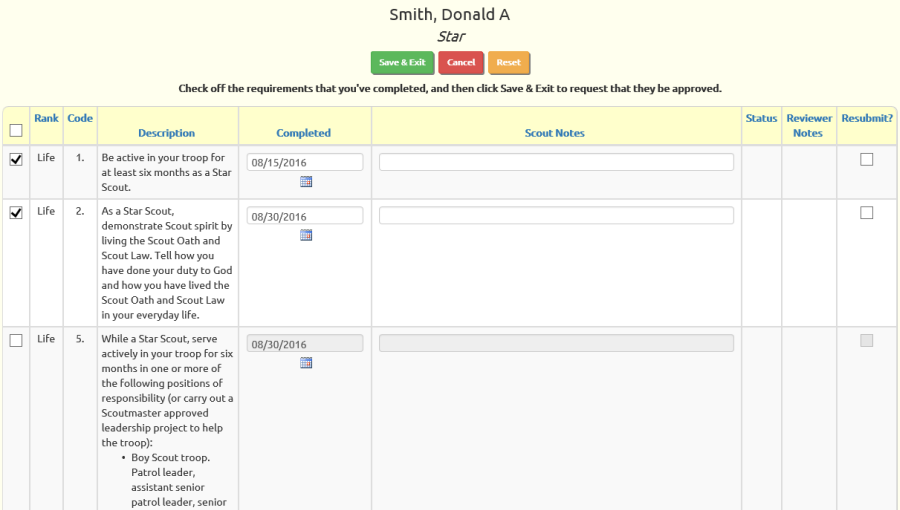
For scouts working toward First Class, this list will show all requirements not yet completed, from the Scout, Tenderfoot, Second Class and First Class ranks.
For scouts working toward a higher rank, it will show all requirements not yet completed for their next rank.
Check off the requirements that you've completed. This will let your advancement leaders know that you are ready to have those requirements signed off.
Click Save & Exit to submit your requests.
My Merit Badges
Scouts can see all of the merit badges they've worked on and see which requirements are still outstanding by going to My Stuff → My Merit Badges. They can also indicate requirements that have been completed and request that they be signed off.
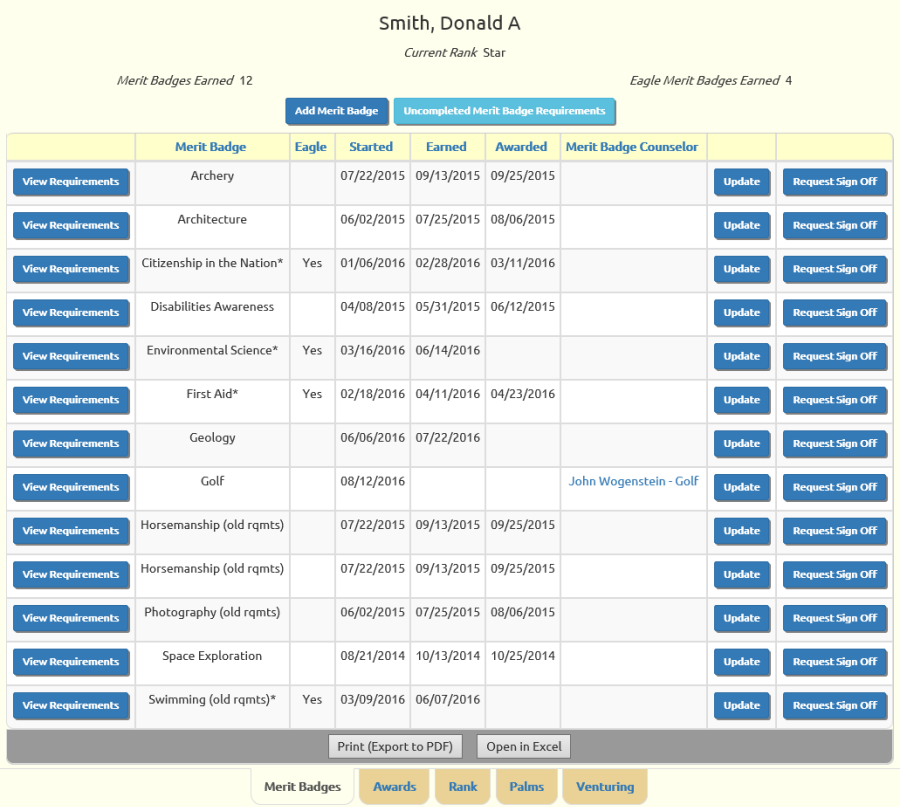
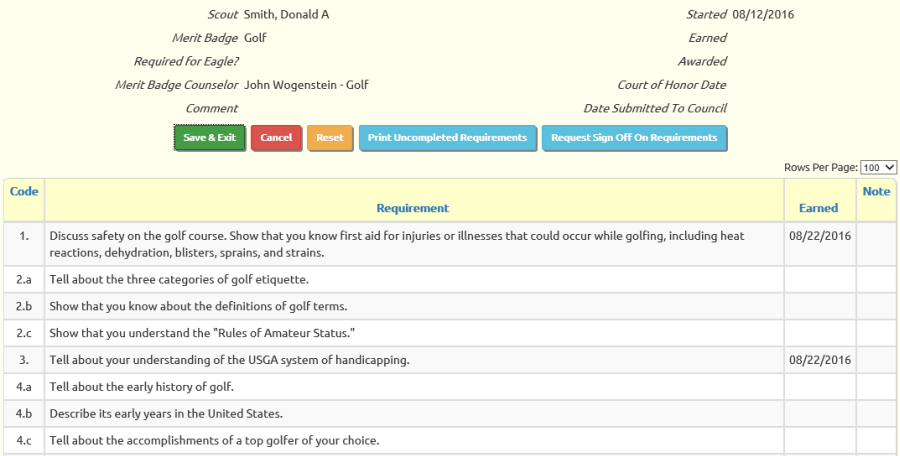
Click the Requirements button to see the requirements for that badge and which ones you've completed.
If none of the requirements are marked complete but the Earned date in the upper right corner has a value, then your troop awarded you this badge without signing off individual requirements, or loaded this badge from another system when your troop transitioned to TroopWebHost. This is not a problem and you don't need to worry about these requirements.
If this is a badge you are still working on, note the button to Request Sign Off On Requirements:
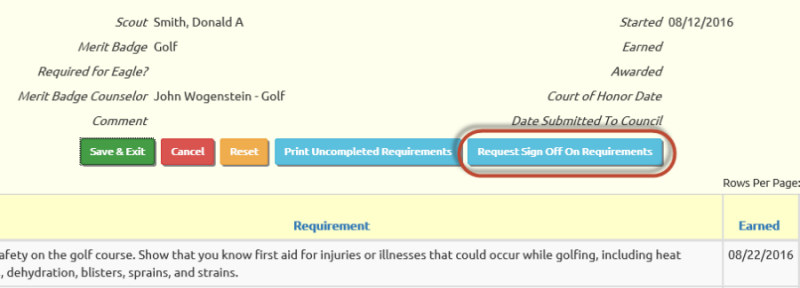
Press this button to view a list of outstanding requirements for this merit badge.
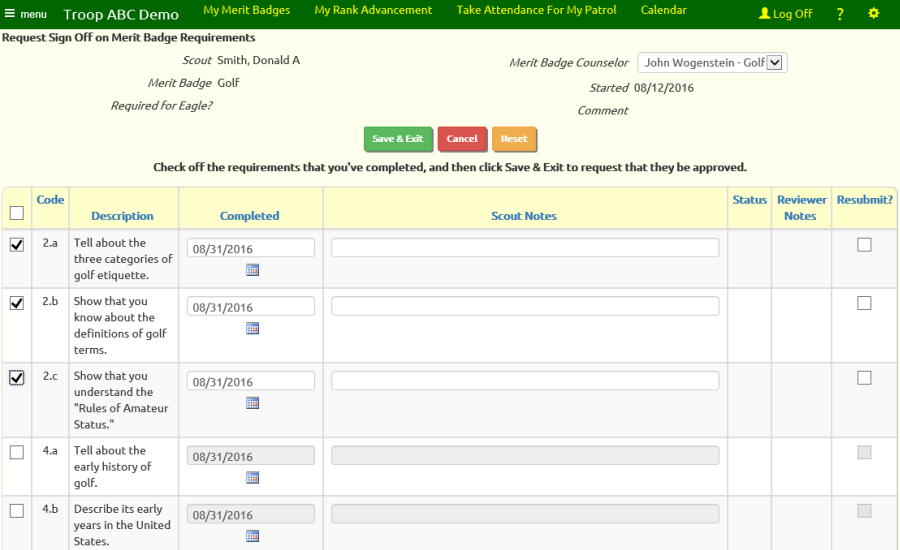
This list only shows the requirements that have not yet been marked complete by your merit badge counselor or advancement leader.
Check off the requirements that you've completed. This will let your advancement leaders know that you are ready to have those requirements signed off.
Click Save & Exit to submit your requests.
My Venturing
Scouts who participate in the Venturing program can view their Venturing advancement status by going to My Stuff → My Venturing.
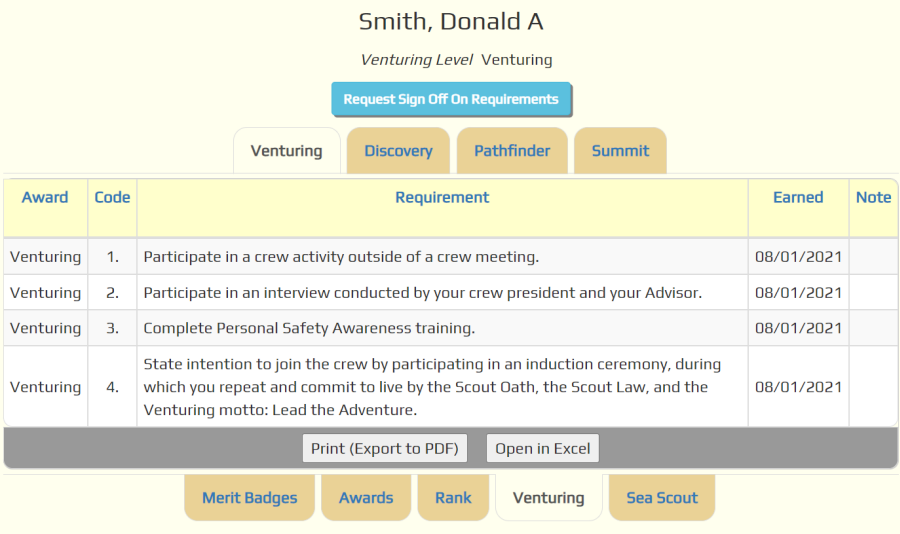
Use the tabs at the top of the page to view the requirements for the corresponding Venturing rank.
Use the tabs at the bottom of the page to go to another type of advancement.
Click Request Sign Off On Requirements to go to the following page where you may indicate requirements that you believe are completed and ready to be signed off.
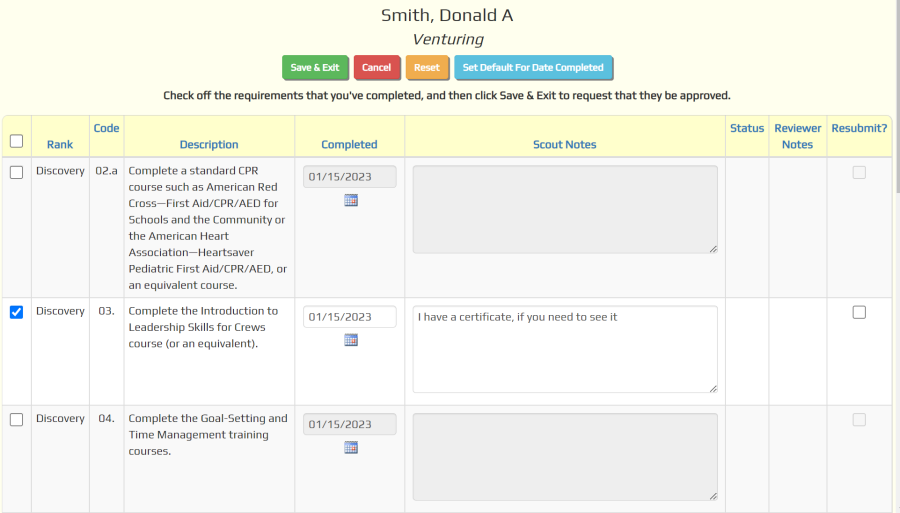
This page shows all of the outstanding requirements for the next Venturing rank that you have yet to earn. Put a checkmark next to each requirement that you believe you have completed by clicking on the checkbox.
These requests will be routed to your advancement leader, who will decide whether or not to accept them as complete.
My Sea Scouts
Scouts who participate in the Sea Scout program can view their Sea Scout rank advancement status by going to My Stuff → My Sea Scouts.
Use the tabs at the top of the page to view the requirements for the corresponding Sea Scout rank.
Use the tabs at the bottom of the page to go to another type of advancement.
Click Request Sign Off On Requirements to go to the following page where you may indicate requirements that you believe are completed and ready to be signed off.
This page shows all of the outstanding requirements for the next Sea Scout rank that you have yet to earn. Put a checkmark next to each requirement that you believe you have completed by clicking on the checkbox.
These requests will be routed to your advancement leader, who will decide whether or not to accept them as complete.
My Library Materials
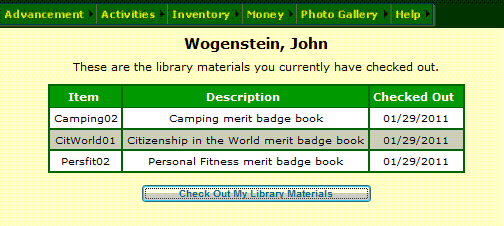 When you check out
a merit badge book or other resource from the Troop Library, it should be logged in the system.
When you check out
a merit badge book or other resource from the Troop Library, it should be logged in the system.
Go to My Stuff --> My Library Materials to view the items that are currently checked out to you.
An example is shown at right.
Some troops allow members to check out their own items. To do this, click on Check Out My Library Materials.
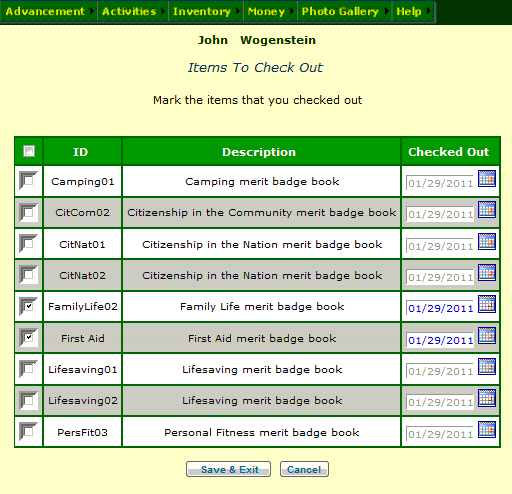 This will
take you to a page that lists all of the library materials that are not currently checked out to anyone.
This will
take you to a page that lists all of the library materials that are not currently checked out to anyone.
Click on the box to the left of each item that you've checked out.
Notice that the date you checked out the item is automatically set to the current date; you can change this to an earlier date if that is more accurate.
Be sure to press the Save button to save your work! The system will redisplay this page.
My Troop Equipment
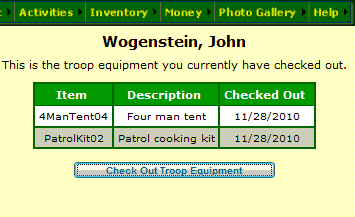 When you check out
a tent or other camping gear from the troop inventory, it should be logged in the system.
When you check out
a tent or other camping gear from the troop inventory, it should be logged in the system.
Go to My Stuff --> My Troop Equipment to view the items that are currently checked out to you, as shown at right.
Some troops allow members to check out their own items. To do this, click on Check Out My Troop Equipment.
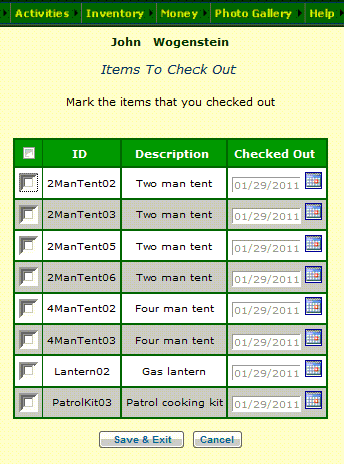 This will
take you to a page that lists all of the troop equipment that is not currently checked out to anyone.
This will
take you to a page that lists all of the troop equipment that is not currently checked out to anyone.
Click on the box to the left of each item that you've checked out.
Notice that the date you checked out the item is automatically set to the current date; you can change this to an earlier date if that is more accurate.
Be sure to press the Save button to save your work! The system will then redisplay this page.
My Fundraiser Sales
If your troop is using TroopWebHost to manage fundraiser sales, you may be authorized to enter your orders directly into the system.
If you are authorized for this function, you will see My Fundraiser Sales on the My Stuff menu.
This page allows you to enter and review orders that you've received for troop fundraisers, like the annual popcorn sales.
It begins by showing you a list of the orders you've already entered into the system.
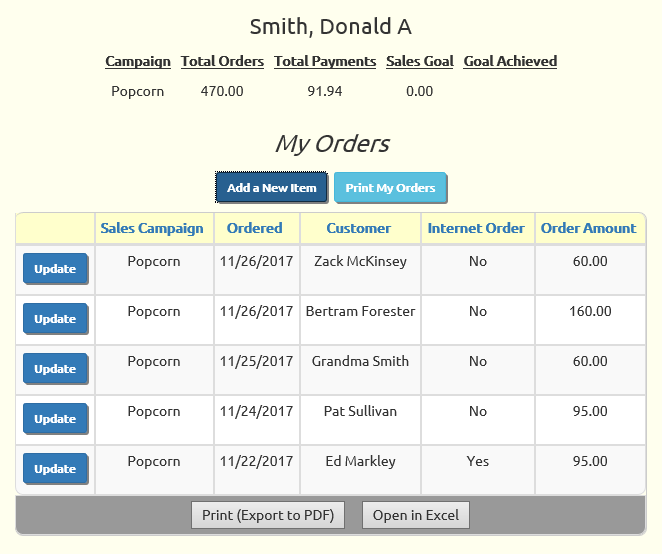
Click Print My Orders to print a delivery report that shows the details of each order on a separate page.
Click Add a New Item to begin entering a new order.

Begin by selecting the Sales Campaign this order is associated with. Often there will only be once choice on this list, which will be the current fundraiser.
Then enter the date of this order. This defaults to the current date, which is always a good choice.
You must enter the Customer Name so you know who this order should be delivered to.
The Address, E-Mail, and Phone fields are all optional, but they will help you remember where to deliver the order and how to contact this customer.
Do not select a choice from the Paid By list unless you've actually received payment from this customer for this order.
Click the Continue button to proceed to the next screen where you will select the items that were ordered.
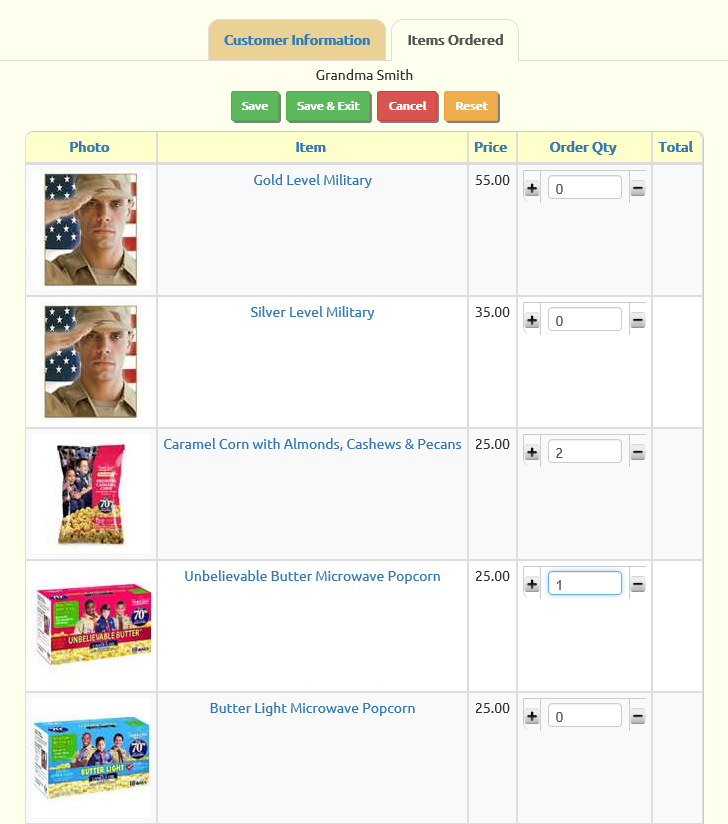
This page shows a list of all of the items available for this sales campaign.
Type the quantity ordered into the Order Qty box for each item, or use the Plus (+) and Minus (-) buttons to increase or decrease the quantity.
Click Save to save this order and see the extended totals.
Click the Customer Information tab to review the rest of the information on this order and see the total amount for the order.
Click Save & Exit to return to the list of all of your orders.
My Sales Prize & Personal URL
If your troop is using TroopWebHost to manage fundraiser sales, you may be able to select your sales incentive prize on-line. You may also be able to view your Personal URL which your customers can use to enter their orders on-line.
Select My Sales Prize & Personal URL from the My Stuff menu to see a page like the one shown below.
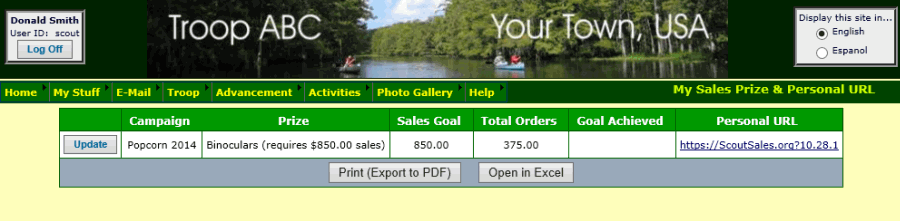
This only shows fundraisers that are currently in progress. If the list is empty, it means that your troop is not currently running a fundraiser.
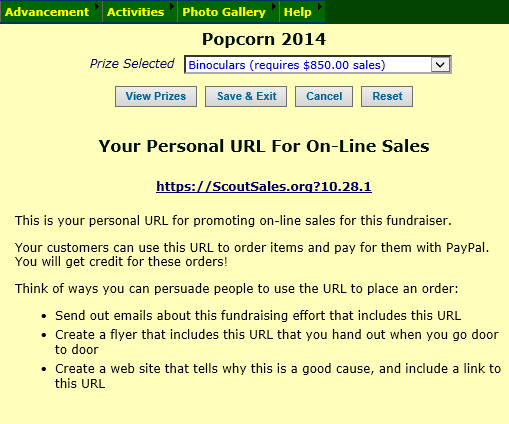
Click the Update button to change your prize selection and to learn more about using your Personal URL.
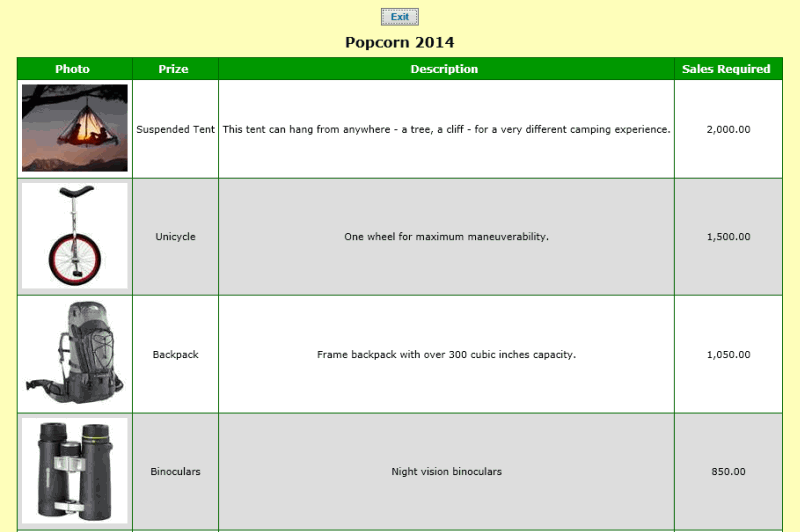
Note the View Prizes button, which will take you to another page (shown further down this page) where you can see more information about all of the prizes offered for this fundraiser.
You can change your prize selection by selecting a different item on the drop down list. Be sure to click Save & Exit to save your choice.
If your troop has set up this fundraiser for on-line sales, you will see information about your Personal URL in the lower half of this page.
Your Personal URL is a web address that you can give out to potential customers. If they go to this address they will be able to place an order and pay for it immediately with PayPal.
You will receive credit for any orders that come in through your Personal URL, just as if you had sold them in person!
When you tell people about your Personal URL, be sure to include the numbers at the end. Those numbers identify you as the salesperson.
The View Prizes button will take you to a page that looks like this. It shows all of the prizes available for this fundraiser.
When your customers use your Personal URL, they will go to a page that looks like this:
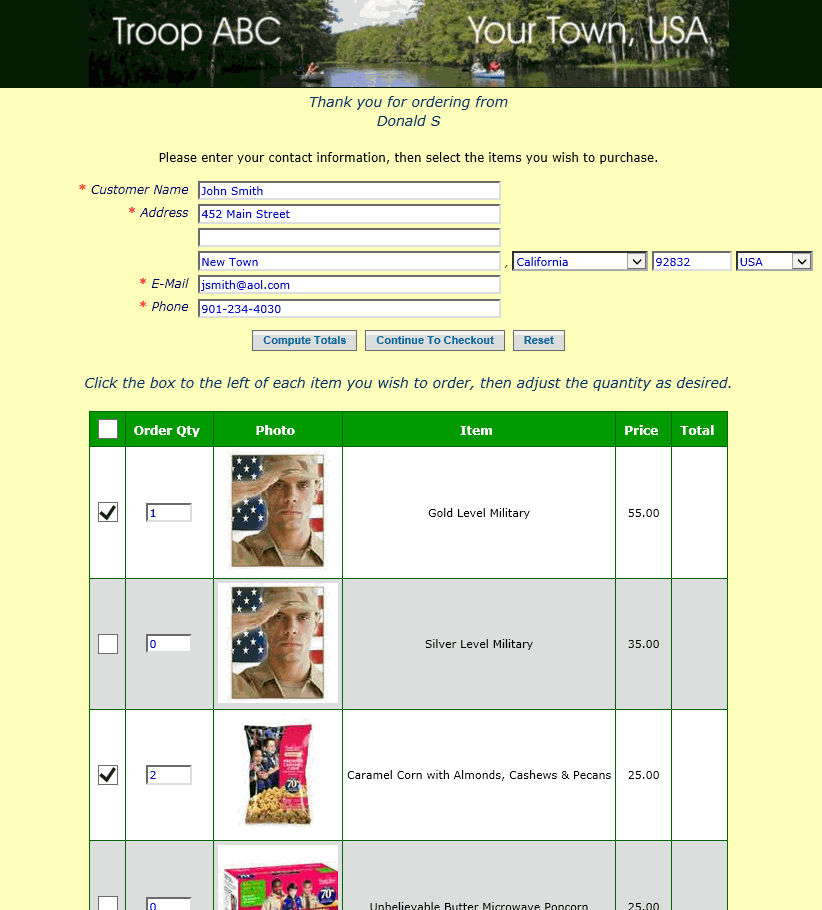
Once they fill in the form and select the products they wish to purchase, the Continue button will take them to an order confirmation page.
The Buy Now button will take them to PayPal, where they
can pay for this order.
The order will not be considered complete until they've completed their PayPal payment.
My Training History
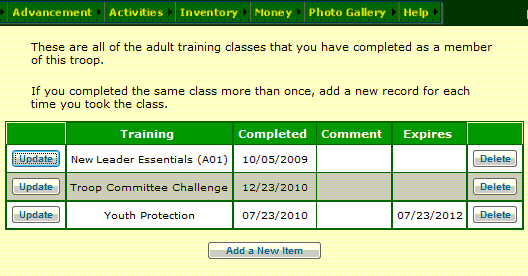 Your troop can keep track of all
its adult leadership training with TroopWebHost.
Your troop can keep track of all
its adult leadership training with TroopWebHost.
Go to My Stuff → My Training History to see the classes that you have completed.
Some clases, like Youth Protection, expire after a period of time. The system automatically calculates the expiration date based on when you completed the class.
You can add to this list any additional classes that you've taken. To do this, click on Add A New Item at the bottom of the list.
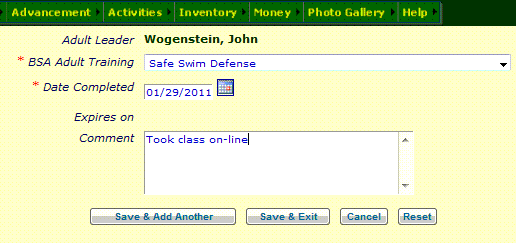 This will
take you to a page where you can select the class that you took and enter the date on which you completed it.
This will
take you to a page where you can select the class that you took and enter the date on which you completed it.
Click on the BSA Adult Training input box to view a list of all possible classes. Select the class you completed and use the mouse or your TAB key to move to the Date Completed field.
Notice that you can use the calendar control to select the date.
Press Save & Add Another to save this class and begin entering another. If you have no more classes to enter, click Save & Exit.
Adult training history for every member of the troop can be viewed and updated on the Adult Training page.
My Merit Badge Assignments
If you are an adult leader you can view the merit badges for which you are registered by going to My Stuff --> My Merit Badge Assignments.
This will display all of the merit badges for which you are allowed to assist scouts, as shown below.
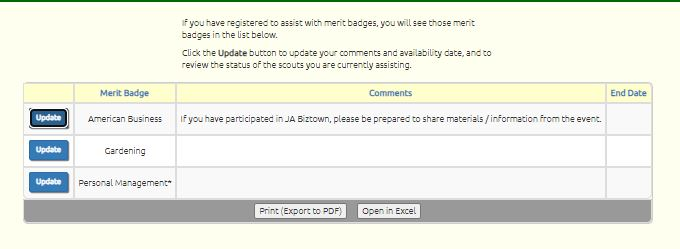
Click Update on one of the merit badges to view the details.
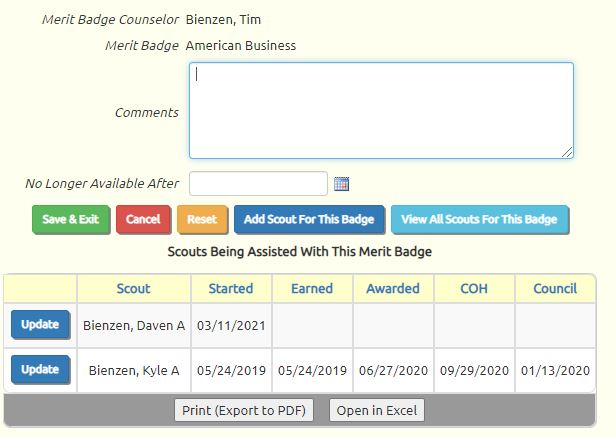
From
this page you can update your comments and availability date.
Click Add Scout For This Badge to select a scout who wishes to begin work on this badge. This will add this badge to their "in progress" list.
Click View All Scouts For This Badge to view all active scouts who are working on this badge, including those for whom you are not assigned as their merit badge counselor.
The lower portion of this page shows the scouts who have signed up for you to assist them with this merit badge.
Click Update next to a scout to sign off on his requirements, as shown below.

Click the check box for each requirement this scout has earned. If the requirement was completed on a different date, enter that date in the Earned column.
Click Save & Exit to save your work.
Approve My Merit Badge Sign Off Requests
A merit badge counselor can process requests submitted by his scouts to sign off on requirements by going to My Stuff → Approve Requests To Sign Off On Merit Badge Requirements. This will display a list of the pending requests, but only for scouts who are working with this counselor on this badge.
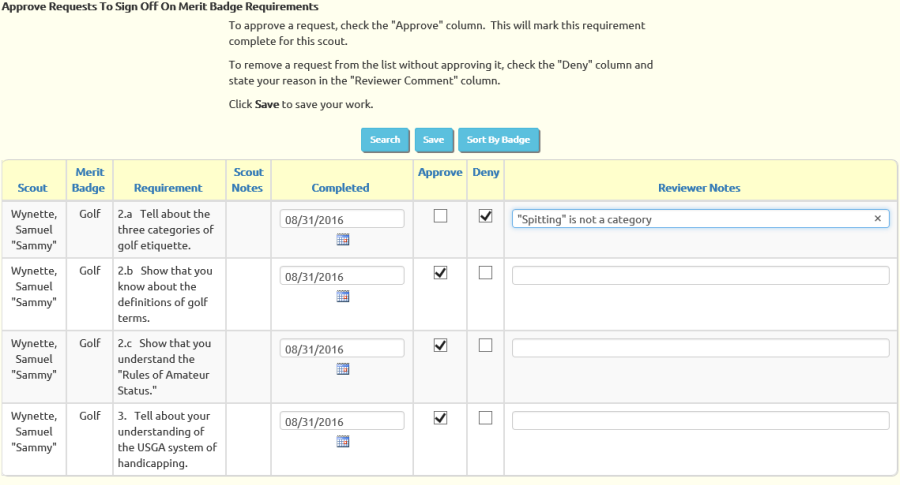
If you wish to mark the requirement complete, click the checkbox in the Approve column. Any comment you enter in the Reviewer Notes will be written to the notes for this completed requirement, along with the scout's comment that was entered in Scout Notes.
If you do not agree that this requirement has been completed, check the checkbox in the Deny column, and indicate your reason in the Reviewer Notes column. The scout will be able to view this comment.
Click Save to update the database with your decisions. Any request that you marked as approved or denied will disappear from the list.
If you would prefer to see the list sorted by merit badge and requirement, click the Sort By Badge button.
My Stuff - Frequently Asked Questions
 I subscribed to our troop calendar from Google Calendar.
I just entered a new event into our troop calendar and I don't see it in Google Calendar. Did I do something wrong?
I subscribed to our troop calendar from Google Calendar.
I just entered a new event into our troop calendar and I don't see it in Google Calendar. Did I do something wrong?
When you subscribe to your TroopWebHost calendar from another application, like Google Calendar, you give that application our iCalendar URL. That application then periodically polls that address. Each time it polls that address, we send it a complete calendar file with all of the events that are currently on your TroopWebHost calendar.
We do not control the timing of the polling, which can be different in each application. We do not push the data to Google Calendar. We wait for the data to be requested.
In our experience, the polling cycle for Google Calendar is between eight and ten hours, but this is subject to change and is outside of our control. Any changes you make to your TroopWebHost calendar will be transmitted to Google Calendar the next time it requests an update.
I went to the My Scouts page and it was empty. I have two sons in the troop. Why don't I see them there?
When your troop entered your sons' membership, they did not create the link between your sons' membership records and yours.
A leader who is authorized for the Membership role can correct this for you by going to Troop --> Active Adults and selecting your record. At the bottom of the page is a grid showing the scouts with whom you have a relationship and an Add A New Item button to add the ones that are missing.
I entered a new password and pressed the Save button and nothing seemed to happen. Why is that?
The screen was redisplayed after it saved your new password. That is how this function works.
Can a scout sign up for an event?
Yes. Both scouts and adults have access to the Sign Up For Events page.