Welcome To TroopWebHost!

This User Guide will show you how to use all of TroopWebHost's capabilities.
Click on the << Back and Next >> links at the top (and bottom) of each page to browse in a logical order. On a touch screen device, like a cell phone or tablet, you can swipe right or left to do the same thing.
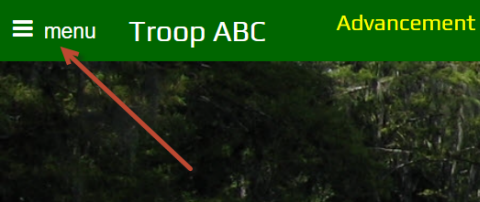
Click the menu icon  in the upper left corner to go directly to a different chapter or page.
You can search the entire User Guide from the search window in the upper right corner of the page. So, as shown below, if we enter "patrol" and click the magnifying glass icon, the system will return a list of pages that talk about patrols.

We use Google Search to return a list of pages that most closely match your criteria.
Use the Print This Chapter link at the bottom of the page to view the current chapter in a new window, without the heading or menu, and invoke your browser's print function.
Going To Your Website For The First Time
The leader who purchased your troop's subscription to TroopWebHost will receive an email within a few minutes of completing their payment. The message will contain a link to your new website and their User ID and password.
You will also find a link to your site at https://www.TroopWebHost.org/Index.aspx.
The first time you visit your site the home page will look like this:
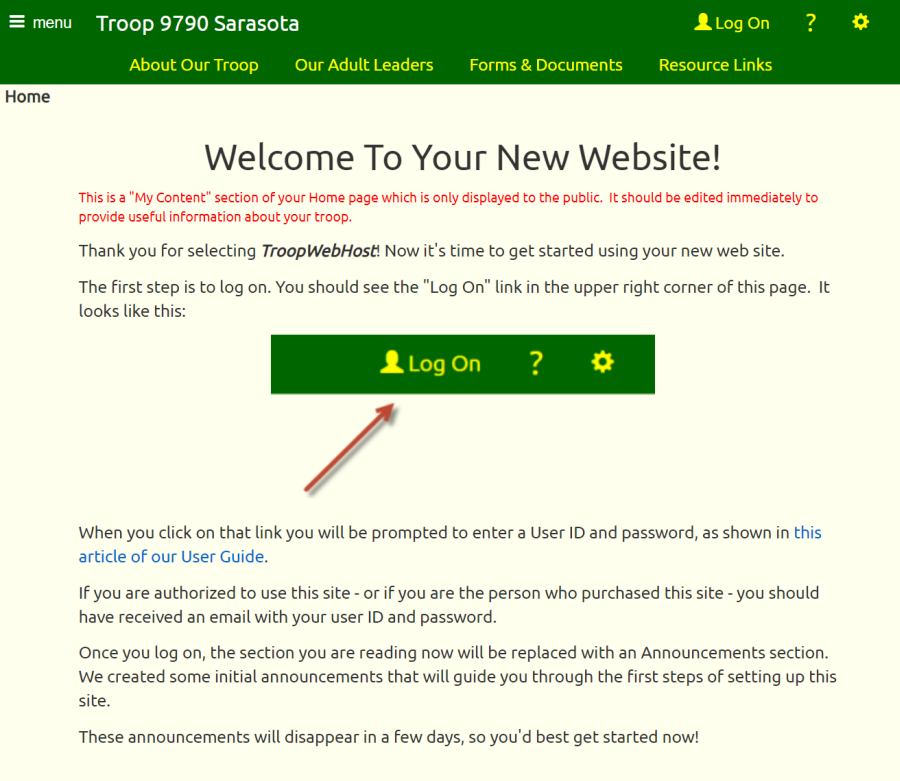
But that isn't how it's going to look after you start working on it!
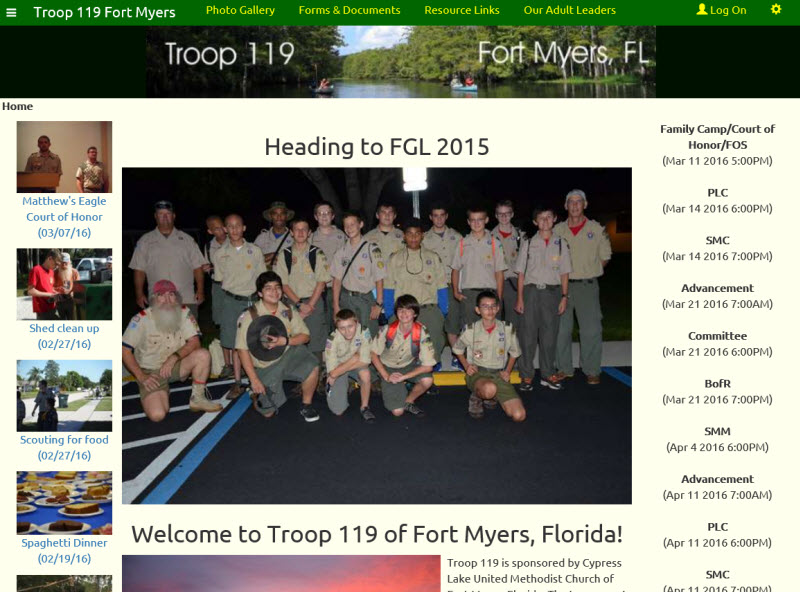
After you log on to your site and edit your home page, it will look more like this:
Page Format
When you first visit your site, the top of the page will look like this.

The main menu is accessed from the menu icon ![]() in the upper left corner of the page. We'll show you what the menu looks like further down this page.
in the upper left corner of the page. We'll show you what the menu looks like further down this page.
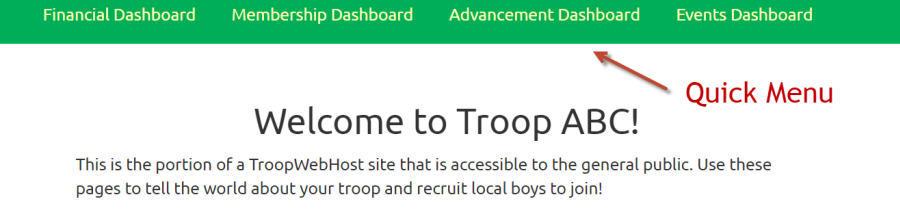
You'll see your unit's name just to the right of the menu icon. Click on the name to go to your home page.
Next to that you'll see your four most popular menu items in what we call the "Quick Menu". These menu items are selected automatically based on the number of times each public menu item has been accessed in the last month. Your site administrator can override these selections using the Configure Public Quick Menu page on the Menu Configuration submenu of the Administration menu.
The Log On link will bring up the new Log On window, which we'll show you on the next page.
The cog icon in the upper right corner of the page will bring up the new Tools Menu, which will allow you to set the page format, choose an alternate language, and bookmark the site.
After you log on to the site, the options at the top of the page will look like this.
The Quick Menu is now personalized to you. It will contain the four menu items that you've spent the most time in over the past month. You can override these selections using the Configure My Quick Menu option on the Tools menu.
The Help icon will bring up a menu that takes you to the User Guide.
The Tools menu has additional choices, which let you change your password and configure your Quick Menu.
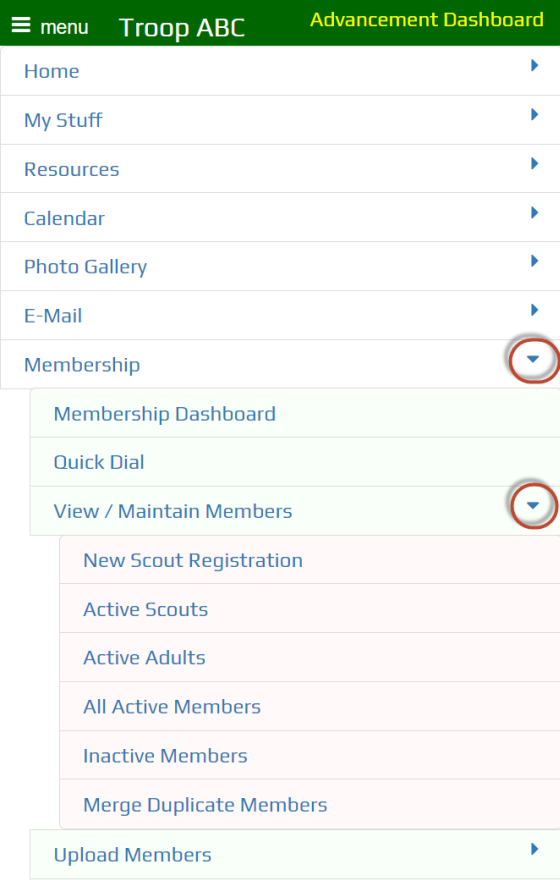
Click on the menu icon ![]() to view the main menu, as shown below.
to view the main menu, as shown below.
At first you will only see the top level items. Click on any of those items to see its submenu. Click on it again to make the submenu disappear.
Click on the cog icon ![]() in the upper right corner of the page to reveal the Tools menu.
in the upper right corner of the page to reveal the Tools menu.
Click on Format to display this pop-up window.
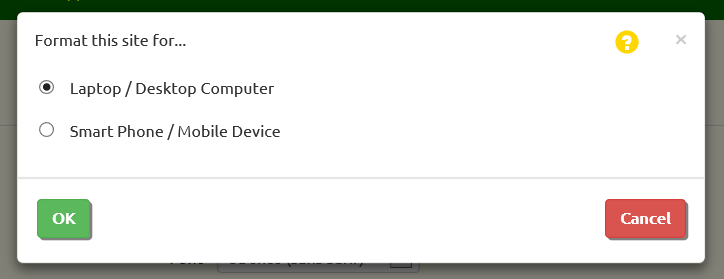
The system should automatically detect whether you are operating on a desktop PC or a mobile device based on the physical width of your screen. But if for some reason you need to change that setting, you can do it here. The Smart Phone / Mobile Device setting will cause all grids to be collapsed into a single column.
Click on Configure My Quick Menu to see the screen shown below.
Your personal Quick Menu will be automatically reset every night based on the four menu items that you've accessed most frequently in the past month.
You can disable this process by unchecking the checkbox. You can then select the items to appear on your Quick Menu, which will remain in place until you change them.
Logging On To Your Website
 You'll find the
Log On link in the upper right corner of the page.
Click on this link to display the Log On window, as shown below.
You'll find the
Log On link in the upper right corner of the page.
Click on this link to display the Log On window, as shown below.
Type your User ID and Password into the boxes and then click the Log On button. You can use your TAB key to move from field to field.
If you click on the Remember me at this computer checkbox you won't have to logon again the next time you come to your site.
Do not check this box if you are on a public computer (like in a public library), or a computer that you share with people who should not be allowed to access your troop's website.
 If you click on Forgot User ID or Password? the system will prompt you for your e-mail address and send you an e-mail with your login information.
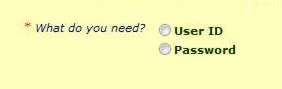
If you've forgotten both your User ID and Password, begin by clicking on the User ID button.
NOTE: This function will only work if your e-mail address is on your membership record.
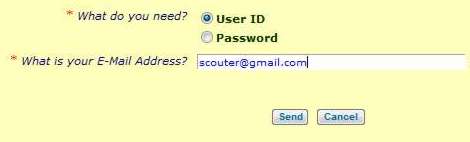
Type in the e-mail address that you registered with the troop, then click the Send button.
You will receive an e-mail with the User IDs associated with that e-mail address.
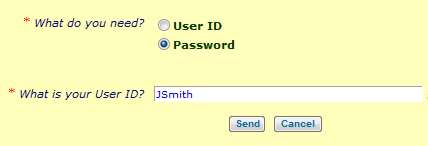
To retrieve your password, click on Password, enter your User ID and press Send.
You will receive an e-mail with the Password for this User ID.
Navigating Your Site
After you log on to your site, you'll still be on the Home page. How do you get to all of the other pages?
Earlier, we showed you how to access the Quick Menu at the top of every page. Your Quick Menu will change over time to take you to the four pages you use the most.
The most powerful menu is the Main Menu, which you open by clicking on the menu icon in the upper left corner of the page.
 The main menu contains all of the functions that your user ID is authorized for.
It can be up to three levels deep. Open up the next level by clicking the triangle icon to the right of that entry.
If you don't see a triangle on an entry, that means it represents a function you can access by clicking on the name.
Most pages contain buttons that can be used to move around the site. Some of these buttons will take you deeper into the site. In the example below, the Add a New Item button, Update button, and Delete buttons take you to a detail page to manage one row in the list.

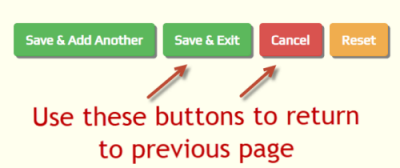
Other buttons can return you to a page you saw earlier. They will usually contain the word "Exit" or "Cancel".

You should NEVER use your browser's BACK and NEXT buttons to navigate your TroopWebHost site!
TroopWebHost keeps track of your progress through the site, leaving a trail of "bread crumbs" so it knows how to return when you click an Exit or Cancel button. And yes, it saves these "bread crumbs" in a "cookie"!
If you use your browser's BACK and NEXT buttons, this cookie will get out of synch. This may cause errors to occur.
While in TroopWebHost, you should only use the menus, buttons and links within the page to move around.
Hubs give you an easy way to use the site. We'll talk about those next!
Hubs
As we just saw, the Main Menu gives you access to all of the functions you are authorized for. This can be a bit overwhelming, especially when you're just getting started. That's why we created hubs!
Hubs give you access to everything you need to manage a functional area of the site. We currently offer these hubs:
- Membership Hub lets you enter and view your membership roster, patrols, and crews. It also lets you manage training and leadership.
- Events Hub lets you manage your unit's calendar and access participation reports.
- Advancement Hub shows you where each scout is at with ranks, merit badges and awards. It lets you sign off on requirements and produce reports.
- Financial Hub gives you access to all money-related functions.
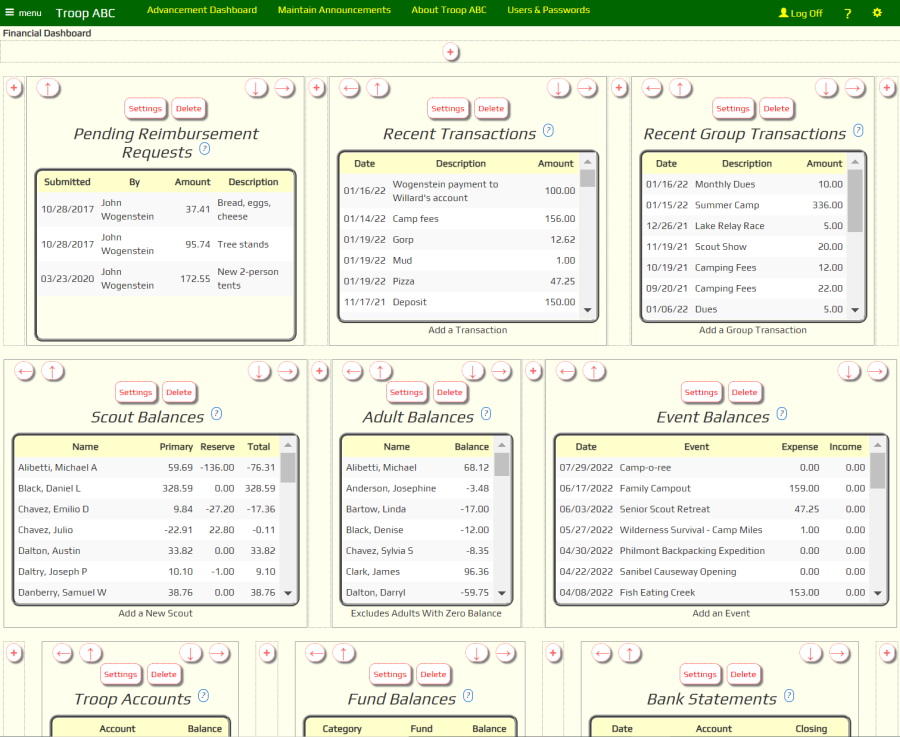
As an example, here is what your Financial Hub might look like:
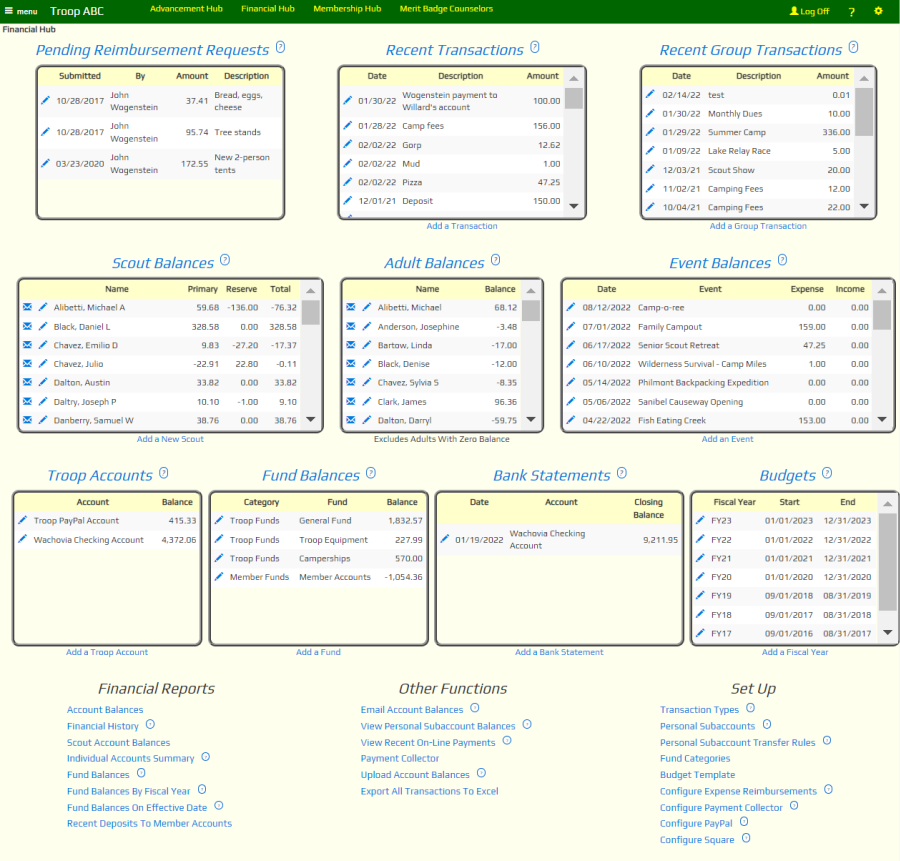
At the top of the page, you'll see a number of "Data Window" widgets that let you view the information in this part of the site from different perspectives.
The heading of each data window is a link to a corresponding page that shows you more information and lets you access more functions.
Many of the data windows have a link at the bottom that lets you add a row to that table.
Most data windows also have edit links - like this  - that let you enter information about that row.
Some data windows have a message link - like this  - that let you initiate an email to that person or group.
Further down the page, you will see several "Menu" widgets. These take you to the rest of the functions for this part of the site.
Once you're on a hub, you won't need to use the Main Menu to use this part of the system. Everything is right here on the page!
Editing Your Hub
Earlier we said that this is what the Financial Hub might look like. Why did we say "might"?
It turns out that you can customize any hub to fit the needs of your unit. The changes you make to a hub will be available to any member of your troop who is authorized for that hub.
Only those users who are authorized for the User Role of Web Page Editor are allowed to edit hubs.
 To begin, open a hub page and click the
 icon in the upper right
corner of the page to reveal the Tools menu, as shown at right.
icon in the upper right
corner of the page to reveal the Tools menu, as shown at right.
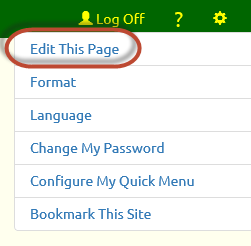
Click on "Edit This Page" at the top of the Tools menu.
Once you are done editing the page, go back to the Tools menu. The top item will now be "Exit Page Edit".
Page Sections
When you enter edit mode, you'll see the page divided into sections, as shown above.
A section is typically linked to a "widget", which is pre-programmed to pull information from your database or display a menu.
You can delete sections, move them around, or add new ones. You can even add sections with text and images that you provide, similar to what you can do when you edit your Home page.
Rearranging The Page
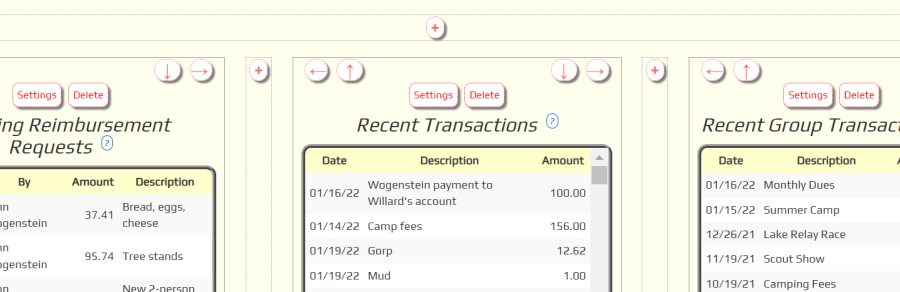
If you look more closely at the top of any section while you are in edit mode, you will see arrows in the upper corners. These arrows can be used to change the position of this section relative to the other sections on the page.
When editing a hub, it is best to only use the Left and Right arrows. Click the Left arrow to immediately swap positions with the section to its left. Click the Right arrow to immediately swap positions with the section to its right.
The Up and Down arrows will move that section into a higher or lower row. We don't recommend this, because it will prevent the page from arranging itself to fit the size of your monitor.
The hubs are designed to be "responsive", which means that on a wide monitor the sections will arrange themselves across the page before beginning a new row. On a narrow screen, like a cell phone, these same sections will stack vertically.
The best way to see this effect is to display the page full screen on a wide computer monitor, then resize the browser window to make it narrower. As the window gets narrower, you will see the sections rearrange to fit that width and, at the same time, make the page longer from top to bottom.
Adding A Section
For the same reason, when you add a section, you should usually add it to the left or right of an existing section by clicking the
![]() button you see to the left or right of that section.
In most cases you should not click the
button you see to the left or right of that section.
In most cases you should not click the ![]() button that is above
or below the current section, as that will cause it to create a new row.
button that is above
or below the current section, as that will cause it to create a new row.
When you click the ![]() icon, the system will display this pop-up window with the settings for your new section.
icon, the system will display this pop-up window with the settings for your new section.
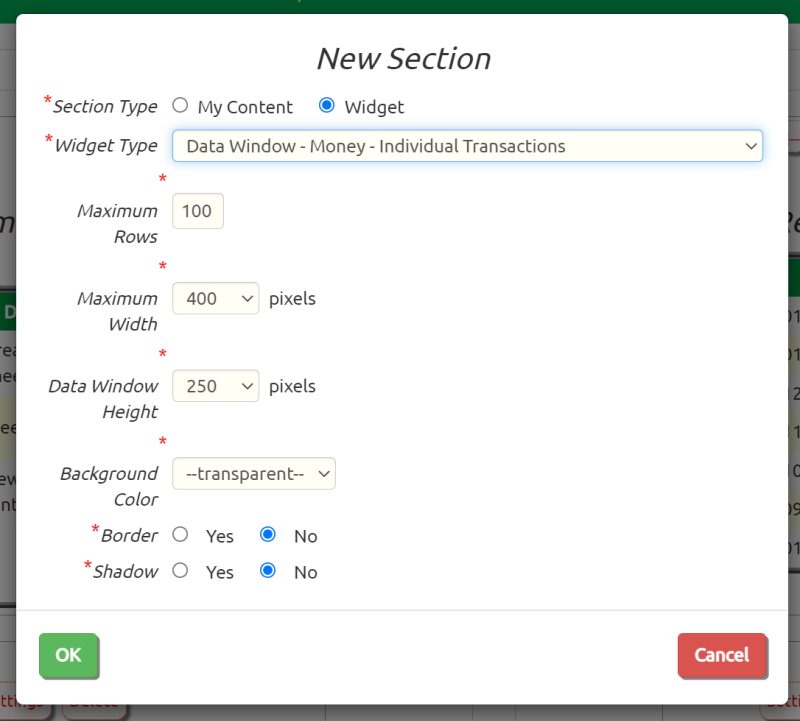
Choose between "My Content" which will allow you to enter text and images, or "Widget" which will fill the section with information from your database.
You can choose any widget from the list, even those that were designed for use with a different hub.
The choices you see on this page will change depending on the type of widget you select.
Data Window widgets and Menu widgets cannot be made available to the public. They are only available to users after they have logged on to the site, and then only if that user has sufficient access rights.
The Maximum Rows option limits the number of rows that will be displayed in this widget. The fewer rows, the faster it will load.
The Maximum Width will default to an appropriate value for the type of section you've selected. For "My Content" sections, this can be used to adjust the height of the section.
The Data Window Height determines how tall a scrollable Data Window grid will be.
The default Background Color is "transparent", but you can change this to any color you want. The drop down list gives you some standard choices, but if you select "Other" you'll have the opportunity to enter any RGB color you'd like. On most browsers you should see a color picker.
Border will draw a border around this section and Shadow will create a shadow effect behind this section.
Menu widgets have a slightly different set of options.

The standard Menu Style is "Regular", which will display a title at the top, followed by left-justified menu selections. The "Heading" option is designed to display at the top of the page, with no title and all entries centered in the section.
Click the OK button when you are done. This will immediately save your changes to the server.
Updating A Section
Click the Settings button to change the parameters for an existing section. You can even select a different widget!
Click the Delete button to remove this section from the page. A pop-up window will aks you to confirm this action.
Getting Organized
 Before you jump into building your new website, take some time to get organized.
In broad terms this means:
- Establish your goals
- Assign tasks to other leaders
- Pull together the needed information
At your next troop committee meeting, discuss how you plan to use your website.
- What should your Home Page say about your troop to the general public?
- Will you post photos and/or videos of troop events on your website?
- Can you export data from an existing system to populate your TroopWebHost site?
- Will you allow scouts to request sign off on requirements through the website and mobile app?
- Will you allow adults to request expense reimbursements through the website?
- Do you want to accept credit card payments through the website and, if so, who will pay the credit card fees?
- If you have both a girls troop and a boys troop, will they share one site or have separate sites?
- How soon do you want to have the site ready for your scouts and parents to use?
Consider creating a "technology committee" to help manage the implementation. Invite your most tech savvy members - adults and scouts - to join.
Once you agree on your goals, it's time to assign responsibilities. Who is going to...
. . . Edit the Home Page and About Our Troop page?
. . . Enter upcoming events into the troop calendar?
. . . Upload photos and videos from recent events?
. . . Load the troop roster and keep it up to date?
. . . Record requirements earned toward merit badges and rank advancement?
. . . Maintain troop accounts and enter monetary transactions?
. . . Manage fundraisers and sales of troop merchandise to members?
. . . Track troop inventory and library materials?
. . . Set up users and assign permissions?
Now you're ready to prepare a checklist of tasks to bring your website up to speed.
Startup Checklist
This checklist will help you implement all of the features of TroopWebHost.
Download This Checklist as Excel Spreadsheet
| Step # | Depends On Step # | Task | Assigned To | Target Date | Date Completed | |
| 1 | PLANNING | |||||
| Meet with Troop Committee to establish goals, responsibilities and schedule | ||||||
| Determine best sources of data for membership, advancement, participation, leadership, training & account balances | ||||||
| Decide whether to allow scouts to request sign off on requirements through the website and app | ||||||
| Decide whether the site will accept credit card payments and, if so, who will pay the credit card fees | ||||||
| Decide whether to allow adults to request expense reimbursements through the website | ||||||
| If you have both a girl troop and boy troop, decide whether to share one site or have separate sites (possibly linked) | ||||||
| Fill out this checklist and send to all committee members | ||||||
| 2 | 1 | INITIAL ROSTER | ||||
| A) If a data source exists, upload membership data for all scouts and adults | ||||||
| B) Otherwise, enter membership data for adult leaders who will be helping set up the site | ||||||
| 3 | 2 | SECURITY | ||||
| Assign additional user roles to user IDs of adult leaders | ||||||
| Send user IDs and passwords to leaders who are helping set up the site | ||||||
| 4 | 3 | ROSTER | ||||
| If not possible to upload membership data, manually enter membership records for everyone else using New Scout Registration page | ||||||
| Set up patrols and update patrol membership | ||||||
| Upload or enter current scout leaders | ||||||
| Enter current adult leaders | ||||||
| Upload or enter adult training | ||||||
| Create dynamic subgroups | ||||||
| Ask all adult leaders to enter their "About Me" section and upload a photo under My Contact Information | ||||||
| 5 | 3 | PUBLIC PAGES | ||||
| Create banner image (optional) | ||||||
| Edit the Home page and About Our Troop pages | ||||||
| Create additional custom pages as needed | ||||||
| Create announcements | ||||||
| Upload troop forms and documents | ||||||
| Create resource links | ||||||
| 6 | 3 | CALENDAR | ||||
| Customize event types as needed | ||||||
| Enter event locations | ||||||
| Enter past events for which you plan to upload photos or enter monetary transactions | ||||||
| Enter upcoming events. Use the "Copy Event" functions to set up meetings and other recurring events. | ||||||
| Train leaders to use mobile app to take attendance at events. | ||||||
| 7 | 6 | PHOTO GALLERY / VIDEO GALLERY | ||||
| Upload photos from past events | ||||||
| Upload videos to YouTube and create links from Video Gallery | ||||||
| 8 | 4 | ADVANCEMENT | ||||
| A) If a data source exists, upload advancement data for all scouts | ||||||
| B) Otherwise, enter advancement data for all scouts | ||||||
| Upload or enter participation history for past camping nights, service hours, hiking miles, etc. | ||||||
| Review and update advancement settings | ||||||
| Enter merit badge counselor assignments | ||||||
| Train adult leaders how to sign off on requirements on the website and the app | ||||||
| 9 | 3 | INVENTORY/LIBRARY | ||||
| Enter all library materials into troop inventory | ||||||
| Enter all troop equipment into troop inventory | ||||||
| Check out items to troop members who currently have them | ||||||
| Train leaders to use mobile app to check out and return library materials and troop equipment | ||||||
| 10 | 4 | ACCOUNTING | ||||
| Set up troop accounts and enter starting balances | ||||||
| Set up personal subaccounts for reserve accounts and fundraising proceeds | ||||||
| A) If data source is available, upload Adult and Scout balances | ||||||
| B) Otherwise, enter starting balances for each troop member | ||||||
| Set up credit card interface using Square or PayPal | ||||||
| Review and update expense reimbursement settings | ||||||
| Train leaders to use website to request expense reimbursements | ||||||
| Begin monthly statement reconciliation process | ||||||
| 11 | 4 | FUNDRAISERS | ||||
| Set up sales campaign for next fundraiser, including merchandise and sales prizes | ||||||
| Train scouts how to enter orders and sell on-line via ScoutSales.org | ||||||
| Train fundraising leaders how to use Booth Sales to run in-person fundraiser event | ||||||
| 12 | 4 | TROOP MERCHANDISE | ||||
| Set up sales campaign for sales of troop merchandise, like troop t-shirts | ||||||
| Train scouts and adults how to "buy stuff from troop" | ||||||
| 13 | 4 | ROLL OUT | ||||
| Send user ID's and passwords to all troop members | ||||||
| Demonstrate/discuss new website and mobile app at troop meetings | ||||||
| Train scouts and parents to use mobile app to sign up for events and give permission | ||||||
| Train scouts to use mobile app to request sign off on requirements | ||||||
| Plan on-going site operation at committee meeting | ||||||
Moving Your Data From ScoutBook™ to TroopWebHost™
Scouting America is transitioning their Scoutbook™ software to their new ScoutbookPlus™ platform. This continues to be a good data source for many new TroopWebHost customers, and we will continue to add import functions as new export functions are added to ScoutbookPlus™.
To begin the process, you will export three files, which can then be uploaded into TroopWebHost:
- Roster Report (from Scoutbook Plus)
- Scout Advancement (from Scoutbook Plus)
- Activity Log Report (from Scoutbook Plus)
The next three pages of this User Guide show how to upload these files into TroopWebHost. Due to the lack of insternal consistency that we've seen in the ScoutBook data, the transfer may not be 100%, but it will allow you to make a faster transition to the superior capabilities of TroopWebHost.
These upload programs are:
- Upload ScoutBookPlus Roster Report. This will add all of your scouts and adult members into your TroopWebHost database, and will also generate user IDs ad passwords for each new member. It will also transfer current adult leadership positions and, for merit badge counselors, a list of the badges they support.
- Upload ScoutBook Plus Advancement. This will process the "Scout Advancement" quick export file, adding completed rank requirements, merit badges, and awards.
- Upload ScoutBook Plus Activity Log Report. This will transfer camping nights, service hours, and hiking miles from the "Scoutbook Plus Activity Log Report" file.
The following import functions are still available in TroopWebHost:
- Upload Scouts From ScoutBook. This will add your scouts to the system, with a User ID and Password for each one.
- Upload Adults From ScoutBook. This will process the "Leaders & Parents" file, adding an adult record for each entry along with a User ID and Password.
- Upload ScoutbookPlus Report Builder Advancement. This function will be phased out July 31, 2026. This will transfer all current advancement information from ScoutbookPlus, including individual requirements that were signed off on ranks and merit badges.
- Upload ScoutBook Participation History. This will transfer camping nights, service hours, and hiking miles from the Scoutbook "Camping, Hiking and Service Logs" file.
Upload Roster Report From ScoutbookPlus™
The first file you should transfer from ScoutBookPlus™ is the Roster Report. It contains information about each scout and each adult in your troop.
To generate the Roster Report, sign into ScoutbookPlus.
Select Reports from the Navigation menu on the left side of the sceen.
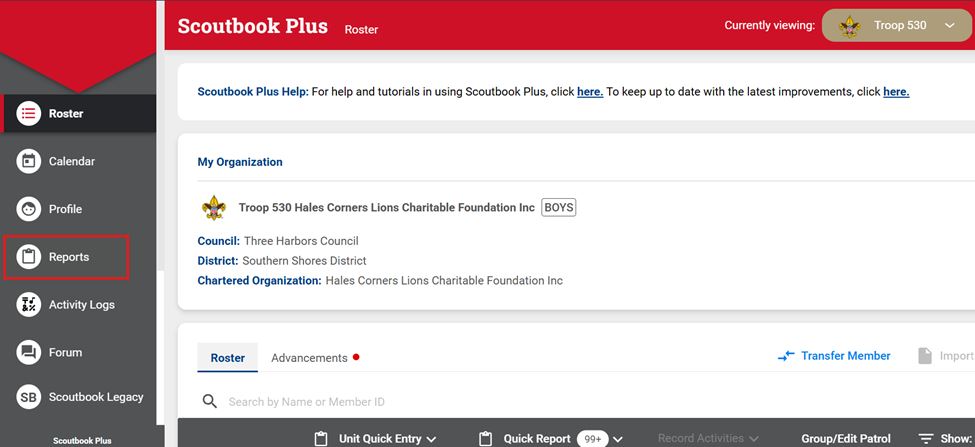
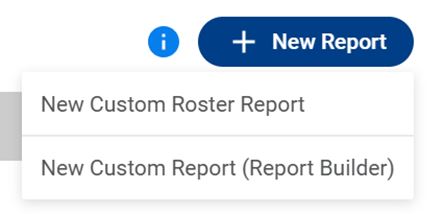
Click “+ New Report”
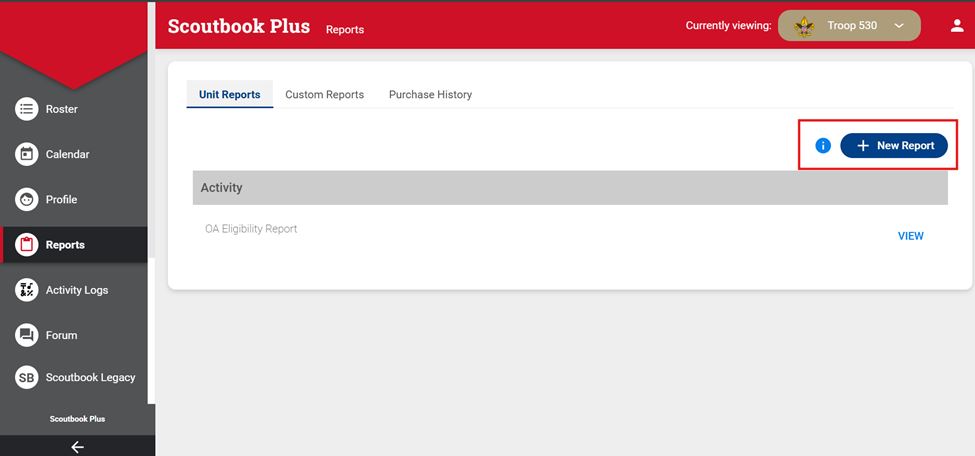
Click New Custom Roster Report.
In the next page, enter a Report Title such as “Member Export”, as shown below.
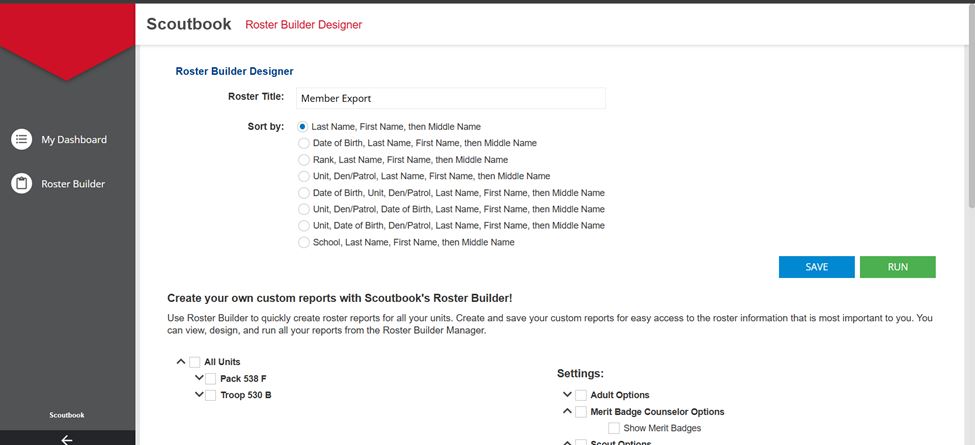
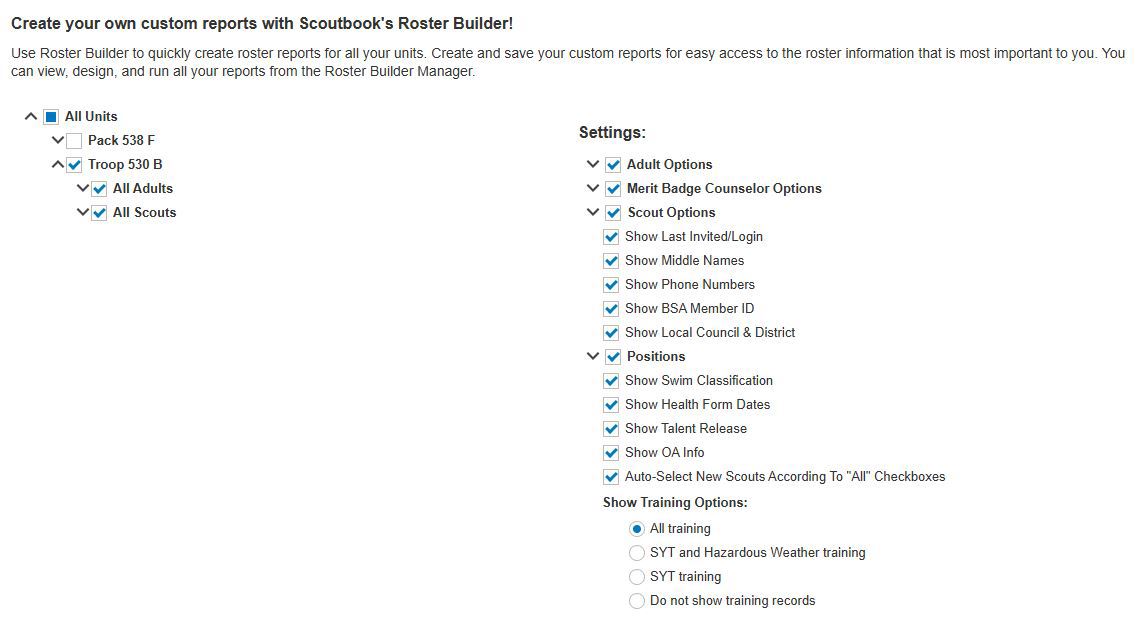
Under "All Units" (if you are affiliated with more than one unit), select the one unit for which you wish to export data. Under "Settings", select all options.
Click the CSV button.
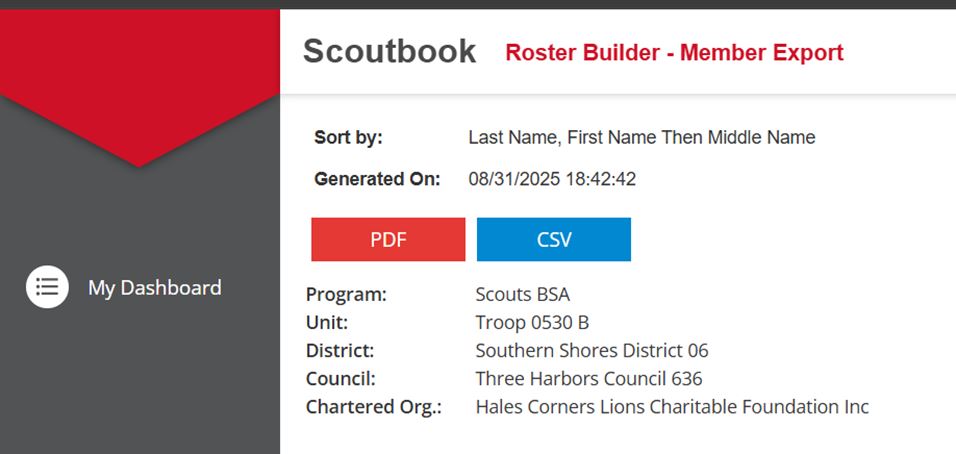
This will create a CSV file. Save it to your local drive and remember the location and file name.
Then log on to TroopWebHost, and from the Main Menu go to Membership → Upload Members → Upload ScoutBookPlus Roster Report.
You should see the screen shown here:
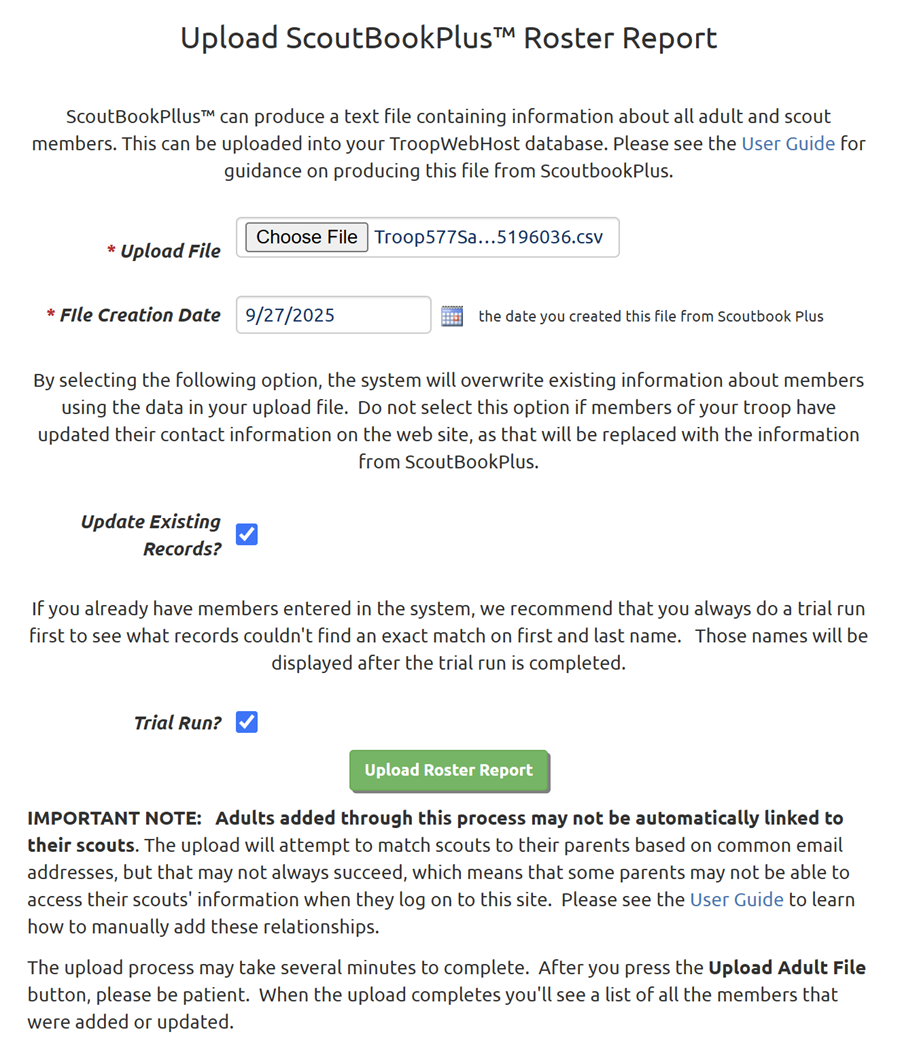
Click the Browse button to find the Roster Report file that you exported from ScoutBookPlus™.
The File Creation Date is the date you created this file from Scoutbook Plus. You may be able to find this date within the file name that Scoutbook Plus generated. We need to know this date to compute the start date for leadership positions. Instead of showing the start date of each position, the file shows the length of time that the person has held that position, using a notation that looks like this: (2y 4m 23d). Presumably this is based on the current date when the file was generated.
Do not select Update Existing Records if you think your membership data in TroopWebHost is accurate and up-to-date. It will overwrite the contact information and other data about existing members with the information found in the file.
Always select the Trial Run option the first time you upload a new file. This will allow you to see what records will be added, without actually committing these new records to the database. This is a great way to prevent duplicate membership records from being added to your system. This can happen if we fail to find a match on the person's BSA ID or the exact spelling of their first and last name (plus date of birth for scouts.) If you do see names being added that are already in the system, update their membership records to match the information in the file and upload the file again in trial run mode. Once all of the duplicates have been removed, you can run it one more time without the Trial Run enabled.
Click the Upload Roster Report button to begin loading this data into TroopWebHost.
This will add each scout who was not already in the system to the Active Scouts page. It will add each adult who was not already in the system to the Active Adults page.
It will also create a User ID and Password for each scout and each adult that it added.
It will create relationships between the scout and his parents, using the parent name columns in the scout entry. It can also match scouts to parents based on matching email addresses.
It will link a scout to his patrol if that patrol has already been created in TroopWebHost with exactly the same name as appears in the file.
For adults, it will attempt to load their leadership positions. For merit badge counselors, it will add a list of badges that they support.
Upload Scoutbook Plus™ Advancement
Once you've uploaded your roster from ScoutBook Plus™, you can proceed to upload the "Scout Advancement" quick export file from ScoutBook Plus. This will add completed rank requirements, merit badges, and awards to your TroopWebHost database.
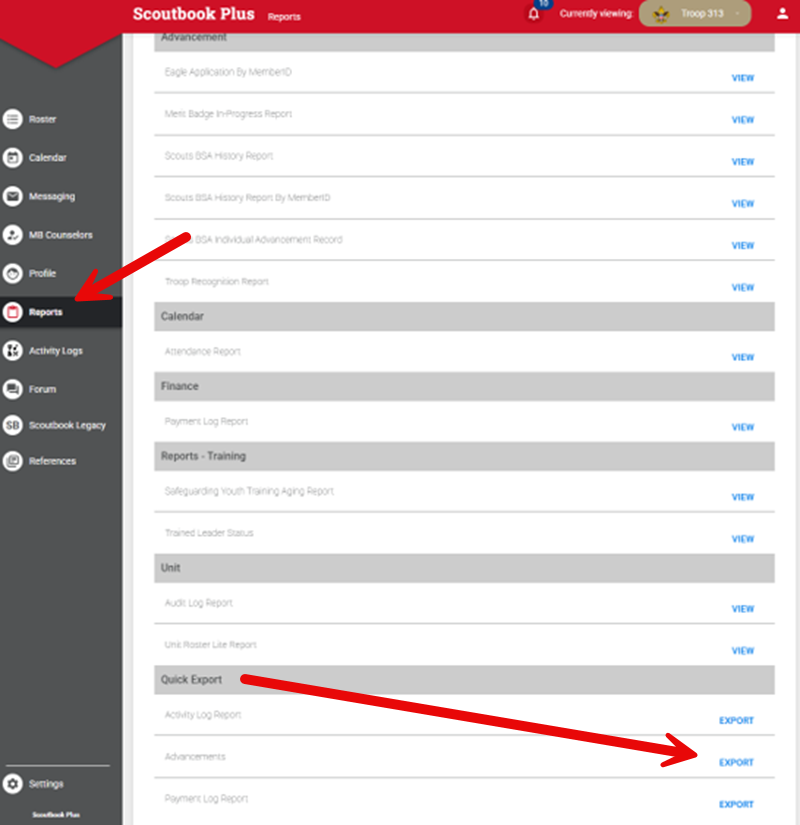
To begin, logon to Scoutbook Plus and click "Reports" on the main menu as shown below. Then scroll down to the "Quick Export" section and click the "EXPORT" button on the "Advancement" row.
Then log on to TroopWebHost, and from the Main Menu go to Advancement → Upload Advancement → Upload ScoutBook Advancement.
You should see the screen shown here:
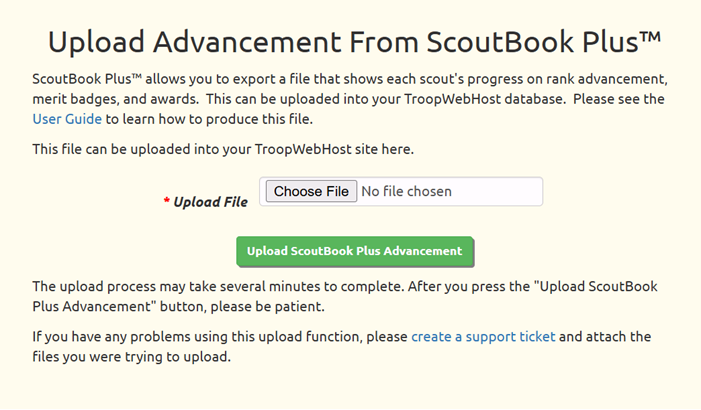
Click the Browse button to find the Scout Advancemenmt file that you exported from ScoutBook™.
Click the Upload ScoutBook Plus Advancement button to begin loading this data into TroopWebHost.
This process may take several minutes, so please be patient and do not click the button a second time.
The samples of ScoutBook advancement data that we've seen included unfortunate inconsistencies, especially with respect to the version of rank requirements being used.
Each row of the ScoutBook file contains the version of the rank, merit badge, or award, that is referenced by that row. This is good, but unfortunately the completed rank requirements for a scout that are included in the file may include requirements for more than one version of the rank. And this, in turn, may be different from the version shown for the completed rank.
TroopWebHost will not allow a scout to work on two versions of the same rank. Once we upload the requirement for one version of the rank for a given scout, the upload program will ignore requirements that reference a different version.
We've also seen duplicate records for the same requirement and scout. Duplicates will be ignored.
The ScoutBook file contains one row for each completed rank. We will use these rows to mark a rank complete, but this means that we will not apply any requirements that are found for a different version of the same rank. If you find this situation, you will need to correct it manually in TroopWebHost by marking the missing requirement(s) as complete.
We will attempt to process partial merit badges and awards found in the ScoutBook file by marking individual requirements complete. However, in some cases we track requirements at a different level, so the requirement codes do not match up. In these cases the requirements will have to be entered manually in TroopWebHost.
You may also find that some awards do not transfer because the corresponding award name could not be found in TroopWebHost. This may be because TroopWebHost does not contain the award, or because the award name is spelled differently in TroopWebHost. In either case, you can add or update the award in TroopWebHost using the Special Awards page on the Site Configuration menu. Then load the same file again.
All of these exceptions will be listed on the screen when the upload completes. Click on any section header to collapse that section; this will make it easier to view the other sections. Please scroll through all of the upload results and make the necessary corrections before uploading the file again.
Upload Scoutbook Plus Activity Log Report
Once you've uploaded your membership data from ScoutBookPlus™, you can proceed to upload the "Activity Log Report" file from ScoutBook Plus. This will add each member's participation history to the Credit For Other Activity in your TroopWebHost database.
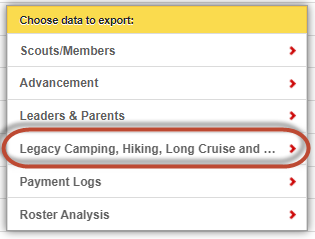
NOTE: If you are unable to access this report in ScoutbookPlus, go to Scoutbook and export the "Legacy Camping, Hiking, Long Cruise and ..." as shown here.
To produce this report, log on to Scoutbook Plus and go to the Reports page as shown here:
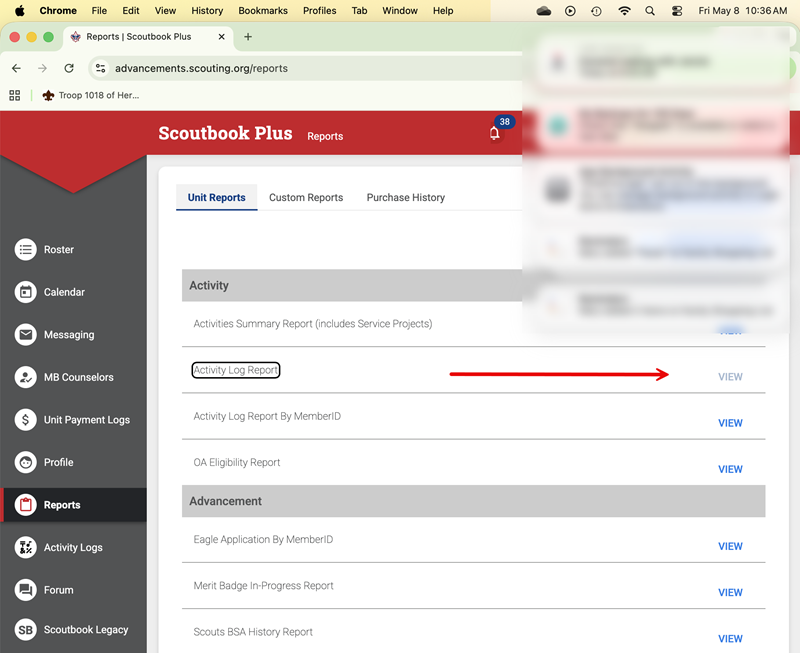
Click the View button to the right of the Activity Log Report title to go to the next page.
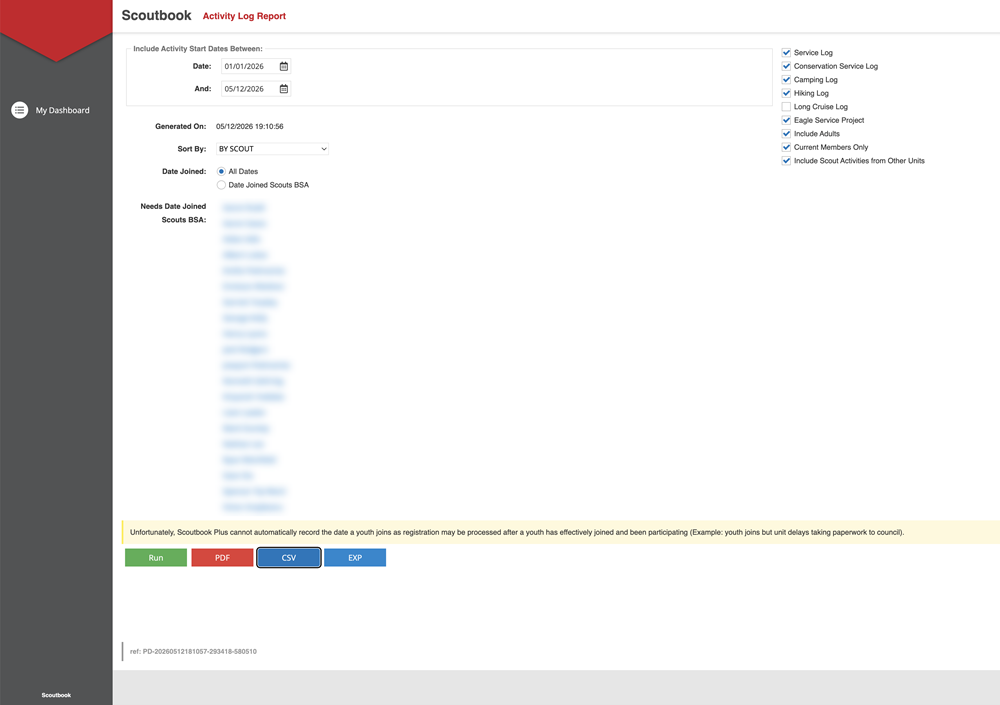
Select the dates for which you wish to pull this activity, and check the boxes on the right as shown above.
Then press the CSV button at the bottom to produce the report in CSV format. Remember where you saved this file, so you can retrieve it in the next step.
Log on to TroopWebHost, and from the Main Menu go to Advancement → Upload Advancement → Upload ScoutBook Plus Activity Log Report
You should see the screen shown here:
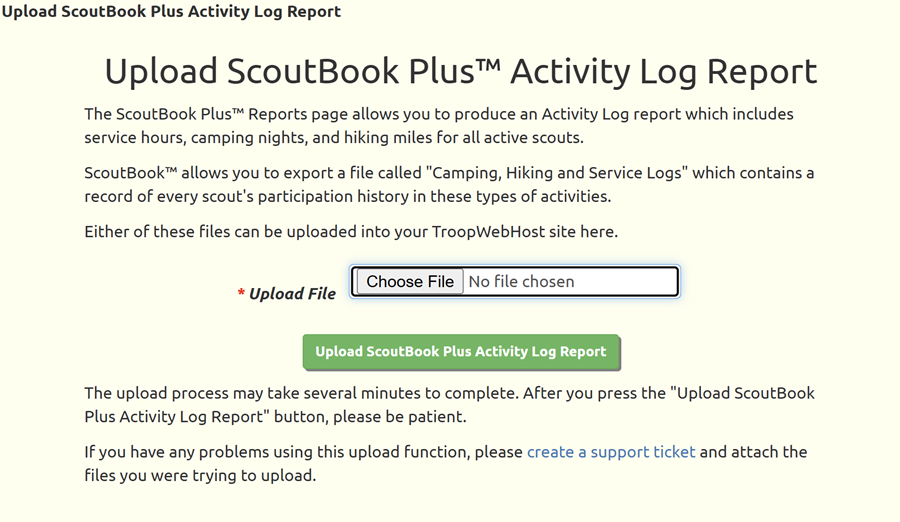
Click the Browse button to find the log file that you exported from ScoutBook Plus™.
Click the Upload ScoutBook Plus Activity Log Report button to begin loading this data into TroopWebHost.
This process may take several minutes, so please be patient and do not click the button a second time.
This file does not include any distinction between tent camping nights and cabin camping nights, so these will all be recorded as regular camping nights in TroopWebHost, not cabin camping.
There is also no distinction between hiking miles and backpacking miles, so all miles will be recorded as hiking miles.
The file does distinguish between community service hours and conservation service hours.
Any necessary corrections should be made in TroopWebHost after the upload is complete.
Upload Scout Data From ScoutBook™
If you cannot access the ScoutbookPlus Roster Report - which is currently the best way to transfer your membership date into TroopWebHost - you may be able to pull your membership data from Scoutbook. If so, the first file you should transfer from ScoutBook™ is the Scout file. It contains information about each scout in your troop.
Begin by exporting the "Scouts" file from ScoutBook. To do this, sign into Scoutbook and select My Dashboard.
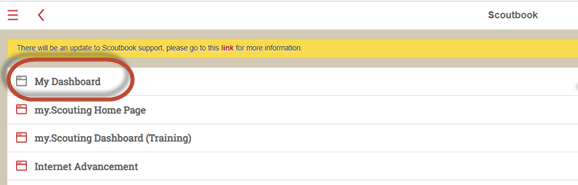
Select the unit whose scouts you wish to export.
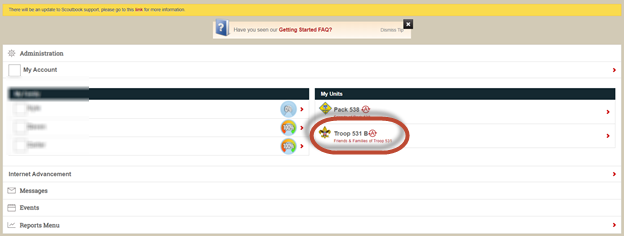
Select Export/Backup.
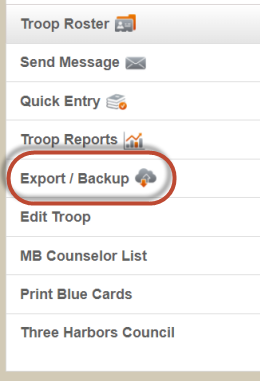
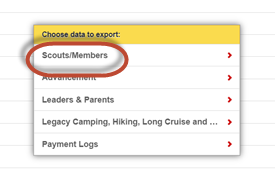
Select Scouts/Members from the pop-up menu.
This will create a CSV file. Save it to your local drive and remember the location and file name.
Then log on to TroopWebHost, and from the Main Menu go to Membership → Upload Members → Upload Scouts From ScoutBook.
You should see the screen shown here:
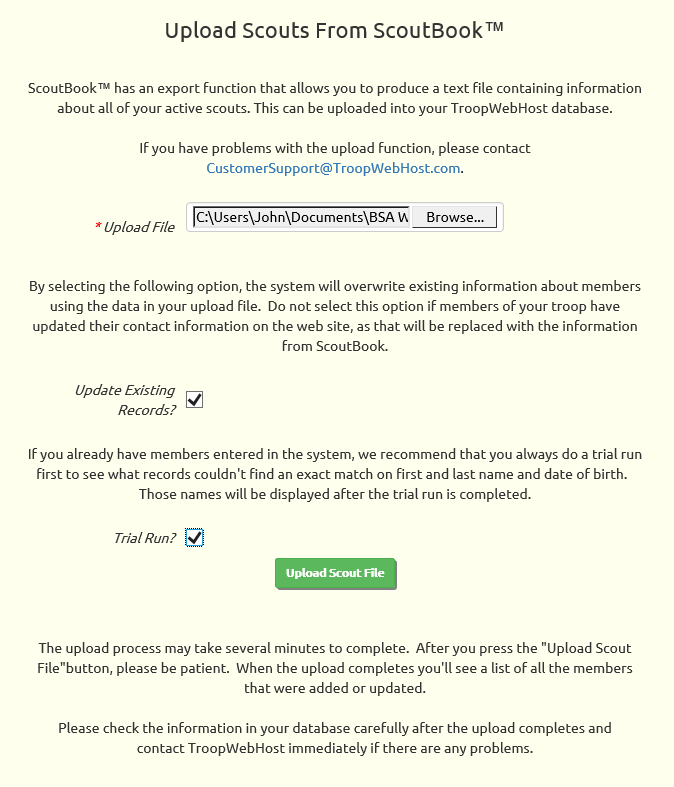
Click the Browse button to find the Scouts file that you exported from ScoutBook™.
Click the Upload Scout File button to begin loading this data into TroopWebHost.
This will add each scout to the Active Scouts page.
It will also create a User ID and Password for each scout.
It will not create a relationship between the scout and his parents, since that relationship information is not provided in the ScoutBook file.
It will only link a scout to his patrol if that patrol has already been created in TroopWebHost with exactly the same name as appears in the file.
IMPORTANT NOTE: The "Scouts" file does not contain any direct identification of the scouts' parents, so we attempt to infer these relationships from common email addresses. This will often work, but we recommend that you review your data after the upload to ensure all of the expected relationships were created. If relationships are missing, parents will not be able to access their scouts' information, add money to their accounts, or sign them up for events.
Once you've completed this upload and also (following the directions on the next page) uploaded the adults, please go to Membership → View / Maintain Members → Active Scouts and update each scout. Scroll to the bottom of the detail page to view this scout's relationships. If one or more parents are missing, click Add Parent Relationship to link this scout to their parents. Do this for each scout on the list. This will link the scouts to their parents, which will allow parents to access their scouts' information.
Should You Update Existing Records?
The two checkboxes on the screen only apply if you already have membership data in TroopWebHost.
If you check Update Existing Records the system will attempt to find a match on BSA ID or first and last name and date of birth and apply all of the information in the upload file to your TroopWebHost database.
If you check Trial Run? it won't actually update your database, but it will show you which records found a match, and which did not.
These options allow you to keep your TroopWebHost database in synch with ScoutBook™. We do not recommend this approach because it will overwrite any changes made to the data directly in TroopWebHost. Since each member has the ability to update their own contact information from the My Stuff menu, you really can't prevent this.
If you do choose to update existing records, we recommend using the Trial Run option the first time you process each new file to verify what records will be added and which will be updated.
Upload Adults From ScoutBook™
The next file you should transfer from ScoutBook™ is the Adults file. It contains information about each parent and adult leader in your troop.
Begin by exporting the "Leaders & Parents" file from ScoutBook. To do this, sign into Scoutbook and select My Dashboard.
Select the unit whose scouts you wish to export.
Select Export/Backup.
Select Leaders & Parents from the pop-up menu.

This will create a CSV file. Save it to your local drive and remember the location and file name.
Then log on to TroopWebHost, and from the Main Menu go to Membership → Upload Members → Upload Adults From ScoutBook.
You should see the screen shown here:
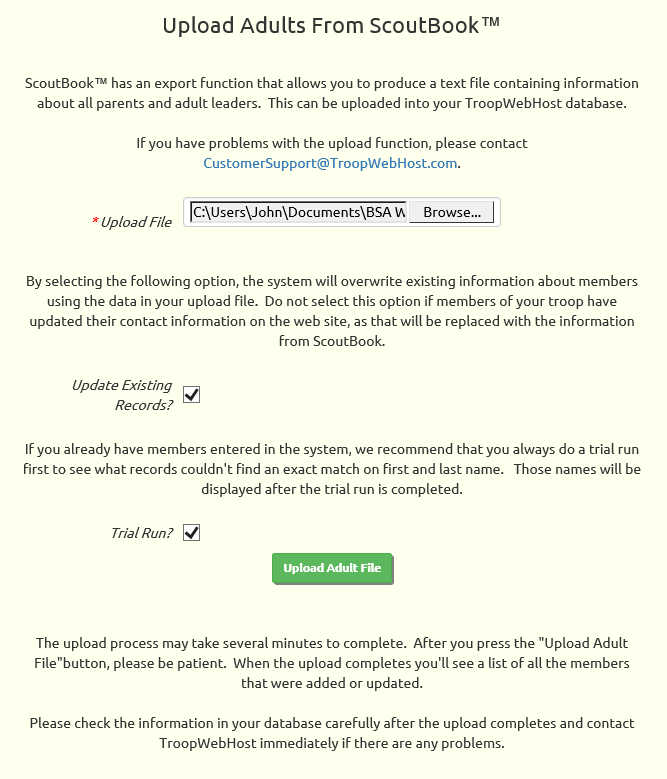
Click the Browse button to find the Adults file that you exported from ScoutBook™.
Click the Upload Adult File button to begin loading this data into TroopWebHost.
This will add each adult to the Active Scouts page.
It will also create a User ID and Password for each adult.
IMPORTANT NOTE: The "Leaders and Parents" file does identify each each parent's scouts, so we attempt to infer these relationships from common email addresses. This will often work, but we recommend that you review your data after the upload to ensure all of the expected relationships were created. If relationships are missing, parents will not be able to access their scouts' information, add money to their accounts, or sign them up for events.
Once you've loaded both the adults and scouts into TroopWebHost, please go to Membership → View / Maintain Members → Active Scouts and update each scout. Scroll to the bottom of the detail page to view this scout's relationships. If one or more parents are missing, click Add Parent Relationship to link this scout to their parents. Do this for each scout on the list. This will link the scouts to their parents, which will allow parents to access their scouts' information.
Should You Update Existing Records?
The two checkboxes on the screen only apply if you already have membership data in TroopWebHost.
If you check Update Existing Records the system will attempt to find a match on BSA ID or first and last name and apply all of the information in the upload file to your TroopWebHost database.
If you check Trial Run? it won't actually update your database, but it will show you which records found a match, and which did not.
These options allow you to keep your TroopWebHost database in synch with ScoutBook™. We do not recommend this approach because it will overwrite any changes made to the data directly in TroopWebHost. Since each member has the ability to update their own contact information from the My Stuff menu, you really can't prevent this.
If you do choose to update existing records, we recommend using the Trial Run option the first time you process each new file to verify what records will be added and which will be updated.
Upload ScoutbookPlus™ Report Builder Advancement
This function will be phased out July 31, 2026. Please use the Scoutbook Plus Advancement file to transfer advancement from Scoutbook to TroopWebHost.
ScoutbookPlus has a Report Builder that can generate a CSV file that includes all ranks, merit badges, and awards that have been earned or are in progress for all of your active scouts.
To generate the Advancement Report, sign into ScoutbookPlus.
Select Reports from the Navigation menu on the left side of the sceen.
Click “+ New Report”
Click New Custom Report (Report Builder).
In the next page, enter a Report Title such as “Advancement Report”. Select the desired options as shown below. Do NOT select the option "Show Pivoted Presentation". It is recommended to click the "Show Subunit" & "Show BSA Membr #". Then click Run.
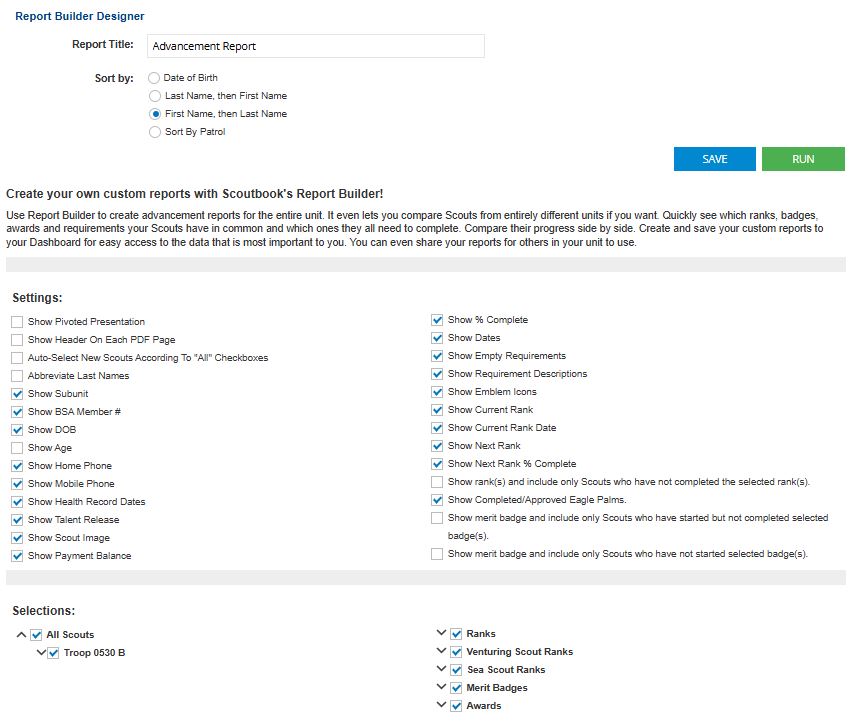
Click the CSV button

This will create a CSV file. Save it to your local drive and remember the location and file name.
This file can now be imported into TroopWebHost by going to Advancement → Upload Advancement → Upload ScoutbookPlus ReportBuilder Advancement.

When the upload is complete, it will display a status report, an example of which is provided below. Please note that you can collapse any section of this report by clicking on the blue header row.
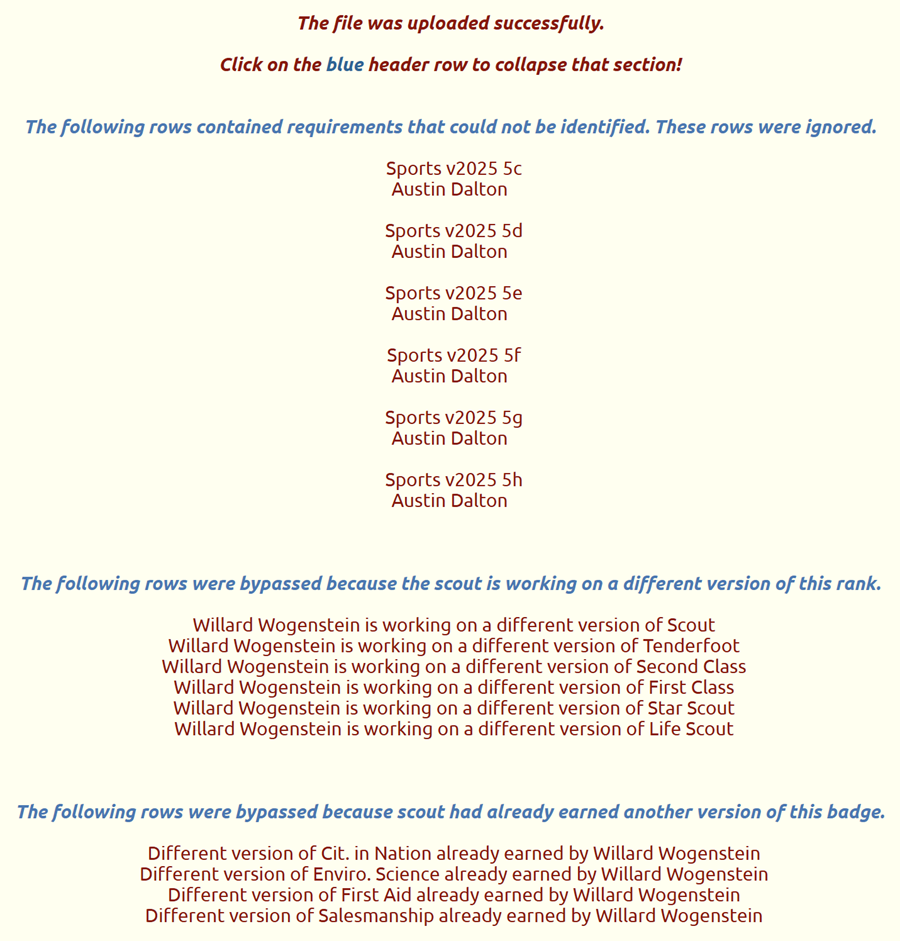
If there are any merit badge requirements that don't align with their definitions in TroopWebHost, you may need to enter these manually into TroopWebHost. If you believe the TroopWebHost definition should be updated to match ScoutbookPlus, please open a Support Ticket and provide us with the details.
One example of such a mismatch involves the Sports Merit Badge. The TroopWebHost definition for requirement 5 is divided into two subsections, one for each of the two selected sports. ScoutbookPlus only provides one set of subrequirements, which doesn't allow you to track each sport separately. In this case we do not plan to change our requirements to match ScoutbookPlus.
The report will also list all ranks, merit badges, awards, and requirements that were added. It does not list any that were already in TroopWebHost.
Upload Events From Scoutbook
There was, not so long ago, a Feature Assistant Extension for Scoutbook that allowed you to export the events from your Scoutbook calendar to a CSV file. Detailed instructions may be found here. This extension may no longer be functional.
If you are able to produce this file, be sure to save the file directly to disk. Do NOT open in Excel or a similar spreadsheet program. Saving the file from Excel may change the format in a way that could cause the upload to fail.
To upload this file, please open the main menu to Calendar → Upload Events → Upload Scoutbook Events.
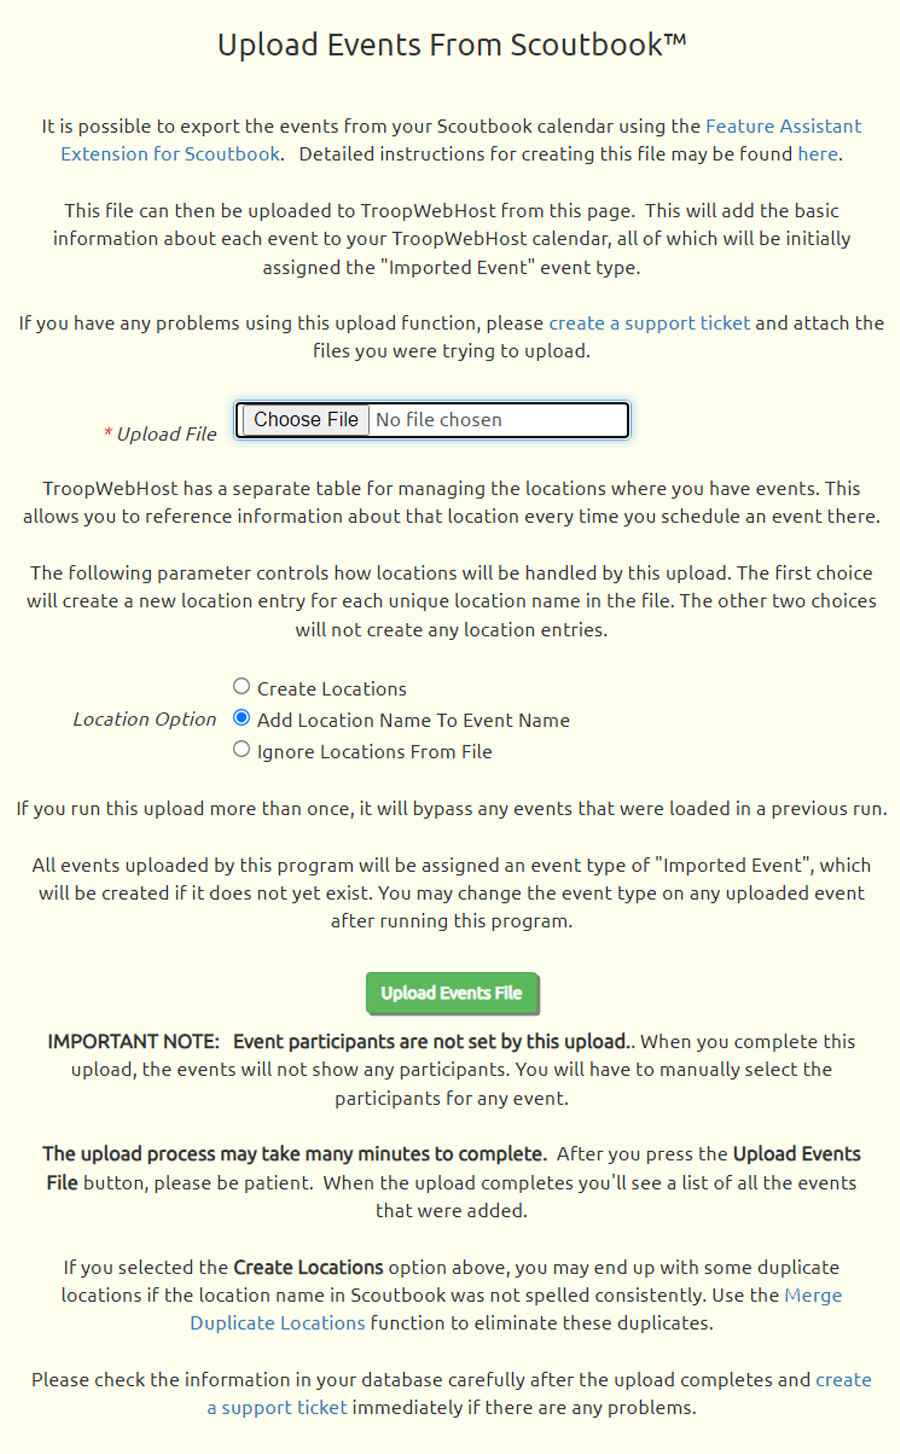
Click the Choose File button to find the Events file that you exported from Scoutbook.
Unless you were very consistent about how you entered locations in Scoutbook, we recommend that you NOT select the first Location Option: "Create Locations". This will create a new Location record in TroopWebHost for each unique location name found in the file. If the same location was entered in many different ways, this could create a lot of duplicate entries that will take a lot of time to clean up.
Click the Upload Events File button to begin loading this data into TroopWebHost. This can take many minutes to run, so please be patient and do not exit this page.
When the upload completes, the page will redisplay, this time with information about errors and successes.
If you chose the "Create Locations" option, it will add entries to the Locations table. You can eliminate any duplicate locations with the Merge Duplicate Locations function.
If it did not already exist, the program will create an event type "Imported Event", which will be assigned to all of the events that it uploads. You may want to change the event type of each of these events to something more appropriate.
This upload will not populate the participant list for each event.
Upload Scout Participation History From ScoutBook™
If you cannot access the ScoutbookPlus Activity Log Report, you may be able to pull your camping nights, service hours and hiking miles from Scoutbook.
Log on to Scoutbook, select the Export function, and choose "Legacy Camping, Hiking, Long Cruise and ..." , as shown below.
Then log on to TroopWebHost, and from the Main Menu go to Advancement → Upload Advancement → Upload ScoutBook Plus Activity Log Report
You should see the screen shown here:
Click the Browse button to find the log file that you exported from ScoutBook™.
Click the Upload ScoutBook Participation History button to begin loading this data into TroopWebHost.
This process may take several minutes, so please be patient and do not click the button a second time.
The file does not include any distinction between community service hours and conservation service hours, so all hours will be logged as community service in TroopWebHost.
Similarly, the file does not include any distinction between tent camping nights and cabin camping nights, so these will all be recorded as regular camping nights in TroopWebHost, not cabin camping.
There is also no distinction between hiking miles and backpacking miles, so all miles will be recorded as hiking miles.
Any necessary corrections should be made in TroopWebHost after the upload is complete.
Moving Your Data From TroopTrack™ to TroopWebHost™
 TroopWebHost makes it easy to move much of your data from TroopTrack™, using files that can easily be exported from your TroopTrack site.
Most of the files you'll need come from the TroopTrack page Request a Spreadsheet Import, which is located in the TroopTrack site at YourTroopName.TroopTrack.com/manage/import. These files are:
You must begin with the Users file. This will populate your membership table in TroopWebHost. After that you may upload the files in any order.
You can capture additional information on each troop member from a canned report called Member Details.
You may also transfer each member's current financial balance from the Money Accounts summary export, which can be generated from the TroopTrack Money Accounts page.
Rather than transfer the Training file from TroopTrack, we recommend that you transfer training records from the BSA's MyScouting site.
Please continue to the next page to learn how to produce and upload the Users file.
Upload Users File From TroopTrack™
The first file you should transfer from TroopTrack™ is the Users file. It contains basic information about each adult and each scout in your troop.
To generate this file, log on to your TroopTrack site and go to the Request a Spreadsheet Import page, as shown below.
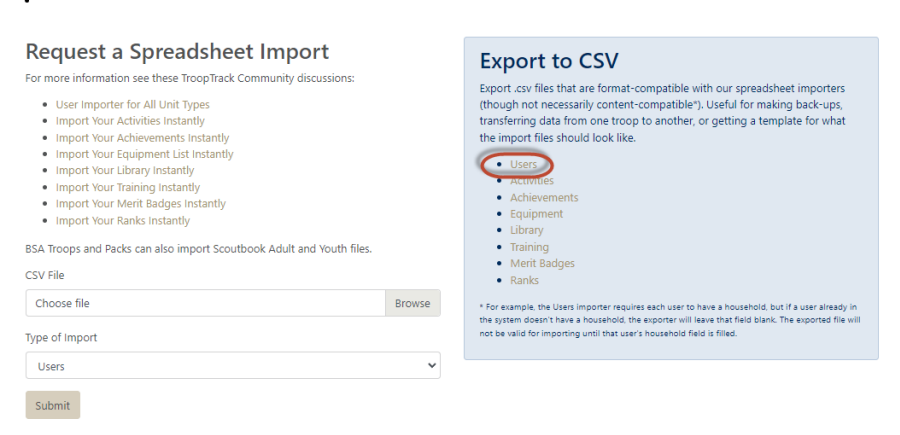
Under "Export to CSV", click on the Users link. This will generate a CSV file that you should download to your local drive.
Then log on to your TroopWebHost site and open the main menu to Membership → Upload Members → Upload Users From TroopTrack.
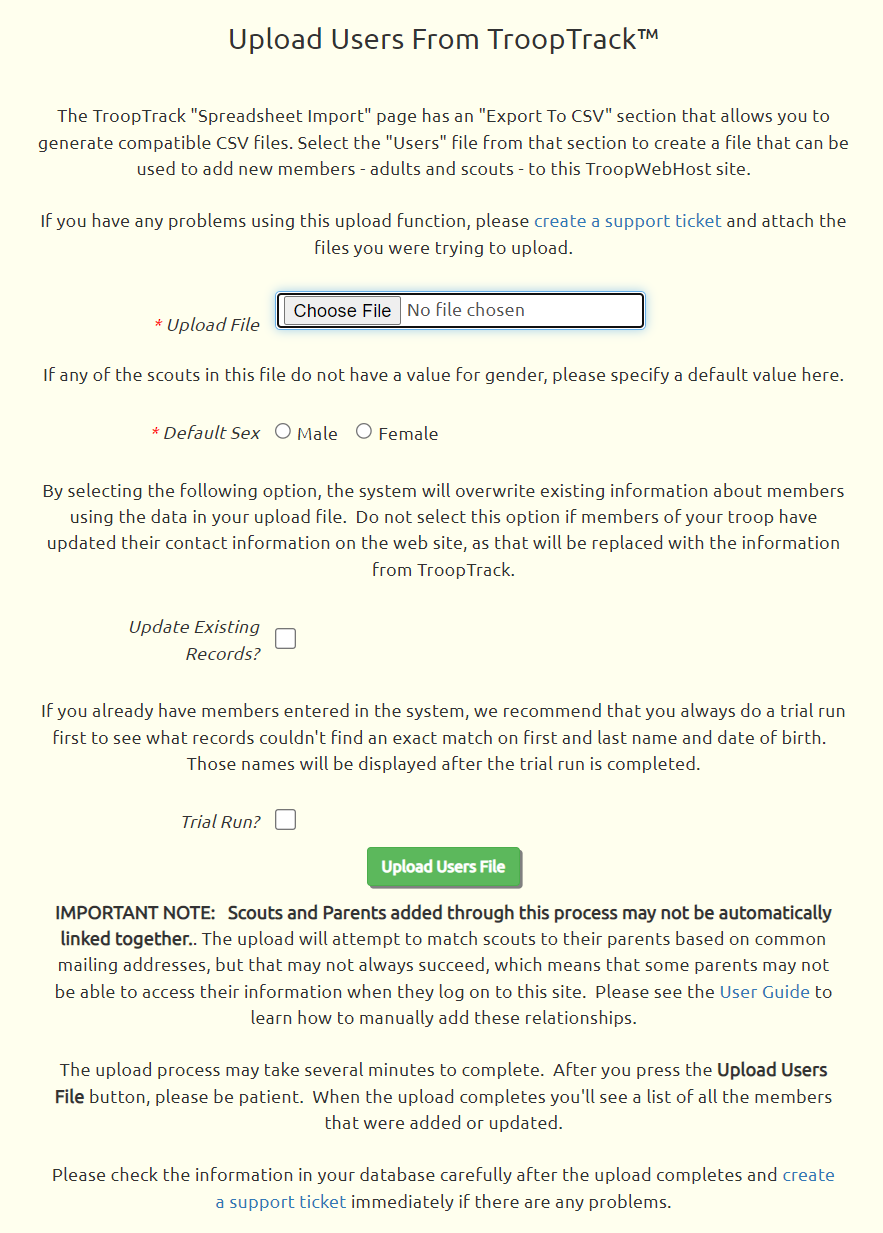
Click the Choose File button to find the Users file that you exported from TroopTrack.
Choose the Default Sex to be assigned to scouts for whom the Users file does not contain a gender.
Put a checkmark by Update Existing Records if you've already added some members into TroopWebHost and want to update those records with information from the Users file.
Always put a checkmark in the Trial Run box the first time you upload any file. This will allow you to see any problems in your data which can be corrected before you permanently add this information to your site.
Click the Upload Users File button to begin loading this data into TroopWebHost. This can take many minutes to run, so please be patient and do not exit this page.
When the upload completes, the page will redisplay, this time with information about errors and successes.When you are satisfied that the upload is going to process your data correctly, run it again with the same file, this time with the Trial Run box unchecked.
This will add each scout to the Active Scouts page and add each adult to the Active Adults page.
It will also create a User ID and Password for each scout and each adult.
It will also create patrols that are referenced by any members, if they didn't already exist; these will be listed at the top of the page. These patrols will not have a gender assignment. If your site has both girl and boy patrols, please go to Membership → Patrols, Ships & Crews → Patrols to add the gender on these patrols.
IMPORTANT NOTE: The Users file does not contain any direct identification of the scouts' parents, so we attempt to infer these relationships from common mailing addresses. This will often work, but we recommend that you review your data after the upload to ensure all of the expected relationships were created. If relationships are missing, parents will not be able to access their scouts' information, add money to their accounts, or sign them up for events.
To ensure that you have the relationships between each scout and their parents, please go to Membership → View / Maintain Members → Active Scouts and update each scout. Scroll to the bottom of the detail page to view this scout's relationships. If one or more parents are missing, click Add Parent Relationship to link this scout to their parents. Do this for each scout on the list. This will link the scouts to their parents, which will allow parents to access their scouts' information.
Upload Member Details CSV Report From TroopTrack™
When you uploaded the TroopTrack™ Users file, you populated the membership table in TroopWebHost with all of your troop's members. But the Users file has only limited information about each person, mostly their contact information, i.e. mailing address, email address, and phone numbers.
TroopTrack's Member Details report has additional information on each member, including drivers license, Order of the Arrow dates and notes, and medical form dates.
You can produce this report from the TroopTrack canned reports page, as shown here:
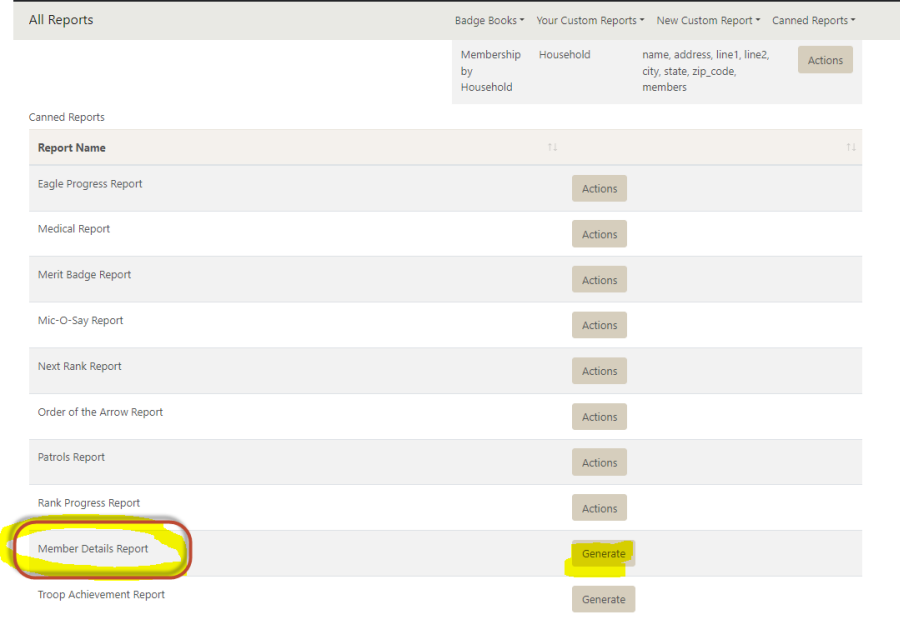
Click the Generate button on that row. This should produce a CSV file that you can save to your local drive.
Then log on to your TroopWebHost site and open the main menu to Membership → Upload Members → Upload Member Details From TroopTrack.
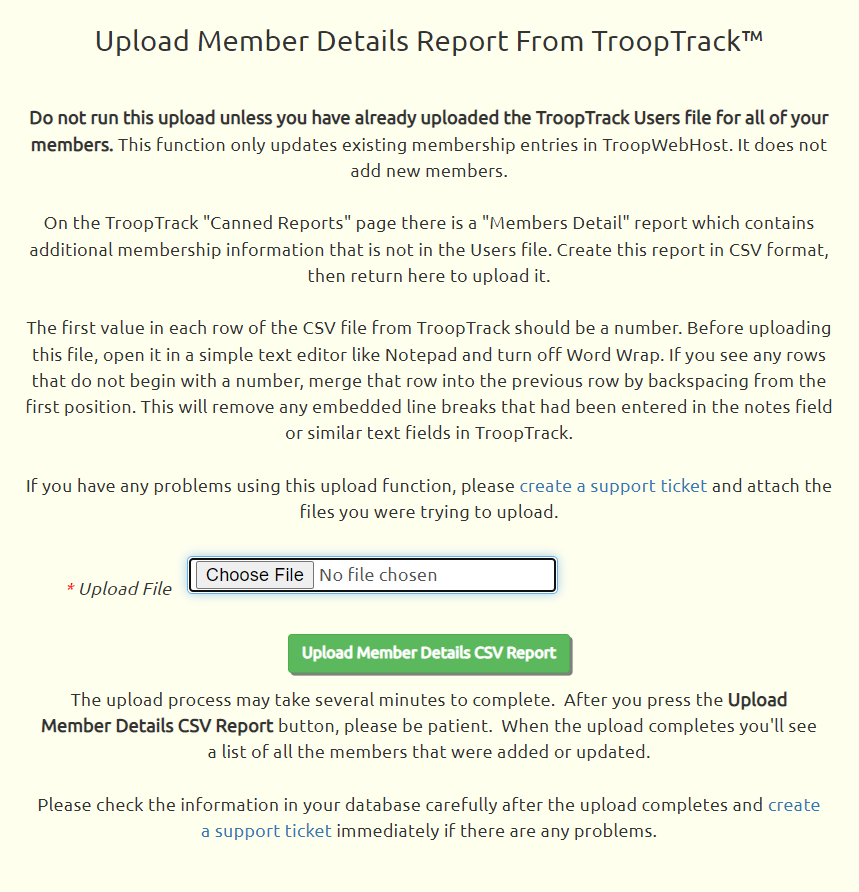
Click the Choose File button to find the Member Details CSV file that you exported from TroopTrack.
Then click the Upload Member Details CSV Report button to begin loading this data into TroopWebHost. This can take several minutes to run, so please be patient and do not exit this page.
This upload will not load any new members into your database. It only updates existing records.
When the upload completes, the page will redisplay, this time with information about errors and successes. It is safe to upload the same file multiple times, so you can correct any errors as needed and upload it again.
Upload Advancement From TroopTrack™
Once you've uploaded the Users file, you may upload advancement data from the following TroopTrack files:
- Ranks
- Merit Badges
- Achievements
To generate these files, log on to your TroopTrack site and go to the Request a Spreadsheet Import page, as shown below.
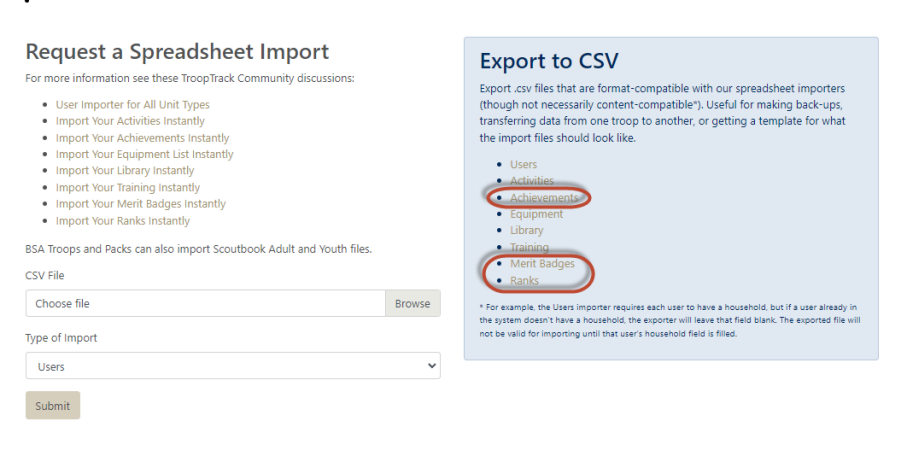
Under "Export to CSV", click on each of the files circled above. This will generate CSV files that you should save to your local drive.
Then log on to your TroopWebHost site and open the main menu to Advancement → Upload Advancement → Upload TroopTrack Advancement.
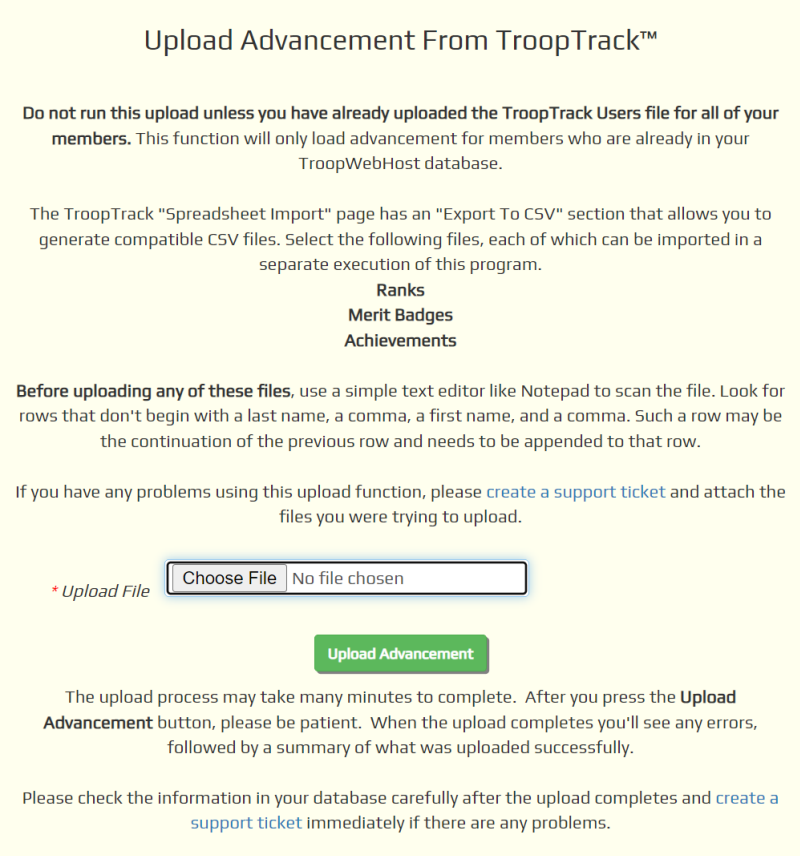
Click the Choose File button to find one of the advancement files that you exported from TroopTrack.
Click the Upload Advancement button to begin loading this data into TroopWebHost. This can take several minutes to run, so please be patient and do not exit this page.
When the upload completes, the page will redisplay, this time with information about errors and successes.
You may then run it again for each of the other advancement files.
TroopTrack only allows its users to sign off on merit badge requirements at the top level. When you upload the Merit Badges file, we will mark all of the subrequirements complete for each top level requirement that TroopTrack shows as completed.
You may find that the Achievements file contains many awards that are not recognized. These can be added to the known list of awards in TroopWebHost from the Special Awards page.
For completed ranks, merit badges, and awards, TroopTrack only tracks the date awarded and the date reported. We use the "date reported" to fill our Date Submitted To Council field. There is no source in TroopTrack for our Court of Honor date.
If you need to upload the same file again, you may do so without fear of creating duplicate records.
Upload Activities From TroopTrack™
Once you've uploaded the Users file, you may upload activity credits from the TroopTrack Activities file. This information will be added to Credit For Other Activity to give your members credit for the camping nights, service hours, hiking miles, and canoeing miles that were earned prior to switching to TroopWebHost. Going forward, TroopWebHost will compute these credits automatically based on participation in events on the TroopWebHost calendar.
To generate this file, log on to your TroopTrack site and go to the Request a Spreadsheet Import page, as shown below.
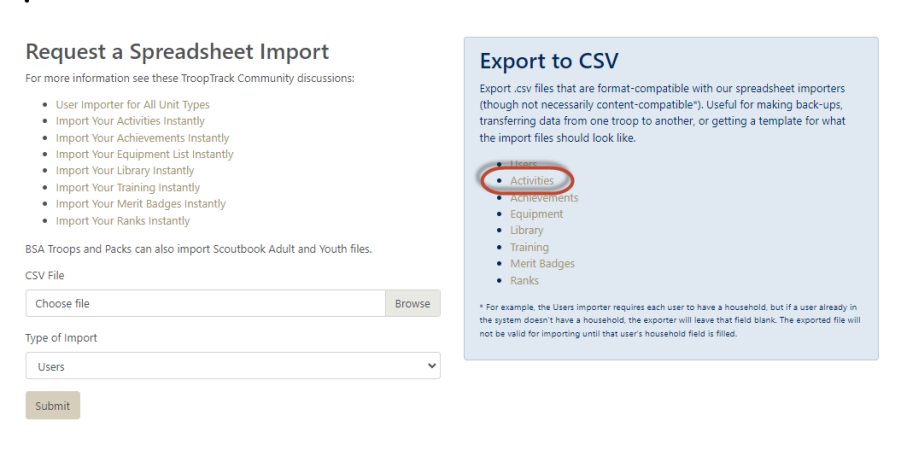
Under "Export to CSV", click on Activities. This will generate a CSV file that you should save to your local drive.
Then log on to your TroopWebHost site and open the main menu to Advancement → Upload Advancement → Upload TroopTrack Activities.

Click the Choose File button to find the file that you exported from TroopTrack.
Click the Upload Activities button to begin loading this data into TroopWebHost. This can take several minutes to run, so please be patient and do not exit this page.
When the upload completes, the page will redisplay, this time with information about errors and successes.
You may then run it again for each of the other advancement files.
Upload Equipment & Library From TroopTrack
TroopTrack allows you to export Equipment and Library files from the Request a Spreadsheet Import page. These files can be used to populate the TroopWebHost Inventory table, but both will require some manipulation.
TroopWebHost Inventory requires each entry to have a unique identifier, a "key value" that distinguishes that item from other items, which may be similar. So, for example, if you have three copies of the Cooking merit badge pamphlet, the unique identifiers could be "Cooking01", "Cooking02", and "Cooking03".
The TroopTrack files do not contain a unique identifier. Before you can upload this data, you will need to create a unique identifier column and populate it with a unique value on each row. This can be best done in a spreadsheet program like Excel.
You will use our Inventory Upload program to upload the file. This requires a specific set of column headings, which appear in the first row of the file. Those values must be as follows:
InventoryType, ItemID, Description, Condition, Category, Location, LocationDetail, SerialNumber, PurchaseDate, PublicationDate, AcquiredCost, EstimatedLifeInMonths, ReplacementCost
InventoryType must be either "Equipment" or "Library". This determines whether this item will be added to Troop Equipment or Library Materials.
ItemID is the unique identifier for this inventory item. It is the "key" that you need to create for each item coming from TroopTrack.
Description is a brief, concise description of this inventory item. For the TroopTrack equipment file, this could come from the "Name" column, or you might combine the contents of the "Name" and "Description" columns.
Condition is the current condition of this item. Both TroopTrack files have a "Condition" column that could be used here.
Category must be one of the categories that you have defined in the Inventory Category table. It must match the Inventory Type for this item. I.e., if you are adding a "Library" item, the category must be one that is defined for "Library". You may leave this column empty, unless you wish to set up the Inventory Category table first.
Location must be one of the locations that you have defined in the Inventory Location table. It must match the Inventory Type for this item. I.e., if you are adding an "Equipment" item, the location must be one that is defined for "Equipment". This should be left empty unless you decide to set up these inventory locations first.
LocationDetail is the specific location on which this item is stored, which could be a shelf number, bin number, etc. The TroopTrack Equipment file has a Location column which may be used for this purpose. For the TroopTrack Library file, this can be left empty.
SerialNumber is the serial number on this item. This may be left empty.
PurchaseDate is the date on which this item was purchased. The TroopTrack Equipment file has a corresponding column which may be used. It can be left empty for the TroopTrack Library upload.
PublicationDate is the date when this library item was published. This column should be left empty.
AcquiredCost is the price paid when this item was purchased. The TroopTrack Equipment file has a Cost column which may be used. It can be left empty for the TroopTrack Library upload.
EstimatedLifeInMonths is the estimated life expectancy of this items from date of purchase, in months. This can be left empty.
ReplacementCost is the estimated cost to replace this item. This can be left emtpy.
Once you've created the spreadsheet in the correct format, it must be saved as a CSV file. If you are using Excel, it will try to persuade you not to leave it in this format; please ignore those warnings.
Then go to Inventory → Maintain Inventory and press the Upload Inventory button, as shown here. This will allow you to upload the CSV file that you just created.
If you have any problems with the upload, please create a Support Ticket and attach the file to this ticket.
Upload Account Balances From TroopTrack™
TroopTrack allows you to export a Money Accounts Summary file from the TroopTrack Money Accounts page. This file can be used to populate the TroopWebHost member account balances, but this will require some manipulation of the file first.
You will need to edit the TroopTrack Money Accounts Summary file in Excel or something similar.
The TroopTrack file contains the balances for many types of accounts. The only type you can upload is the member account balance. Delete all of the rows that do not represent member balances.
The TroopWebHost Upload Account Balances function requires that the first row contains these column headings, in this specific order:
LastName,FirstName,CurBal
Edit your TroopTrack file to contain just these three columns, in that order.
Once you've created the spreadsheet in the correct format, it must be saved as a CSV file. If you are using Excel, it will try to persuade you not to leave it in this format; please ignore those warnings.
Then go to Money → Upload Account Balances From TroopLedger to upload the file you just created, as shown here.
If you have any problems with the upload, please create a Support Ticket and attach the file to this ticket.
Moving Your Data From TM Web 2.0 to TroopWebHost™
TroopMaster offers two distinct versions of its software. This section will describe how to migrate data from the new web-based version, known as TM Web 2.0.
We also provide tools for moving data from the old, desktop PC version of TroopMaster, which you'll find here.
There are three types of files that can be transferred from TM Web 2.0 to TroopWebHost:
- Personal Data. This contains contact information for each scout, his parents, and other adult leaders.
- Individual History. This will transfer rank requirements earned, completed merit badges, partial merit badges, awards earned, training, and leadership history for each scout.
- Individual Participation. This will transfer camping nights, service hours, hiking miles, cycling miles, and paddling miles for each scout.
We recommend that you perform the uploads in the order indicated above.
The next few pages provide details on each type of upload.
Upload Members From TM Web 2.0
The first file you should transfer from TM Web 2.0 is the Personal Data file. It contains information about each scout in your troop and his parents.
Begin by exporting the file from TM Web 2.0:
- Log on to TM Web 2.0
- From the "File" menu, select "Export", and then select "Export Personal Data".
- Under "Include Scouts", select "All Scouts".
- Under "Include Adults", select "All Adults".
- Under "Include MBCs", select "No Counselors".
- Under "Include POCs", select "No Contacts".
- Under "Select the fields to include your export", select all fields.
- Press the "Export CSV" button to create a file.
- Remember where you created the file so you can find it later!
In TroopWebHost, open the Membership menu and select Upload Members, then select Upload Members From TM Web 2.0.
You should see the screen shown here:
Click the Browse button to find the Scout file that you exported from TM Web 2.0.
Click the Upload Personal Data File button to begin loading this data into TroopWebHost.
This will add each scout to the Active Scouts page and each parent to the Active Adults page.
It will also create a User ID and Password for each scout and each parent.
It will update records when an exact match is found on first and last name.
If you check Trial Run? it won't actually update your database, but it will show you which records found a match, and which did not.
We strongly recommend that you use the Trial Run option the first time you load any new file, to make sure you are not accidentally creating duplicate records for people already in your system.
Upload Individual History PDF from TM Web 2.0
TM Web 2.0 can produce an Individual History report which contains information about each scout's achievements. This can be used to transfer:
- Completion dates for completed ranks
- Completion dates for rank requirements for ranks in progress
- Completion dates for merit badges
- Partial merit badges
- Completion dates for special awards
- Leadership history
- Training history
This function should not be used unless you have completed the transition to the 2016 rank requirements in TM Web 2.0 for all of your scouts' uncompleted ranks.
You must have your preferences set in TM Web 2.0 so that scout's names are displayed beginning with the last name, followed by a comma, followed by the nickname or first name. Dates should be displayed with a two digit year, like this: 12/25/16.
To produce this report:
- Log on to TM Web 2.0
- From the "Reports" menu, select "Advancement", then select "Individual History".
- Select "All Scouts".
- Select all ranks
- Do NOT select "Omit details on completed ranks"
- Under "Merit Badges", select "Earned MB List" and "Partial MB's", but do not select any of the options under "Partial MB's"
- Under "Other", select "Special Awards", "Training", and "Leadership History"
- Click the "Generate Report" button.
- Remember where you saved these files so you can find them when you're ready to upload them.
This should create a PDF file. Open the PDF to verify that all of your active scouts are listed.
When you are ready to upload these files, log on to your TroopWebHost site and go to Advancement → Upload Advancement → Upload Individual History PDF from TM Web 2.0 to view a page like the one shown below.
Use the Browse button to find the PDF file you produced from TM Web 2.0.
Press the Update Individual History Report button and then wait for the process to complete.
The program will transfer the following data:
- All completed ranks.
- All rank requirements that have been completed for ranks not yet earned. If you entered "Complete" in TroopMaster instead of a date, we will set the completion date to 1/1/2000 in TroopWebHost.
- All merit badges that have been completed by each scout.
- All merit badges that have been started by each scout, but not which requirements have been completed.
- All awards that have been earned by each scout, but only if we can find an exact match for the name of that award in the TroopWebHost Special Awards table.
- The leadership history for each scout, but only if we can find an exact match for the name of that position in the TroopWebHost Leadership Positions table.
- All training that was completed by each scout, but only if we can find an exact match for the name of that training course in the TroopWebHost Training Courses table.
The Individual History report includes no indication of whether a given rank, merit badge or award has been recorded or presented. As a result, the upload will not set the Date Awarded, Court of Honor Date, or Date Submitted to Council. These dates should be set after the upload using the Set Award Date function.
The upload may take several minutes. When it finishes, it will display a status report.
The status report begins by listing the awards, leadership positions and training courses for which an exact match could not be found.
This may be because the name of that item is spelled differently in TroopWebHost. Or it may be missing entirely from TroopWebHost.
Save a copy of this report. You can copy the entire page and paste it into a word processing program if you don't want to print it.
Then update your TroopWebHost tables to make spelling corrections or add missing entries:
- For awards, go to Site Configuration → Special Awards
- For leadership, go to Site Configuration → Leadership Positions
- For training, go to Site Configuration → Training Courses
Once you've updated these tables, you can reload the file again. You can reload the file as many times as you'd like without fear of creating duplicate entries.
Upload Individual Participation PDF from TM Web 2.0
TM Web 2.0 can produce an Individual Participation report that provides the details on scout participation in past troop activities.
You must have your preferences set in TM Web 2.0 so that scout's names are displayed beginning with the last name, followed by a comma, followed by the nickname or first name. Dates should be displayed with a two digit year, like this: 12/25/16.
To produce this report:
- Log on to TM Web 2.0
- From the "Reports" menu, select "Activities", then select "Individual Participation".
- Do not select any of the options under "Summary".
- Under "Select Members", click the "Scouts" radio button and select "All Scouts".
- Under "Activities", select "All Levels" and all types. Do not filter on "Credit Toward".
- Click the "Generate Report" button.
- Remember where you saved the file so you can find it when you're ready to upload them.
This will produce a PDF document. Open the PDF to verify that it contains the expected information on all of your scouts.
Produce one report file for all of your scouts. If you want to transfer participation history for your adults, create a second file for the adults you wish to transfer.
In TroopWebHost, open the Advancement menu and select Upload Advancement, then select Upload Individual Participation PDF from TM Web 2.0 to view the page shown below.
Click the Browse button to find the PDF file that you created from TM Web 2.0.
If you are loading the file with adults, click the Adults? checkbox; if you are loading scouts leave the box unchecked.
Click the Upload Individual Participation PDF button to begin loading this data into TroopWebHost.
The program will identify scouts or adults based on an exact match of nickname, last name, and date of birth. If it cannot find an exact match it will bypass the records for that person.
The program will ignore entries for which Credit For Other Activity already exists for the same person, activity type, date, and amount. This allows you to run this upload multiple times without creating duplicate records.
Moving Your Data From TroopMaster™ to TroopWebHost™
 TroopMaster offers two distinct versions of its software. This section will describe how to migrate data from the old, desktop PC version of TroopMaster.
We also provide tools for moving data from the new web-based version, known as TM Web 2.0., which can learn about here.
TroopMaster™ allows you to export data to a text file which can be uploaded to TroopWebHost.
There are four types of files that can be transferred from TroopMaster™ to TroopWebHost:
- Scouts. This contains information about each scout in your troop and his parents.
- Adults. This contains information about each adult leader in your troop.
- Individual History. This will transfer rank requirements earned, completed merit badges, partial merit badges, awards earned, training, and leadership history for each scout.
- Individual Participation History. This will transfer camping nights, service hours, hiking miles, cycling miles, and paddling miles for each scout.
We recommend that you perform the uploads in the order indicated above.
Uploading Parents and Adult Leaders
Unlike TroopWebHost, TroopMaster™ stores information about adult leaders separately from information about parents, even if it involves the same person. This means that information about an adult - such as current address or phone numbers - can be updated in one place but not the other, with no clue as to which one is correct.
When you upload the Scouts file into TroopWebHost, the program will create a new record for each parent of each scout. If two scouts have the same parent, it will use the parent's name to link to an existing record rather than create a duplicate.
If you think the information you have in TroopMaster™ about your adult leaders is more accurate than the corresponding parent records, you may use the "Update" option to apply that information to the parent records loaded earlier.
The next few pages provide more information on each type of upload.
Upload Scout Data From TroopMaster™
The first file you should transfer from TroopMaster™ is the Scout file.
It contains information about each scout in your troop and his parents.
Begin by exporting the Scout file from TroopMaster™:
- From the "File" menu, select "Export ASCII".
- On the Export Data screen, check the box that says "Include field names as first line of export"
- Set the delimiter to be a comma.
- Select "Scout Data" as your area.
- Select "MM/DD/YYYY" as your date format.
- Select all available fields.
- Press the Export button to create a file.
- Remember where you created the file so you can find it later!
In TroopWebHost, open the Membership menu and select Upload Members, then select Upload Scouts From TroopMaster™.
You should see the screen shown here:

Click the Browse button to find the Scout file that you exported from TroopMaster™.
Click the Upload Scout File button to begin loading this data into TroopWebHost.
This will add each scout to the Active Scouts page and each parent to the Active Adults page.
It will also create a User ID and Password for each scout and each parent.
Should You Update Existing Records?
The two checkboxes on the screen only apply if you have previously transferred data from TroopMaster™.
If you check Update Existing Records the system will attempt to find a match on first and last name (and date of birth for scouts) and apply all of the information in the upload file to your TroopWebHost database.
If you check Trial Run? it won't actually update your database, but it will show you which records found a match, and which did not.
These options allow you to keep your TroopWebHost database in synch with TroopMaster™. We do not recommend this approach because it will overwrite any changes made to the data directly in TroopWebHost. Since each member has the ability to update their own contact information from the My Stuff menu, you really can't prevent this.
If you do choose to update existing records, we recommend using the Trial Run option to verify what records will be added and which will be updated.
Upload Adult Data From TroopMaster™
After you've loaded the Scout file from TroopMaster™, you may proceed to load the Adult file.
This contains information about each adult leader.
Begin by exporting the Adult file from TroopMaster™:
- From the "File" menu, select "Export ASCII".
- On the Export Data screen, check the box that says "Include field names as first line of export"
- Set the delimiter to be a comma.
- Select "Adult Data" as your area.
- Select "MM/DD/YYYY" as your date format.
- Select all available fields.
- Press the Export button to create a file.
- Remember where you created the file so you can find it later!
In TroopWebHost, open the Membership menu and select Upload Members, then select Upload Adult Leaders From TroopMaster™.
You should see the screen shown here:
Click the Browse button to find the Adult file that you exported from TroopMaster™.
Click the Upload Adult File button to begin loading this data into TroopWebHost.
This will add each adult leader to the Active Adults page. It will also create a User ID and Password for each person added.
Note that many of your adult leaders may already have been added to the system when you uploaded the Scout file, since it also contained information about each scout's parents.
If you wish to update those existing records, check the Update Existing Records box. The first time you do this we recommend that you also check the Trial Run? box; this will allow you to see which records will be added and which will be updated, before you actually apply this information to your database.
Upload Individual History
TroopMaster™ can produce two reports that contain most of the information about each scout's
achievements and participation in troop events:
- The Individual History report provides a detailed record of when each scout completed each rank requirement. It also lists each completed merit badge, each merit badge that has been started, awards that have been earned, and training and leadership history.
- The Individual Participation History report lists every troop event in which each scout has participated.
The next page of the User Guide will show how to load the Individual Participation History report.
The Individual History report is available in two versions: one that uses the 2016 rank requirements which you select from their "Awards/Advancement" submenu under "Reports", and an "old rules" version which you select from their "Awards/Advancement (old rules" submenu that uses the previous rank requirements. You will need to produce both versions of this report to successfully transfer your rank advancement data.
To produce this report:
- Open your TroopMaster™ software and select Individual History from the Reports menu.
- Select the "Text" format. Do not select PDF or rich text.
- Produce the report for all of your scouts. Do not include adults. Be sure to select the following options:
- Earned MB List
- Partial MBs
- Special Awards
- Training
- Leadership History
- Run this process twice, creating two output files: one using the 2016 rank requirements, and one using the "old rules".
- Remember where you saved these files so you can find them when you're ready to upload them.
After you've created the files, open them to verify that all of your active scouts are in both files. If you are unable to achieve this, you may want to use the alternative One File approach, which only uses the "new rules" version of the Individual History Report.
When you are ready to upload these files, log on to your TroopWebHost site and go to Advancement → Upload Advancement → Upload Individual History to view a page like the one shown below.

Use the Browse button to find the file you wish to upload.
Always begin with the version of the file that uses the 2016 rank requirements. After you've successfully loaded this file, immediately load the "old rules" file.
Here's why they must be loaded in this order. By default, in TroopWebHost all scouts will be set to use the 2016 requirements. The file with the 2016 rank requirements contains clues that allow us to detect scouts who completed a rank using the previous requirements. The upload will reset those scouts to the old requirements, which will allow the "old rules" file to populate those ranks for those scouts. (This "reset" is not permanent, which is why the second file must be loaded immediately after the first one.). The "old rules" file does not provide any clues as to which version of the requirements the scout used for a given rank, so it cannot be loaded first.
Click the Upload Individual History Report button to begin the upload.
The program will transfer the following data:
- All rank requirements that have been completed by each scout. If you entered "Complete" in TroopMaster instead of a date, we will set the completion date to 1/1/2000 in TroopWebHost.
- All merit badges that have been completed by each scout.
- All merit badges that have been started by each scout, as long as you've entered a start date for that badge in TroopMaster.
- All awards that have been earned by each scout, but only if we can find an exact match for the name of that award in the TroopWebHost Special Awards table.
- The leadership history for each scout, but only if we can find an exact match for the name of that position in the TroopWebHost Leadership Positions table.
- All training that was completed by each scout, but only if we can find an exact match for the name of that training course in the TroopWebHost Training Courses table.
The Individual History report includes no indication of whether a given rank, merit badge or award has been recorded or presented. As a result, the upload will not set the Date Awarded, Court of Honor Date, or Date Submitted to Council. These dates should be set after the upload using the Set Award Date function.
The upload may take several minutes. When it finishes, it will display a status report like the one shown below.
The status report begins by listing the awards, leadership positions and training courses for which an exact match could not be found.
This may be because the name of that item is spelled differently in TroopWebHost. Or it may be missing entirely from TroopWebHost.
Save a copy of this report. You can copy the entire page and paste it into a word processing program if you don't want to print it.
Then update your TroopWebHost tables to make spelling corrections or add missing entries:
- For awards, go to Site Configuration → Special Awards
- For leadership, go to Site Configuration → Leadership Positions
- For training, go to Site Configuration → Training Courses
Once you've updated these tables, you can reload the file again. You can reload the file as many times as you'd like without fear of creating duplicate entries.
One File
If you were unable to create the "old rules" version of the Individual History Report with all of your scouts, click the Switch to One File Version button on this page.
This will take you to a page that only requires the "new rules" version of the report, as shown below.
The limitations of this approach are:
- It will not transfer any information about partially completed ranks that are being done under the pre-2016 requirements.
- For ranks that were completed under the pre-2016 requirements, all requirements will be shown completed as of the date of the board of review.
The process for creating and processing the files is the same as described above, except that you will only upload one file that was created using the 2016 requirements.
If you have any problems with the upload that you cannot resolve, please attach both files to a support ticket along with a detailed description of the problem, and we will try to resolve it for you.
Upload Individual Participation History
TroopMaster™ does not have an export function that provides the details on scout participation in past troop activities,
but it does have a report that contains that information.
This TroopMaster™ report is called the Individual Participation History report. If you produce it in text format (with a file name extension of ".txt") you can upload this file into the Credit For Other Activity.
If you choose the PDF or HTML formats, the upload will fail. This program can only work with the text format report file.
Before running the report, please make sure your TroopMaster™ preferences are set to display nickname and last name on reports.
Produce one report file for all of your scouts. If you want to transfer participation history for your adults, create a second file for the adults you wish to transfer.
In TroopWebHost, open the Advancement menu and select Upload Advancement, then select Upload Individual Participation History to view the page shown below.
Click the Browse button to find the Individual Participation History Report file that you created from TroopMaster™.
If you are loading the file with adults, click the Adults? checkbox; if you are loading scouts leave the box unchecked.
Click the Upload Individual Participation History button to begin loading this data into TroopWebHost.
The program will identify scouts or adults based on an exact match of nickname, last name, and date of birth. If it cannot find an exact match it will bypass the records for that person.
The program will ignore entries for which Credit For Other Activity already exists for the same person, activity type, date, and amount. This allows you to run this upload multiple times without creating duplicate records.
Note: As an alternative approach, if you would prefer to see all of your past events show up in your TroopWebHost calendar, the TroopMaster "Individual Activity Report" contains all of the information needed to manually enter each event using Maintain Events. You can use the "Sign-up List" tab to enter the attendance at each past event.
Upload Members From SOAR™
SOAR is a simple scouting software platform that shut down unexpectedly in March of 2023. At that time TroopWebHost helped hundreds of SOAR customers migrate to TroopWebHost using the backup files that were graciously provided by SOAR management.
SOAR has since recovered and no longer makes these backup files available to their customers. However, they do support an export capability that can be used to transfer membership data to TroopWebHost.
Exporting Membership Data From SOAR
You must have administrative access to export membership data from SOAR. After logging on to your SOAR site, you should see an Administration submenu in the lower left section of the page, as shown below. Select Members from that submenu.
Once you click Members from the above menu, you will see the page shown below. Click the Export icon to continue.
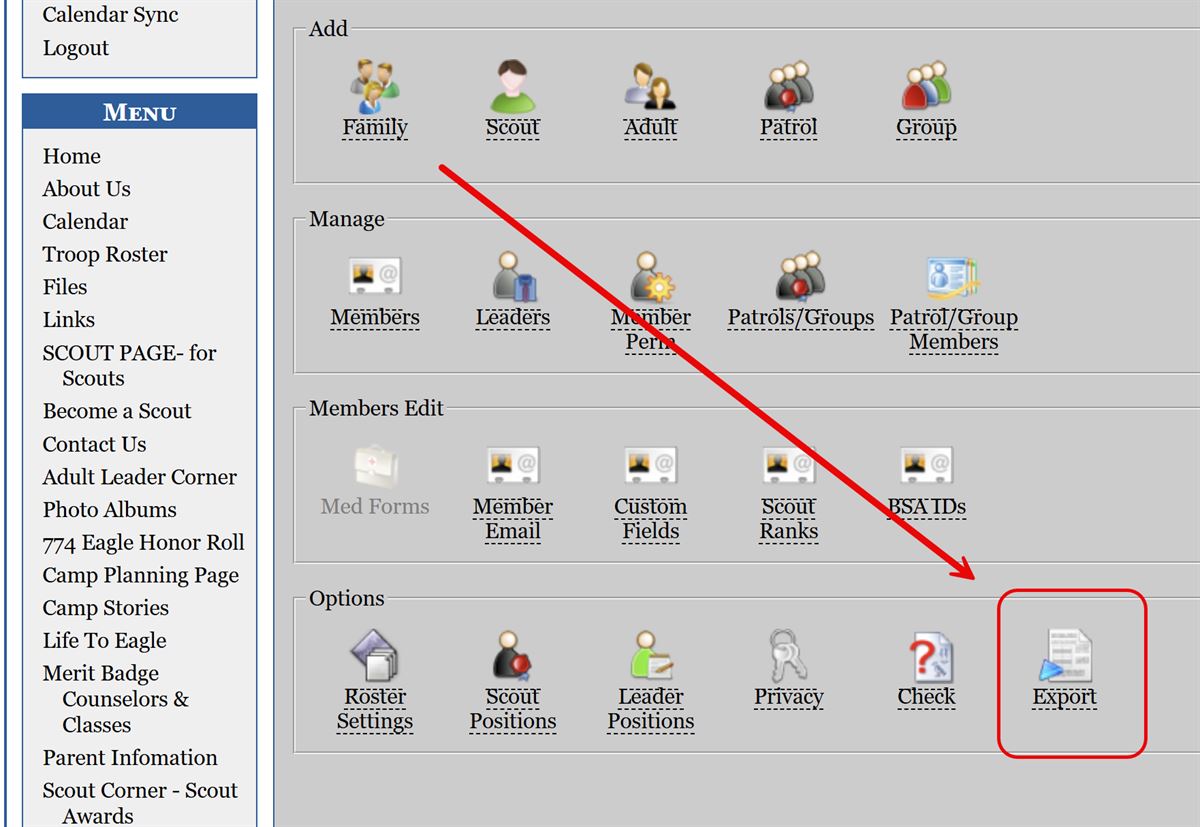
Clicking the Export button, as shown above, will cause an Excel spreadsheet to be downloaded to your device. Click on that file to open the spreadsheet in Excel (or compatible software).
If you opened the file in Excel, you will see that it contains four tabs, or "worksheets", as shown below. These will appear at the bottom of the window.
Save the contents of the first two tabs to CSV files. This will put the data in a format that can be uploaded into TroopWebHost.

While in the "Scouts" tab, open the File menu to Save As. Type in a name for the CSV file you are going to create, like "SOAR Scouts".
Open the drop down list for file type by clicking the down arrow on the right side of that control, as indicated below.
Choose "CSV (MS-DOS)". Then click the Save button.
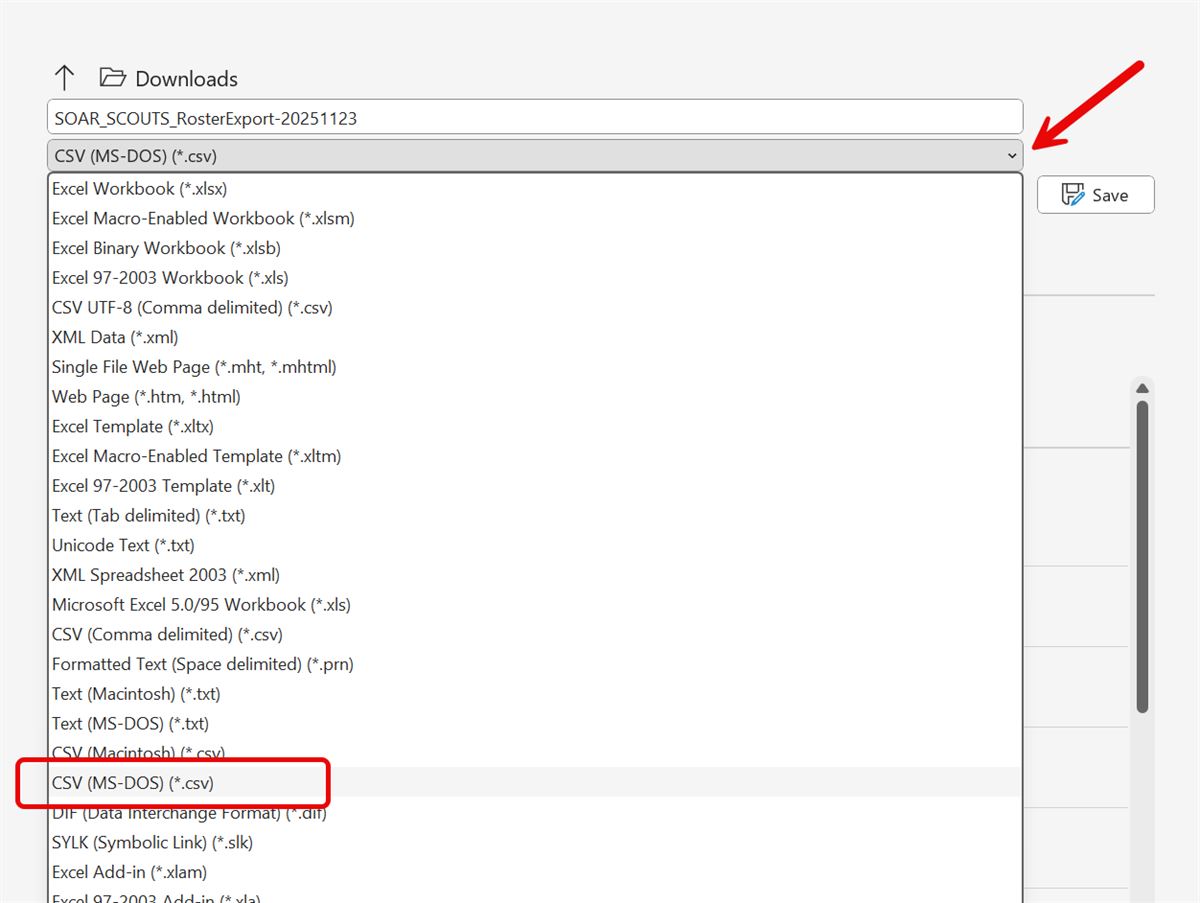
Return to the spreadsheet and select the "Adults" tab. Then open the File menu and select Save As. Enter a file name like "SOAR Adults", select the CSV file type, and Save.
Make sure you know the location of these two CSV files on your computer. You are now ready to transfer these files into TroopWebHost.
Uploading SOAR Membership Files To TroopWebHost
Log on to your TroopWebHost site. Open your main menu to Membership → Upload Members → Upload SOAR Members.
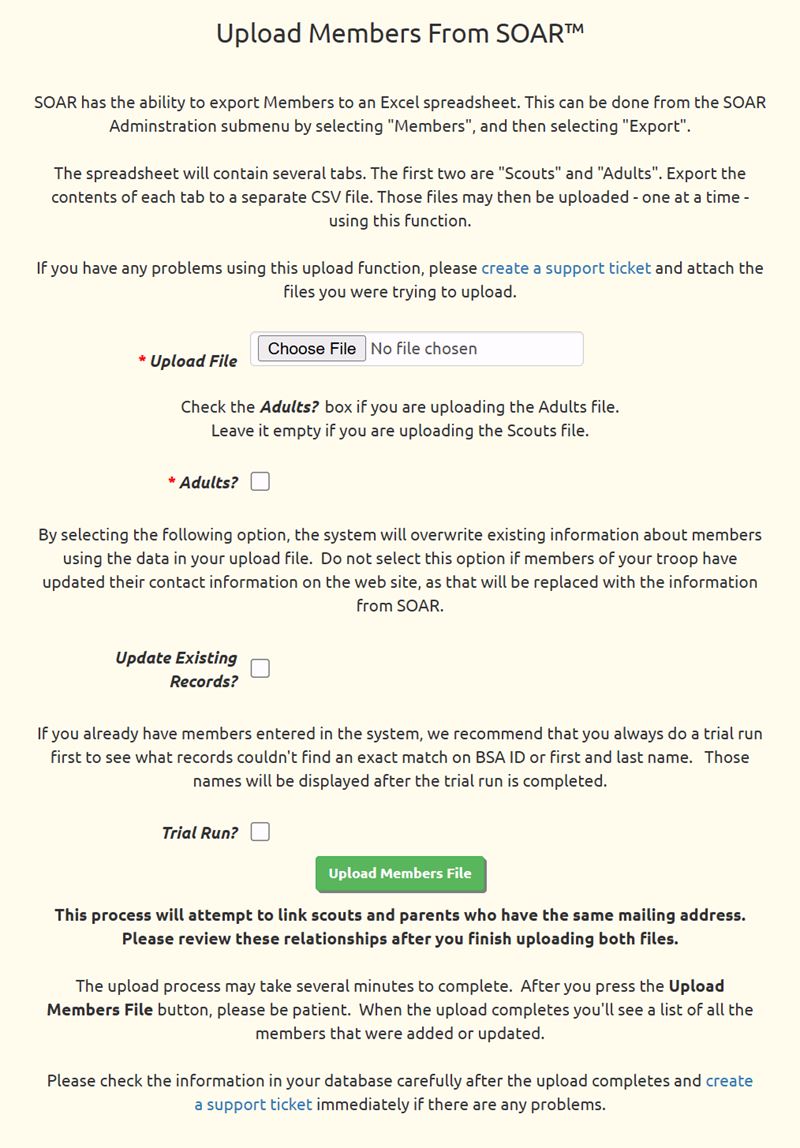
You need to run this function for each of the files you exported from SOAR.
Select the file using the "Choose File" control, as shown above. On some browsers, this may have a different caption.
If you selected the Adults file, click the Adults? checkbox.
If you wish to update existing records, which are identified by matching their BSA ID number or exact spelling of first and last name, then click the checkbox for Update Existing Records?.
If this is the first time you've uploaded this file, enable the Trial Run? option. This will allow you to see which existing members will be updated, as well as what new members will be added. This allows you to prevent duplicate membership records from being created in your system. When the upload completes, the system will list the names that would have been added; if you think that any of those names are already in your database, you need to figure out why they did not find a match. This could be because the BSA ID was missing, or because the spelling of the first and last name did not match exactly. Make the necessary corrections before uploading the file again - again, with the Trial Run option selected. Once you are convinced that no duplicates will be created should you upload the file without the Trial Run option.
Click the Upload Members File button to begin the upload. Please be patient; do not click the button again. This may take several minutes to complete. Once it completes, it will display a status page. This may include a list of patrols that you will need to add.
After The Upload Completes
The upload will attempt to create relationships between scouts and their parents, based on an exact match of their mailing address. If the addresses are not spelled exactly the same, the upload will not create the desired relationship.
Obviously, the upload cannot create these relationships until you've uploaded both the Adult and the Scout files. Once you have completed the upload for both files, run the Scout Parent Cross Reference report to see what relationships have (or haven't) been created. You will then need to manually enter the missing relationships.
The upload will also generate a User ID for each new member that is added. For those members who are in leadership positions, you should update their User ID to authorize them for additional user roles. This will allow them to access the TroopWebHost functions appropriate for their position.
When you are ready to have members use the site, you can communicate their logon information using the Send User IDs and Passwords function.
The upload will not transfer leadership positions or YPT training history.
Moving from ScoutTrack™ to TroopWebHost™
Some scout troops use a software package called ScoutTrack™. It provides some of the same capabilities as TroopWebHost.
If your troop has decided to move from ScoutTrack to TroopWebHost, you can easily move your roster to your new site by exporting your data from ScoutTrack. This will produce an Excel spreadsheet with multiple tabs, as shown below:

You can upload the information from the first two tabs into TroopWebHost:
- Use Upload Scouts From ScoutTrack to upload scouts from the ScoutTrackExport tab.
- Use Upload Adults From ScoutTrack to upload parents and adult leaders from the ScoutTrackAdults tab.
To create files suitable for upload, you will need to open the spreadsheet in Excel, and then save the contents of the first two tabs as separate tab-delimited text files.
From the Excel File menu, select Save As. This will display a file browser window as shown below. Select "Text (Tab delimited) (*.txt)" from the Save as Type choice list.
After you upload both files, you will need to create the relationships between the scouts and their parents. You can do this from the Active Adults page. Update a parent and scroll to the bottom of the page, where you will see the Add Scout Relationship button. Click this button to begin linking this adult to their scouts.
Upload Scout Data from ScoutTrack™
The first file you should upload from ScoutTrack™ is the Scout file. It contains information about each scout in your troop and his parents.
To create this file, export your data from ScoutTrack into an Excel spreadsheet, then open the spreadsheet in Excel to the first tab, ScoutTrackExport, as shown below.
Then select Save As from the Excel File menu, and choose "Text (Tab delimited) (*.txt)" from the Save as Type choice list, as shown here.
In TroopWebHost, go to the Membership menu and select Upload Members, then select Upload Scouts From ScoutTrack.
You should see the screen shown here:
Click the Browse button to find the Scout file that you just created from the Excel spreadsheet.
Click the Upload Scout File button to begin loading this data into TroopWebHost.
This will add each scout to the Active Scouts page and create a User ID and Password for each scout.
Should You Update Existing Records?
The two checkboxes on the screen only apply if you have previously transferred data from ScoutTrack™.
If you check Update Existing Records the system will attempt to find a match on first and last name and date of birth and apply all of the information in the upload file to your TroopWebHost database.
If you check Trial Run? it won't actually update your database, but it will show you which records found a match, and which did not.
These options allow you to keep your TroopWebHost database in synch with ScoutTrack™. We do not recommend this approach because it will overwrite any changes made to the data directly in TroopWebHost. Since each member has the ability to update their own contact information from the My Stuff menu, you really can't prevent this.
If you do choose to update existing records, we recommend using the Trial Run option to verify what records will be added and which will be updated.
Upload Adult Data From ScoutTrack™
After you've loaded the Scout file from ScoutTrack™, you may proceed to load the Adult file. This contains information about parents and adult leaders.
To create this file, export your data from ScoutTrack into an Excel spreadsheet, then open the spreadsheet in Excel to the second tab, ScoutTrackAdults, as shown below.

Then select Save As from the Excel File menu, and choose "Text (Tab delimited) (*.txt)" from the Save as Type choice list, as shown here.
In TroopWebHost, go to the Membership menu and select Upload Members, then select Upload Adults From ScoutTrack™.
You should see the screen shown here:
Click the Browse button to find the Adult file that you just created from the Excel spreadsheet.
Click the Upload Adult File button to begin loading this data into TroopWebHost.
This will add all of the parents and adults from ScoutTrack™. It will create a User ID and Password for each person added.
After you upload this file, you will need to create the relationships between the scouts and their parents. You can do this from the Active Adults page. Update a parent and scroll to the bottom of the page, where you will see the Add Scout Relationship button. Click this button to begin linking this adult to their scouts.
Uploading Members From ScoutNet™
Your troop may be able to obtain membership data from your Council's registration office. If so, you can load your roster into TroopWebHost from this file.
Ask your registrar for a ScoutNet™ membership file in the same CSV format that they give to troops who are starting to use TroopMaster™.
This is what the file should look like when viewed in Notepad:

Once you have this file, select Upload Members From ScoutNet from the Upload Members submenu on the Membership menu to see a page like the one shown below.
This function will add new members to your database, and will also generate user IDs and passwords for each new member. It will not create relationships between parents and scouts, since the ScoutNet file does not contain that information.
It will also update existing membership records if you select the Update Existing Records option.
A record must match exactly on first, middle, and last name, and date of birth in order to be updated. If an exact match is not found, the system will create a new record for this person.
If you already have members in the database, we recommend that you always use the Trial Run option the first time you try to upload a file. This will allow you to see which records will be added and which will be updated, without actually affecting your database.
Upload ScoutNet Advancement
Your troop may also be able to obtain advancement data from your Council's registration office. If so, you can load completed ranks, merit badges, and awards into TroopWebHost from this file.
This file is available from the Internet Advancement section of your Council's site. It is called Member Summary Export.
If you cannot find it on their site, please contact your Council to see if they can obtain it for you.
The file must be in CSV format. It should look like this when viewed in Notepad:
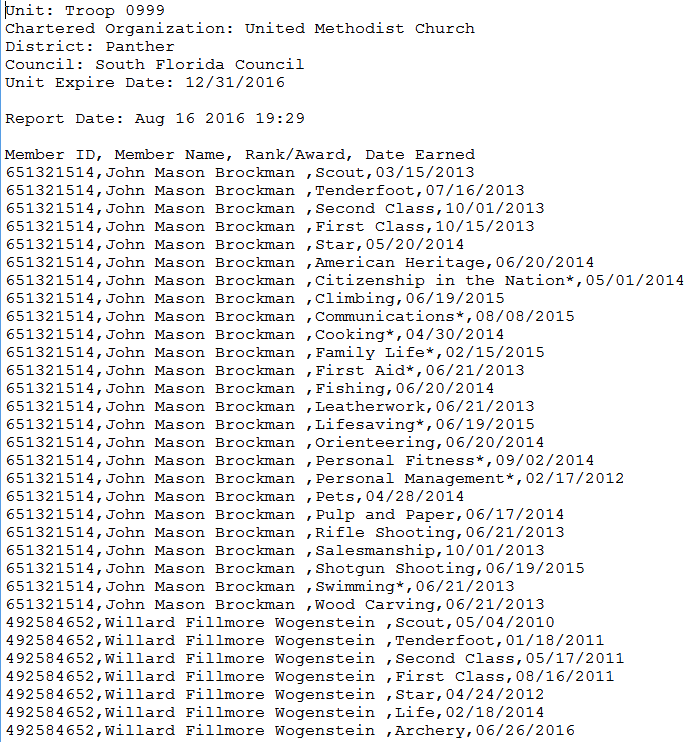
Once you have this file, go to Advancement → Upload Advancement → Upload ScoutNet Advancement to see a page like the one shown below.
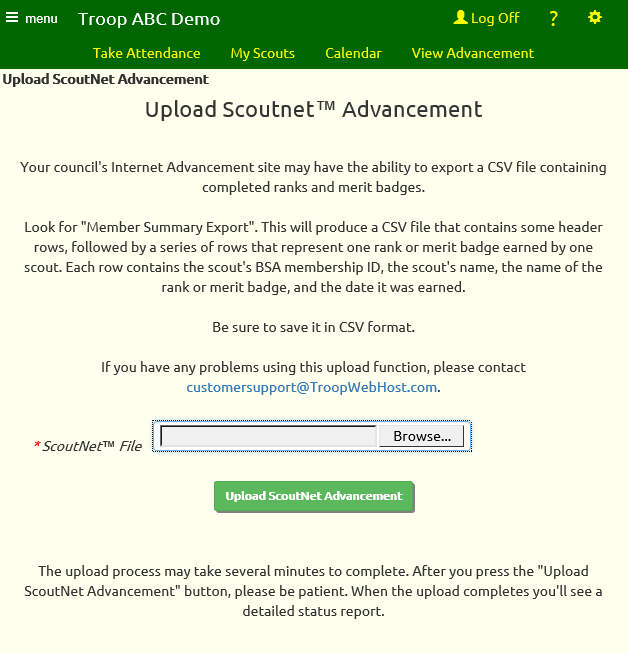
This function will add completed ranks, merit badges, and awards. If the scout was already working on a merit badge or award, it will fill in the Date Earned to mark it complete.
It will not mark off the requirements as complete.
It can match your scouts either on the BSA ID or on the exact spelling of their first name, middle name, last name, and name suffix. It will display a list of the scouts for whom it could not find a match when it completes.
It will match the award based on the exact spelling of the name of the award. It will display a list of the items for which it could not find a match when it completes. If there are ranks or merit badges on this list, please send this list to CustomerSupport@TroopWebHost.com. If there are awards on this list, go to Site Configuration → Special Awards and either update existing items to match the spelling or add new items to the list.
You can upload the same file - or new files - as often as you like. If the scout already has that rank or merit badge or award, the system will simply bypass it.
Upload Activity Credits From Internet Advancement
If you have used the BSA's Internet Advancement page to record service hours, camping nights, and hiking miles, you can easily transfer that information into Credit For Other Activity on your TroopWebHost site.
NOTE: This function only uploads activity credits for scouts; it will not process adults. Why? The BSA file does not contain any way to distinguish youth from adults. So if there are activity records for a scout named "Robert Smith Jr" and an adult named "Robert Smith Sr", they will both appear in the file as "Robert Smith", with no indicator as to whether it is referring to the adult or the scout. That is why the instructions below tell you not to include adults in the file.
To begin, log on to the my.scouting.org site and select the Internet Advancement 2.0 subsystem. On the left side of the page (shown below) select Reports.
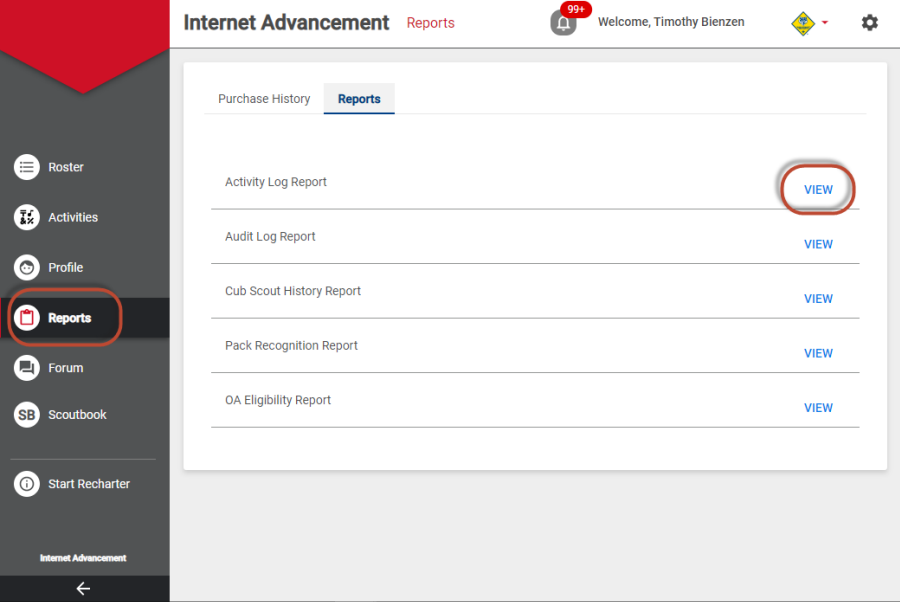
Click the View link to the right of "Activity Log Report" to get to the page shown below.
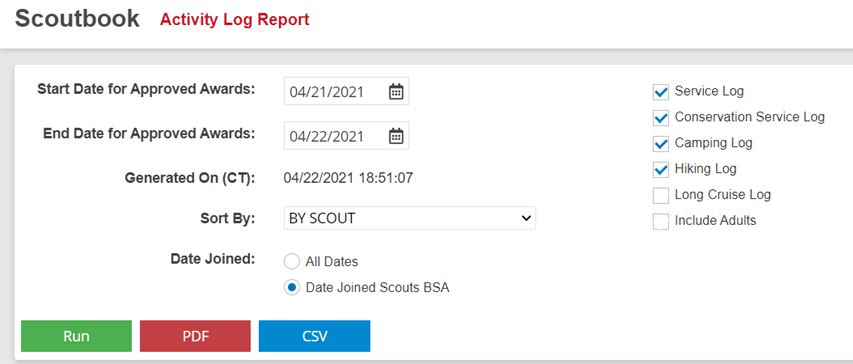
Do NOT check the box "Include Adults", as the upload is not designed to process adults.
Press the blue CSV button to create your file, and remember where you saved it on your local drive.
Then log on to your TroopWebHost site and go to Advancement → Maintain Advancement → Credit For Other Activity, as shown here:
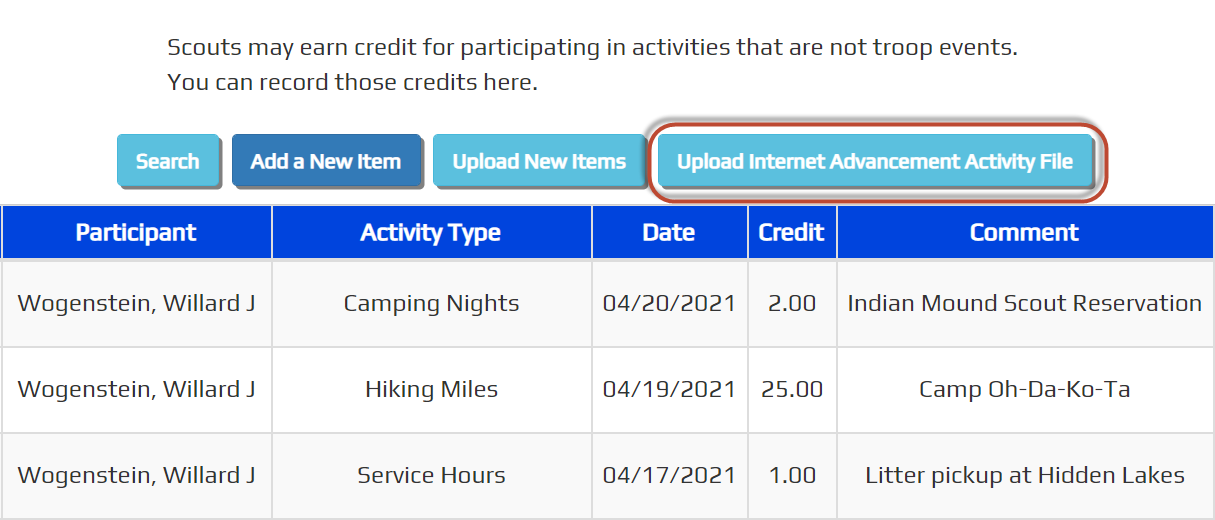
Click Upload Internet Advancement Activity File to get to this page...
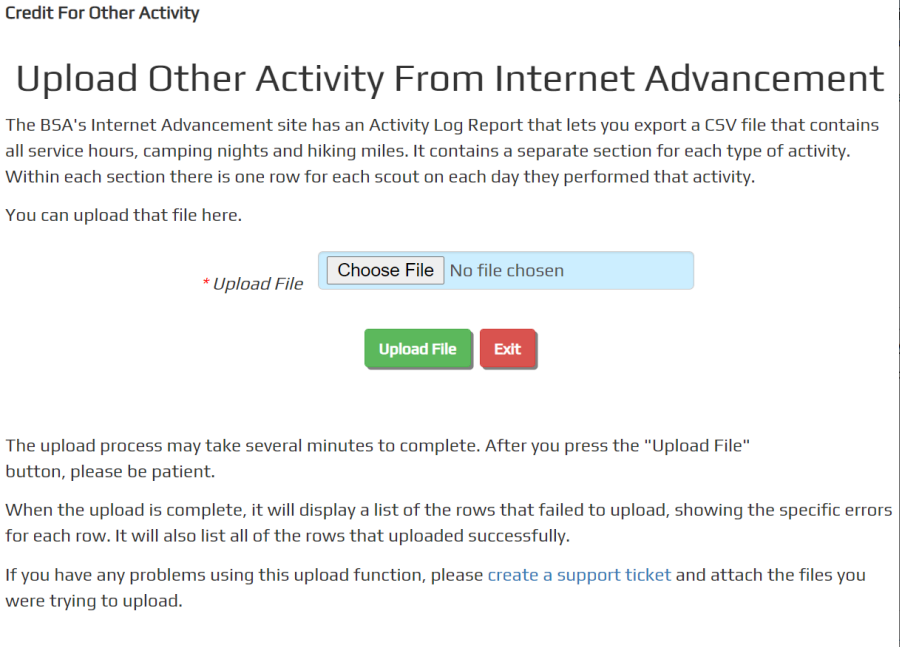
Click Choose File to select the file that you exported from Internet Advancement, then click Upload File.
The upload will add these entries to the Credit For Other Activity table. It will not create duplicate entries in this table; i.e., it will not add a row if that person already has an entry for that activity on that date. So it is safe to upload the same file more than once if needed to correct errors.
Once you begin using the TroopWebHost calendar to record participation in service projects, campouts, and hikes, you should no longer transfer this information from Internet Advancement, as we do not try to match the Internet Advancement data to activities on your TroopWebHost calendar, so you could end up with duplicates.
Uploading Members From Other Systems
If your troop is not moving from one of the unit management software products described in the previous sections of this chapter (Troopmaster or ScoutTrack) and cannot obtain the files you need from Scoutbook or ScoutNet, it may still be possible to upload your data by creating CSV files in a format compatible with our upload functions.
If that is your situation, we recommend that you use the following combination of upload programs to load your data:
- The Troopmaster Upload Scout Data program for Scout membership data
- The Troopmaster Upload Adult Data program for Adult Leader membership data
- The Scoutbook Upload Advancement program for scout advancement data
The Troopmaster scout data and adult data files are the most complete sources of membership information that we support. Here are sample files that you can use as a pattern for your inputs:
- The Scout File contains one row for each scout.
- The Adult File is only for adult leaders who are not parents.
These files must be CSV - Comma Separated Value - files. As the name suggests, that means that each piece of information is separated from every other piece of information by a comma. For example, the last name, first name and middle name values might appear like this: Smith,William,A,
If you create a file using a spreadsheet program, like Microsoft Excel, be sure to save it in the CSV format.
The first row of each file must contain the column names. They must be spelled exactly as shown in the sample file because this is how our upload program knows what data is in each column.
The Scout File should be loaded first. It contains one row for each scout. Notice that it also has information about the scout's parents. If you include the parent information in this file, they will be automatically linked to their scouts. The system will also create user ID's and passwords for the parents so they can access the troop website.
The Adult File is only for adult leaders who are not parents.
The Scoutbook Advancement file contains one row for each completed rank requirement. For merit badges and awards, it does not break down to individual requirements; it just contains one row for each completed merit badge or award.
Click here to download a sample of the Scoutbook Advancement file.
If you have any problem with these upload files, please open a Support Ticket and be sure to attach the file you are trying to upload.
Taking It To The Troop
 The last section of your Startup Checklist
is entitled Roll Out.
This is when you get the rest of your troop involved with using your new website.
The last section of your Startup Checklist
is entitled Roll Out.
This is when you get the rest of your troop involved with using your new website.
Schedule time at a troop meeting to make a presentation about the website.
If it is possible to have a video projection system and web connection, display your site and demonstrate how it works. If not, bring handouts that provide the basics on how to get started.
Be sure to point out:
- How to get to your new site.
- How to log on.
- How to change your password.
- How to update your contact information.
- How to view the troop calendar.
- How to sign up for events.
- How to view your account balance and transaction history.
This is also a great opportunity to teach your scouts about Internet safety.
On-Going Operation
Now you need to be sure you have a plan for keeping all of the information on your site up to date.
Meet with your committee and scoutmasters to review roles and responsibilities.
Consider which tasks can be done by scout leaders, such as your scribe, historian and senior patrol leader.
Some choices will be obvious, but should still be reviewed. Make sure your treasurer understands how to use the on-line accounting system. Talk to your advancement chair about keeping up with requirements as they are earned.
Above all, be sure to spread the load. Managing your troop can be easy if everyone does their part!
Using Internet Explorer 11
When Microsoft released Internet Explorer 11, we recommended that users add TroopWebHost to their Compatibility View list.
This is no longer necessary now that we've upgraded our software to be fully HTML 5 compatible.
For best results, we now recommend that you remove your site from the Compatibility View list if you are using Internet Explorer 11.
To do this, first open up Internet Explorer and find the tool bar in the upper right corner of the page. It looks like this:
![]()
Click on the gear image (circled above) to view the Tools menu:
From this menu, click on Compatibility View settings. This will display this dialogue box:
Click on the row that says TroopWebHost.org so that it is highlighted as shown above, then click the Remove button to remove it from the list.
Press the Close button to complete this process.
Getting Started - Frequently Asked Questions
 We bought a custom URL for our troop. Why doesn't that show up in my browser's address line?
Let's suppose your troop purchased a custom URL of www.MyTroop999.com. You can tell the world - and especially your troop - to use this URL to get to your site. This will help everyone because it is so easy to remember.
However, once you arrive at your site, if you look at your browser's address line, you will see something like this:
![]()
We redirected your browser to this location because that is where the TroopWebHost software is installed. Otherwise, we would have to install a separate copy of the software for each troop, which would cause it to run more slowly and would make it difficult for us to roll out new versions.
Can we continue to use TroopMaster™ and use the upload functions to keep our data in synch?
While it is possible to use TroopWebHost in this fashion, we do not recommend this approach.
Since TroopMaster™ does not export information about individual merit badge requirements that have been completed, your scouts will not be able to view an accurate picture of their remaining requirements when they go to the site.
If a troop member updates his contact information on-line from the My Stuff menu, you could overwrite it the next time you upload your scout records.
You would also need to be careful not to create duplicate membership records. This can happen if the spelling of the person's name changes in either system, or if a scout's date of birth is changed in either system. If this happens, the upload program will not find a match and so will create a new record for this individual. You can guard against this by always using the Trial Run option the first time you upload any new file. This will allow you to review the records that would have been added and make the necessary corrections before committing the data to your database.
There are some troops that use the system in this way, but they are losing out on the ability to share the work of keeping your troop's information up to date - which is one of the big benefits of taking your troop on-line!
I uploaded our merit badges from TroopMaster™, but I don't see the partial merit badges. What did I do wrong?
Unfortunately, the TroopMaster™ merit badge export file does not include merit badges that have been started but not completed. You will have to enter those merit badges manually.
Is it possible to upload rank advancement and merit badges from ScoutTrack™
As much as we would like to provide this capability, we're afraid that it simply is not possible at this time. We have seen samples of the ScoutTrack™ export files for rank advancement and merit badges. Unfortunately, there are problems with each file that would prevent us from creating a reliable upload function.
When I try to access the site from my iPhone it returns me to the main TroopWebHost page. What am I doing wrong?
It’s probably just a matter of enabling cookies and javascript in your browser.
Go to the “Settings” app on your iPhone and scroll down to “Safari”. Select “Safari”.
Find the “Block Cookies” option and set it to “Never”.
Then scroll down to “Advanced” and select that.
On the Advanced page you’ll see an option for “Javascript”. Turn that option on.
Then go back to Safari and try to access your site. I expect it will work just fine.