Troop Events
 Your Troop Calendar is available to every member of the troop once they log on to your site.
The first step in setting up your calendar is to add the Event Locations that your troop commonly uses.
You can then Add Events to your calendar.
Events that occur on a regular basis, like weekly troop meetings, can be produced automatically using the Copy An Event feature.
Once the event has been created, you can send an iCalendar E-Mail Invitation to each member of your troop. If they accept the invitation it will be added to their personal calendar.
You can configure the system to automatically send reminders to your troop prior to an event.
Scouts and adults can sign up for events from the My Stuff menu. You can update any member's sign-up status from the Sign Up Members page.
You can record the final roster of who attended an event when you Take Attendance.
A number of reports are available to show information about a specific event, as well as overall event participation.
Events Hub
The Events Hub gives you a central page to manage your unit's calendar. It is available to any user who has a role that is authorized for the "_Event Planner", "Maintain Events", or "Events Hub" tasks. You'll find it at Calendar → Events Hub.
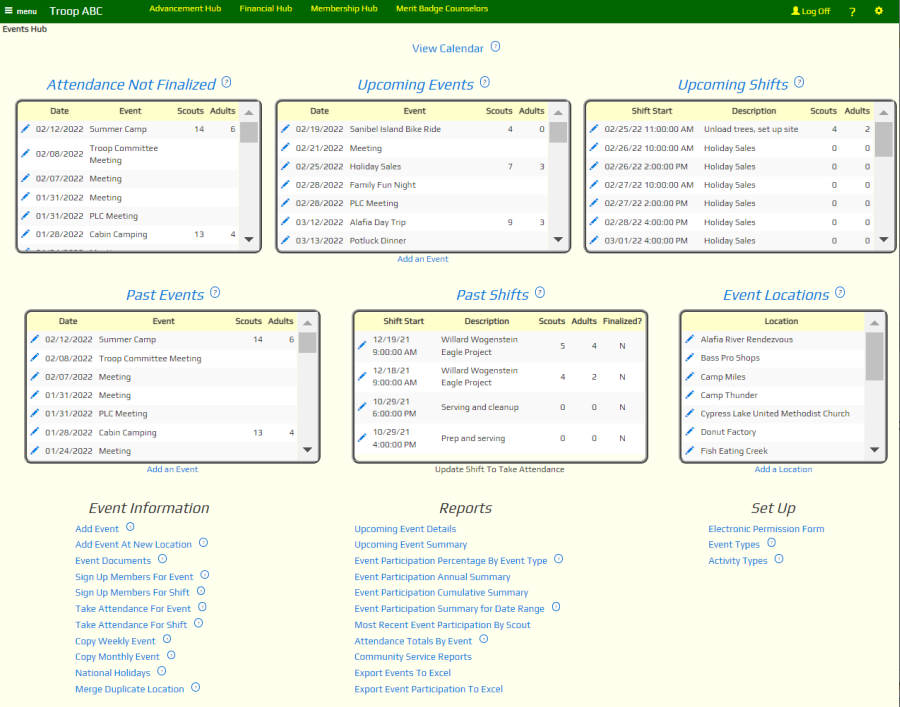
Like all hubs, you can edit the Events Hub to fit your troop's requirements. This allows you to remove widgets you don't need - like the "Upcoming Shifts" data window if you don't use shifts. You may also add or replace widgets.
You can choose from the following Data Window widgets:
| Widget Name | Displays | Links To |
|---|---|---|
| Data Window - Events - Upcoming Events | Future events. | The heading links to the Upcoming Events tab of the Maintain Events page. |
| Data Window - Events - Upcoming Events - With Guest Count | Future events with guest counts. | The heading links to the Upcoming Events tab of the Maintain Events page. |
| Data Window - Events - Upcoming Shifts | Future shifts. | The heading links to the Sign Up For Shifts page. |
| Data Window - Events - Past Events | Past events. | The heading links to the Past Events tab of the Maintain Events page. |
| Data Window - Events - Past Events - With Guest Count | Past events with guest counts. | The heading links to the Past Events tab of the Maintain Events page. |
| Data Window - Events - Past Shifts | Past shifts. | The heading links to the Take Attendance For Shifts page. |
| Data Window - Events - Attendance Not Finalized | Past events for which you have not yet finalized attendance. | The heading links to the Take Attendance page. |
| Data Window - Events - Event Locations | Event locations. | The heading links to the Maintain Event Locations page. |
Unless otherwise specified above, the  icon will allow you to update that row, and the
  icon will allow you to send a message to that person or group.
The Events Hub may also include these Menu widgets:
| Widget Name | Contains |
|---|---|
| Menu - Events - View Calendar | A link to view the calendar. This menu is intended to be placed at the top of the hub, using the "Heading" menu style. |
| Menu - Events - Event Functions | Functions that let you maintain your calendar. |
| Menu - Events - Reports | Reports showing event participation. |
| Menu - Events - Set Up | Site configuration and supporting tables. |
Calendar
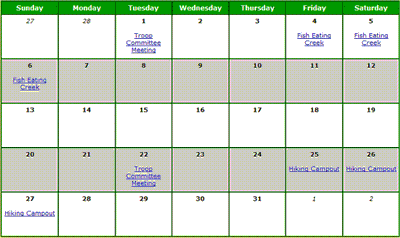
All members of your troop can view the Calendar once they log on to the site.
Select Calendar from the Calendar menu to view the current month's schedule, as shown below.
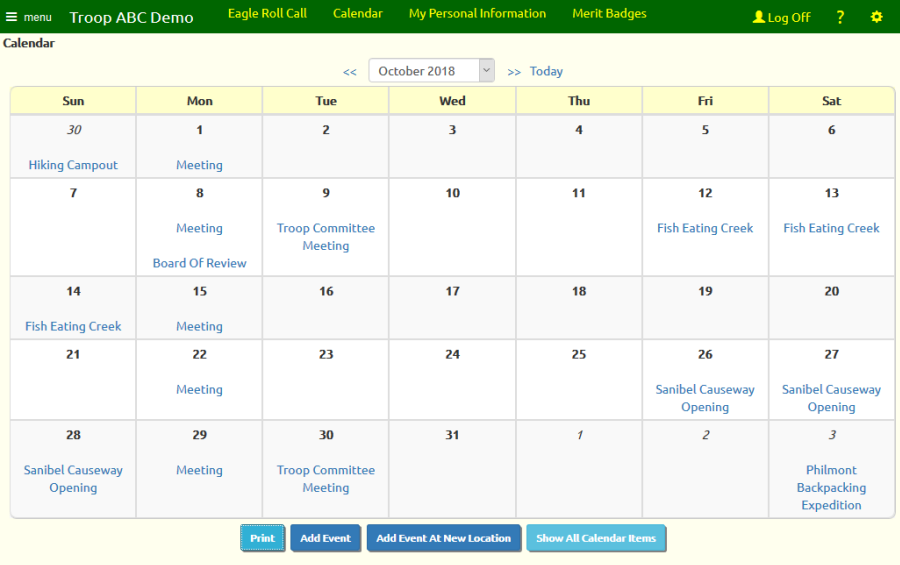
Use the drop down box at the top of the page to select a different month, or use the << and >> links to go backward and forward through the calendar.
Use the Today link to return to the current month.
Click the Print button to produce a PDF document showing this month's calendar. This will prompt you for a range of months to print, which will default to the month currently displayed.
If you are authorized to add events to the calendar, you will see the Add Event and Add Event At New Location buttons, which will allow you to add an event to the calendar.
Show All Calendar Items will show the calendar with all events, including those that are restricted to a dynamic subgroup to which you do not belong.
Click on any event to see the details of that event, as shown below.
Click on Send Me An Invitation to send yourself an e-mail invitation to this event. When you receive this e-mail you can add it to your personal calendar by accepting the invitation.
Sign up for this event by clicking on the Yes button next to the name of each family member who plans to attend; if you are not planning to attend, click the No button.
Parents can press the Give Permission button to sign up their scouts for the event and fill out the electronic permission form.
If this event allows guests, once you sign up you'll be able to enter the number of guests you'll be bringing. Enter their names in the Comment field.
Adults can sign up to drive to and/or from the event, regardless of whether they plan to attend. If you sign up to drive, you should then indicate which directions you'll be driving and the total number of seats available in your vehicle.
Be sure to click Save or Save & Exit to save your choices.
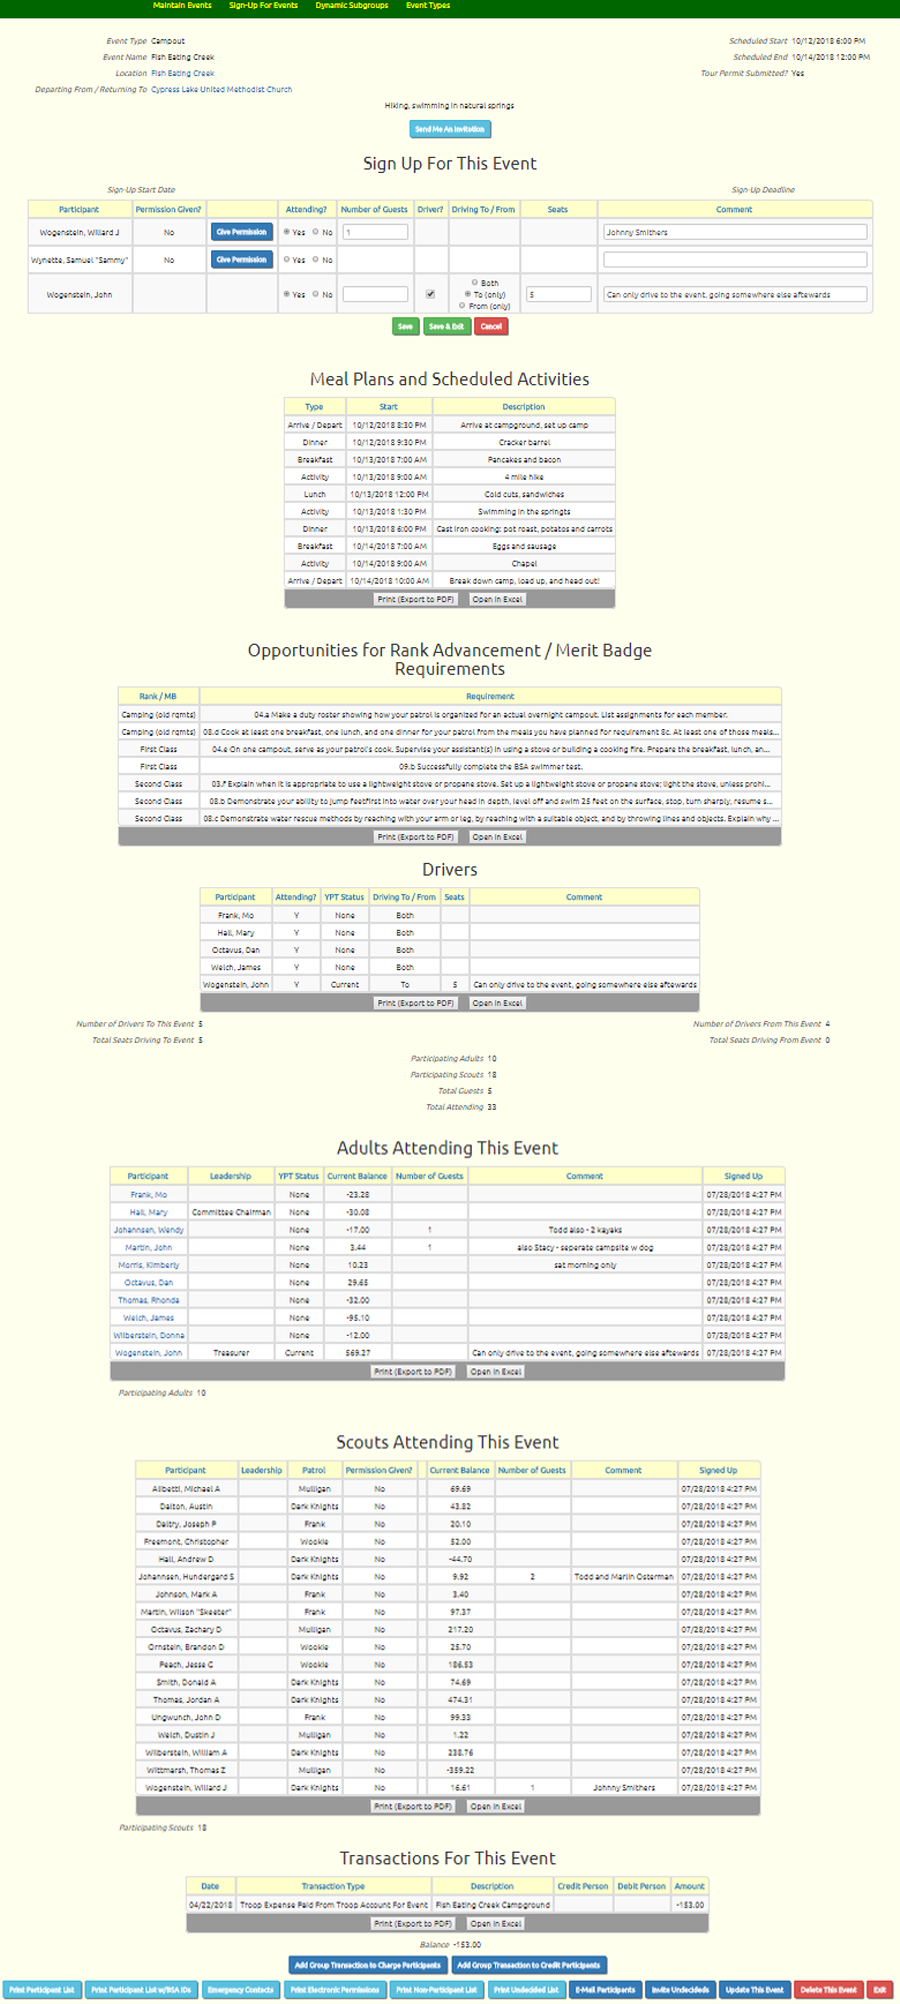
At the bottom and top of the page you may see additional buttons, depending on your security access level:
- Add Group Transaction to Charge Participants
- Add Group Transaction to Credit Participants
- Print Participant List
- Print Participant List w/BSA IDs
- Emergency Contacts
- Print Electronic Permissions
- Send Permission Reminders
- Print Non-Participant List
- Print Undecided List
- E-Mail Participants
- Invite Undecideds
- Update This Event
- Delete This Event
- Exit
The Add Group Transaction to Charge Participants and Add Group Transaction to Credit Participants buttons are only available to users authorized for the Treasurer role. They allow you to begin a group transaction with all of the event participants pre-selected.
Click on Print Participant List to produce a PDF document showing all adults and scouts who have signed up for this event.
Click on Print Participant List w/BSA IDs to produce a similar report with additional contact information for each participant, along with their BSA ID number.
Emergency Contacts will produce a report showing the emergency contacts for all participants. It also includes allergies and dietary restrictions from the member's record.
Click on Print Electronic Permissions to produce a report showing the electronic permission form and listing the parents who agreed to its terms for this trip for their scouts.
Send Permission Reminders will cause the system to send an e-mail reminder to the parents of each scout who has signed up for this event but has not yet been given permission, either with a permission slip or through the electronic permission process. This reminder will not go out immediately, but will be sent the next time this job runs.
Click on Print Non-Participant List to produce a PDF document showing all members who have indicated that they do not plan to attend this event.
Click on Print Undecided List to produce a PDF document showing all members who have not yet indicated whether they plan to attend.
The E-Mail Participants button will let you compose an e-mail with all of the participants pre-selected.
Invite Undecideds will take you to a page that lets you broadcast an iCalendar E-Mail Invitation to this event. The members of the troop who have not yet indicated whether they attend will be pre-selected, but you can change the invitation list to include the entire troop.
If you are authorized to maintain events, you will see an Update This Event button that lets you change the information about this event, and a Delete This Event button that will delete this event.
If you are authorized to maintain financial information, you will see a list of the monetary transactions that have already been posted to this event.
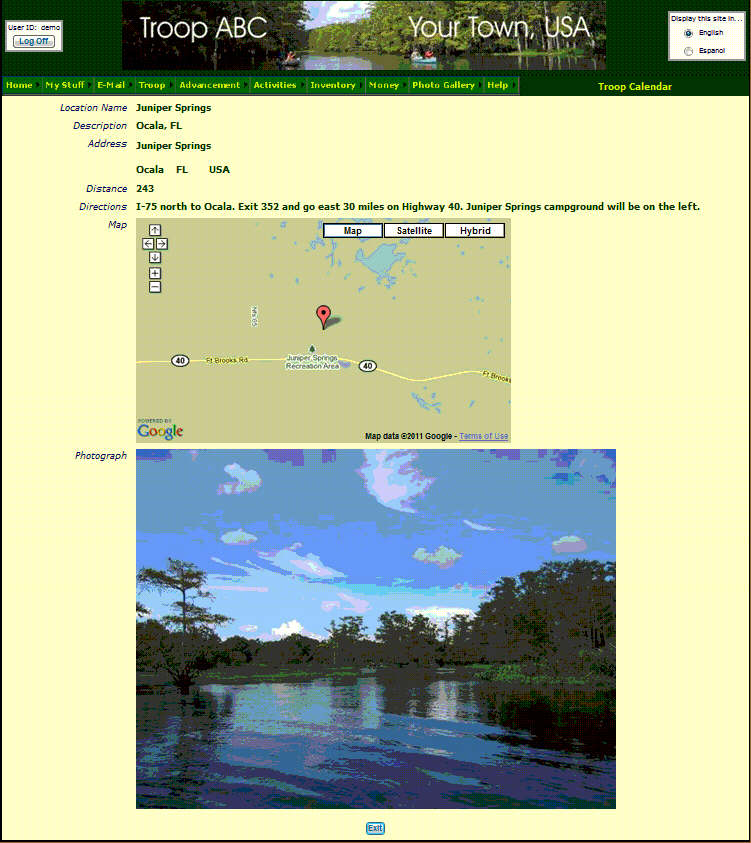
Click on the location name to view the information about that location, as shown below.
Shifts
If this event has Shifts, you will see a section on this page listing the shifts, like this:
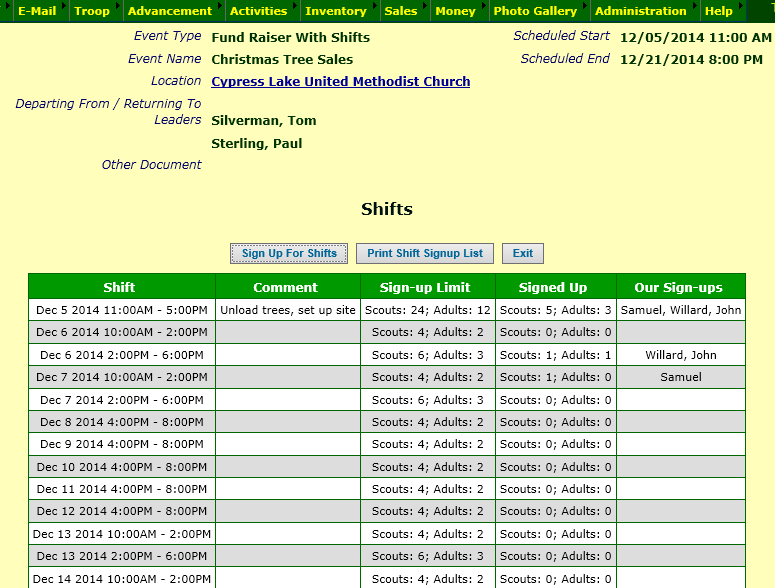
Print Shift Signup List will print the Shift Signup List report.
If this even is in the past, you may also see buttons to print the Shift Participant Detail report and the Shift Total Hours Per Person report.
If some of the shifts are still in the future, you will ses a Sign Up For Shifts button, which will take you to a page that looks like the one shown below.
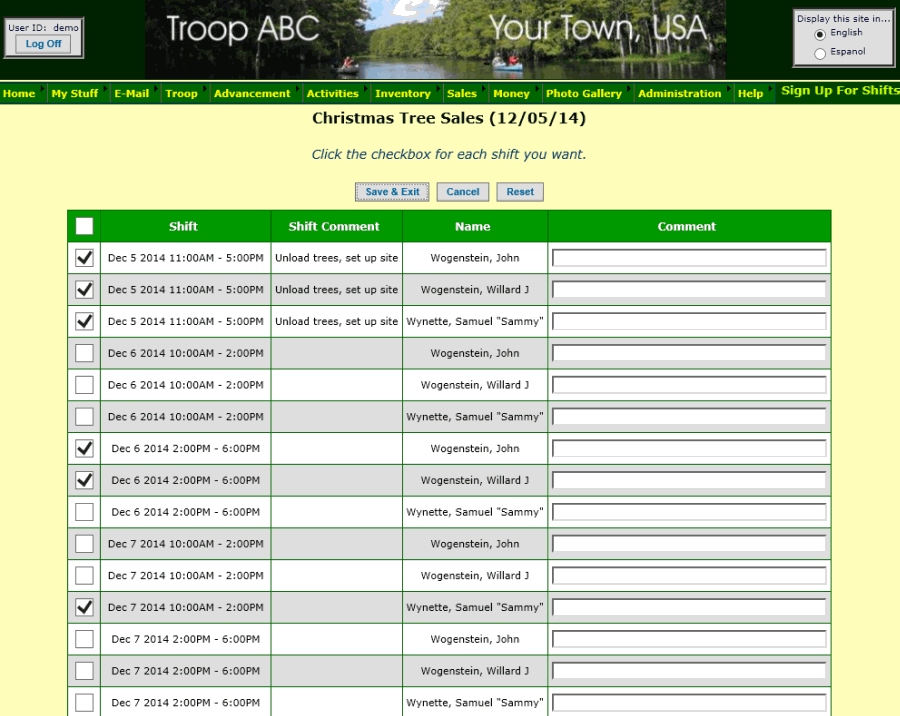
Parents can sign up their scouts for shifts as well as themselves. Scouts can only sign up themselves.
You will not see any shifts on this list that have already reached their sign-up limit.
Just click on the checkboxes next to the shift you want, enter any appropriate comments in the box to the right, then click Save & Exit to save your work.
E-Mail Invitation
You can send an e-mail invitation to selected members of your troop by clicking the Invite Undecideds button from the Troop Calendar detail page or at the bottom of the Sign-Up List tab on the Add And Update Events detail page.
Either way, you will end up in a page that looks like the one shown below.
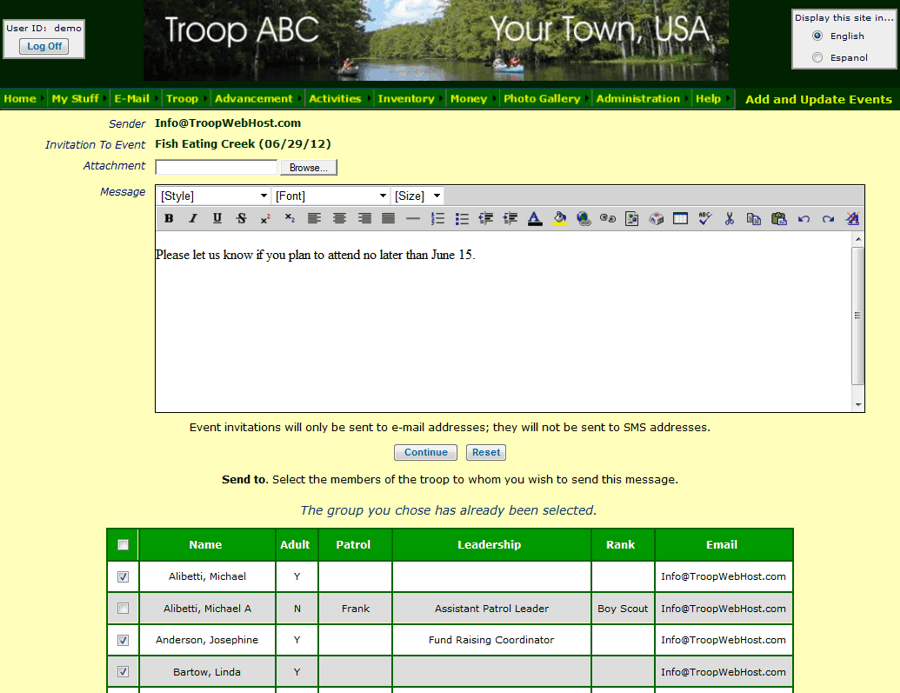
This looks like the standard Compose E-Mail page, but with a special twist: each message will contain an embedded iCalendar meeting invitation which will allow the recipient to Accept or Decline the invitation.
This message will only go to E-Mail addresses; it will not go to SMS addresses, since SMS recipients do not recognize an iCalendar invitation.
The members of the troop who have not yet indicated whether they plan to attend will be pre-selected, but you can add or remove recipients from the list by clicking on the checkbox next to their names.
You can select all members of the troop by clicking on the checkbox at the top of the grid.
When a troop member receives this message, their e-mail client will give them the option to Accept or Decline the invitation as shown below.
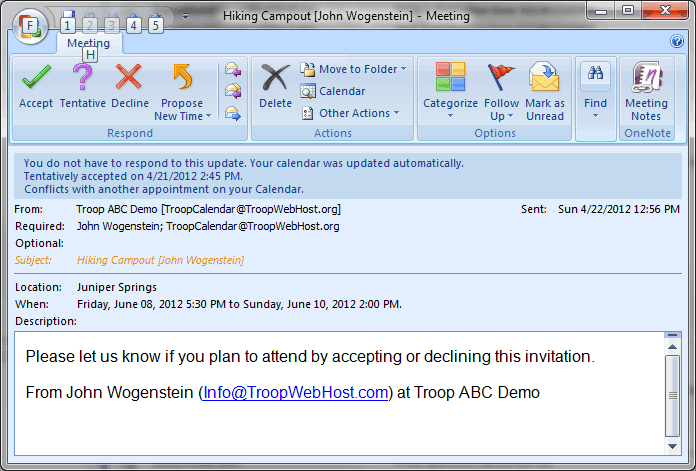
If they Accept the invitation it will be added to their personal calendar.
Regardless of whether they Accept or Decline, their e-mail client may then ask them if they want to send a response. The response will update the troop's database to show whether this member plans to attend.
Note that the system will generate an invitation to each selected troop member, even if that person shares an e-mail address with another family member. This is because the invitation is personalized to each troop member, and their response must be for an individual person.
The Subject line of the invitation indicates for whom the invitation was sent; when you Accept or Decline the invitation, you will update the status for that person.
Event Reminders
 The system can automatically send out messages to members of your troop reminding them of an upcoming event.
You set up these reminders using Event Types.
Once an event type has been configured to send out reminders, a reminder will be sent out for every event of this type.
Select Event Types from the Site Configuration menu. Update an event type and scroll down to the bottom of the page to see the Send Reminder Prior To Event checkbox. Click on that checkbox to see the rest of the parameters for event reminders, as shown below.
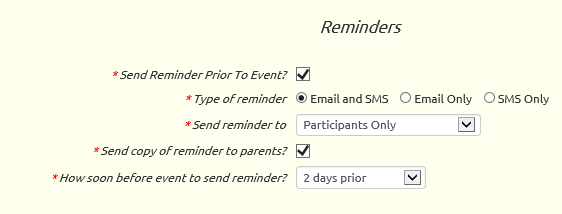
Reminders can be set up to go to both email and SMS addresses, or one or the other.
You can send the reminder to:
- Everyone
- Participants Only (those who have signed up for the event)
- Undecideds Only (those who haven't signed up or declined the event)
- Participants and Undecideds
You can send a copy of the reminder to the parents of the selected recipients. With this option selected, a reminder going to Participants Only will also go to their parents, even for participants who do not have an e-mail address.
Reminders can be set to go out on the day of the event, one to six days prior to the event, or one to four weeks prior to the event.
The system will begin generating reminders every day at 8:00 AM local time, beginning with the same day reminders for every troop.
SMS reminders will only contain the subject line of the reminder like this:
REMINDER: Camp-o-ree on Friday March 27 at 6:00 PM
This is what an e-mail reminder looks like.
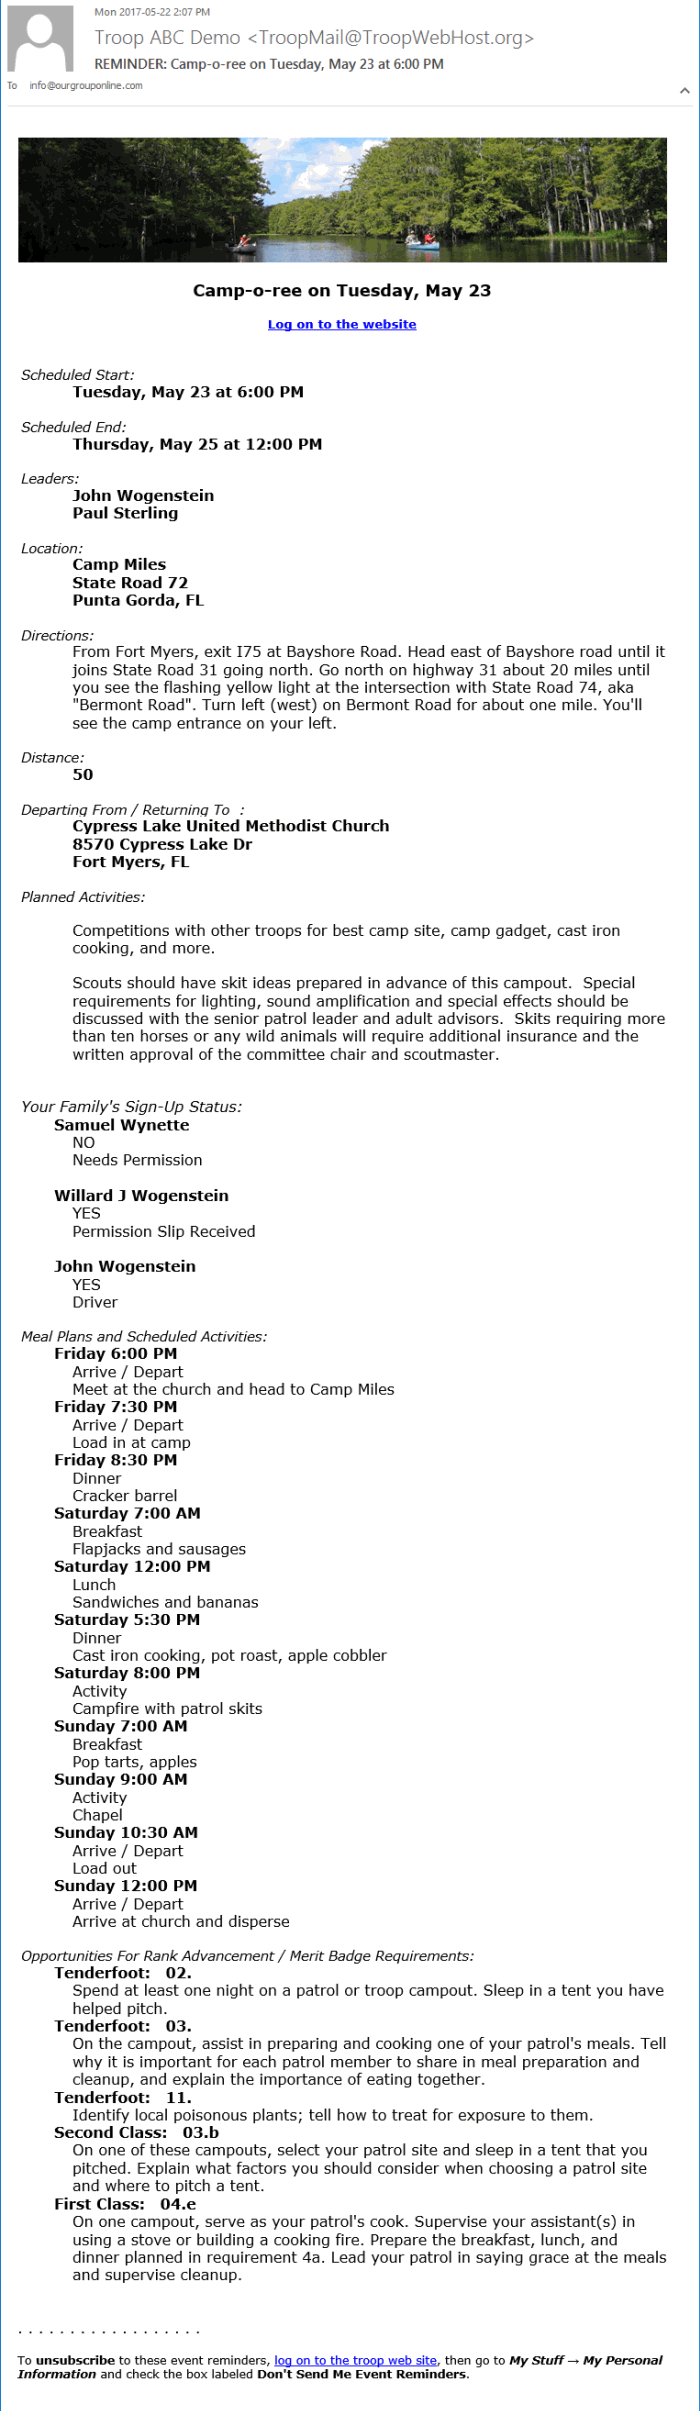
Click on the link below the event name to log on to your site. If you are already logged on this link will take you directly to the calendar detail page for this event.
The schedule and location appear at the top.
If this type of event allows members to sign up, then the current sign up status for each member of the recipient's family will be displayed.
If this event has shifts, then a list of shifts will be displayed. If family members have signed up for a shift their names will appear next to that shift.
If this event has a meal plan or list of scheduled activities, those will appear next.
Finally, if this event offers opportunities to earn requirements for rank advancement or merit badges, those opportunities will be displayed.
Opting Out
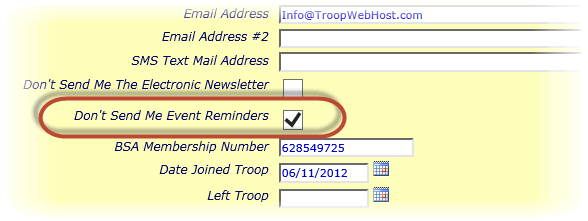
Any member of your troop who does not want to receive event reminders may opt out by going to My Stuff → My Personal Information and checking the Don't Send Me Event Reminders checkbox, as shown above.
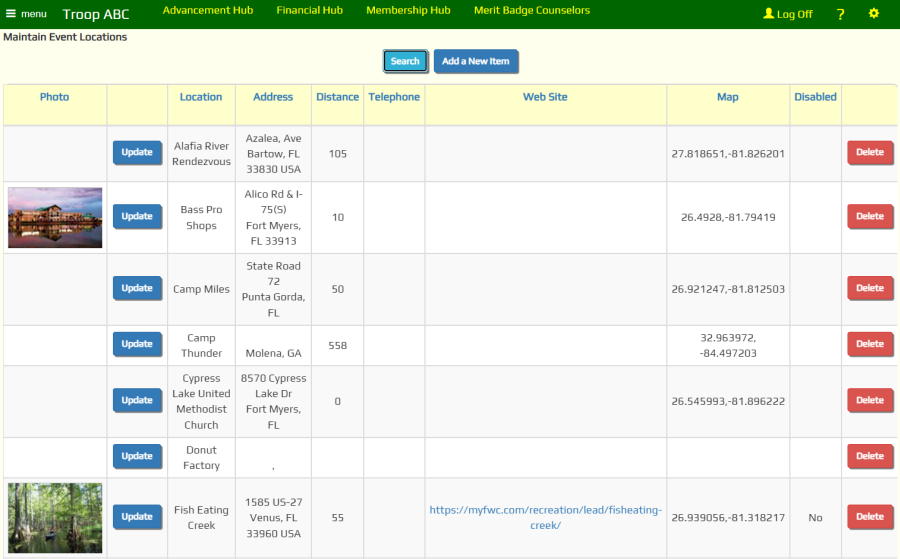
Event Locations
Most troops have a number of locations that they return to time and time again. Their meeting place, favorite campgrounds, local atractions.
Once you create an Event Location record you can reference it every time you schedule an event for that location.
Select Maintain Event Locations from the Calendar menu to get started.
Click Add a New Item to add a new location to this list. That will bring up a page that looks like the one below.
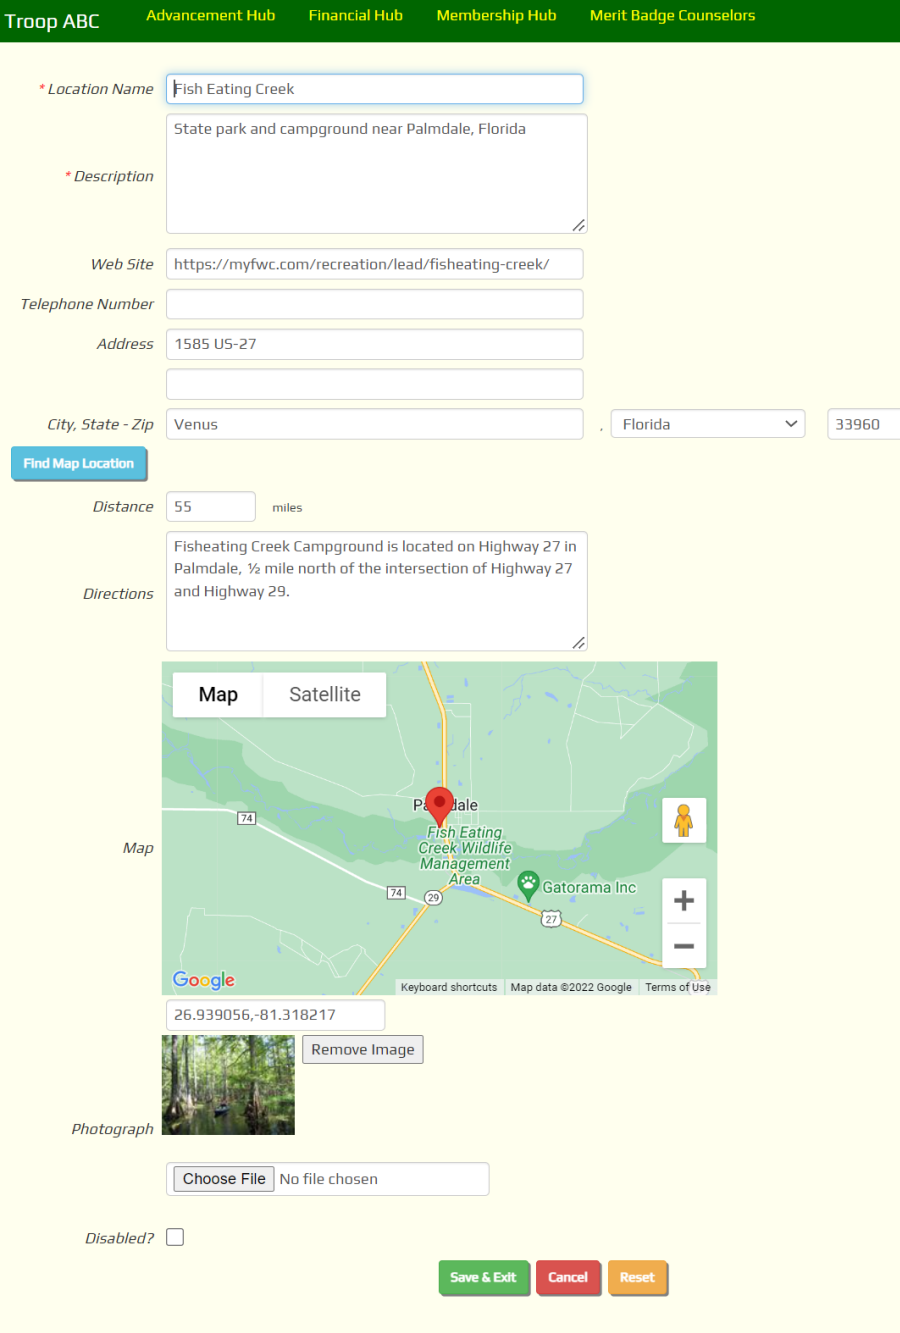
The Location Name and Description are required, as indicated by the red asterisks.
After you fill in the Address fields, click Find Map Location to look up the geographical coordinates for this location. If the address is valid, you should see a map appear below the directions box.
If you do not have an exact address for the location, you can enter the latitude and longitude directly into the Map field. Note that longitudes in the western hemisphere are expressed as negative numbers.
The Distance is the distance from your regular meeting place. This will be a big help to your treasurer if you compensate drivers for mileage.
Most location lists are sorted by distance from your meeting place, with the closest locations appearing at the top of the list.
Be sure to enter your regular meeting place as a location. If this is not your chartering organization, be sure to enter a location for that group as well; you'll need this when you create your ScoutNET™ files.
To upload a photograph of this location, click the Browse button to locate that image on your local disk. It will be uploaded when you save this record.
To replace a photograph of this location, click the Remove Image button, then click Save & Exit. This will delete the old image. Then update the location again and use the Browse button to select the new image. Then click Save & Exit to save the new image.
Check the Disabled? box to prevent this location from showing up on drop down lists for events. This will not cause a problem for past events that referenced this location.
Click Save & Exit to save your work.
Merge Duplicate Locations
Sometimes you accidentally create a new location record for a place that already has one. Once you reference that new record from an event, you won't be able to delete it.
Instead, you can merge the two location records to get rid of the duplicate.
To do this, select Merge Duplicate Locations from the Calendar menu.
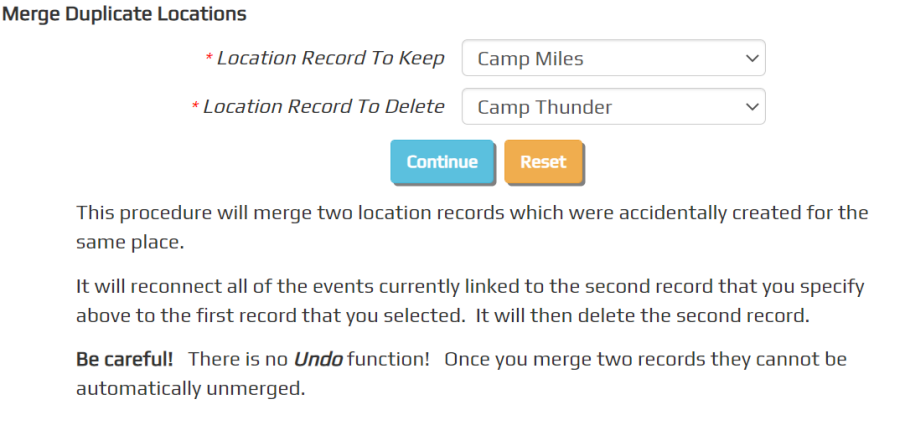
Select the location you wish to keep in the first drop down list.
Select the location you wish to merge (and delete) in the second drop down list.
Click Continue to complete the merge.
Maintain Events
Select Maintain Events from the Calendar menu to begin adding events to your calendar.
The two tabs on this page allow you to view upcoming events, going forward in time, or past events, going back in time.
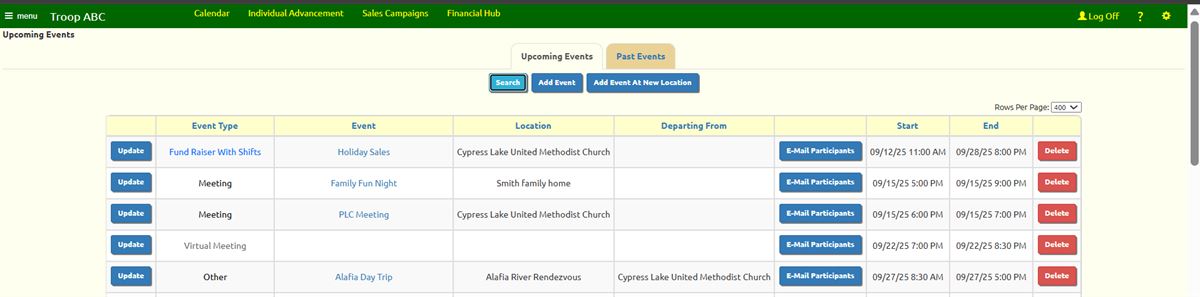
Click Add Event to add a new event for which you already have an Event Location on file.
Click Add Event At New Location to create a new event location and a new event, in that order.
Either way you'll eventually end up at a screen that looks like the one below.
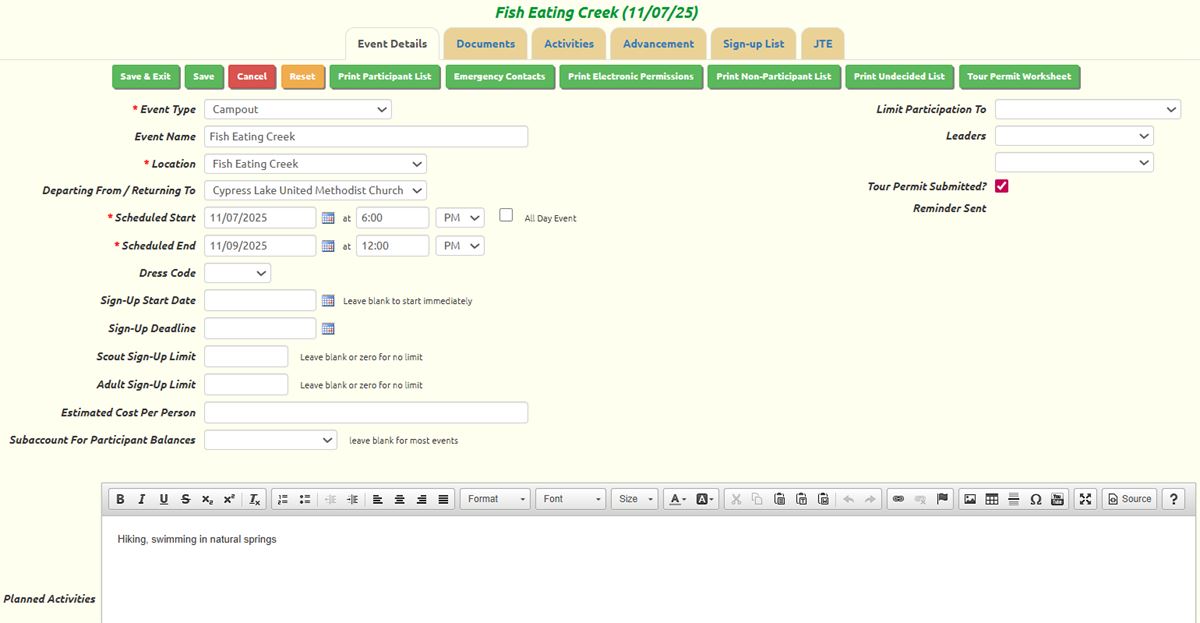
This page has several tabs that allow you to enter information about this event. The first tab is "Details".
Select an Event Type from the drop down list. You can control the types of information that can be gathered for a given type of event by updating the Event Type table. So, for example, if you do not see the Leaders fields after you select an event type, you can update that Event Type to include those fields.
The Event Name will be displayed on the calendar and other event and financial pages. If this is not supplied the Event Type will be displayed.
The Location should always be the destination for this event. If you are leaving from a drop-off location, like your regular meeting place, select that location in the Departing From / Return To field. For events that do not require travel, you may leave the Departing From / Return To field empty.
The drop down lists for locations consist of the entries in your Event Locations table. If you do not see the location you need, you may add it by going to Calendar → Maintain Event Locations and clicking Add a New Item.
The Scheduled Start is when you expect everyone to be at the departure location. The Scheduled End is when you expect to return to that location.
The Dress Code lets you select a value that you've configured in the Dress Codes table.
The Sign-up Start Date allows you to control when users may begin signing up for this event.
The Sign-up Deadline allows you to prevent users from signing up for this event after the specified date. If you enter a date in this field, users will not be able to sign up for this event from the My Stuff menu or the Troop Calendar after this date. You will still be able to update the planned attendance from the Sign-Up List tab (shown later on this page) or the Sign Up Members page.
The Estimated Cost is for informational purposes only. It does not have any effect on the accounting system.
The Minimum Balance Required To Sign Up overrides the minimum balance that was configured for this event type. Scouts who have less than this amount in their account when they try to sign up will be prevented from doing so. Please note that this number can be negative; if you use a negative number then only those scouts who are already in arrears will be prevented from signing up for an event.
The Subaccount For Participant Balances should only be used for major events, like summer camp or Philmont, for which you've created a separate Personal Subaccount to track member payments. It should be left empty for most events.
When you do select a Subaccount For Participant Balances, when that event is viewed from the Calendar, the Current Balance shown for each participant will be the balance of the selected subaccount. If you do not select a Subaccount For Participant Balances, the Current Balance shown for each participant will be the total balance of his primary subaccounts.
Community Service Hours is the number of service hours that will be credited to each participant. You can override this value for individual participants when you Take Attendance.
Hiking Miles is the number of hiking miles that will be credited to each participant. You can override this value for individual participants when you Take Attendance.
Backpacking Miles is the number of backpacking miles that will be credited to each participant. You can override this value for individual participants when you Take Attendance.
Cycling Miles is the number of cycling miles that will be credited to each participant. You can override this value for individual participants when you Take Attendance.
Paddling Miles is the number of paddling miles that will be credited to each participant. You can override this value for individual participants when you Take Attendance.
Motorboating Miles is the number of motorboating miles that will be credited to each participant. You can override this value for individual participants when you Take Attendance.
On The Water Hours is the number of on the water hours that will be credited to each participant. You can override this value for individual participants when you Take Attendance.
Horseback Riding Miles is the number of horseback miles that will be credited to each participant. You can override this value for individual participants when you Take Attendance.
Skating Miles is the number of skating miles that will be credited to each participant. You can override this value for individual participants when you Take Attendance.
Limit Participation To allows you to select a dynamic subgroup. This will prevent users who do not belong to that subgroup from signing up for the event. Users who do not belong to the selected subgroup will not see the event on the Troop Calendar nor will it be included in the list of upcoming events in the electronic newsletter or in their iCalendar subscription.
You can select the Leaders for this event from a list containing all active scouts and adult members.
Click the Tour Permit Submitted checkbox once you've submitted your Tour Plan for this event.
The Planned Activities will be visible to everyone in the troop on the Calendar and the Automated Newsletter, so make it fun, descriptive, and concise.
After you've saved your work, click on Print Participant List to print a list of the scouts and adults who have signed up for this event, Print Non-Participant List to print a list of the scouts and adults who have indicated they do not plan to attend, or Print Undecided List to print a report showing those members who have not yet indicated whether they plan to attend. Emergency Contacts will print the Emergency Contacts report for the scouts and adults who have signed up for this event.
The Tour Permit Worksheet button will produce a report that has a list of the participants, including vehicle and insurance information for the adult leaders who are driving. This makes it easy to fill out your Tour Permit.
The second tab, Documents, lets you maintain a list of documents for this event. These can be files that you upload to this site, or can be references to resources on the Internet.
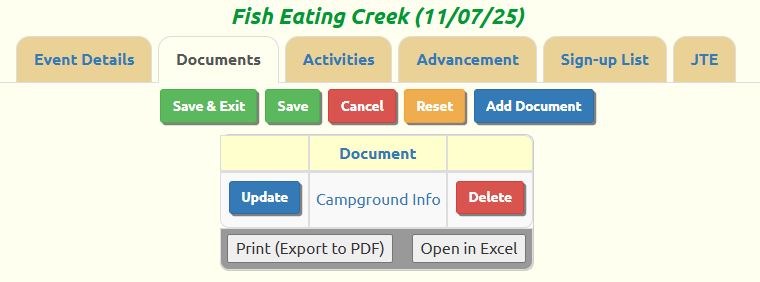
Click Add a New Item to add a new document to the list.
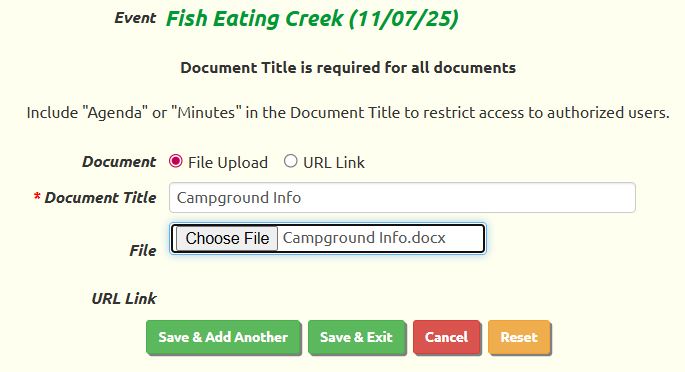
Select whether you wish to upload a file or enter the URL for an existing web resource. Either way, you must enter a title for this document.
Use the File control to select the file from your local disk, or enter the URL in the URL Link field. Then click one of the Save buttons to save this document.
The third tab, Activities, lets you enter meal plans and scheduled activities.
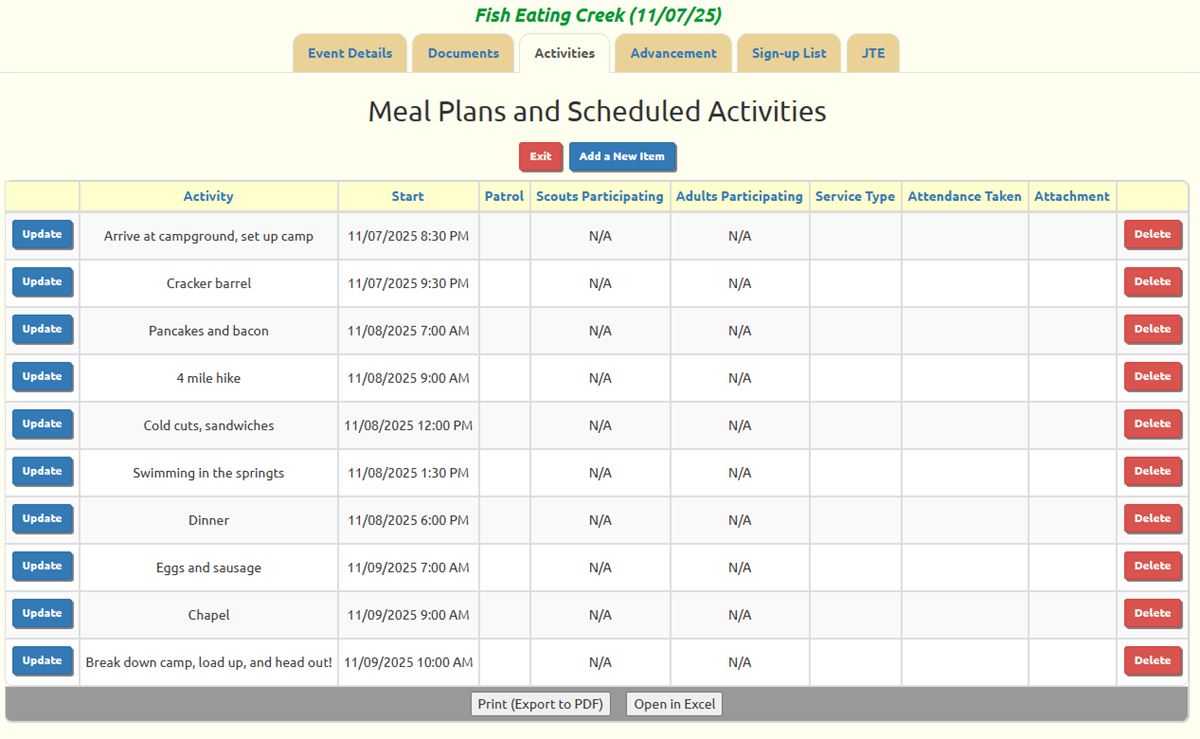
When you add activities to an event, the types of activities that you can choose are the ones that you set up in the Activity Types page.
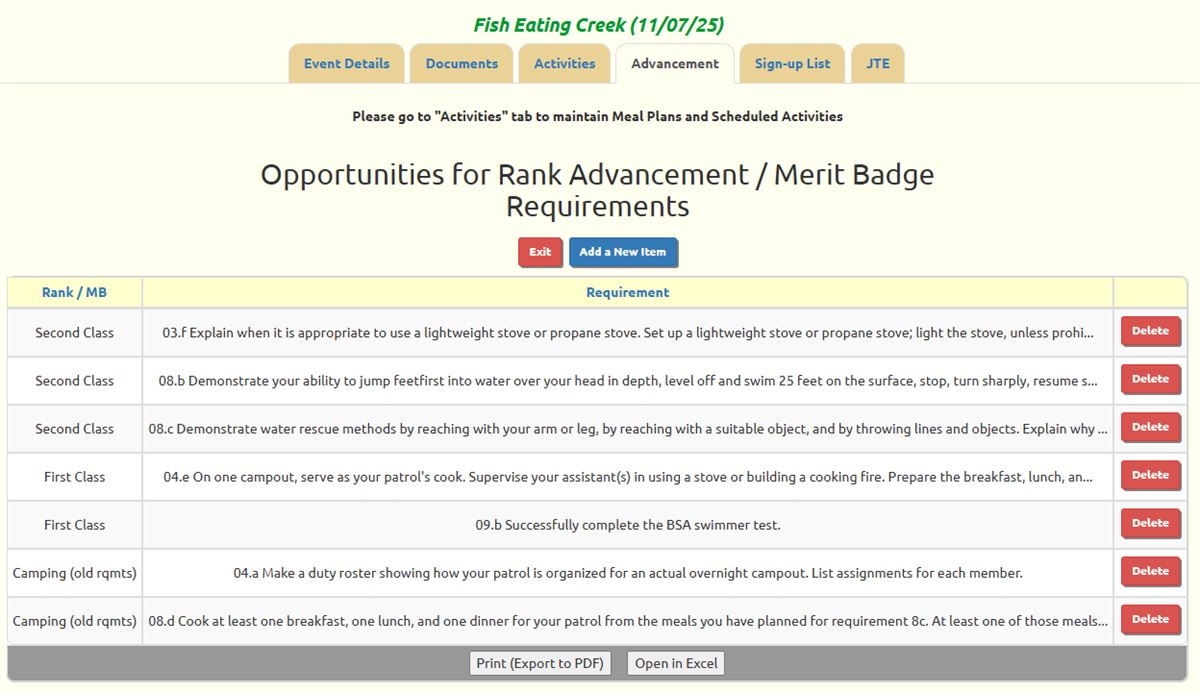
The fourth tab, Advancement, lets you enter opportunities for advancement.
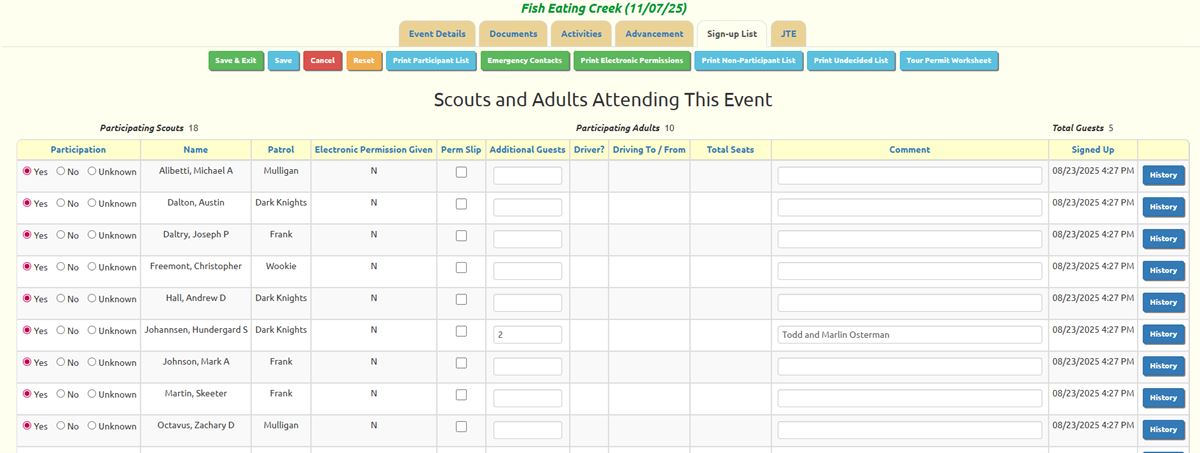
The fifth tab, Sign-up List, as shown below, lets you check off the troop members who plan to attend. After the event is over, you can use this page to note who actually attended; you can also use the Take Attendance pages for that purpose.
If you limited participation to the members of a dynamic subgroup, you will only see the members of that subgroup on this page.
Clicking on any tab will save your work. Click Save & Exit to return to the events list.
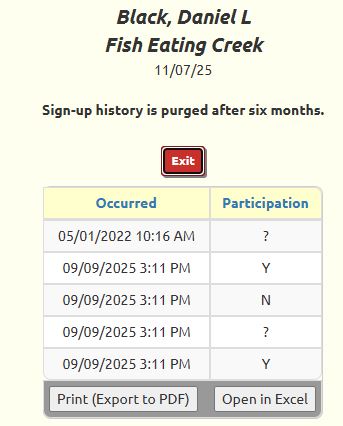
The History button will display the sign-up history for the selected member. The Partiicipation field contains one of the followng 3 values:
- ? - Unknown
- Y - Yes
- N - No
Scroll to the bottom of this page to see additional buttons.
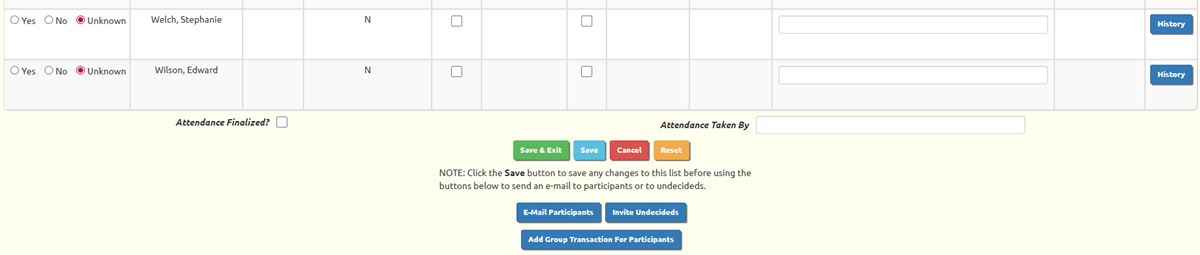
At the bottom of this page you will see another set of buttons to save your work. Below these are buttons to send an e-mail about this event:
- E-Mail Participants will take you the Compose E-Mail page and pre-select the scouts and adults who are signed up for this event
- Invite Undecideds will take you to the E-Mail Invitation page and pre-select the scouts and adults who are Unknown for this event
Be sure to save your latest changes before using either of the e-mail buttons.
Add Group Transaction For Participants will only be visible if you are authorized for the Treasurer user role. It will allow you to create a group transaction to charge the participants.
If this event type supports shifts, you will also see a Shifts tab, which we'll explain later in this chapter.
We'll explain the JTE tab in the Journey To Excellence chapter.
Event Types
On the Event Types page, you can define the kinds of events your troop can host, and determine what TroopWebHost features will be enabled for each event. It is accessed through Site Configuration → Event Types.
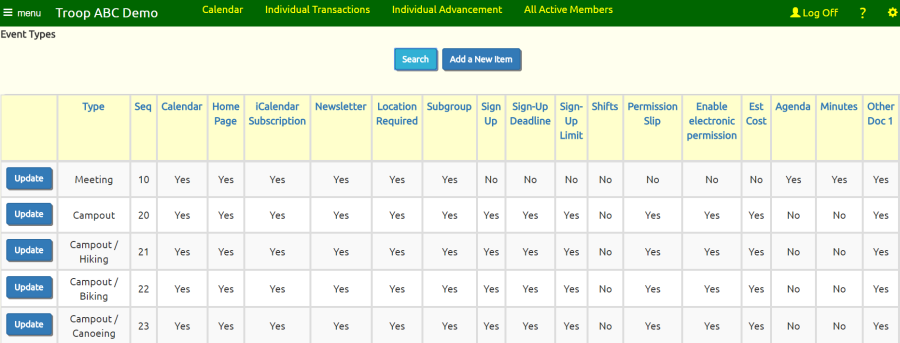
Each event type has a number of settings that enable or disable the display of certain types of information.
When creating a new event type, you may want to disable attributes that aren't relevant to the event; for instance, Display Cycling Miles? would not be appropriate for a "Scout Sunday" event.
The first section identifies this event type.
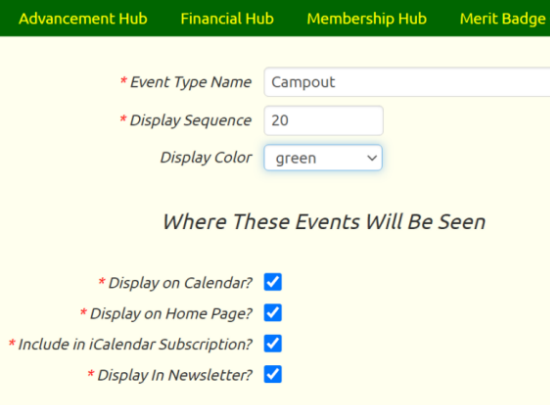 Event Type Name: This will be the name for all events of this type, unless you enter a specific name for each event.
Display Sequence: Sets the relative order of this item in the list of event types. A lower number will cause this Event Type to appear higher on the list.
Display Color. Sets the color in which this event's name will be displayed on the troop calendar.
Where These Events Will Be Seen
Display on Calendar?: Determines whether this type of event is displayed on the troop calendar.
Display on Home Page?: Determines whether this type of event is displayed by any of the widgets that can list upcoming events on your home page or other custom pages.
Include in iCalendar Subscription?: Determines whether this type of event will be included when you Subscribe to the Troop Calendar.
Display In Newsletter?: Determines whether the event is automatically added to the troop newsletter.
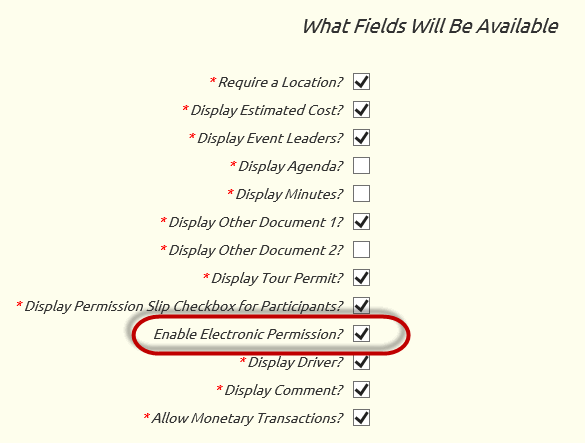
What Fields Will Be Available
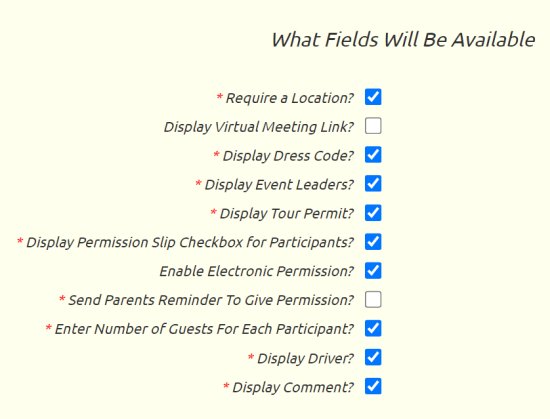 Require a Location?: Determines whether a user is required to enter a location for this type of event.
Display Virtual Meeting Link? Allows you to enter the URL for a virtual meeting.
Display Dress Code?: Allows you to select the required dress code for events of this type.
Display Event Leaders?: Allows you to enter two leaders for this event. Leaders can be scouts or adults.
Display Tour Permit?: Enables a Tour Permit Submitted checkbox on the Maintain Events page. Tour permit worksheets can be downloaded from the same page.
Display Permission Slip Checkbox for Participants: Creates a checkbox for permission slip submission on the Sign Up Members page.
Enable Electronic Permission: Gives parents the ability to electronically sign a permission slip for a scout to attend the event.
Enter Number of Guests For Each Participant: Allows users to enter the number of guests they plan to bring to this event.
Send Parents Reminder To Give Permission. Will cause the system to automatically send an email reminder to the parents of each scout who signs up for an event for which the parents have not given permission. This email is sent the day after the scout signed up for the event.
Display Driver?: Displays Driver? checkboxes on the Sign Up For Upcoming Events page and on the Sign-up List tab of the Maintain Events pages. When a user checks this box, it indicates that they can provide transportation to the event for others. It will then prompt the user as to whether they can drive to the event, from the event, or both ways, and the number of seats in the vehicle they will be using.
Display Comment?: Allows users to enter comments next to events in the Sign Up For Upcoming Events page. Comments are also displayed in the Sign-up List tab on the Maintain Events page.
Financial
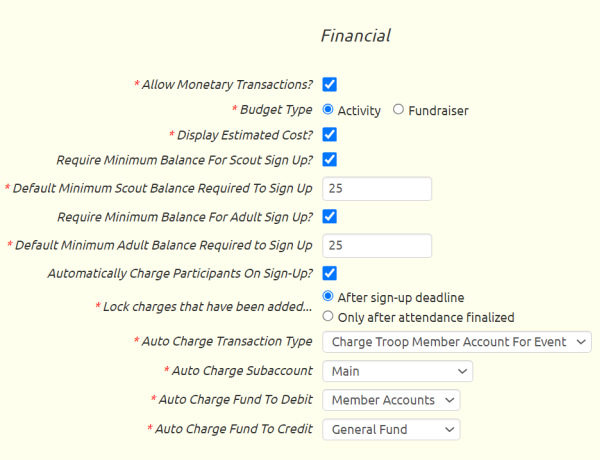 Allow Monetary Transactions?: Allows users to debit and credit events through monetary transactions. Events with this flag enabled can have their balances reduced through debiting or increased through crediting. See Event Balances for more information.
Budget Type: If the event type allows monetary transactions, you may then select whether events of this type show up as activities in the expense section of the budget, or as fundraisers in the fundraiser section of the budget.
Display Estimated Cost?: Allows you to enter a comment on each event regarding the expected cost for each participant. This is a free text field which has no actual financial impact. It is not used by the accounting module.
Require Minimum Balance For Scout Sign Up? lets you prevent scouts from signing up for an event if their current balance is less than an amount you specify.
Default Minimum Scout Balance Required To Sign Up is the minimum balance required for scouts to sign up for events of this type. You can override this amount on individual events. Please note that this number can be negative; if you use a negative number then only those scouts who are already in arrears will be prevented from signing up for an event.
Require Minimum Balance For Adult Sign Up? lets you prevent adults from signing up for an event if their current balance is less than an amount you specify.
Default Minimum Adult Balance Required To Sign Up is the minimum balance required for adults to sign up for events of this type. You can override this amount on individual events. Please note that this number can be negative; if you use a negative number then only those adults who are already in arrears will be prevented from signing up for an event.
Automatically Charge Participants On Sign-Up? allows events of this type to be configured to automatically charge a fee to each member who signs up for an event.
Lock charges that have been added... determines when the system will stop automatically removing the charges for members who signed up for an event earlier, but later withdrew. If you choose "After sign-up deadline", then members who withdraw after the sign-up deadline will still be charged for the event. Regardless of which option you select, no changes to participant charges will occur automatically after attendance has been finalized for the event.
Auto Charge Transaction Type. Select the transaction type to be used when the system generates group transactions to charge the participants on an event.
Auto Charge Subaccount. This should usually be set to "Main". This is the personal subaccount that will be used when the participants are automatically charged for the event, unless a subaccount was specified in the Subaccount For Participant Balances for that event.
Auto Charge Fund To Debit. If the selected transaction type is configured to debit a fund, select the fund to be automatically debited when participants are automatically charged.
Auto Charge Fund To Credit. If the selected transaction type is configured to credit a fund, select the fund to be automatically credited when participants are automatically charged.
Sign-Ups and Shifts
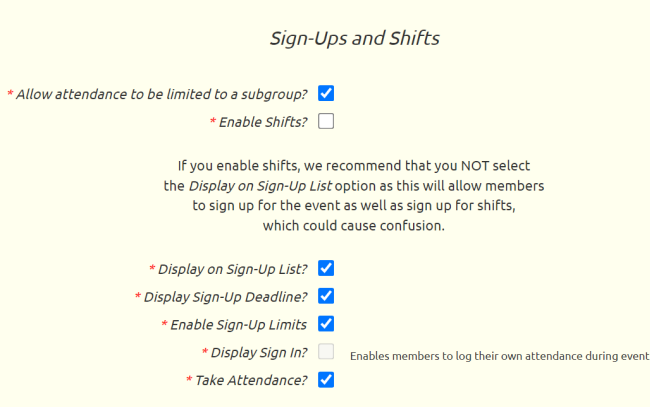 Allow attendance to be limited to a subgroup: Allows you to create events that only allow members of a selected dynamic subgroup to attend.
Enable Shifts: Allows you to set up Shifts for this event, which your members can then sign up for.
Display on Sign-Up List?: Allows users to sign up online via the Sign Up For Upcoming Events page or from the troop calendar.
Display Sign-Up Deadline?: Allows you to set a sign-up deadline, after which users cannot sign up for the event. This will also give you a sign-up start date, which determines when members can first sign up for an event.
Enable Sign-Up Limits: Allows you to set limits on the number of scouts and adults who can sign up for this type of event on-line.
Display Sign In?: Allows members to sign in during the meeting and up to a half hour prior, thus logging their attendance. This feature is mutually exclusive with Display on Sign-Up List and will disable Display Sign-Up Deadline.
Take Attendance?: Allows leader to take attendance for this type of event.
Send Email When Signup Status Changes
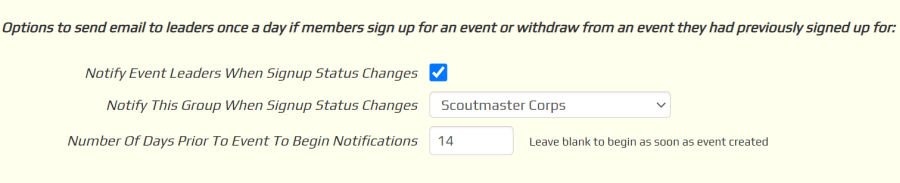
The system can send email notifications when members of the group sign-up for event or withdraw their sign-up. These emails are generated once a day. They can be sent to the leaders that were designated for that event and/or a specified dynamic subgroup.
Notify Event Leaders When Signup Status Changes will cause the leaders designated for an event of this type to receive these email notifications. Note: you will only see the Notify Event Leaders When Signup Status Changes field if you have enabled "Display Event Leaders?" for this event type.
Notify This Group When Signup Status Changes will cause the members of the selected dynamic subgroup to receive these email notifications for events of this type.
Set the Number Of Days Prior To Event To Begin Notifications if you want to wait until the event is closer at hand to begin sending these notifications.
Participation Credit
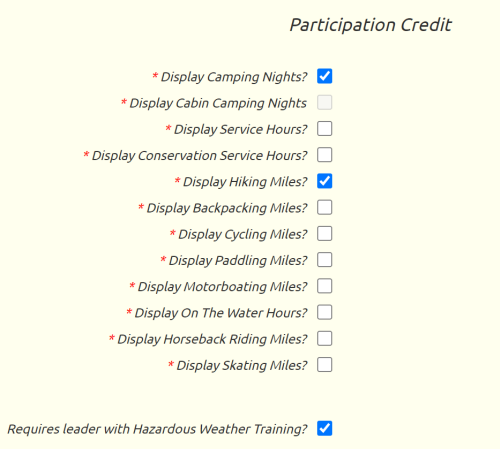 Display Camping Nights?: Will cause the system to compute the number of camping nights for this event, which you may override for individual scouts when you take attendance. Scouts who attend events with camping nights will have those nights added to their total, which is displayed on the Individual Advancement page.
Display Cabin Camping Nights?: Will cause the system to compute the number of camping nights for this event, which you may override for individual scouts when you take attendance. Cabin camping nights are not counted towared the requirements for Camping merit badge or Order of the Arrow eligibility. Scouts who attend events with cabin camping nights will have those nights added to their total, which is displayed on the Individual Advancement page.
Display Service Hours?: Allows you to enter the number of community service hours served during this event. Scouts who attend events with community service hours will have those hours added to their total, which is displayed on the Individual Advancement page. Please note that fundraisers do not count as community service.
Display Conservation Service Hours?: Allows you to enter the number of conservation service hours served during this event. Scouts who attend events with conservation service hours will have those hours added to their total, which is displayed on the Individual Advancement page.
Display Hiking Miles?: Allows you to enter the number of miles that will be hiked during this event. Scouts who attend events with hiking miles will have those miles added to their total, which is displayed on the Individual Advancement page.
Display Backpacking Miles?: Allows you to enter the number of backpacking miles for this event. This will add to the participating scouts' backpacking miles total which will be displayed on the Individual Advancement page.
Display Cycling Miles?: Allows you to enter the number of miles that will be biked during this event. Scouts who attend events with cycling miles will have those miles added to their total, which is displayed on the Individual Advancement page.
Display Paddling Miles?: Allows you to enter the number of miles that will be canoed or kayaked during this event. Scouts who attend events with paddling miles will have those miles added to their total, which is displayed on the Individual Advancement page.
Display Motorboating Miles?: Allows you to enter the number of miles covered via motorboat in this event. This will add to the participating scouts' motorboating miles total which will be displayed on the Individual Advancement page.
Display On The Water Hours?: Allows you to enter the number of hours spent on the water at this event. This will add to the participating scouts' on the water hours as defined for the National Outdoor Awards Aquatic segment, which will be displayed on the Individual Advancement page.
Display Horseback Riding Miles?: Allows you to enter the number of horseback riding miles at this event. This will add to the participating scouts' horseback riding miles total which will be displayed on the Individual Advancement page.
Display Skating Miles?: Allows you to enter the number of skating miles at this event. This will add to the participating scouts' skating miles total which will be displayed on the Individual Advancement page.
Requires leader with Hazardous Weather Training? should be checked for any outdoor event for which the BSA there to be at least one adult leader present who is current on Hazardous Weather Training (BSA course code SCO_800). Please see the following link regarding additional considerations regarding displaying the hazardous weather training status on events; Hazardous Weather Training.
Reminders
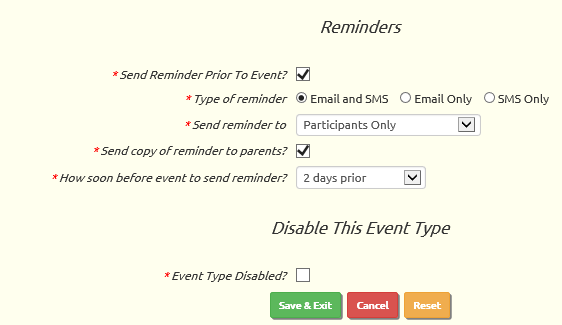 Send Reminder Prior To Event?: Will enable event reminders for events of this type. Selecting this option will reveal the next four options to configure these reminders.
Type of reminder: Determines whether event reminders will be sent to e-mail addresses, SMS text message addresses, or both.
Send reminder to: Determines whether event reminders will go to everyone, participants only, undecideds only, or participants and undecideds.
Send copy of reminder to parents?: Determines whether the parents of the intended recipients will receive a copy of the reminder.
How soon before event to send reminder?: Configures reminders to go out the same day as the event, or one to six days prior, or one to four weeks prior to the event.
Disable This Event Type
Event Type Disabled?: Hides this event type on all event type choice lists. This does not change any existing events, but prevents users from creating new events of this type.
Activity Types
When you add activities to an event, the choices for Activity Type come from a table that you can maintain. To add, delete, or edit activity types, go to Site Configuration → Activity Types.
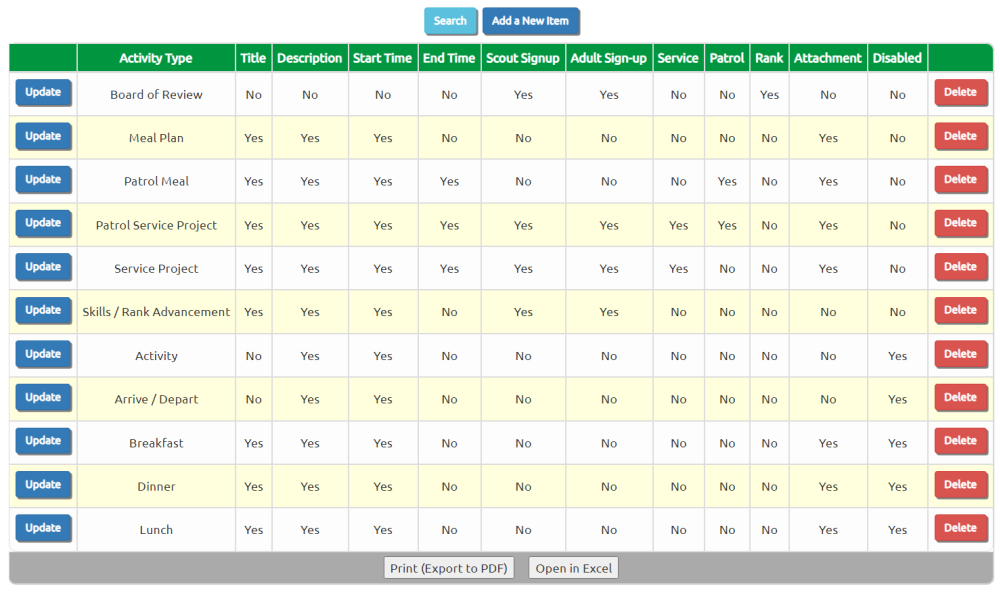
Click Add a New Item to add an Activity Type to this list.
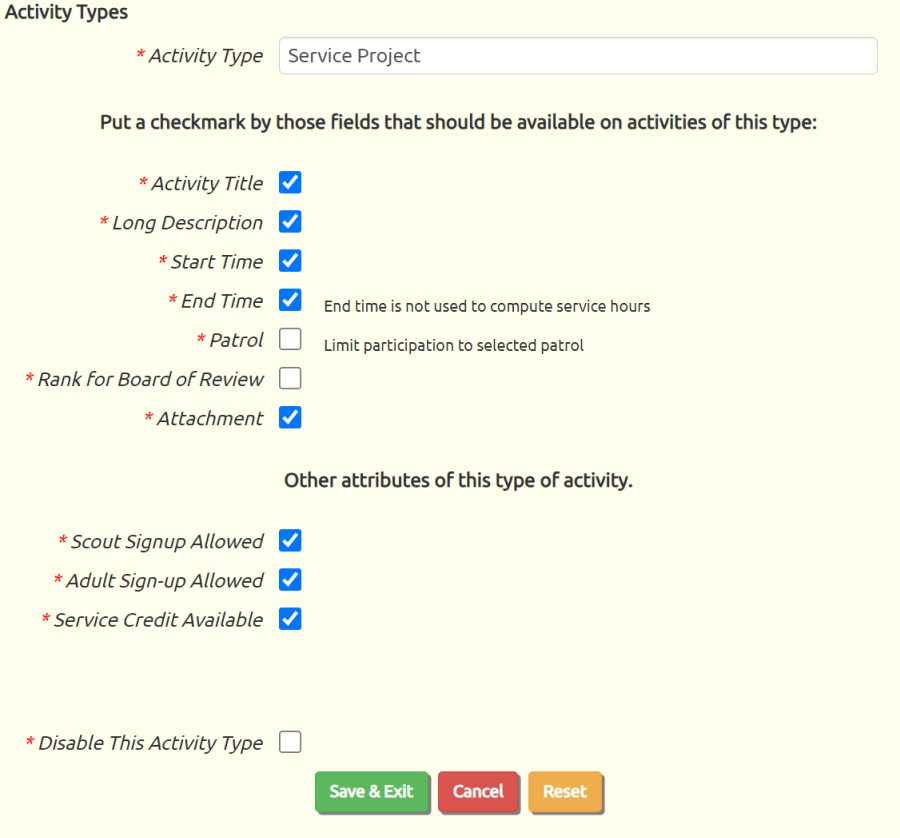
Provide a name for this Activity Type in the first field, then put checkboxes next to each attribute in the next section that would be appropriate for activities of this type:
- Activity Title. A short description of this activity.
- Long Description. A longer description (this enables the original "description" field on activities.)
- Start Time. The starting date and time for this activity.
- End Time. The ending date and time for this activity. (Note: this is not used to compute the duration of the activity.)
- Patrol. Activities of this type will be limited to the members of a selected patrol.
- Rank for Board of Review. Scouts signing up for an event of this type can select the rank for which they want a Board of Review.
- Attachment. You can attach a file or document to this activity.
Then consider the remaining attributes:
Scout Signup Allowed determines whether scouts will be allowed to sign up for activities of this type. It also controls whether you can set a scout sign-up limit for this type of activity.
Adult Signup Allowed determines wheter adults will be allowed to sign up for activities of this type. It also controls whether you can set an adult sign-up limit for this type of activity.
Service Credit Available allows you to designate whether an activity of this type is a community service or conservation service. Participants will earn credit by participating in this activity.
Disable This Activity Type will prevent this activity type from appearing as a choice for new activities. It may still be referenced by old activities.
Click the Save button to save your work.
Dress Codes
Every event on your calendar can have a required dress code. You can set up the available choices by going to Site Configuration → Dress Codes, as shown here.
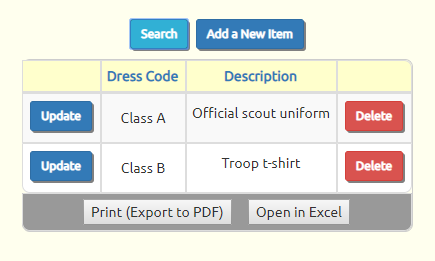
Click Add a New Item to add a Dress Code to this list.
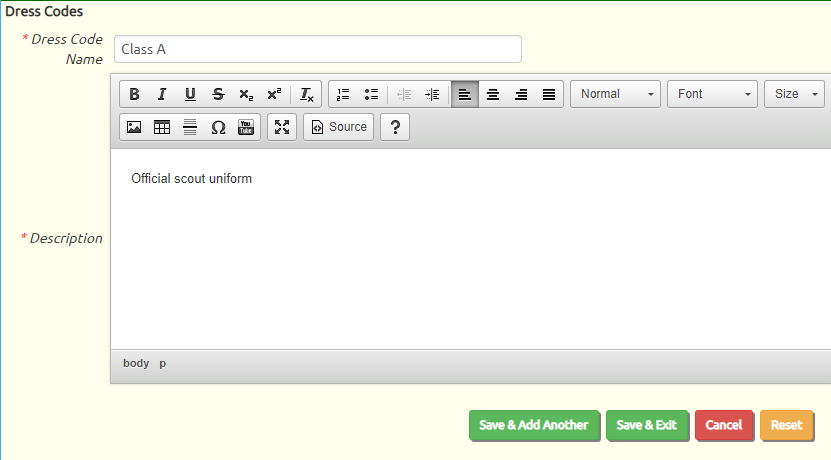
The Dress Code should be a short name for this dress code.
The Description should be a brief description, which could contain small illustrations.
The name and description will be displayed on the calendar for every event that has this dress code, so we recommend keeping it as short as possible.
Event Documents
The Documents tab of Maintain Events allows you to attach any number of documents to an event.
These documents may be viewed independently of any event by going to Calendar → Event Documents.
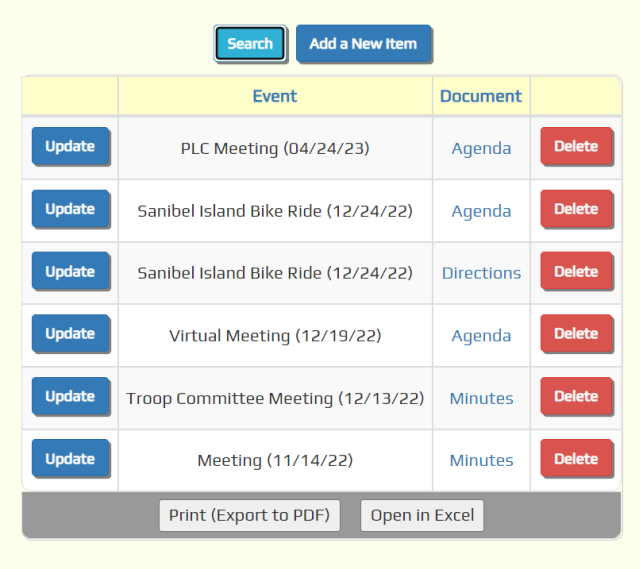
This list will not include any documents for which the title contains the word "Agenda" or "Minutes" unless the current user is a site administrator or has a user role that is authorized for the "Maintain Agenda and Minutes" task or the "View Agenda and Minutes" task.
Click on the document name to open that document. Click the Update button to go to the page shown below.
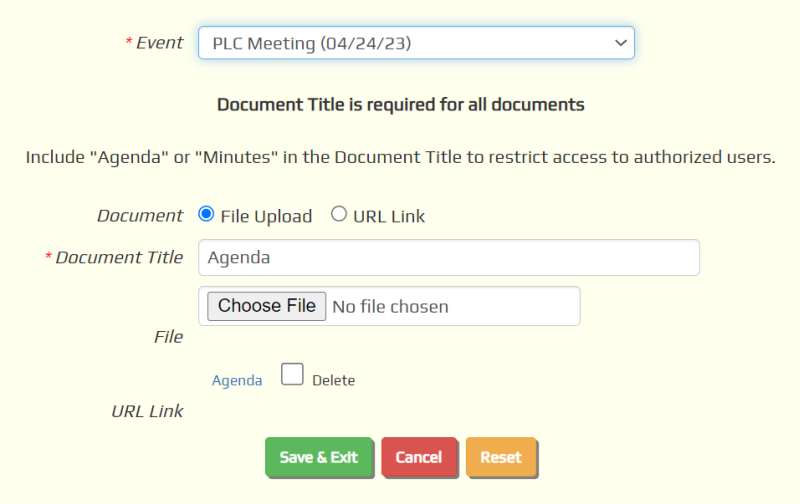
The Event drop down list allows you to link this document to a different event. This should only be done if the document was accidentally uploaded under the wrong event.
The Document type is "File Upload" for files that have been uploaded to the TroopWebHost server. "URL link" allows you to reference files on other servers using a URL.
You can change the Document Title to make it more descriptive of this document.
If you wish to replace the file that was uploaded, put checkmark in the Delete box, then click Save & Exit. This will delete the original file. Then update this entry again, and use the Choose File button to select the new file. Click Save & Exit to upload the new file to the server.
Copy An Event
Your troop's regular meetings should always be on your calendar. But entering an event for each meeting would take a long time and be really boring.
Instead, why not create the first meeting and then copy it into future dates? That's what I'm talking about.
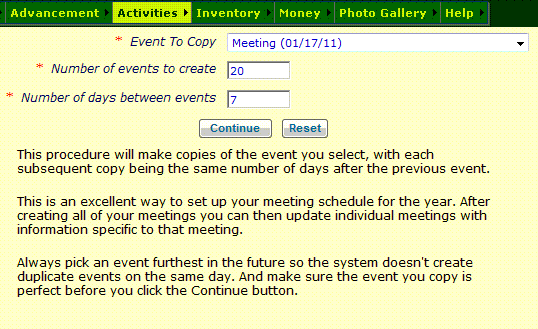 Select Copy An Event from the Calendar menu to see a page like the one shown at right.
Before you do this, you must have already created the first event using Maintain Events.
Your first event should not have any information in it that you do not want to copy into the new events.
Select that event in the drop down list.
Then select the number of events you want to create. We recommend that you not copy weekly events more than six months into the future. Having a large number of future events in your system will make it harder to maintain your calendar.
The number of days between events should be 7 for weekly meetings.
When you click Continue, the system will copy the selected event as many times as you told it, always adding the number of days you indicated to the starting and ending dates.
For example, if you select an event that has a scheduled start of May 1, with 7 days between events, the first new event would be May 8, the next would be May 15, and so on.
Be careful! There is no undo function, so if you make a mistake you will have to manually delete all of the events you created.
Copy Monthly Event
The Copy Event function is very useful when you need to create a series of events that are always separated by the same number of days, like weekly or bi-weekly meetings.
But what if you need to copy an event that happens once a month, or once a quarter?
That's where the Copy Monthly Event function comes in handy.
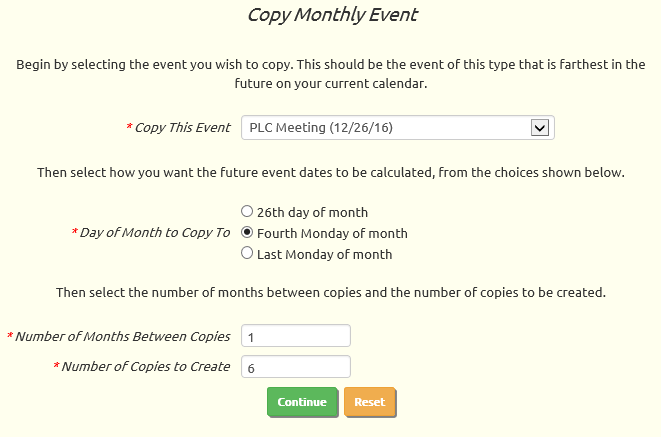 Select Copy Monthly Event from the Calendar menu to see a page like the one shown at right.
Before you do this, you must have already created the first event using Maintain Events.
Your first event should not have any information in it that you do not want to copy into the new events.
Select that event in the drop down list.
Then tab to the next field. The choices for Day of Month to Copy To should immediately change to match the event that you selected.
Select the pattern you want to use for day of month from the available choices.
Number of Months Between Copies should be set to 1 for events that occur every month. For quarterly events, set this to 3. For semi-annual events, set this to 6. For annual events, set this to 12.
We recommend that you not set the Number of Copies to Create to a value much higher than 12, so you don't overwhelm your calendar with copies of this event.
When you click Continue, the system will copy the selected event as many times as you told it, using the pattern you selected to calculate the day of month on which each copy will be created.
It will then take you to the Maintain Events page where you can see the events you just created.
Be careful! There is no undo function, so if you make a mistake you will have to manually delete all of the events you created.
National Holidays
Your unit may find it useful to include national holidays on your calendar. If nothing else, it can help you avoid potential conflicts when you're scheduling an event.
TroopWebHost maintains a list of standard holidays that can be imported into your calendar. These include the federally recognized holidays, along with Mothers Day and Fathers Day. (You don't want to forget about Mothers Day!)
You can view this list of holidays by selecting National Holidays from the Calendar menu. This will display a list like this:
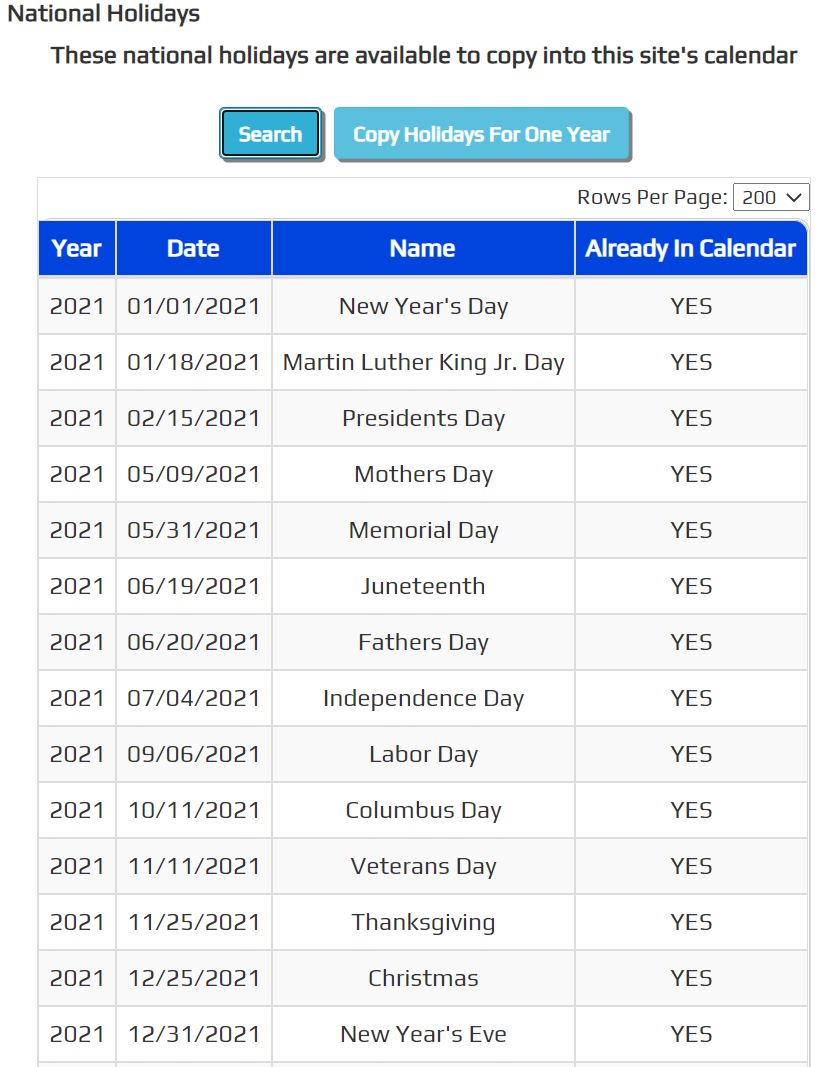
The "Already In Calendar" column indicates whether this holiday is already present in your calendar. This will only be set to "YES" if the event has exactly the same name and date.
Press the Copy Holidays For One Year button to open the following page.
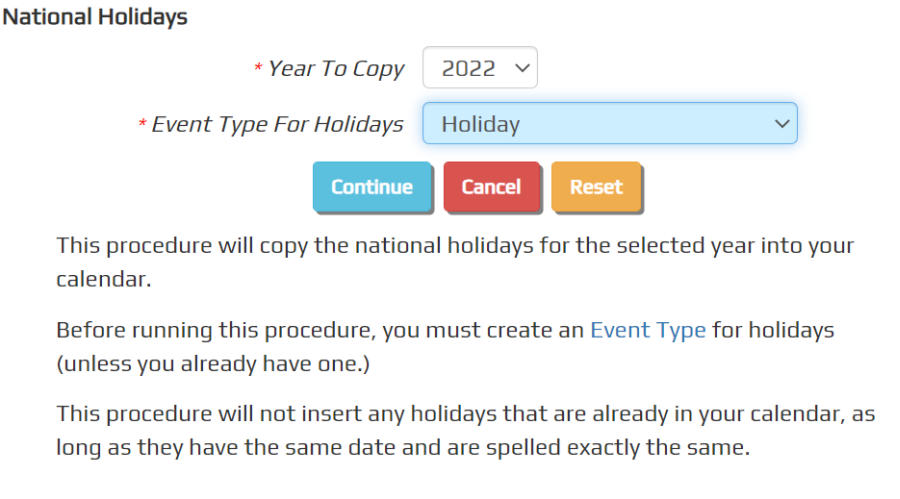
This page allows you to copy the holidays for a selected year into your calendar. It will only copy those holidays that are not already in your calendar with the same exact name and date.
Before running this function, you must first have an appropriate Event Type that can be assigned to these holidays when they are added to your calendar. Please go to Site Configuration → Event Types to add a "Holiday" event type, unless you have already done so. Under "Where These Events Will Be Seen", consider whether you want to include this event type in the iCalendar Subscription or Newsletter. We recommend that you disable all of the options under the rest of the sections.
Once you have a "Holiday" event type, you can return to the page shown above and select that event type from the drop down list. Then press the Continue button to copy that year's holidays into your calendar.
Once this is complete, the system will display the Maintain Events page.
Electronic Permission
TroopWebHost gives you the option to let parents fill out an electronic permission form instead of signing a paper document.
This option is turned off by default. Further down this page we will show you how to enable it for your troop.
With electronic permission configured, when your parents access the calendar to sign up for an event they will see an additional button, Give Permission, as shown below. A similar button will be available on the Event Sign-Up page that can be accessed from My Stuff → My Scouts.
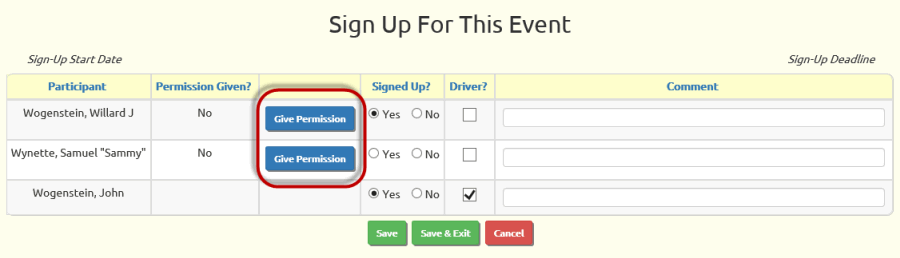
This button will only appear next to scouts who have not yet been given permission to attend this event.
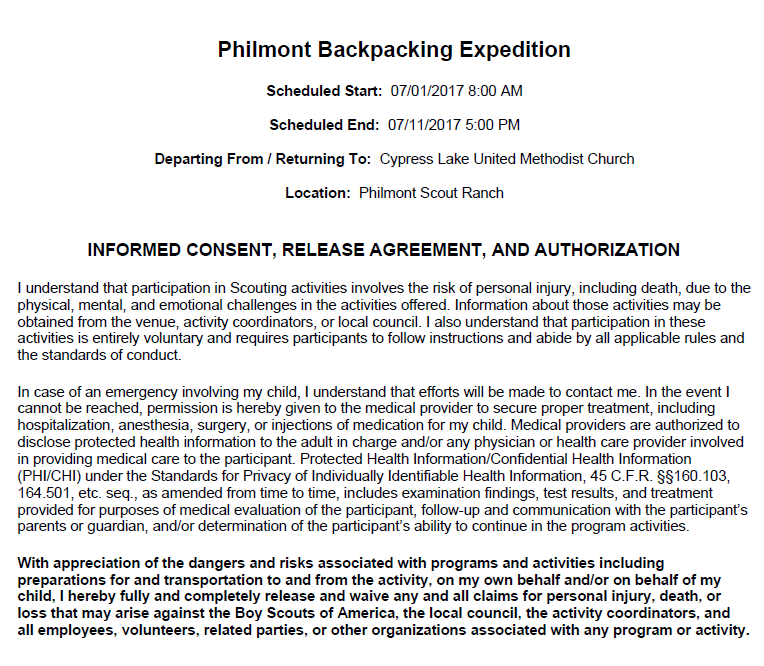
When you press this button, you'll be taken to the Electronic Permission Form, as shown below.
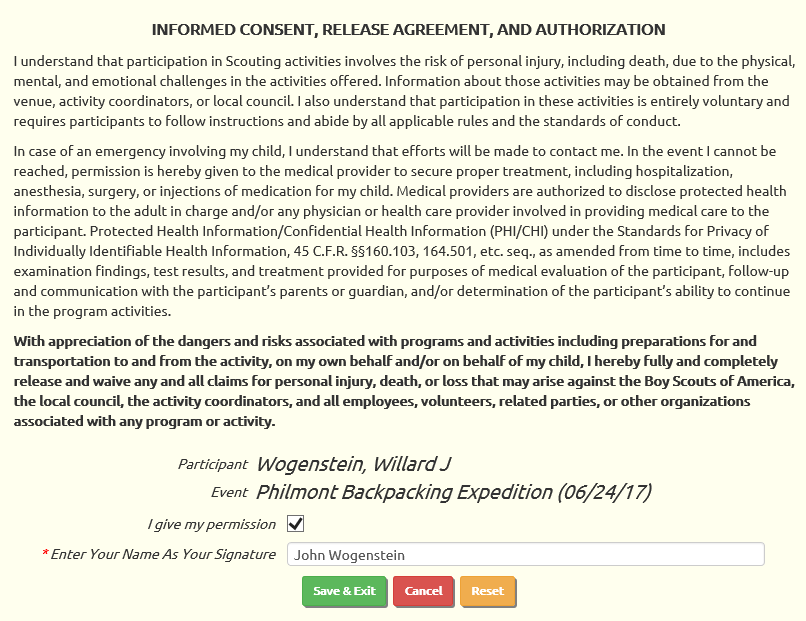
This page identifies the scout and the event for which you are giving permission.
Click the checkbox, then type your name in the signature block. Click Save & Exit to complete the process.
If the scout wasn't already signed up for this event, he will be signed up now.
Configuring Electronic Permission
As you might have guessed, electronic permission is enabled through the Event Type.
To enable electronic permission for events of a given type, update that event type and select the Enable Electronic Permission option, as shown below.
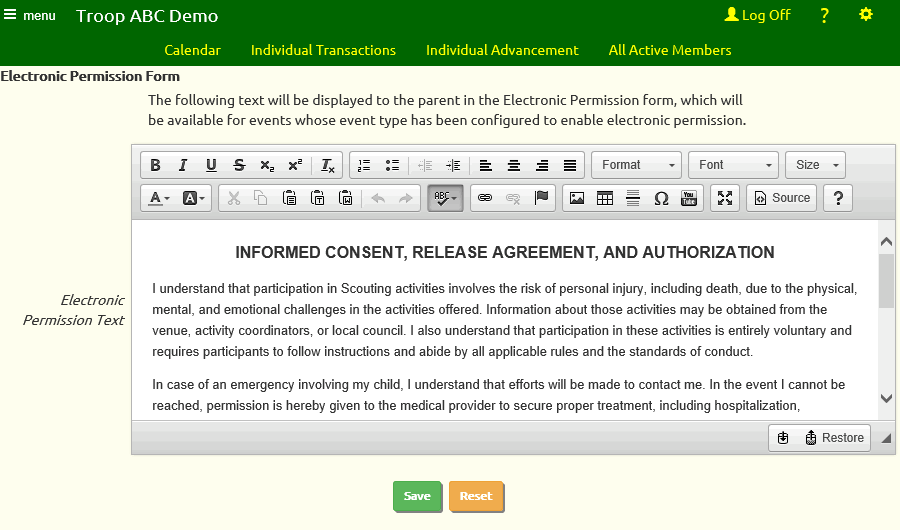
The text of the Electronic Permission Form is also configurable. Please go to Site Configuration → Electronic Permission Form to see a page like the one shown below.
Edit the text as needed, then click Save to save your changes.
Viewing Electronic Permissions
Troop leaders can view the details of an electronic permission from the Sign Up Members For Event page or from the Troop Calendar detail page.
A section of the Troop Calendar detail page is shown below.
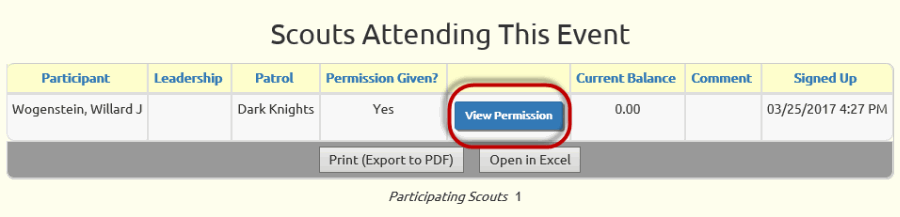
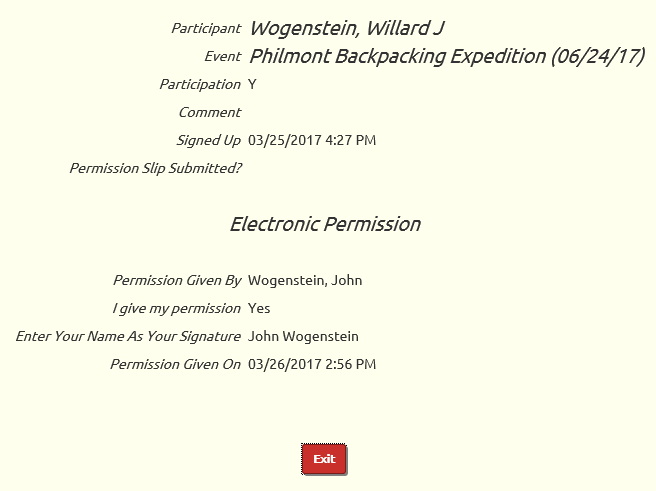
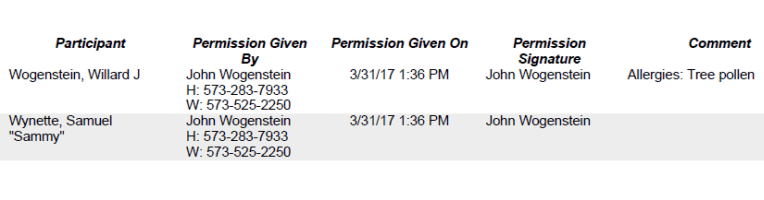
The View Permission button will appear next to any scout who has been given permission either by paper form or by electronic permission. This will take you to a page like this:
Permission Reminders
Once you've implemented the TroopWebHost electronic permission feature - or if your unit still requires handwritten permission slips to be submitted for each event - you may want to have the system send a reminder to the parents if a scout signs up for an event without asking them to give permission.
You can configure the system to send e-mail reminders to a scout's parents the day after they sign up for an event if they have not yet given permission for this event. This is done by updating the appropriate Event Types to enable the "Send Parents Reminder To Give Permission" option.
The e-mail reminder is sent the day after the scout signed up for the event. The reminder is sent to every adult linked to that scout, except for those with a relationship of "Advisor". It is only sent once, unless an event leader presses the Send Permission Reminders button on an event to force new reminders to go out for an event.
Here is an example of a permission reminder email:
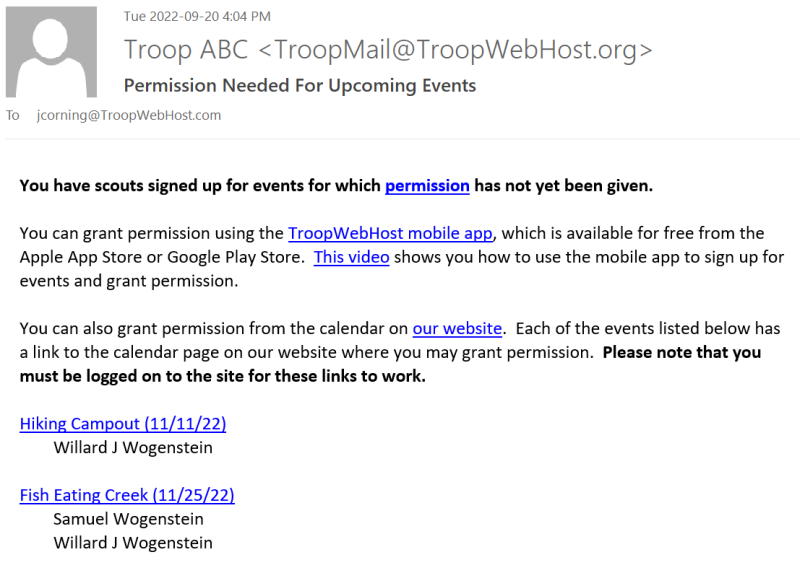
Please note that, when you implement this feature, email reminders will go out for all future events for which scouts need permission. Only one email will go to each parental email address, with a summary of all the permissions needed, as shown in the above example.
Sign Up Members For An Event
Scouts can sign up for upcoming events from the My Stuff - Sign Up For Events page or from the Troop Calendar. Parents can use these pages to sign up their families.
Authorized leaders can update the sign up status for all members of the troop using the Sign Up Members For Event page available from the Calendar menu.
This page begins by displaying a list of upcoming events which have an Event Type which allows members to sign up.
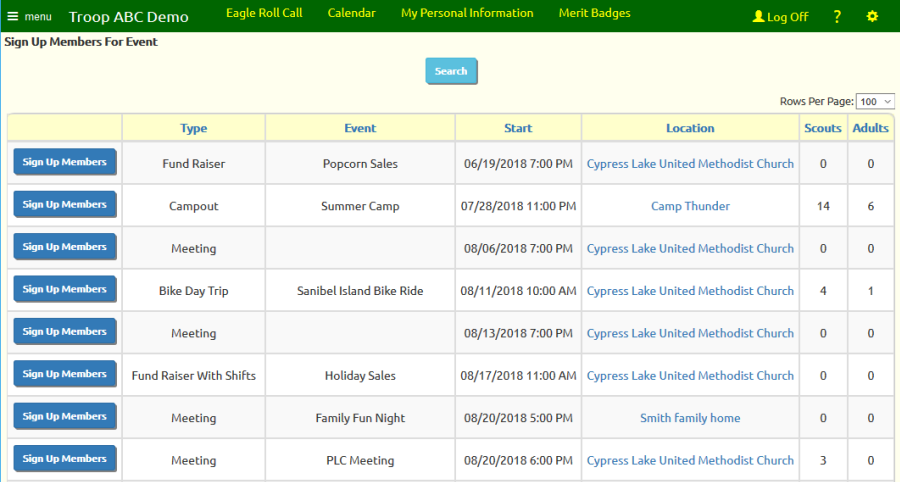
Click the Sign Up Members button for the event you wish to update.
This will take you to a page like the one shown below:
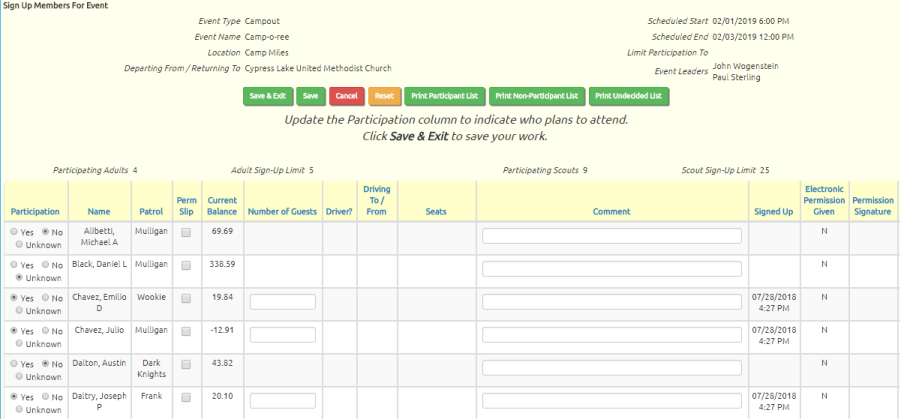
The columns displayed on this page will vary based on how the Event Type was configured for this type of event.
For example, the Permission Slip column will only appear if this Event Type has enabled the Display Permission Slip Checkbox for Participants option.
Click the Yes button next to each member who plans to attend the event.
Click the No button next to any member who has indicated he does not plan to attend.
For any member who has been set to "Yes", you can enter the number of guests they plan to bring along, if the Event Type is configured for this option.
Adults can be designated as drivers, regardless of whether they are signed up for the event, if the Event Type is configured for drivers. For each driver, indicate whether they are driving to and/or from the event, and the total number of seats in their vehicle.
Use the Comments field to indicate other information about this person, such as alternative travel plans or the names of guests.
Click Save & Exit to save your work.
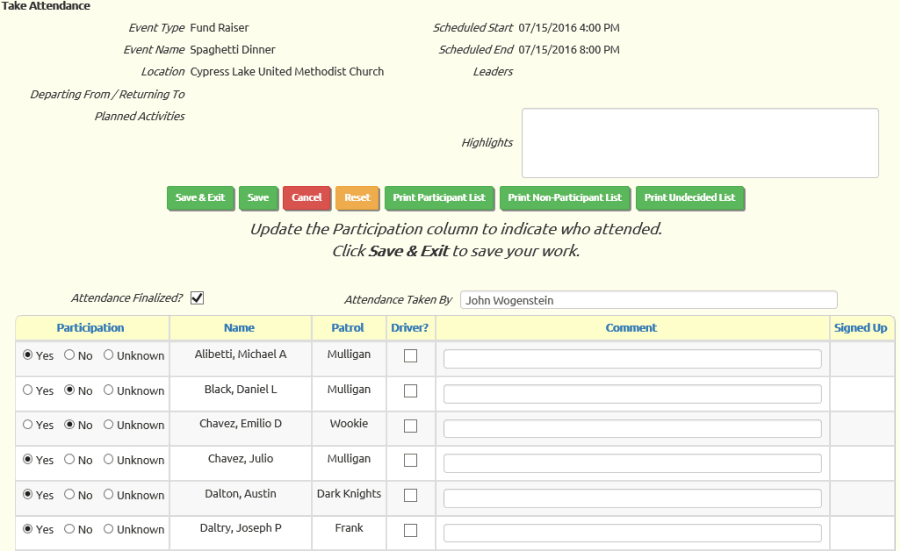
Taking Attendance
Attendance at campouts, hikes and community service events should be recorded since it is required for rank advancement. You can take attendance for events by going to Calendar → Take Attendance → Take Attendance.
You must record a scout's attendance at an event for it to show up on their Rank Summary page.
You can choose an event to take attendance for from a list similar to the one below.
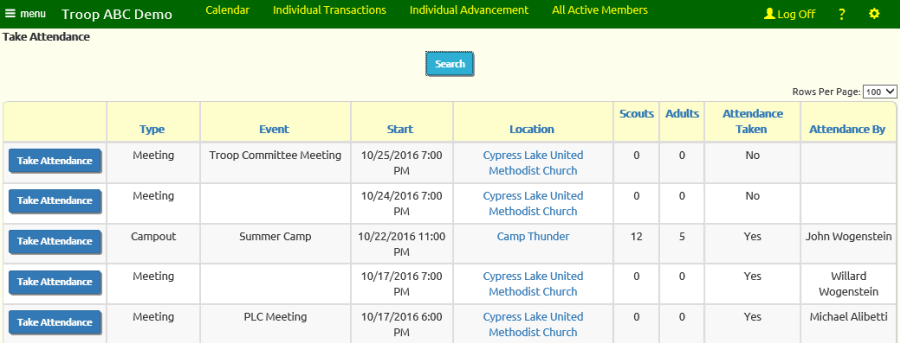
This page will only show events with a start date in the past. Click the Take Attendance button for the event you wish to update.
When an Event Type is set up to record community service hours, hiking miles, cycling miles or paddling miles, you will be able to enter the number possible at this event at the top of the page. Note that you cannot enter a number of camping nights; instead, the system will calculate the number automatically based on the starting and ending dates.
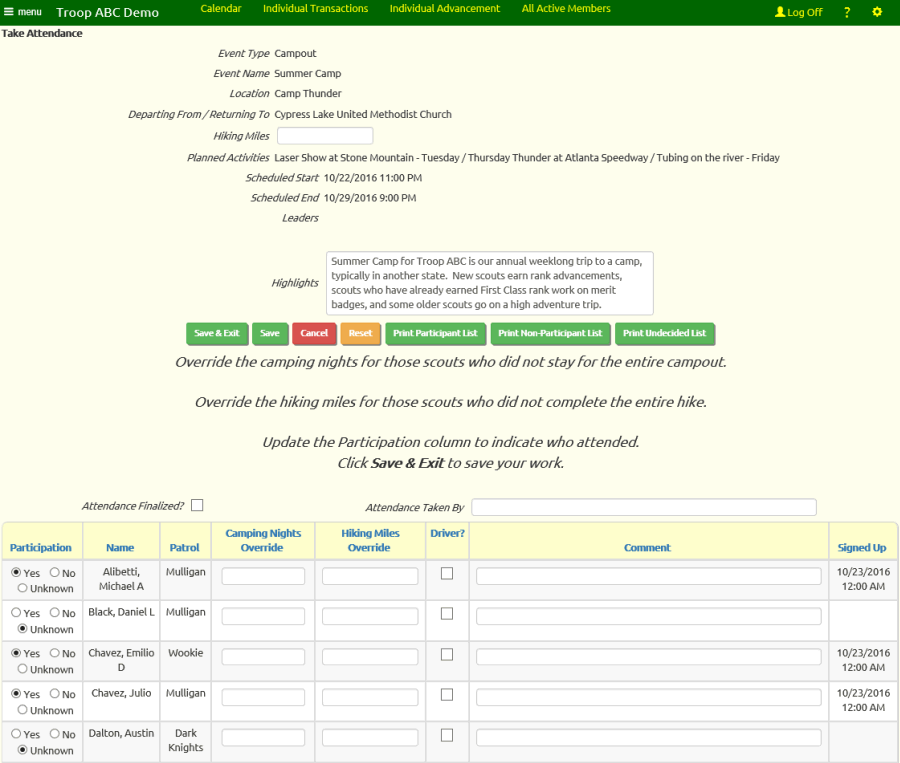
Click the Yes button next to each member who attended the event. If members signed up for an event in advance, this button may already be selected; if they did not show up, you should click the No button.
Different events will allow you to enter different information based on their Event Type. For example, in the image above, the event is a Campout; in the image below, it is a Fund Raiser. The settings for each Event Type can be configured on the Event Types page.
When an Event Type is set up to record camping nights, community service hours, hiking miles, cycling miles or paddling miles, you will see Override fields for each scout. Normally, the nights, hours, and miles for an event are given to all scouts who attend; however, there may be some cases in which you may want to assign a different amount to one or more scouts. To do this, just enter the number of nights, miles or hours you want a scout to have earned in the respective override box for their row.
You might want to use this if, for example, some of your scouts join a weekend campout on the second night, or if a group at summer camp engages in an optional hike. Using the override fields will affect number of nights, miles or hours shown on the scout's Rank Summary page.
Put a checkmark in the Attendance Finalized? box to log the fact that the participation history is now accurate for this event. Enter your name in Attendance Taken By so others will know who completed this task.
Take Attendance For My Patrol
Some troops allow patrol leaders to take attendance for events. If this is your policy, you can authorize these scouts to record the attendance for the members of their patrol.
This function is available on the desktop version of the site, but we will illustrate the smartphone format since that is a more likely way for it to be used.
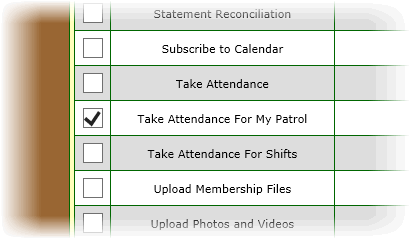
Scouts will access this function by going to Calendar → Take Attendance → Take Attendance For My Patrol.
This will bring up a page that lists all events for the last week, including any that are in progress, as shown below:
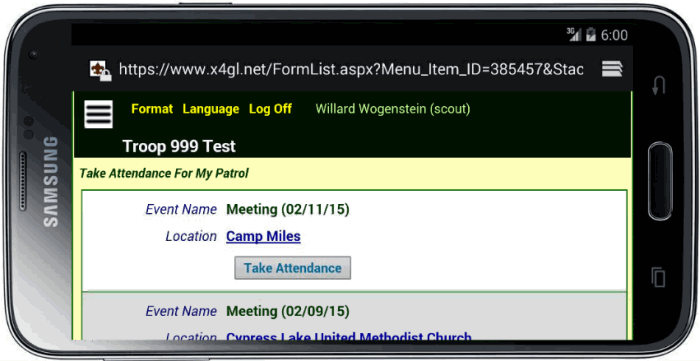
Click the Take Attendance button for this event to begin.
This will take you to a page listing all of the members of this scout's patrol.
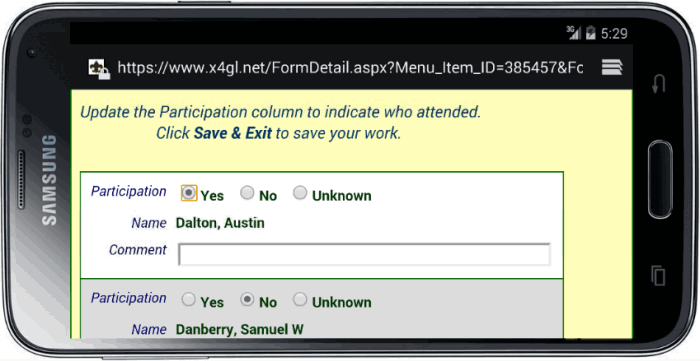
Click the Yes radio button for each scout in attendance, and the No button for those not present.
Then scroll to the bottom of the page to save your work.
Authorizing This Function
This function will not be available to scouts with the default security configuration. If your troop wants to use this function you will need to authorize it for an existing user role or add a new user role for this purpose.
 For example, you might want to create a "Patrol Leader" user role that has this capability.
To do this, you would go to Configure User Roles and add the user role.
On the list of authorized tasks, scroll down to "Take Attendance For My Patrol" and check the box, as shown at right.
Click Save & Exit to save your work.
Then assign this role to the current patrol leaders using the Users & Passwords page.
You will need to update this authorization when your patrol leaders change.
Shifts
An event can have shifts. This is useful for fundraisers, like Christmas tree sales, when you need to staff your sales location over a period of days or weeks, or for lengthy community service projects.
 The Event Type determines whether an event can have shifts.
You may want to create new Event Types for events that have shifts, if your system does not already have these set up.
To do this, go to Site Configuration → Event Types, click Add a New Item, and begin selecting the options, as shown at right. You'll find this section midway down the page.
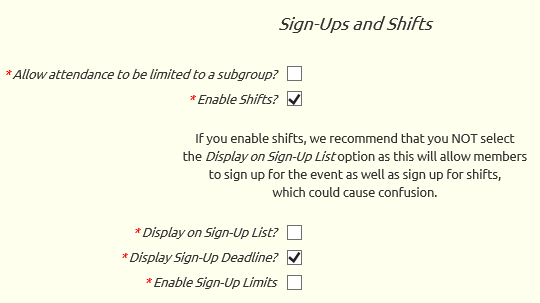
Select the Enable Shifts? option to allow this type of event to have shifts.
We recommend that you do not select Display on Sign-Up List? for events with shifts.
You can select Display Sign-Up Deadline? for events with shifts, which will limit when your members will be able to sign up for these shifts.
Enable Sign-Up Limits? has no effect on shifts. Shifts have their own sign up limits.
Once you have Event Types that support shifts, you can create an event with Maintain Events and select one of those event types.
When you arrive at the detail page you'll notice that there is a tab for "Shifts".

Click on the Shifts tab to go to the page shown below.
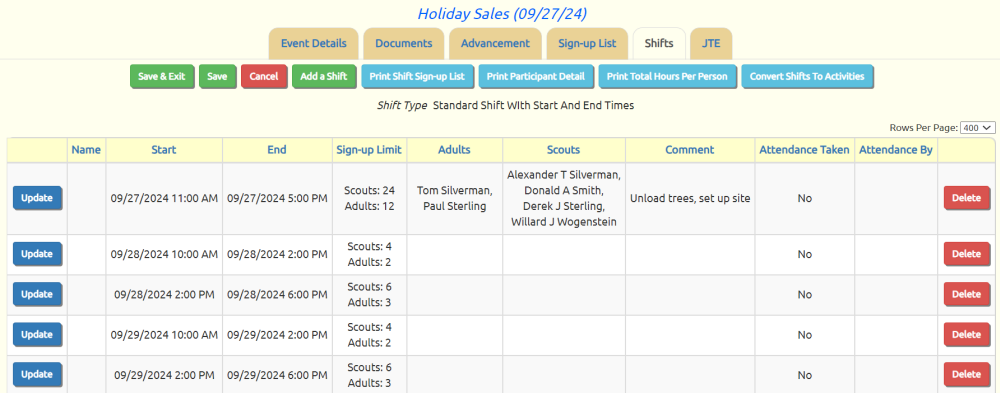
Click Add a Shift to begin adding a shift. You will see a page that looks like this:
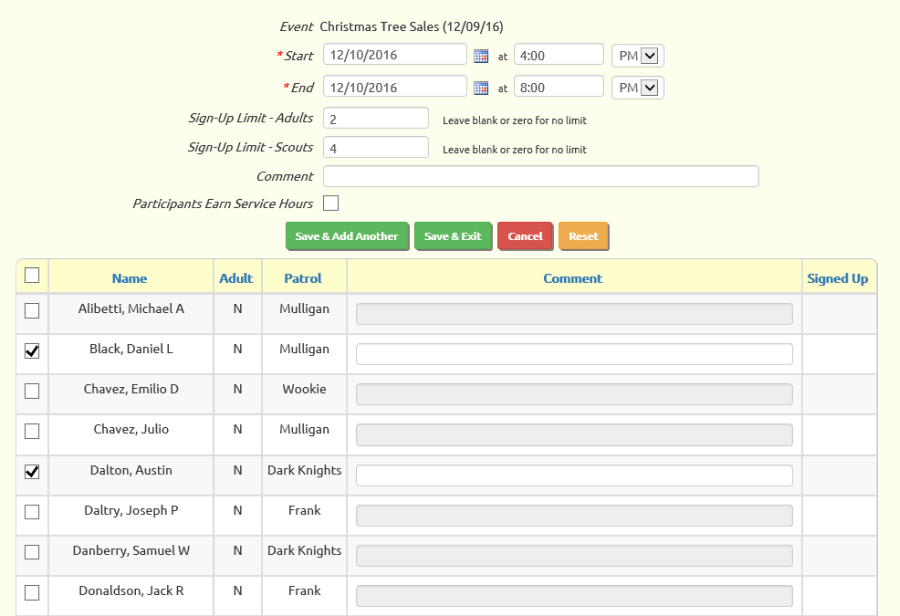
The Start date and time are when the shift is scheduled to begin, and the End date and time are when it ends.
The Sign-Up Limit - Adults value will limit the number of adults who can sign up for this shift on-line. Once the limit is reached, adults will no longer see this shift as an option. Users authorized for the Maintain Events function or the Sign Up Members for Shifts function will be able to override these limits. Leave this field blank or set it to zero if you do not want any limits.
Similarly, the Sign-Up Limit - Scouts value will limit the number of scouts who can sign up for this shift on-line.
The Comment will be displayed when a member views the shifts that are available.
Check the Participants Earn Service Hours if this shift is on a community service or conservation service event for which participants should get credit for service hours.
Note that you can sign up members for this shift on this page by clicking the checkbox next to their name.
Click Save & Exit to save your work, or Save & Add Another to save it and begin another shift.
Once you've defined the shifts for an event, your members can sign up for shifts and you can create reports showing who is scheduled for each shift.
Sign Up Members For Shifts
Scouts can sign up for upcoming Shifts from the My Stuff → Sign Up For Shifts page or from the Troop Calendar. Parents can use these pages to sign up their families.
Authorized leaders can sign up any member of the troop for shifts by selecting Sign Up Members For Shifts page from the Sign Up Members submenu on the Calendar menu.
This page begins by displaying a list of upcoming shifts, showing the limits and number signed up for each, as shown below.
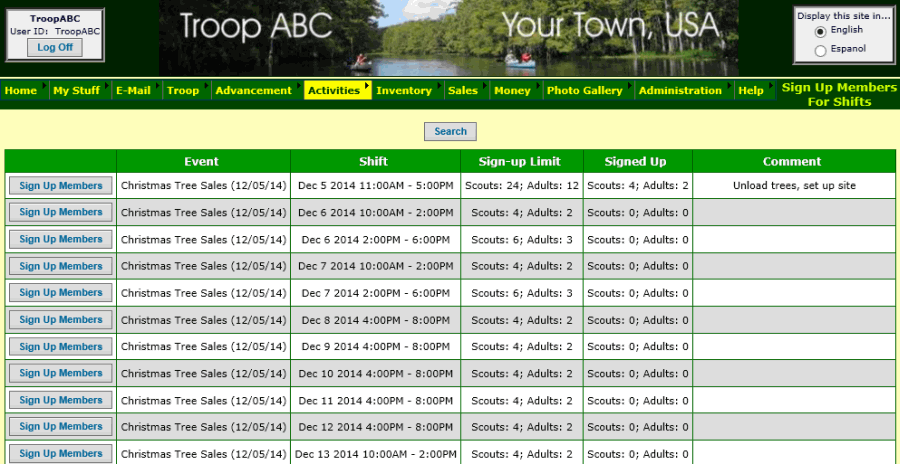
Click the Sign Up Members button to select a shift.
This will take you to a page like this:
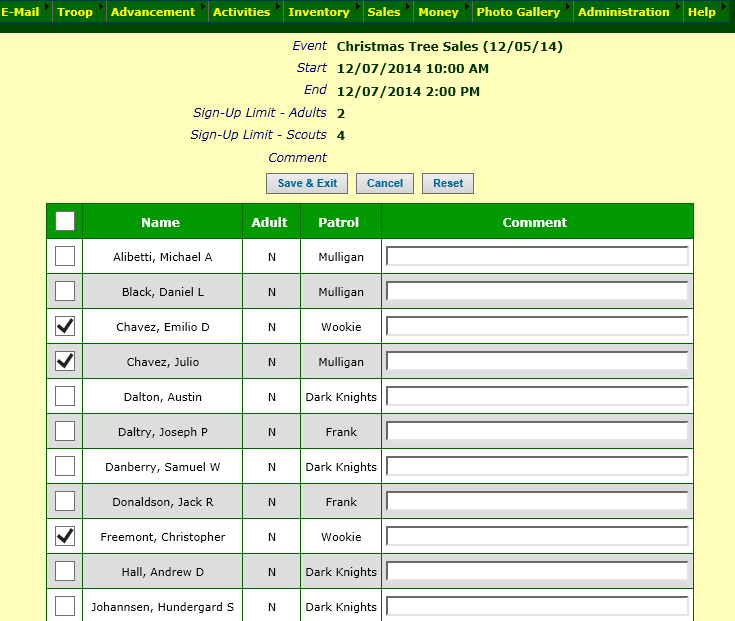
Click the checkbox next to the name of each member who is signing up for this shift.
Click Save & Exit to save your work.
Take Attendance For Shifts
Once a Shift has started, you can take attendance for that shift by by going to Calendar → Take Attendance → Take Attendance For Shifts.
This will display a list of recent shifts.
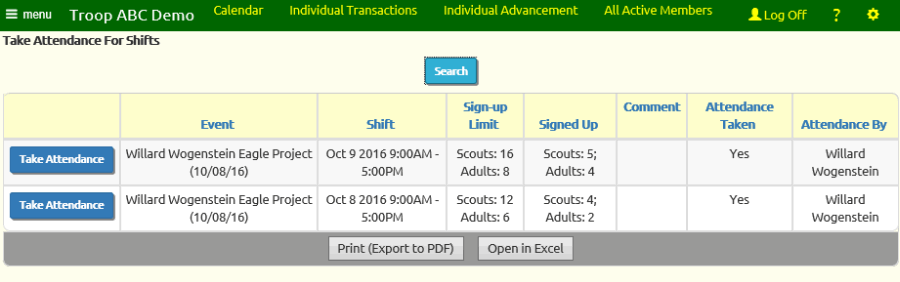
Click Take Attendance for the shift in question to see a page like this:
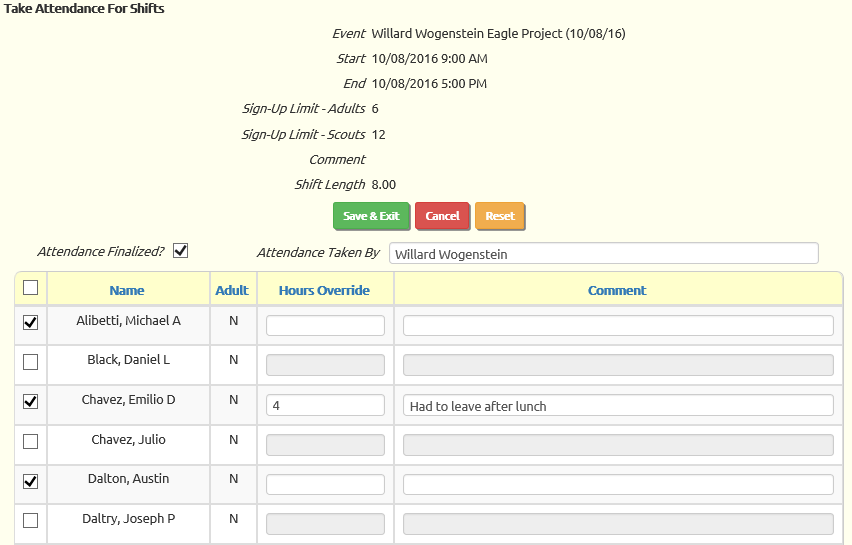
Make sure the checkbox is checked for each member who performed this shift.
Make sure it is unchecked for anyone who signed up but failed to show.
If you are tracking hours for this event, like for a community service project, you can use the Hours Override column to change the time reported for any individual who did not work the entire shift, or who worked longer.
Check the Attendance Finalized box at the top to indicate that you have finished taking attendance and type in your name in Attendance Taken By.
Click Save & Exit to save your work.
Export Events To Excel
Export Events To Excel will create an Excel spreadsheet showing all past and future events.
The spreadsheet contains information about the event location, the credits available for each type of activity, and other details.
To create the spreadsheet, go to Calendar → Export Events to Excel.
If you have software on your PC that is compatible with Microsoft Excel, your browser will prompt you to open the file with that program.
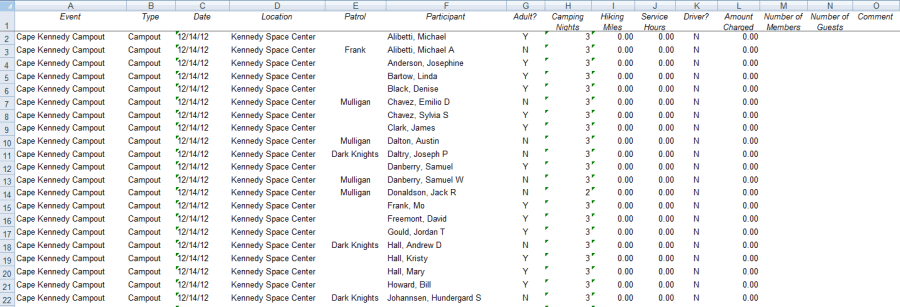
Export Event Participation To Excel
Export Event Participation To Excel will create an Excel spreadsheet showing all participants in all past events.
This report is based on the event participation that is finalized when you Take Attendance.
The spreadsheet identifies the event and the participant, and the number of camping nights, hiking miles, and community service hours earned at that event.
If you are authorized to view financial information, it will also include the amount charged to each individual's account.
To create the spreadsheet, go to Calendar → Export Event Participation to Excel.
If you have software on your PC that is compatible with Microsoft Excel, your browser will prompt you to open the file with that program.
Event Reports
There are some reports that can be produced from Add and Update Events that are about a specific event:
- Participant List shows all scouts and adults who have signed up for the event.
- Emergency Contacts lists the emergency contacts for everyone who has signed up for the event.
- Non-Participant List shows all scouts and adults who have indicated they do not plan to attend the event.
- Undecided List shows all scouts and adults who have not yet indicated whether they plan to attend the event.
- Tour Permit Worksheet provides information that will be needed to fill out the Tour Plan form.
Other reports summarizing your troop's activities and participation are available from the Event Reports submenu on the Activities menu:
- Upcoming Events Detail and Upcoming Events Summary reports list all upcoming events.
- Event Compliance and Shift Compliance reports help you spot potential compliance issues with BSA regulations for upcoming events and shifts.
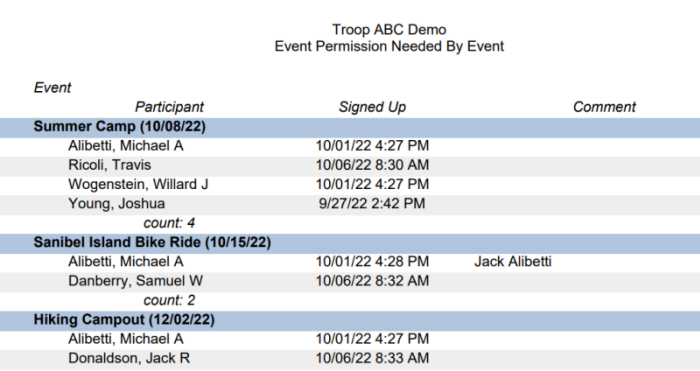
- Permission Needed By Event shows upcoming events for which permission is required, and lists the scouts who still need permission.
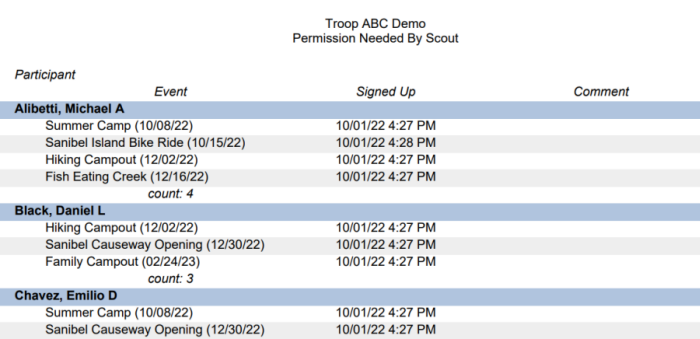
- Permission Needed By Scout lists each scout who still needs permission for one or more upcoming events.
- Event Participation Percentage By Event Type shows the percentage of troop events attended by each scout, broken out by type of event.
- Event Participation Annual Summary shows the total camping nights, hiking miles, and service hours completed by each troop member each year.
- Event Participation Cumulative Summary shows the total camping nights, hiking miles, and service hours completed by each troop member since joining the troop.
- Event Participation Summary For Date Range shows the total camping nights, hiking miles, and service hours completed by each troop member within a period of time that you specify.
- Most Recent Event Participation By Scout shows the date and name of the last event attended by each scout.
- Attendance Totals By Event shows the number of scouts and adults who attended each event within a selected date range.
- Community Service Reports show community service hours performed during a specified time frame, grouped by event or by member.
When you select any of these reports, your browser may display a message like the one shown below.
![]()
Click the Open button to open the document.
You must have the Adobe Acrobat Reader™ to view the PDF document. You can download this free software from the Adobe website at http://get.adobe.com/reader/.
The system will format the report to fit standard sized paper:
- If possible, it will produce the report for 8 1/2 by 11 inch paper in standard "portrait" mode.
- If the report is too wide for that, it will switch the report to "landscape" mode.
- If the report still won't fit, it will switch to legal size (8 1/2 by 14 inch) paper in "landscape" mode.
Before you print your report, make sure you have the appropriate size paper in your printer.
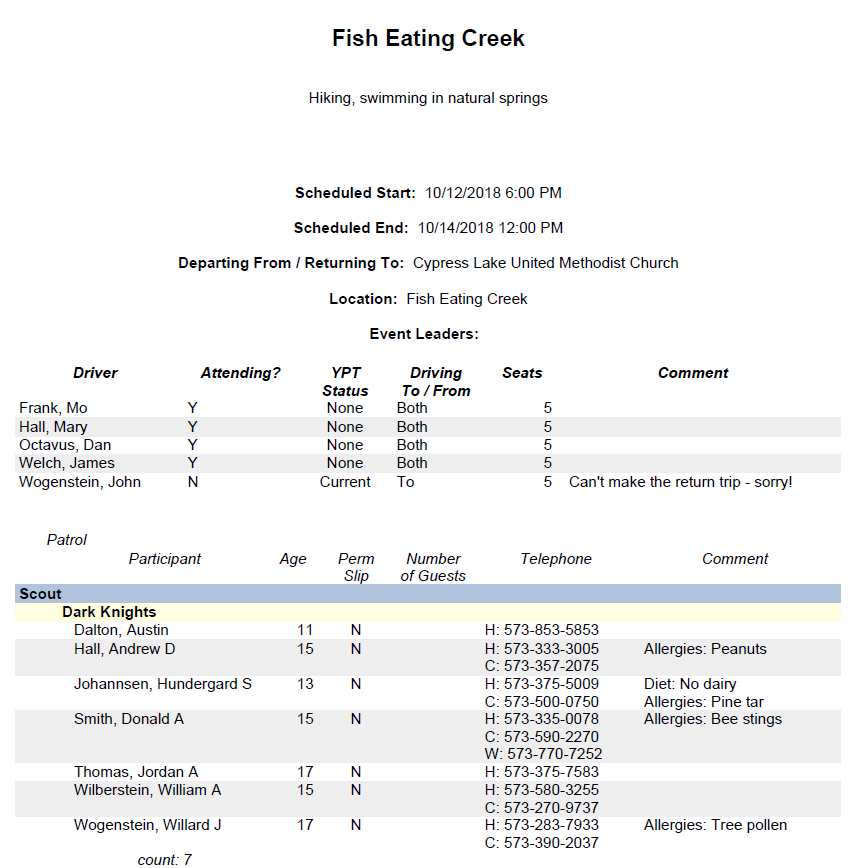
Participant List
The Participant List shows the scouts and adults who have signed up for an event.
You'll find the button that produces this report on the detail page when you select an event from Maintain Events.
![]()
Click the Print Participant List button to produce the report. This button may also be found at the bottom of the Troop Calendar detail page.
The first section of this report provides the key facts about this event.
If this event has drivers, there will be a section that lists them. This may include adults who have not signed up for the event, but who are just driving.
The last section of the report is sorted by patrol, showing each scout and each adult who has signed up for the event. The Comment column includes any comments entered from the sign-up page, along with allergies and dietary restrictions from the member's record.
Participant List With BSA IDs
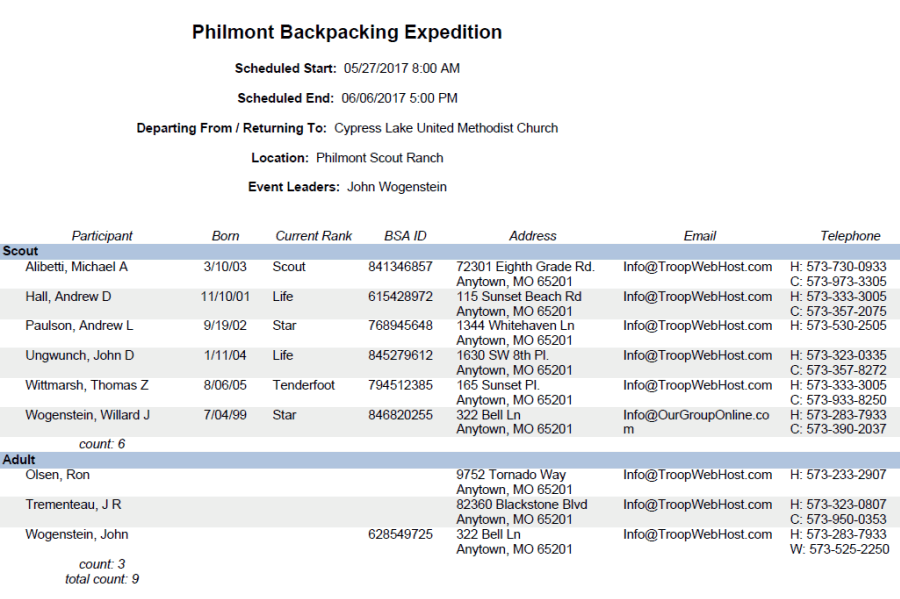
The Participant List w/BSA ID provides the most commonly requested information to register members for summer camp. It includes all members who have signed up for the event.
You'll find the button that produces this report on the detail page when you select an event from Maintain Events or when you select the event from the Troop Calendar.
Click the Print Participant List w/BSA ID button to produce the report.
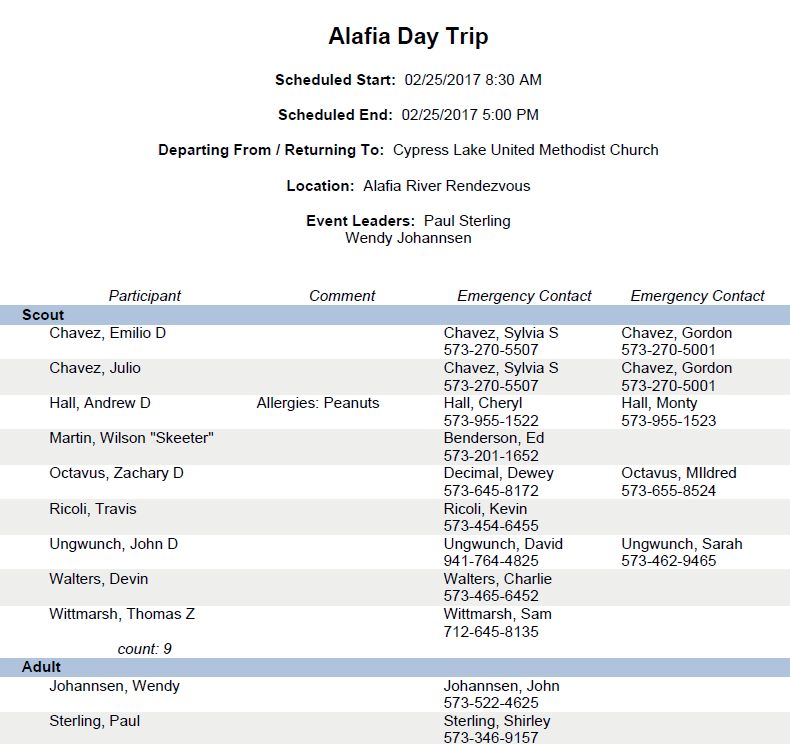
Emergency Contacts For Event Participants
While it is possible to print an Emergency Contact List for the entire troop, it may be more convenient to print just the emergency contacts for the people attending an event.
You'll find the button that produces this report on the detail page when you select an event from Maintain Events.
![]()
Click the Emergency Contacts button to produce the report. This button may also be found at the bottom of the Troop Calendar detail page.
The Comment column includes any comments entered from the sign-up page, along with allergies and dietary restrictions from the member's record.
Electronic Permission Summary
The Electronic Permissions Summary report shows all of the scouts who received electronic permission to attend an event.
You'll find the button that produces this report at the bottom of the detail page when you select an event from the Calendar.

Click the Electronic Permissions button to produce the report.
The first page identifies the event and includes the text from the Electronic Permission Form. The second page lists all of the scouts who received permission from their parents in this manner.
Permission Needed By Event
If your troop requires parental permission to attend some events, either by submitting a permission slip or by using the TroopWebHost electronic permission feature, you may want to review the status of these permissions prior to your upcoming events.
The Permission Needed By Event report gives you an easy way to do this. Select this report by going to Calendar → Event Reports → Permission Needed By Event.
This report lists all of the scouts who have signed up for each upcoming event, for whom permission has not yet been given.
Permission Needed By Scout
The Permission Needed By Event report, described on the previous page, allows you to see which scouts still need permission for each upcoming event. But once you identify a scout who needs permission for the next event, you may want to follow up with their parents about all upcoming events for which they need permission.
The Permission Needed By Scout report provides the same information, grouped by scout, so you can see all of the events for which each scout needs permission. Select this report by going to Calendar → Event Reports → Permission Needed By Scout.
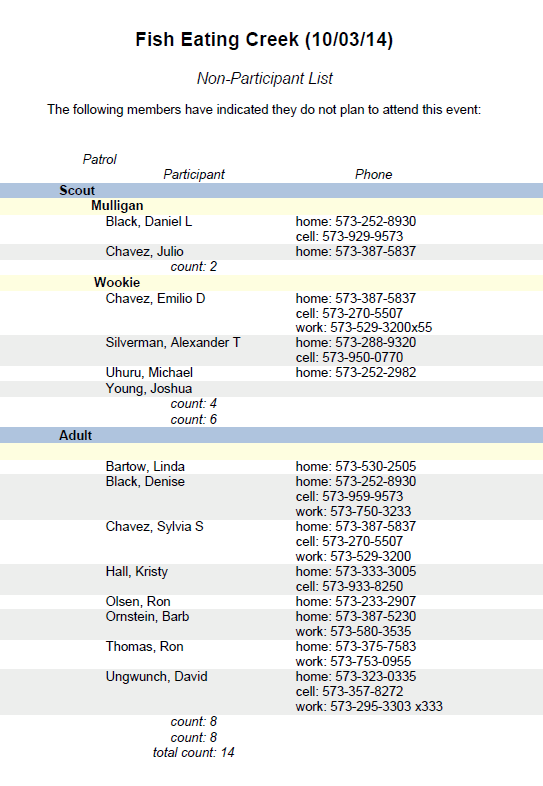
Non-Participant List
The Non-Participant List shows the scouts and adults who have indicated they do not plan to attend the event.
You'll find the button that produces this report on the detail page when you select an event from Maintain Events.
![]()
Click the Print Non-Participant List button to produce the report. This button may also be found at the bottom of the Troop Calendar detail page.
The report is sorted by patrol, showing each scout and each adult who has indicated they do not plan to attend.
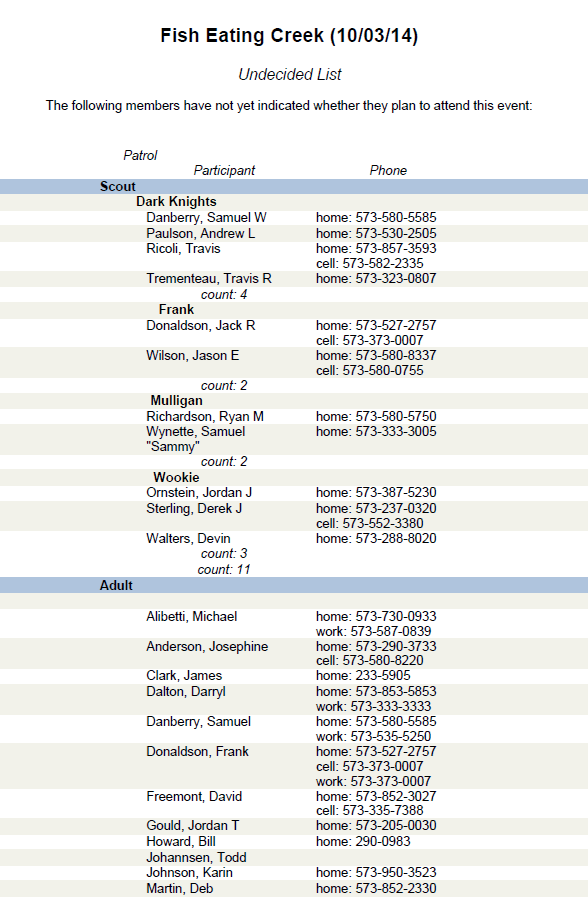
Undecided List
The Undecided List shows the scouts and adults who have not yet indicated whether they plan to attend the event.
You'll find the button that produces this report on the detail page when you select an event from Maintain Events.
![]()
Click the Print Undecided List button to produce the report. This button may also be found at the bottom of the Troop Calendar detail page.
The report is sorted by patrol, showing each scout and each adult who has not yet indicated whether they plan to attend.
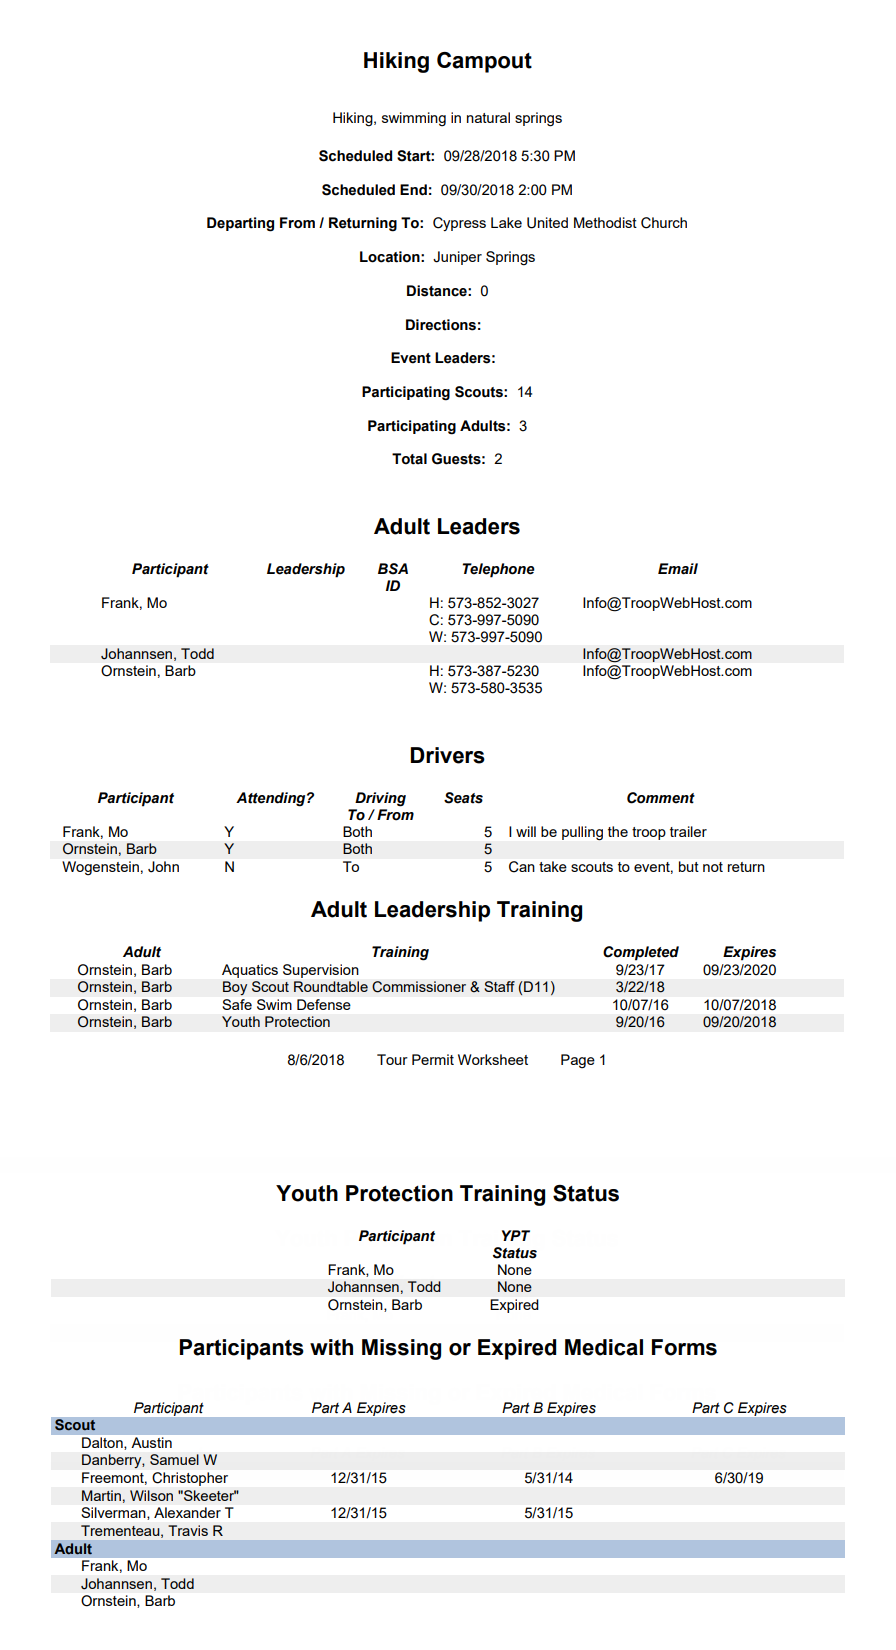
Tour Permit Worksheet
The Tour Permit Worksheet pulls together much of the information that you need to fill out the Tour and Activity Plan for an event.
You'll find the button that produces this report on the detail page when you select an event from Maintain Events.
![]()
Click the Tour Permit Worksheet button to produce the report.
The report includes information about the adult leaders that are signed up for this event, including vehicle information and training history.
It also shows any scouts or adults who have signed up who do not have current medical forms on file with the troop.
Upcoming Events Detail
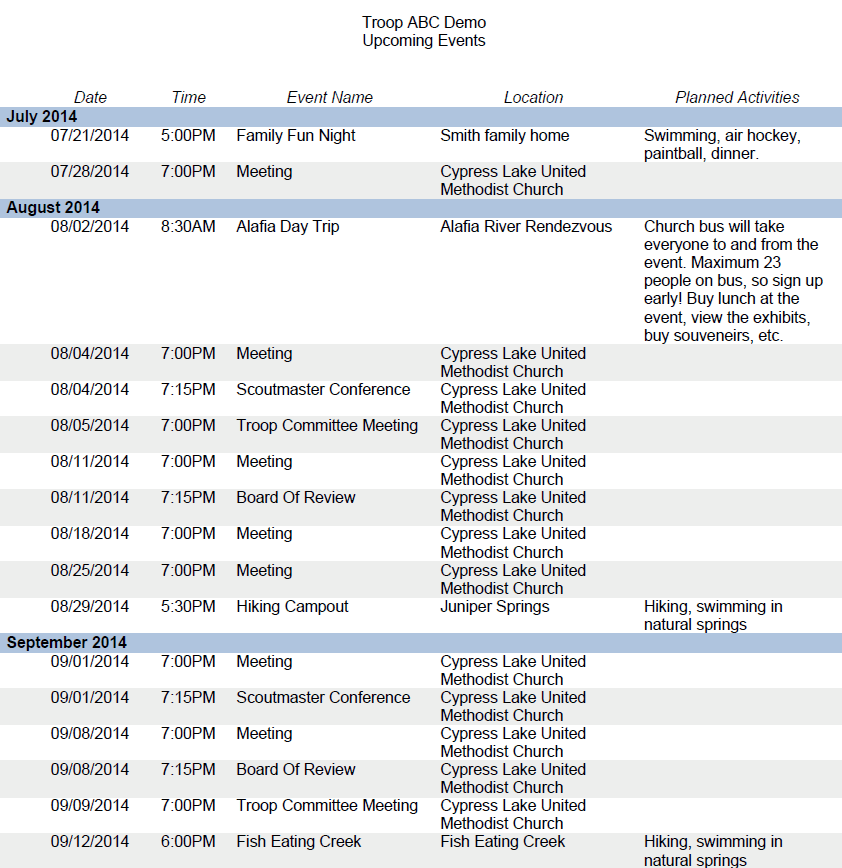
You can help all members of your troop keep up with the troop's schedule by printing this report that shows all upcoming events.
The Upcoming Events Detail report shows all future events on your calendar, including the Planned Activities. A shorter version that includes the Event Leaders is available as the Upcoming Events Summary report.
Select this report by going to Calendar → Event Reports → Upcoming Events Detail.
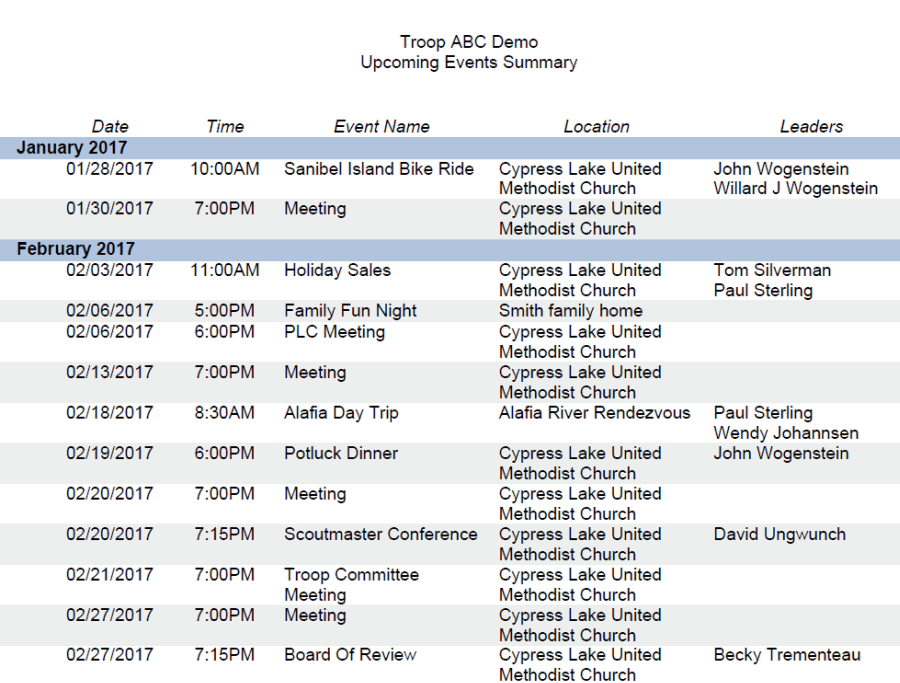
Upcoming Events Summary
This alternate version of the Upcoming Events Detail report potentially reduces the length of the report by replacing the Planned Activities column with the Event Leaders.
Select this report by going to Calendar → Event Reports → Upcoming Events Summary.
Event Compliance Report
Are you sure the participants at upcoming events meet all BSA requirements?
- All participants at overnight campouts must be current with medical forms A and B
- All participants at campouts lasting more than 72 hours must be current with medical form C
- All adults at any BSA event must be current with Youth Protection training
- At least two adults at any BSA event must have current BSA registration and be 21 years of age
- All adults at overnight campouts must currently hold fee paid leadership positions
- Outdoor events must have at least one adult who is current with Hazardous Weather training
The Event Compliance report shows you all participants at events scheduled for the next three months who may not be compliant with one or more of the above. This report does not show ALL members who are signed up for the event. It only shows those members who are signed up for whom there may be compliance issues.
Select this report by going to Calendar → Event Reports → Event Compliance.

The Medical Forms column indicates whether that person will be current with medical forms A & B as of the date of the event. If the event is a campout of three days or longer, it also considers medical form C.
YPT Status shows whether each adult participant will be current with YPT training as of the date of the event.
BSA Registered indicates whether each adult participant will be current with their BSA registration as of the date of the event.
The Hazardous Weather Training column indicates the status of each adult participant's Hazardous Weather training as of the date of the event. If the event requires hazardous weather training and there is no one signed up for the event who is current with that training, then all adult participants will be listed for that event, with a status of "None" or "Expired".
Fee Pos indicates whether this adult will hold a fee paid leadership position as of the date of this event.
Shift Compliance
Similar to the Event Compliance report, the Shift Compliance report shows you all participants at shifts scheduled for the next three months who may not be compliant with one or more BSA regulations. This report does not show ALL shifts. It only shows those shifts for which some members who are signed up may have one or more of the following compliance issues:
- All participants at overnight campouts must be current with medical forms A and B
- All participants at campouts lasting more than 72 hours must be current with medical form C
- All adults at any BSA event must be current with Youth Protection training
- At least two adults at any BSA event must have current BSA registration and be 21 years of age
- All adults at overnight campouts must currently hold fee paid leadership positions
- Outdoor events must have at least one adult who is current with Hazardous Weather training
Select this report by going to Calendar → Event Reports → Shift Compliance.
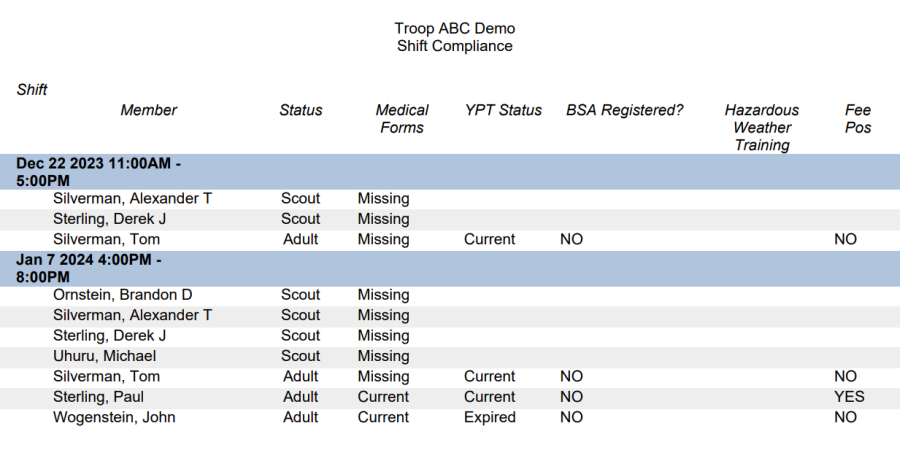
The Medical Forms column indicates whether that person will be current with medical forms A & B as of the date of the event. If the event is a campout of three days or longer, it also considers medical form C.
YPT Status shows whether each adult participant will be current with YPT training as of the date of the event.
BSA Registered indicates whether each adult participant will be current with their BSA registration as of the date of the event.
The Hazardous Weather Training column indicates the status of each adult participant's Hazardous Weather training as of the date of the event. If the event requires hazardous weather training and there is no one signed up for the event who is current with that training, then all adult participants will be listed for that event, with a status of "None" or "Expired".
Fee Pos indicates whether this adult will hold a fee paid leadership position as of the date of this event.
Event Participation Percentage By Event Type
Event Participation Percentage By Event Type shows each scout's participation in each type of event over a specified range of dates.
Select this report by going to Calendar → Event Reports → Event Participation Percentage By Event Type.
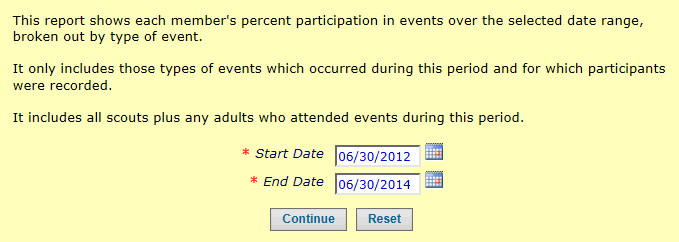
The report will show how many of the events each scout participated in between the start and end dates you specify on this page.
It only includes those types of events which occurred during the selected date range for which you recorded at least one participant. If your troop requires attendance to be finalized before giving credit for participation, then this report will only consider events for which the Attendance Finalized box has been checked.

Event Participation Annual Summary
Event Participation Annual Summary shows totals for every type of activity for each troop member each year.
Select this report by going to Calendar → Event Reports → Event Participation Annual Summary.
There are two main sections to this report. The first section shows camping nights, cabin camping nights, community service hours, conservation service hours, hiking miles, and backpacking miles.
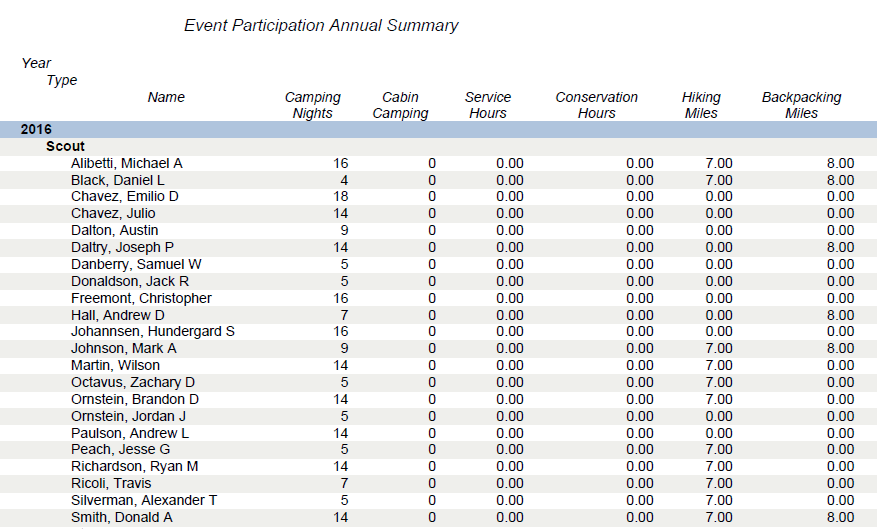
The second section shows cycling miles, paddling miles, motorboating miles, on the water hours, horseback riding miles, and skating miles.

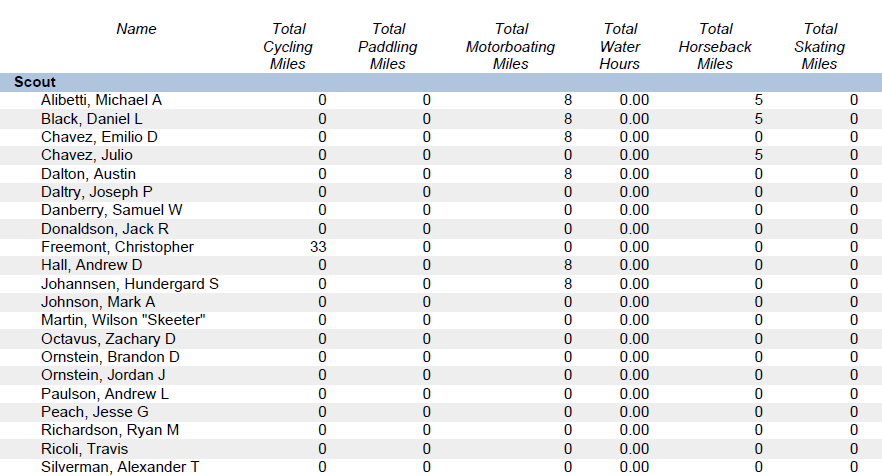
Event Participation Cumulative Summary
Event Participation Cumulative Summary shows totals for each type of activity for each troop member since they joined the troop.
Select this report by going to Calendar → Event Reports → Event Participation Cumulative Summary.
There are two main sections to this report. The first section shows camping nights, cabin camping nights, community service hours, conservation service hours, hiking miles, and backpacking miles.
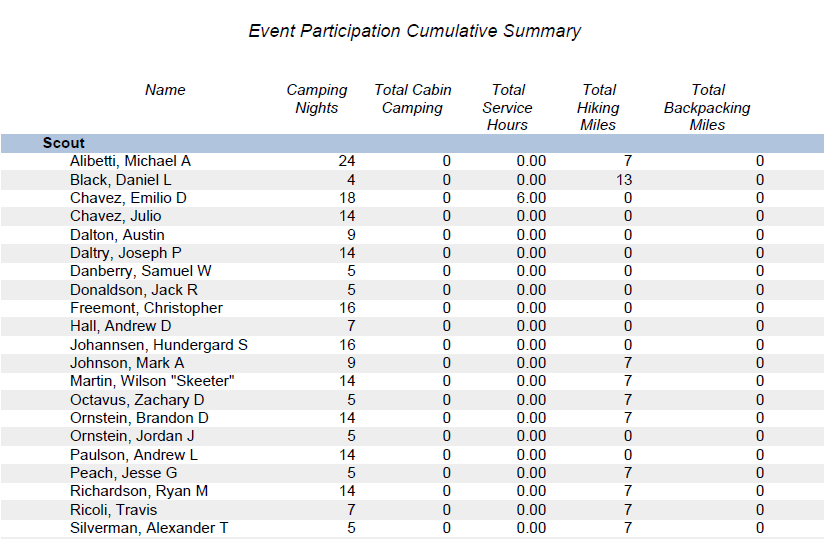
The second section shows cycling miles, paddling miles, motorboating miles, on the water hours, horseback riding miles, and skating miles.
Event Participation Summary For Date Range
Event Participation Summary For Date Range shows the totals by type of activity for each troop member during a selected period of time.
Select this report by going to Calendar → Event Reports → Event Participation Summary For Date Range.
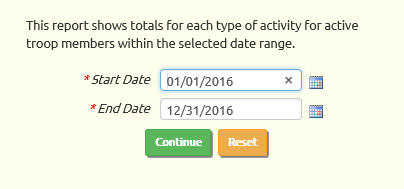
The report will show participation in all events that occurred between the start and end dates you specify on this page.
There are two main sections to this report. The first section shows camping nights, cabin camping nights, community service hours, conservation service hours, hiking miles, and backpacking miles.
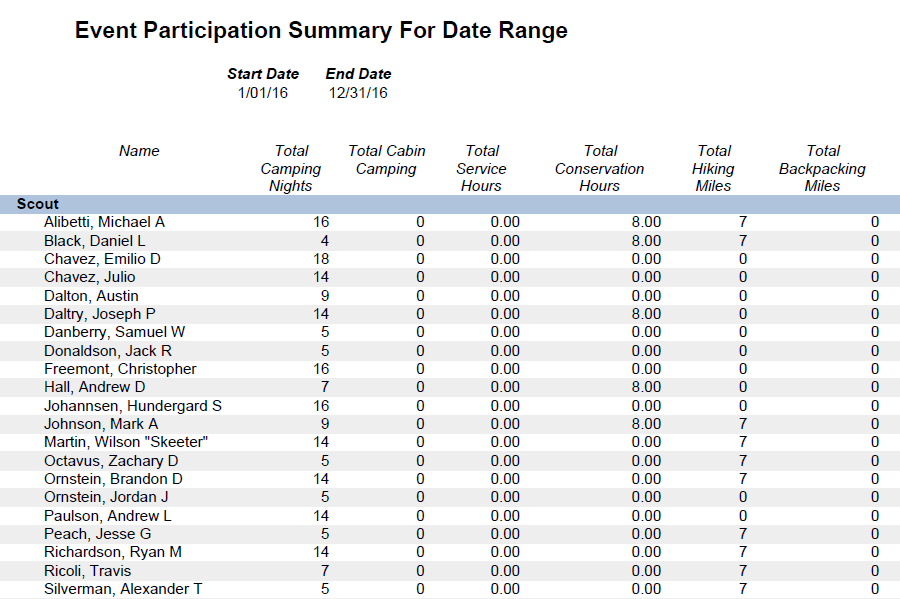
The second section shows cycling miles, paddling miles, motorboating miles, on the water hours, horseback riding miles, and skating miles.
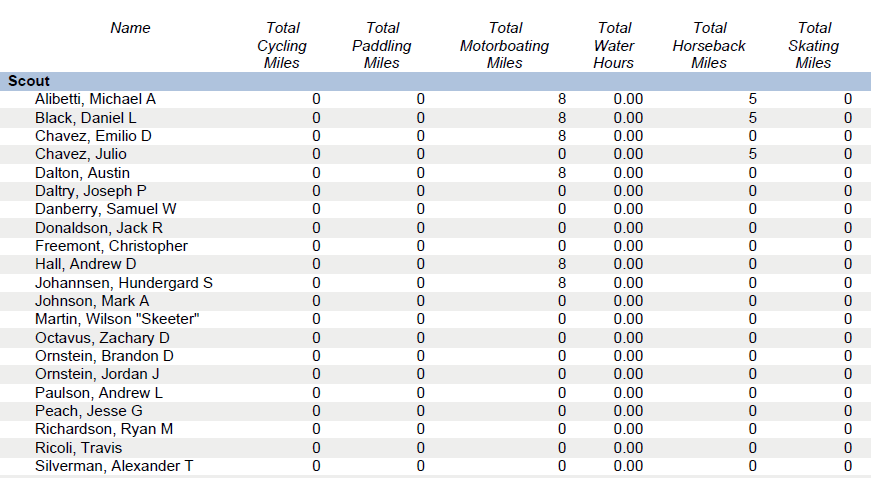
Most Recent Event Participation By Scout
The Most Recent Event Participation By Scout report allows you to quickly spot scouts who may be losing interest in scouting.
It lists all of your scouts in order by the last date on which they attended any troop event. Scouts who haven't attended any events will appear at the top, followed by those whose attendance was the furthest back in time.
If you require attendance to be finalized at an event before credit is given, this report will only consider those events where attendance has been finalized.
To produce this report, please go to Calendar → Event Reports → Most Recent Event Participation By Scout.
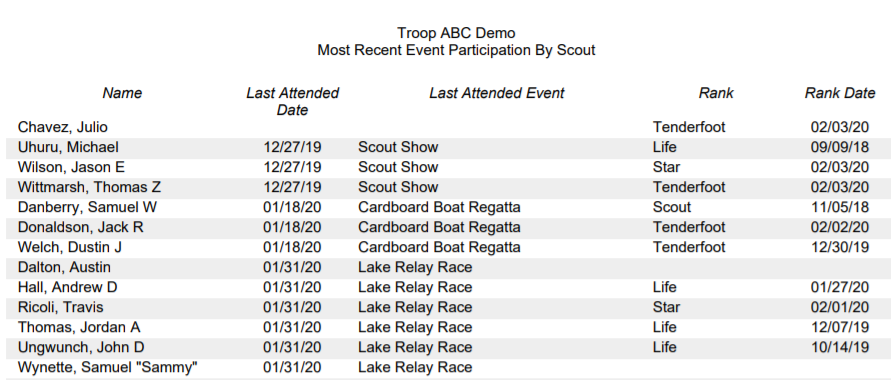
Attendance Totals By Event
The Attendance Totals By Event report shows the number of scouts and adults who participated in each event within the selected date range.
The report is grouped by type of event, with a separate section for each event type.
Select Attendance Totals By Event from the Event Reports submenu of the Calendar menu to see a page like the one below.

Enter the date range for which you'd like to produce the report, then click Continue.
Here is a sample of this report:

Community Service Reports
The Community Service Reports show the total participation in community service and conservation service events of a selected date range.
Select this report by going to Calendar → Event Reports → Community Service Reports.
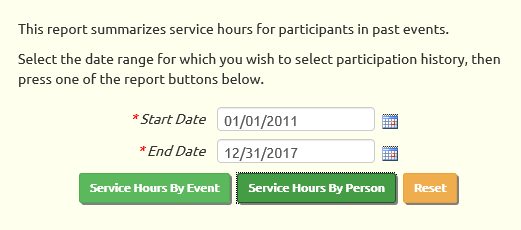
The report will show participation in all service events that occurred between the start and end dates you specify on this page.
There are two versions of this report. Service Hours By Event, as shown below, contains one section for each event, listing the scouts and adults who participated in that event. If the event was organized into shifts, you will see the starting time of each shift.
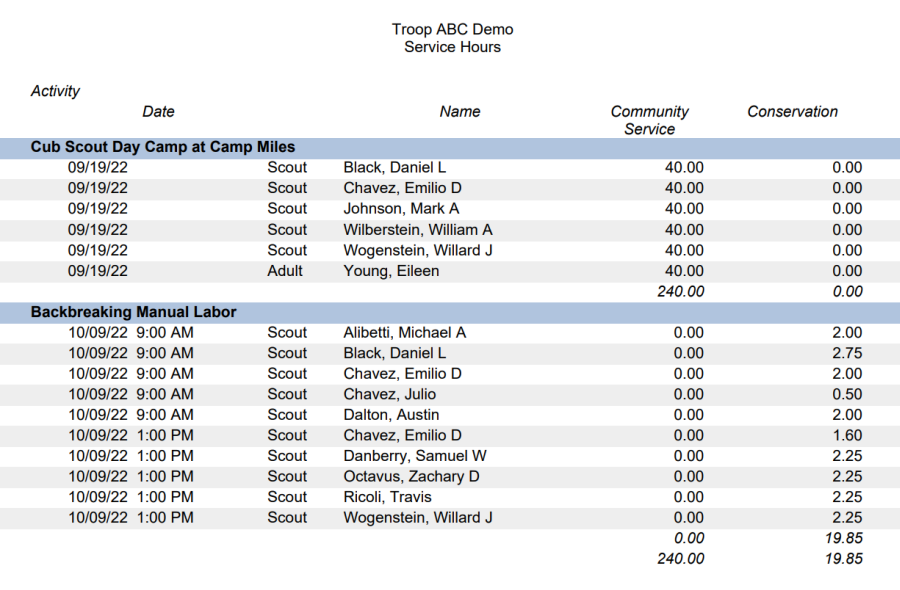
Service Hours By Person has a section for scouts followed by a section for adults. For each person it lists the service events in which they participated. This may include credit for other activity, which will be displayed with a type of "Other".

Shift Signup List
The Shift Sign-up List can be printed either from the Shifts tab of Maintain Events or from the Troop Calendar detail page.
In either case, you'll see a button Print Shift Signup List that will produce a report like the one shown below.
It shows all of the shifts scheduled for this event, and for those shifts where members have signed up it lists those members.
This makes it easy to see the shifts that still need to be filled.
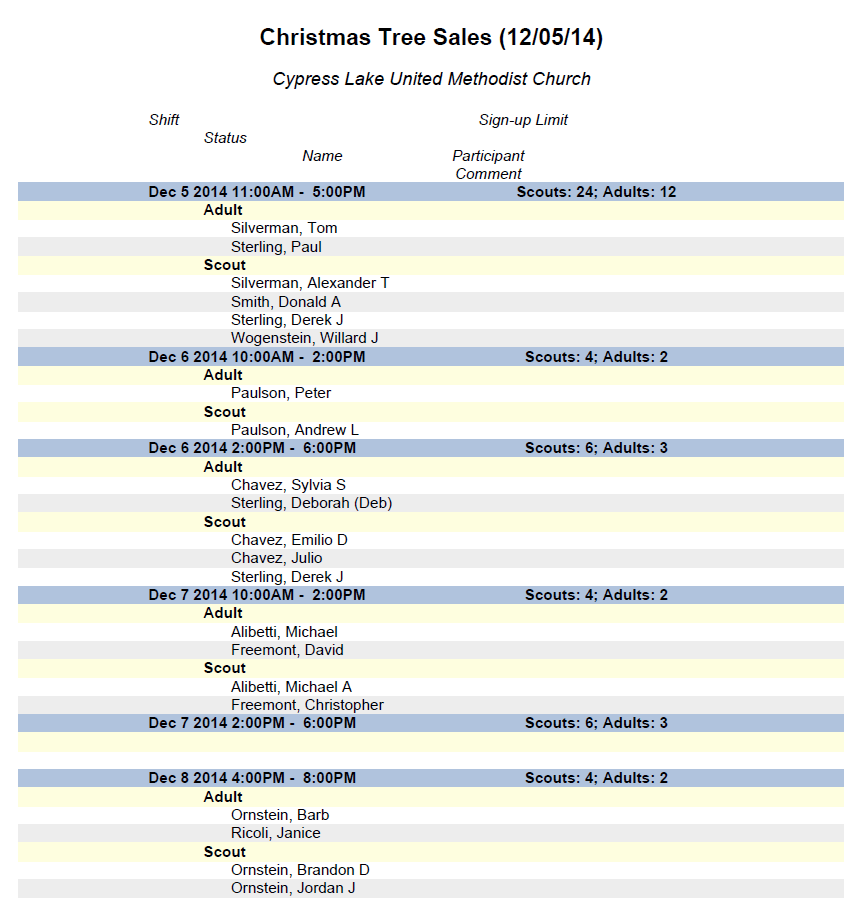
Shift Participant Detail
The Shift Participant Detail report can be printed from the Shifts tab of Maintain Events by pressing the Print Participant Detail button.. For past events, you can also print this report from the Troop Calendar detail page using the same button.
This report lists all of the shifts that members worked, with the associated hours.
It can be used to review your attendance records.
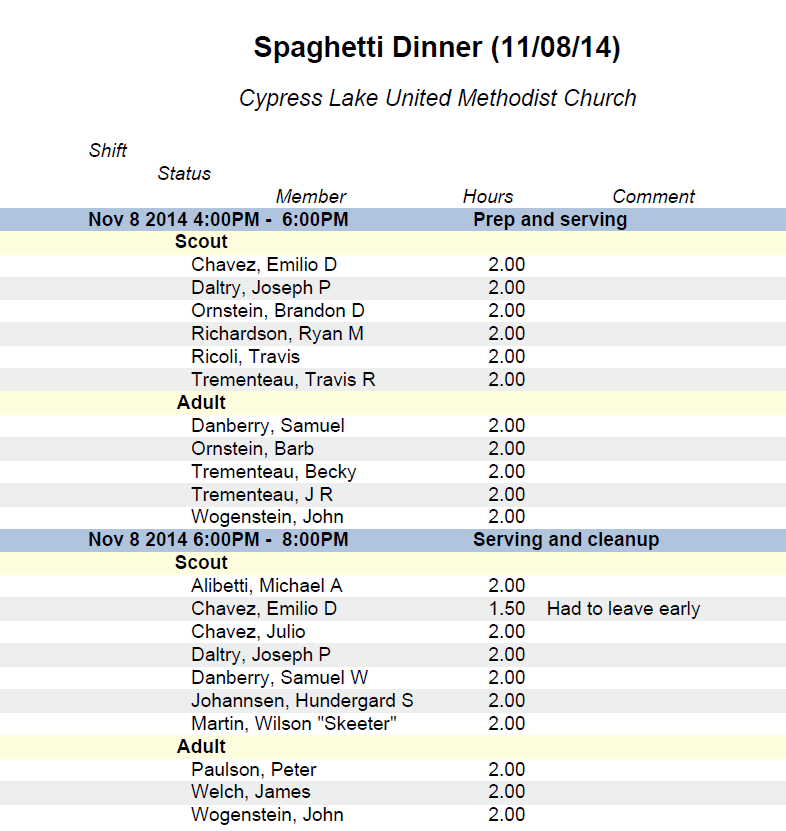
Shift Total Hours Per Person
The Shift Total Hours Per Person report can be printed from the Shifts tab of Maintain Events by pressing the Print Total Hours Per Person button. For past events, you can also print this report from the Troop Calendar detail page using the same button.
It shows the total hours worked by all members of the troop on this event, based on the time reported for each shift.
It can be used to split the credit among the participants.
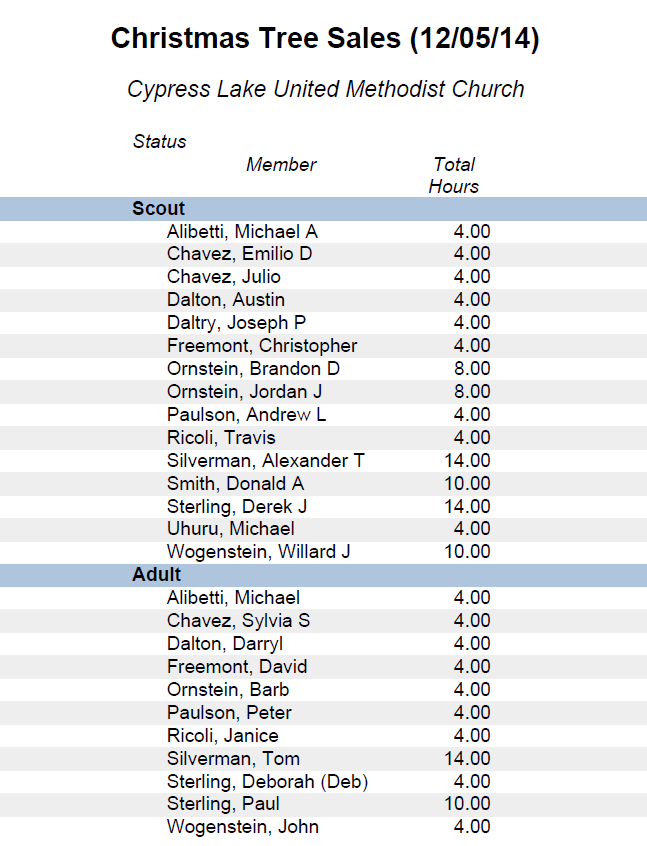
Family Shift Participation Report
The Family Shift Participation Report can be printed from the Troop Calendar detail page using the Print Family Shift Participation button.
For each scout, it shows the number of shifts he has signed up for and the number of shifts his parents has signed up for.
It includes contact information, so you can easily follow up with families that are not doing their share.
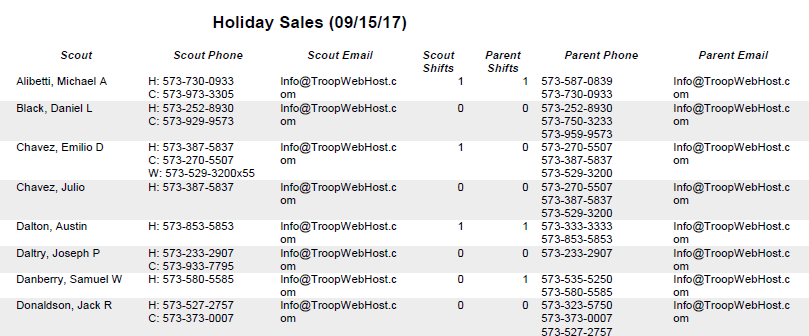
Activities FAQ
 I finalized attendance for an event, then realized I still need to make some changes. Can I reverse finalize an event?
Yes! This can be done from Calendar → Maintain Events. Update the event and go to the Sign-up List tab. This page allows you to change the participation status of any member, even if the attendance has been finalized. If you need to undo the finalized status, scroll to the bottom of the page, as shown below, and click on the checkbox to remove the checkmark from Attendance Finalized? Be sure to click the Save button to save your changes.
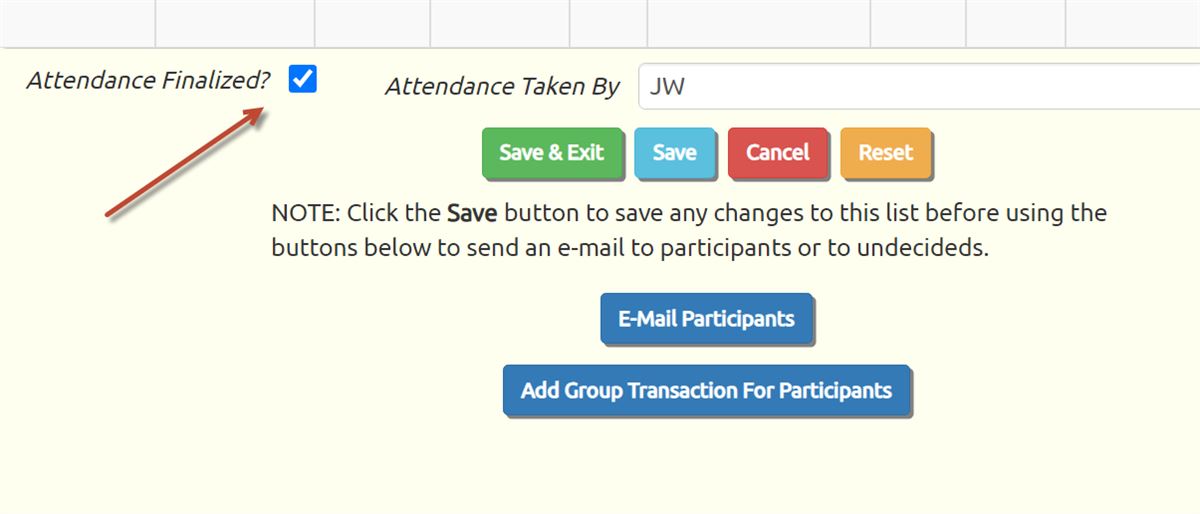
When I tried to add an activity in the Meal Plans and Scheduled Activities part of the event, the choice list for Activity Type was empty. Why?
You need to define the types of activities you wish to include in your plans. To do this select Activity Types from the Site Configuration menu.
Is it possible to set up recurring events for things like meetings?
Not in the same way that you can schedule recurring meetings in Microsoft Outlook, but you can do the next best thing: you can create a "template" event and copy it forward in time using the Copy An Event function. For monthly meetings you can use the Copy Monthly Event function.
Can we make the calendar available to the public without logging on?
Most troops prefer to keep the calendar private to provide an extra degree of safety for the scouts. But if you want to make the Calendar page available to the public, you can do so at Administration ? Menu Configuration ? Override Default Public Access Settings. Put a checkmark by Calendar ? Calendar, then change the Public Access value to "Yes". Then click Save & Exit.
Alternatively, you could subscribe to your calendar from Google Calendar, and then embed your Google Calendar into a public web page.