Manage Your Troop's Funds With TroopWebHost™
 TroopWebHost is a great way to manage your troop's funds.
If you are your troop's treasurer, please take the time to carefully read this chapter of the User Guide before you get started.
Your first steps will be to:
- Set up Personal Subaccounts as needed for fundraising proceeds and reserve accounts.
- Decide if you want to use the budget feature and, if so, review the budget template and your event types, and update your transaction types to enable budgeting.
- Decide if you want to enable credit and debit card payments via PayPal or Square and, if so, configure your site accordingly.
- Decide if you want to allow adult leaders to submit requests for reimbursement through the system and, if so, configure your system to enable this feature.
- Decide if you want to implement fund accounting and, if so, set up the funds, categories and transaction types as needed
- Create a Troop Account for your troop's checking account.
- Enter a starting balance for your troop's checking account.
- Enter the starting balance for each member of your troop, either by:
You will then be ready to settle into a routine for managing your troop's funds.
This will involve these activities:
- Accept payments from scouts and parents at meetings
- Record all other deposits
- Record expenses associated with troop activities
- Charge the cost of troop activities to those members who participated
- Reconcile your monthly bank statement
- Charge dues to all active scouts
- Send current balances to all members
The rest of this chapter will explain these operations in detail.
Types Of Accounts
 TroopWebHost can track five types of balances:
- Troop Accounts
- Member Acounts
- Events
- Budget Items (optional)
- Funds (optional)
Troop Accounts represent the places your troop keeps money, such as your troop checking account, PayPal account, petty cash drawer, or scout shop account.
Many troops only need one Troop Account, which represents the troop checking account. The balance in this account should always match the current balance in the checking account.
This balance may include funds that belong to troop members who have positive balances in their accounts. The portion that does not belong to troop members belongs to the troop.
Member Accounts, often referred to as "Scout Accounts", track the current balance for each scout and adult member of the troop. The balance in a member account will reflect all of the payments received from that member and charges for participating in troop activities. A member account is automatically created for each scout and adult when you enter them into your roster.
Think of a Member Account as being like a credit card. You can charge the account for expenses like dues and camping trips. You will credit the account when you receive money from that member.
With this system, expenses and payments are completely independent. There is no explicit connection between the transaction that charges a member for a campout and the payment they submit for that expense.
To return to the credit card analogy, when you pay your Visa bill you don't pay for a specific item on your bill; your payment is simply applied to your total balance. Your TroopWebHost member accounts work the same way.
In theory a troop member could deposit $1,000 to his account at the beginning of the year, and then let that balance be used for his expenses as the year goes by.
Another troop member might end up with a negative balance after attending several campouts, and then pay off that balance with one payment.
As we'll see on the next page of this User Guide, a member account can have multiple personal subaccounts. This allows you to create reserve accounts for major expenses like summer camp or Philmont.
Event Balances reflect the expenses for an event, which are subtracted from the income for that event. The income from most campouts comes from the charges to the scouts who attended the event. Fundraisers can also be set up as events, so you can track the income from sales against the cost of the merchandise being sold.
Budget Items are an optional way to track income and expenses against a budget. If you implement budgeting, you will be able to track the balance of each budget item in each fiscal year.
Funds are an optional way to track additional financial information. Funds are not recommended for troops who simply wish to track their checking account and individual member account balances.
You can change the balance of one or more accounts by entering Transactions.
Each transaction has a Transaction Type which determines the types of accounts it affects. For example, a Deposit To Member Account transaction will add to both the troop checking account and the member account.
You will select a transaction type when you enter a transaction. You will then be prompted for the specific accounts to be affected by this transaction.
Personal Subaccounts
Personal Subaccounts let you designate a portion of the money in a scout's account for special purposes.
By default, all deposits to a member account will go to the pre-defined "Main" subaccount.
You may want to create additional subaccounts to handle major future events, like summer camp or Philmont. This would allow you to maintain a separate balance for those payments.
This could also be used to segregate the donations collected by a scout for his Eagle project, keeping them separate from his personal funds.
Troops that allocate fundraiser proceeds back to their scouts can use this feature to earmark these funds to ensure that they are spent appropriately.
To maintain your troop's list of subaccounts, go to Site Configuration → Money → Personal Subaccounts.

Click Add a New Item to add a subaccount to the list.
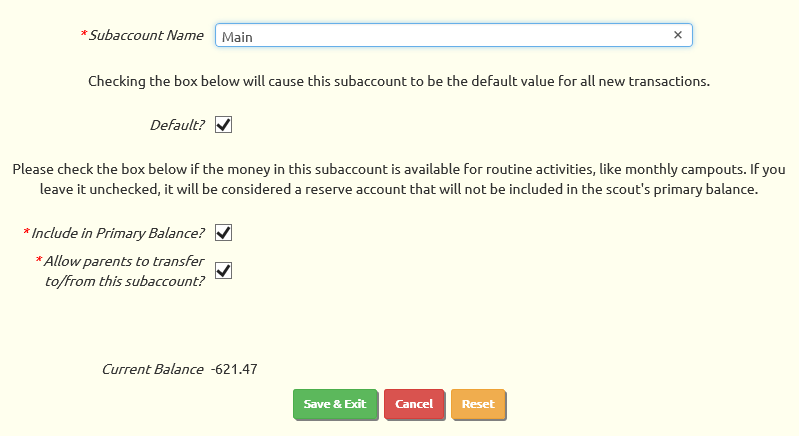
There can only be one Default subaccount. We recommend that you leave the "Main" subaccount as the default. You can, however, change the name of the "Main" subaccount if you'd like.
The Include in Primary Balance? checkbox lets you indicate that the funds in this subaccount are available for routine activities. The sum of the balances of these subaccounts will be displayed as the participant's current balance on most events.
Allow parents to transfer to/from this subaccount determines whether a parent can specify this subaccount when transferring money between family member accounts. It also determines whether they can select this subaccount when making on-line payments.
The Current Balance is the sum of the balances for this subaccount for all members of your troop.
We strongly recommend that you do NOT create a separate subaccount for every campout. Please open a Support Ticket if you have any questions about this recommendation.
You can view the current Personal Subaccount Balances for all active members by going to Money → Account Balances → Personal Subaccount Balances.
If you are charging subaccounts other than "Main" for troop activities, you may need to occasionally transfer money between subaccounts to eliminate negative balances. Rather than do this manually, you can create Personal Subaccount Transfer Rules that can be applied across all accounts, or for individual members.
Best Practices
Keep It Simple
The treasurer's job can be one of the most time-consuming positions in a troop. Our goal is to make this job as easy as possible, so you can still spend some time having fun with the scouts.
That is why our accounting subsystem is focused on just those things that matter to a scout troop:
- Tracking the balance of your troop checking account and other troop accounts
- Tracking member account balances
- Tracking the expenses for campouts and other events and charging them back to the participants
- Optionally tracking income and expenses against a budget
The accounting subsystem is not a comprehensive, double-entry business accounting package. It won't produce a balance sheet, although if you implement budgeting it will produce something equivalent to a P&L. We made it as simple as possible to take up less of your valuable time.
Consider these tips to reduce your workload:
- Perform statement reconciliation every month when you receive your bank statement to verify the accuracy of your transactions, thus avoiding time consuming investigations when members report problems.
- When troop members ask questions about their accounts, ask them to log on to the site to see their balance and transaction history.
- Use the email account balances function to remind everyone of their current status - and provide a link to the site so they can log on to see their transaction history.
- Configure the automated newsletter to include the recipient's current account balance.
- Encourage the parents to maintain a positive balance in their scout accounts, so you won't have to spend so much time following up on scouts who are in arrears.
- Set up the PayPal interface so parents can make payments on-line. These payments are automatically posted to the scout's account with no effort whatsoever by the treasurer.
- Ask parents who have two or more scouts or adult leaders in the troop to use the Transfer Money Between Accounts function on the My Scouts page, rather than having you move money around for them.
- Use group transactions whenever possible. Note that you can initiate a group transaction - for either a charge or a credit - from the troop calendar with the participants pre-selected.
- Wait until attendance for an event has been finalized - preferably after the event has taken place - before creating the group transaction to charge the participants.
- Don't try to get fancy with fund accounting. If you must use it, limit the scope so you don't have to specify a fund on every transaction.
And the most important way to make your job easier is...
Don't Try To Link Payments To Events!
Many troops believe that every payment from a scout must be for a specific campout. This goes hand in hand with a policy that scouts can only attend the events for which they've paid.
But there is an easier way to enforce such a rule without the bookkeeping hassle of linking payments to events. Simply require that they have a sufficient balance in their account to pay for the upcoming campout.
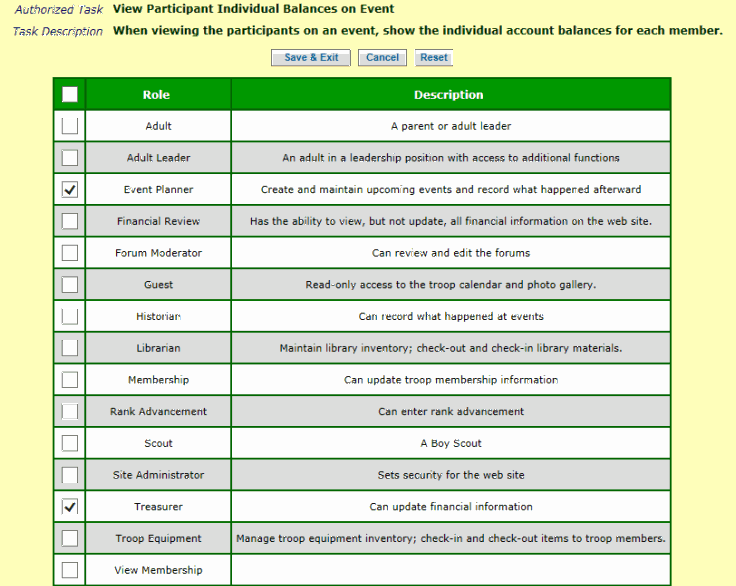
To make this easier, you can configure your system to allow the treasurer to view everyone's account balance on the list of event participants. To do this, select Assign Tasks To Roles from the Security Configuration submenu of the Administration menu, then scroll down the list until you find the authorized task "View Participant Individual Balances on Event", as shown below. Click on the Assign To Roles button for that item.

Check the boxes next to the user roles that should be allowed to see member account balances when viewing the participants on an event.
When the users who have been assigned these roles select an event from the Troop Calendar and scroll down to view the participants, they will now see each participant's current balance.
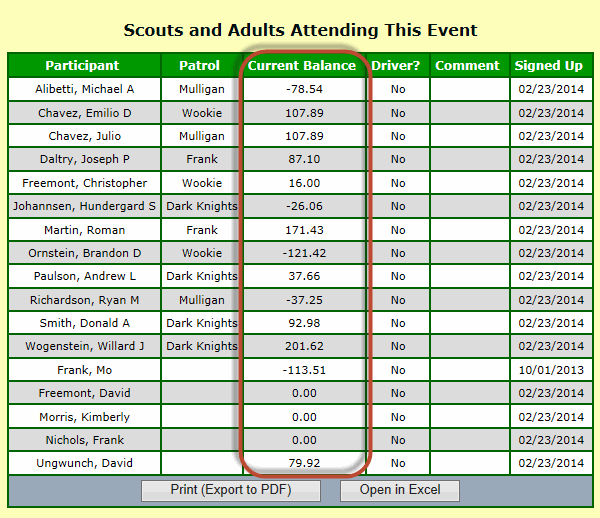
Those scouts whose balance is less than the cost of the upcoming campout can be identified and told not to attend unless they increase their balance.
But what if the scout's balance includes pre-payments for summer camp or Philmont? That's where Personal Subaccounts come in. Use these subaccounts to set aside deposits for big future expenses. Those deposits won't show up in the scout's balance as described above.
By not linking payments to events, you avoid a lot of bookkeeping issues, like what to do when a scout brings you a payment that doesn't exactly match the amount for the campout. Or if a parent with two scouts brings you a check covering both of them.
It's also more convenient for the parents. Rather than writing a check for each individual campout, they can simply add to the scout's balance from time to time, as needed.
Finally, it's better for your troop if everyone maintains a positive balance. This gives the troop a "cash cushion" for paying for camp reservation fees and other future expenses.
Transaction Types
Transaction Types control the effect of each transaction that is entered into the system.
When you enter a transaction you are required to select a transaction type. This will determine the other information you are required to enter on that transaction.
Your system was initialized with a set of transaction types that are all you need to do the basic troop accounting.
Unless you plan to use budgeting or fund accounting, we recommend that you not make any changes to this table.
To view the transaction types, go to Site Configuration → Money → Transaction Types.
![]()
![]() Click Update to select a transaction type to modify.
Click Update to select a transaction type to modify.
Transaction Type is the name that will appear in the transaction type list when you are entering transactions.
Deposit Date Required determines whether you will be required to enter an additional date - the Deposit Date - when entering this type of transaction. For transactions that can be grouped together for bank deposits, requiring this date will make it easier to reconcile your bank statement.
Expense Budget Item Required should only be selected if you are using budgets. It will require a budget item to be selected for each transaction of this type.
Similarly, Income Budget Item Required should only be selected if you are using budgets. It will require a budget item to be selected for each transaction of this type.
Fund Debit Required should only be selected if you are using fund accounting. If this box is checked, when you enter a transaction of this type you will be required to specify a fund whose balance will be reduced by the amount of the transaction.
Fund Credit Required should only be selected if you are using fund accounting. If this box is checked, when you enter a transaction of this type you will be required to specify a fund whose balance will be increased by the amount of the transaction.
We recommend that you not use the Event For Which Payment Is Intended option. If you do, it should only be selected on "deposit" transaction types which affect an individual's account balance. If this box is checked, when you enter a transaction of this type you will have the option of indicating the event for which this payment is intended. It will not cause the amount to be posted to this event's balance, but will allow you to view which members have made payments that were intended for this event.
The Disabled box will make this transaction type unavailable when adding or updating transactions. Disabling a transaction type will have no effect on transactions that were already entered using this type.
The rest of the fields on this form will only be modifiable if you have not yet created any transactions that use this transaction type.
Troop Debit Required will determine whether you will be required to specify a troop account whose balance will be reduced by the amount of this transaction.
Troop Credit Required will determine whether you will be required to specify a troop account whose balance will be increased by the amount of this transaction.
Person Debit Required will determine whether you will be required to specify a troop member whose balance will be reduced by the amount of this transaction.
Person Credit Required will determine whether you will be required to specify a troop member whose balance will be increased by the amount of this transaction.
Event Debit Required will determine whether you will be required to specify an event whose balance will be reduced by the amount of this transaction.
Event Credit Required will determine whether you will be required to specify an event whose balance will be increased by the amount of this transaction.
Click Save & Exit to save your work.
Financial Hub
The Financial Hub is a great entry point for all of TroopWebHost's accounting functions. It is available to any user who has a role that is authorized for the "Maintain Financial Information" or "Financial Hub" tasks. It is available at Money → Financial Hub.
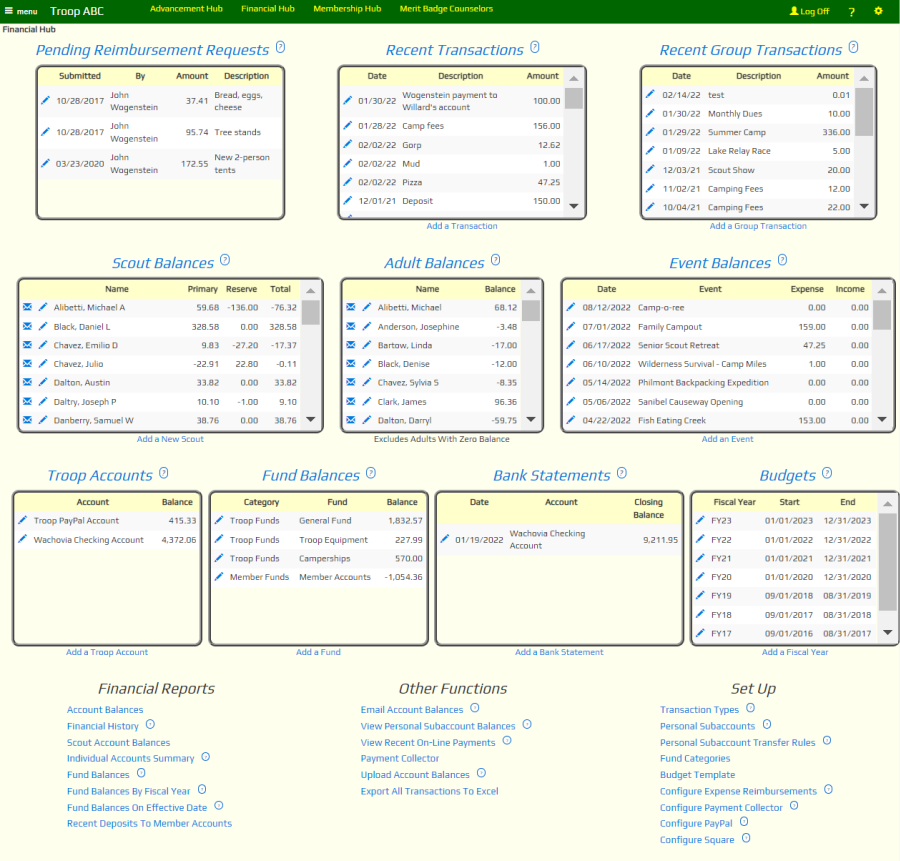
Like all hubs, you can edit the Financial Hub to fit your troop's requirements. This allows you to remove widgets you don't need - like the "Fund Balances" data window if you're not using funds. You may also add or replace widgets.
You can choose from the following Data Window widgets:
| Widget Name | Displays | Links To |
|---|---|---|
| Data Window - Money - Individual Transactions | The most recently entered transactions - not including those spawned by group transactions - in reverse order of when they were created. | The heading links to the Individual Transactions page. |
| Data Window - Money - Group Transactions | The most recently entered group transactions in reverse order of when they were created. | The heading links to the Group Transactions page. |
| Data Window - Money - Scout Balances | Every scout in your unit with their current balance. | The heading links to the Individual Accounts page. |
| Data Window - Money - Scout Balances With Reserve And Primary | Every scout in your unit with their primary, reserve, and overall balances. | The heading links to the Individual Accounts page. |
| Data Window - Money - All Adult Balances | Every adult in your unit with their overall account balance. | The heading links to the Individual Accounts page. |
| Data Window - Money - Active Adult Balances | Every adult in your unit with a non-zero balance. | The heading links to the Individual Accounts page. |
| Data Window - Money - Troop Accounts | All troop accounts | The heading links to the Troop Accounts page. |
| Data Window - Money - Fund Balances | All funds. | The heading links to the Funds page. |
| Data Window - Money - Event Balances | All events that are eligible for monetary transactions, based on their event type. | The heading links to the Event Balances page. |
| Data Window - Money - Pending Reimbursement Requests | All pending requests for expense reimbursement. | The heading links to the Expense Reimbursement Requests page. The update link takes you to a page where you can approve or reject that individual request. |
| Data Window - Money - Budget Years | All fiscal years, with the most recent at the top. | The heading links to the Fiscal Years page. |
| Data Window - Money - Bank Statements | All bank statements that have been entered for reconciliation, with the most recent at the top. | The heading links to the Statement Reconciliation page. |
Unless otherwise specified above, the  icon will allow you to update that row,
and the
icon will allow you to update that row,
and the  icon
will allow you to send a message to that person or group.
icon
will allow you to send a message to that person or group.
The Financial Hub may also include these Menu widgets:
| Widget Name | Contains |
|---|---|
| Menu - Financial Functions | Other accounting functions that cannot be accessed from the Data Windows. |
| Menu - Financial Reports | All of the financial reports. |
| Menu - Financial Set-up | Supporting tables for the accounting subsystem. |
Getting Started With Troop Accounting
To get started with troop accounting:
- Enter or upload your complete troop roster of scouts and adults.
- Decide if you want to use the fund accounting feature (usually not necessary) and, if so, set up the funds, categories and transaction types.
- Create a troop account for each place your troop keeps money, like your troop checking account or the troop's PayPal account.
- Enter the starting balance for each troop account.
- Enter or upload the starting balance for each member account.
- Enter the starting balance for any event for which the books are still open.
- Enter the starting balance for each fund (only if you are doing fund accounting)
- Decide if you want to accept on-line payments and, if so, whether you want to use Square (highly recommended) and/or PayPal (best for troops who use PayPal as their bank account).
- Decide if you want to use the budget feature and, if so, review the budget template and your event types, and update your transaction types to enable budgeting. This can be implemented later, after you've used the other accounting features for a while.
As treasurer, you may not be responsible for the first step, but you must wait until this is complete before you can start. The troop roster can be entered manually using the New Scout Registration page. If you are coming from another troop management package, such as TroopMaster™, you may be able to Upload Your Roster into TroopWebHost.
Troop Accounts
A troop account represents a place where your troop keeps money, like your checking account or a troop PayPal account. There should only be one troop account for each of these locations. This could include locations like a petty cash drawer, depending on whether you want to record all of your cash transactions into the system.
Troop accounts are NOT the same as general ledger accounts. You should only have one troop account for each bank account or other place where you keep money.
To create your troop accounts, please go to please go to Money → Account Balances → Troop Accounts and click the Add a New Item button. This will bring you to a page that looks like this:
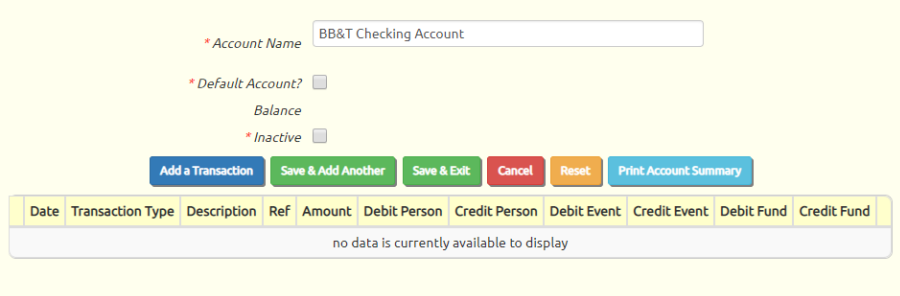
The Account Name should describe the location briefly but accurately, like this: "BB&T checking account"
We recommend that you include the name of the bank in your account name; this will make it easier to manage the transition if you ever move to a different bank. We also recommend that you include some other descriptive word, such as checking account, in case you ever create more than one account at that bank.
Check the checkbox labeled Default Account if this is going to be the main account in which you track troop funds.
The Inactive checkbox can be used to deactivate this account later if you switch to another bank.
Click the Save & Exit button to save your work, or Save & Add Another to do just that.
Enter Starting Balance For Troop Accounts
![]() To
enter the starting balance in each troop account, go to Money → Individual Transactions and press the Add a New Item button.
To
enter the starting balance in each troop account, go to Money → Individual Transactions and press the Add a New Item button.
Select the transaction type "Starting Troop Account Balance". As soon as you leave this field, you should see the Credit Troop Account field displayed in the middle of the page; all other account fields should disappear. If you do not see Credit Troop Account, please go back to the transaction type and reselect it.
The Transaction Date should be the date on which this balance was current. This could be the closing date of your last bank statement.
The Description is optional; it should describe this transaction.
The Reference is also optional; it can be left blank.
The Amount should be the current account balance. Assuming you are not overdrawn, this should be a positive number.
Select the troop account for which this is the balance in Credit Troop Account.
Click Save & Exit to save this transaction.
Member Accounts
The system automatically creates a member account for each member of the troop as soon as they are added to the system.
A member account works like a debit card. When a member deposits money into the account, it increases the balance. The account may then be charged for attending a campout, or for other troop activities.
If your troop had a similar concept prior to moving to TroopWebHost, you will need to enter the starting balance for each member as of the date of your transition.
Starting Balance For Troop Members
It may be possible to upload the starting balances for each member if you have been using TroopLedger™, or if you can create a compatible CSV file.
![]() If that is not an option,
you should enter a transaction for each member's starting balance.
If that is not an option,
you should enter a transaction for each member's starting balance.
Go to Money → Individual Transactions and click the Add a New Item button to see a page like the one shown at left.
(As an alternative, you may find it faster to create these transactions using a group transaction in which you override the amount for each person.)
Select the transaction type "Starting Member Account Balance".
The Transaction Date should be the date on which this balance was accurate, i.e. the date you officially moved your books to TroopWebHost.
The Description is optional, but we recommend always entering something meaningful.
The Reference is also optional, and probably not relevant for this type of transaction.
If the troop member currently owest the troop money, the Amount should be a negative number, like this: -42.00.
If the troop member current has a surplus in his troop account, the Amount should be positive, as shown at left.
Select the person's name from the Credit To Person drop down list.
Select "Main" as the Credit Subaccount.
Click Save & Add Another to move on to the next account.
Uploading Member Starting Balances
 If your troop has been using TroopLedger™ to manage its funds, you have the option of transferring
each member's current balance into TroopWebHost electronically.
If your troop has been using TroopLedger™ to manage its funds, you have the option of transferring
each member's current balance into TroopWebHost electronically.
If you are using a different accounting system, you may be able to create a compatible CSV file that can be uploaded in the same way.
Either way, this will create a separate Starting Member Account Balance transaction for each member of your troop.
This is a one-time load only. For any given member/subaccount, you can only load one balance. This function cannot be used to synchronize TroopWebHost with another accounting system on an on-going basis.
You must have already loaded your entire troop roster into TroopWebHost before using this function.
Export From TroopLedger™
TroopLedger™ requires you to create separate export files for scouts and adults.
Begin by exporting both of these files from TroopLedger™:
- On the Export Data screen, check the box that says "Include field names as first line of export"
- Set the delimiter to be a comma.
- Export the Scout file, then export the Adult file.
- Remember where you created these files so you can find them later!
Exporting Balances From Other Systems
If you want to upload currrent balances from a system other than TroopLedger, you may be able to create CSV files in the same format. You will need to create separate files for adults and scouts. Here is an example of such a file:
Jones,Willard,40.0
Smith,John,54.23
The first row must appear exactly as shown, followed by a row for each member. The last name and first name must be spelled exactly the same as in your TroopWebHost database.
This will set the balance of the default personal subaccount for each member, which is usually the "Main" subaccount.
If you wish to upload balances for other personal subaccounts, you can specify the subaccount name by adding a fourth element, as shown in the example below:
Jones,Willard,40.00,Main
Jones,Willard,250.00,Philmont
Smith,John,54.23,Main
The first row must appear exactly as shown above. Each subsequent row contains the same information as before, with the addition of the subaccount name. If you leave the subaccount name blank, it will assign the balance to the default subaccount on your system.
Upload To TroopWebHost
In TroopWebHost, go to the Money menu and select Upload Account Balances From TroopLedger™.
You should see the screen shown here:
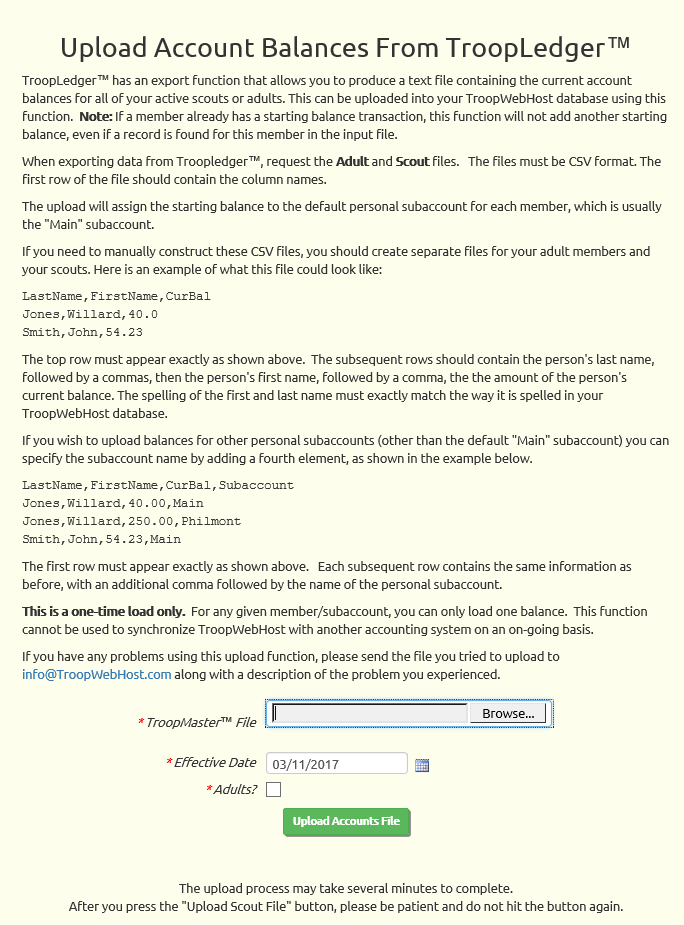
Click the Browse button to find the Scout file that you exported from TroopLedger™, or the CSV file you created from some other system.
Set the Effective Date to the date on which these balances were current. This will be the transaction date for each of the Starting Member Account Balance transactions that will be created by this upload.
Leave the Adults? box unchecked when uploading the Scout file, then click Upload Accounts File to begin the upload.
Repeat this process for the Adults file, but this time click on the Adults? checkbox before beginning the upload.
In both cases, the system will only create transactions when it finds an exact match on the member's first and last names.
When it completes the upload, it will display a list of those names in the TroopLedger™ file for which it could not find a matching record in TroopWebHost.
You can edit your CSV file to remove the names that DID upload successfully. Then correct the remaining entries to match the exact spelling of their names, and upload this new file.
Event Balances
The system maintains a balance for each event in your calendar. This balance reflects the expenses incurred for that event, like campground fees and food. It also reflects the income generated by charging the scouts who attended.
When you convert to TroopWebHost, you'll need to enter the starting balance for any events for which you have not yet closed the books.
Starting Balance For Events
This is an optional step, and is only needed for recent events for which you have not yet finished the accounting.
Go to Money → Individual Transactions and click the Add a New Item button to see a page like the one shown below.
![]() Select the transaction type "Starting Event Balance".
Select the transaction type "Starting Event Balance".
The Transaction Date should be the date on which this balance was accurate, i.e. the date you officially moved your books to TroopWebHost.
The Description is optional, but we recommend always entering something meaningful.
The Reference is also optional, and probably not relevant for this type of transaction.
If this event has accumulated more income than expenses - perhaps a fundraiser - the Amount should be a positive number.
If this event has more expenses than income - like a campout that has not yet been charged back to the participants - the Amount should be a negative number.
This transaction will not affect the balance of any troop account. It just creates an initial balance for the selected event.
Click Save & Exit to save this transaction.
Fund Balances
This is an optional step that you would only do if you are using the fund accounting feature.
Go to Money → Individual Transactions and click the Add a New Item button to see a page like the one shown below.
![]() Select the transaction type "Starting Fund Balance".
Select the transaction type "Starting Fund Balance".
The Transaction Date should be the date on which this balance was accurate, i.e. the date you officially moved your books to TroopWebHost.
The Description is optional, but we recommend always entering something meaningful.
The Reference is also optional, and probably not relevant for this type of transaction.
If this fund has accumulated more income than expenses, the Amount should be a positive number.
If this fund is currently in arrears, the Amount should be negative.
Click Save & Exit to save this transaction.
Create one transaction for each fund that has a balance.
Budgets

Budgeting is an optional feature of TroopWebHost which makes it easy for you to create an annual budget and track it against actual income and expenses.
This allows you to meet the first Journey To Excellence (JTE) requirement for planning and budget. It also helps you set your fundraising goals for the coming year.
Configuring your system to enable budgeting involves these steps:
- Review and extend the budget template, which is modeled on the BSA's recommended budget spreadsheet.
- Review event types to distinguish fundraisers from other activities.
- Update your transaction types to require budgets.
Add a fiscal year to begin creating a budget for that year. This defines the starting and ending dates for this fiscal year.
You can then enter the budget for this fiscal year:
- Enter your expense budget on the expense tab.
- Enter your budgets for the events scheduled for this fiscal year on the event budgets tab.
- Enter your income budget on the income tab.
- Enter your sales goals and expected income for each scheduled fundraiser in the fiscal year on the fundraiser budgets tab.
A major portion of the budgeting process is based on events. For each campout and other outings, you can create a budget which may anticipate charging back part or all of the expense to the participants. For fundraiser events, you can set the goal and the expected income for each fundraiser.
You can then track your actual income and expenses against each item on your budget.
All transactions that affect an event will be counted against the fiscal year in which the event is scheduled, regardless of the date of the transaction. So, for example, if FY18 runs from 1/1/2018 through 12/31/2018 and you have a campout scheduled for the first week of January, any purchases made in December of 2017 in preparation for that event will be counted against the FY18 budget.
All other transactions will be assigned to a fiscal year based on their transaction date.
If you have already entered transactions in the fiscal year for which you are creating a budget, you can assign those transactions to a budget item from the expense tab and the income tab.
When you enter new transactions which represent income or expense to the troop, you will be prompted for a budget item - unless that transaction relates to an event. Transactions that affect an event do not have to be assigned a budget item, since that is done at the event level.
The system can then provide reports to show the variance between actual and budgeted amounts for every budget item.
Budget Template
The budget template defines the line items for your budgets. These budget items are used for every fiscal year in which you create a budget.
Your system is pre-configured with a budget template based on the BSA's Troop Operating Budget Worksheet. If this meets your troop's needs, there is no need to change anything.
We do recommend that you review this template before you move on to the next step. To do this, please go to Site Configuration → Money → Budget Template.
This page allows you to view the current budget template and make any changes needed before you begin creating your troop's budget.
Click Add a New Item to add a new budget item, or use the Update buttons to change an existing item.

The Type determines the section of the budget in which this item will appear.
The Display Sequence determines the position of this item within the selected section.
The Item Name is the title for this budget item that will appear on all screens and reports.
Values Taken From Events should be checked for those budget items whose values will be derived from events. Line items for campouts and other outings should have this box checked. So should fundraisers.
For items not derived from an event, you can check Compute Budget Per Person (or other unit) if you wish to have the system prompt you for a per person budget amount and a count of how many to which it applies. The system will automatically compute the total for these items.
If you specify a default value, the system will fill in this value for this budget item for every fiscal year you create. If this is a "pers person" budget item, this value will be placed in the per person column; otherwise, it will be placed in the total field.
Use the Disabled checkbox to prevent this item from being added to any new budgets you create. This will not remove this item from any existing budgets.
Event Types
Event Types control many aspects of your events, including how they are categorized for budget purposes.
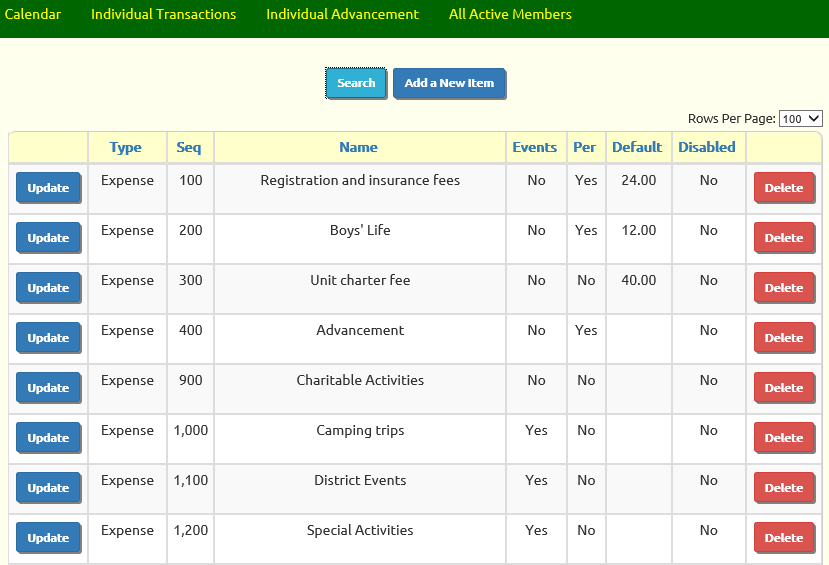
To review and update these settings, please go to Site Configuration → Event Types. Use the Search button to pull up a list of selection criteria for this page; scroll down to Budget Type and select "Equal" from the drop down list, then select "Activity" and click the Show button at the bottom of the page. Scan the resulting list to verify that none of these event types are for fundraisers. If you find one that is, update it and change its Budget Type to "Fundraiser".
Perform a second search, this time looking those entries with a Budget Type of "Fundraiser". If you see any that are not fundraisers, update them and change the Budget Type to "Activity".
If you update an event type and scroll down to the "What Fields Will Be Available" section, you see where you can designate the budget type.
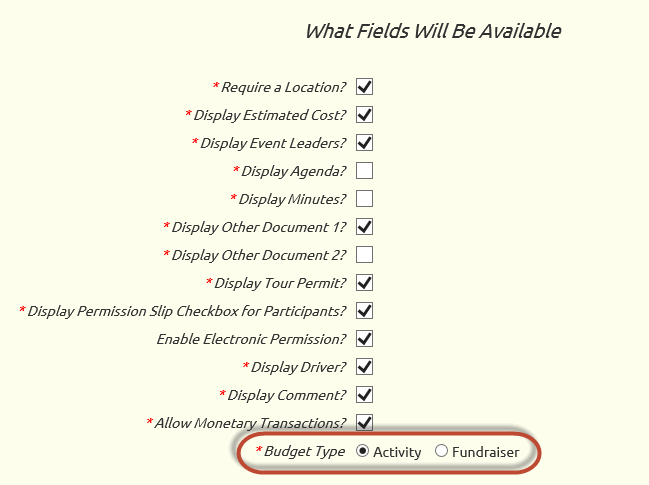
This is really only relevant for events that allow monetary transactions.
The default value is "Activity", which is anything other than a fundraiser. This is the proper setting for campouts and other outings.
Select "Fundraiser" for any event type which is going to raise money for the troop.
Transaction Types For Budgets
Transaction Types control the effect of each transaction that is entered into the system, including whether it affects performance against a budget item.
You can maintain your transaction types by going to Site Configuration → Money → Transaction Types.
![]()
The default configuration of your site had budgeting disabled, so none of the transaction types affect a budget item.
You can easily implement budgeting in your transaction types by pressing the Enable Budget Using Recommended Settings button at the top of the page. This will invoke an algorithm that sets the expense or budget flag based on a pre-defined set of criteria.
If you have not altered the original transaction types or added new ones, this may be all you need to do.
But if you decide you wish to change these settings, please keep in mind these concepts:
Transaction types that affect events cannot be assigned to a budget. That is because these transactions will use the budget item assigned to the event. It therefore is unnecessary to specify a budget item for these transactions.
A transaction type cannot affect both budget expense and budget income. You must choose one or the other.
Transaction types should only be assigned to a budget category if they will affect the troop's income or expense.
To illustrate that last point, consider the setting for the "Deposit To Member Account" transaction type. You might think that this should be set to be an Income budget item, since it represents money flowing into the troop's coffers. However, this is not actually income to the troop at this point; it is simply money you are holding on behalf of this individual. It only becomes income to the troop when you charge that individual for something, which is why "Charge Member Account" does affect an income budget item, as shown below.
![]()
Similarly, the "Reimburse Member From Member Account" transaction type should not be assigned an Expense budget item, since it represents the disposition of money that doesn't belong to the troop.
If you have any questions or concerns about how the budget flags should be configured, please contact CustomerSupport@TroopWebHost.com.
Fiscal Years
The Fiscal Year table lets you define your troop's fiscal years. This is the first step in creating a budget. It is also necessary if you plan to use the Fund Balances By Fiscal Year report.
To maintain your fiscal years, go to Money → Fiscal Years & Budgets.

Click Add a New Item to create a new fiscal year.
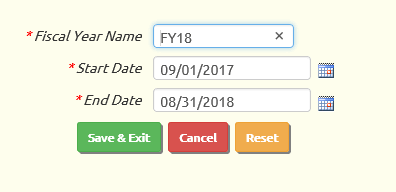
Fiscal Year Name is the name that will appear whenever this fiscal year is referenced.
Start Date is the first day of this fiscal year.
End Date is the last day of this fiscal year.
For the budget "actual" totals, transactions that affect an event will be assigned to a fiscal year based on the starting date of the event.
All other transactions will be assigned to a fiscal year based on their transaction date.
For the Fund Balances By Fiscal Year report, ALL transactions are assigned to a fiscal year based on the transaction date (including transactions that affect an event.)
Expense
Once you've created a fiscal year, you can begin entering your budget for that year.
This is also done from Money → Fiscal Years & Budgets.
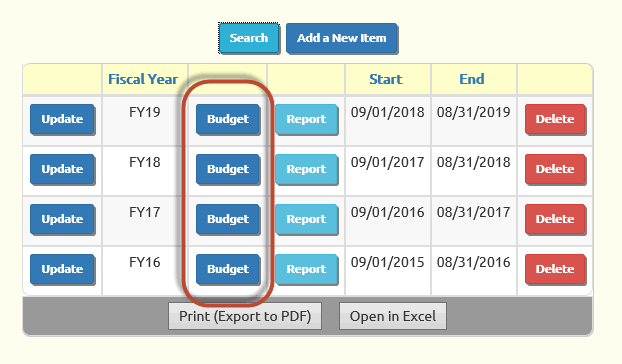
Click the Budget button to go to the Expense tab of the budget page.
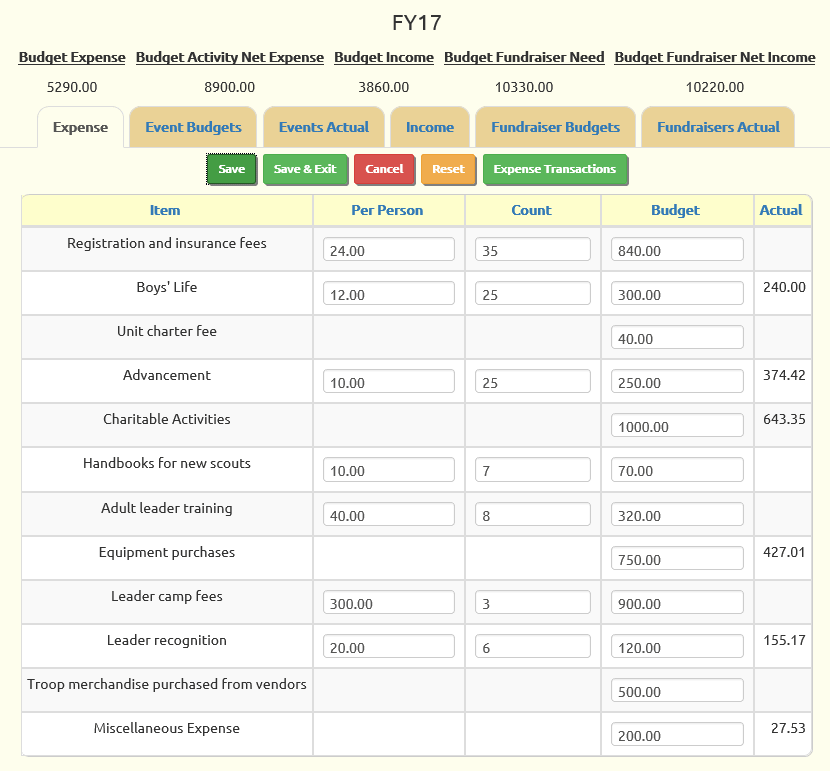
This tab displays all of the expense budget items that are not linked to events, as determined by the settings in the budget template.
If the budget item is configured for "per person" computation, you will be able to enter a per person amount and count on that row, and the system will compute the total budget.
For other items you can just enter the total budget amount.
To save your changes on any of the tabs in this page, you can:
- Click Save
- Click Save & Exit
- Click on another tab
The Actual column displays the total of all transactions that are assigned to this budget item whose transaction dates fall within this fiscal year.
You can assign the budget item for transactions by pressing the Expense Transactions button.
![]()
This will display all of the expense transactions for this fiscal year that are not associated with events. Use the drop down list in the budget column to select the budget item for each transaction.
Click Unassigned Transactions Only for an easy way to set the budget items for old transactions which were entered without this information.
Event Budgets
The Event Budgets tab allows you to create a budget for each activity planned for this fiscal year.
This is the second tab on the Budget page reached from Money → Fiscal Years & Budgets.
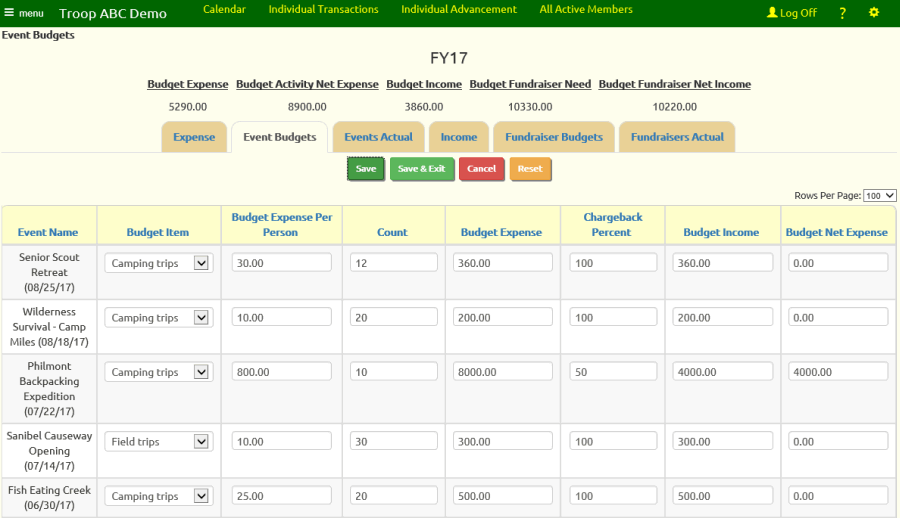
For each event, you should first select the appropriate Budget Item from the drop down list. This is the budget item into which all of the expenses and income for this event will roll up.
Budget Expense Per Person is your anticipated cost of this event per participant.
Count is the expected number of participants for this event.
Budget Expense will be automatically computed based on the previous two columns. It represents the total expected cost of this event.
Chargeback. Most troops charge the cost of most of their campouts to the scouts who attended. The Chargeback Percent column lets you enter a number between 0 and 100 indicating the portion of the expense you plan to charge to the participants. In most cases, this will be "100" if you plan to charge the entire cost of the event back to the participants.
The Budget Income column is the amount you expect to charge back to the participants. It will be automatically computed based on the previous two columns.
Budget Net Expense is the difference between the Budge Expense and Budget Income. This is the number that will be rolled up to the Budget Expense for this budget item.
As on the previous tab, to save your entries:
- Click Save, or
- Click Save & Exit, or
- Click on another tab
Events Actual
The Events Actual tab shows you the actual expense and income recorded for each of the events in this fiscal year.
This is the third tab on the Budget page reached from Money → Fiscal Years & Budgets.
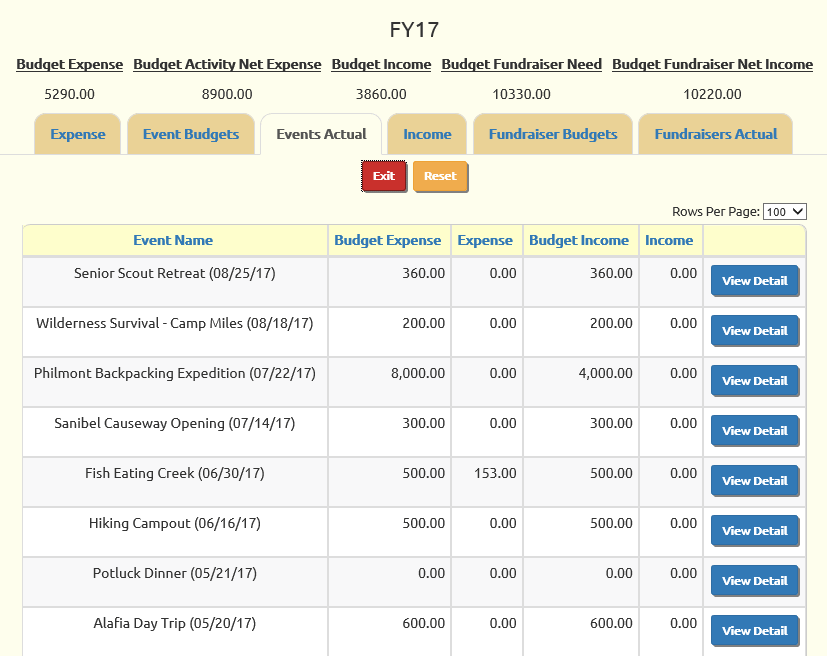
For each event, it shows:
- Budget Expense, as set in the Event Budgets tab.
- Expense, from the debit transactions entered for this event.
- Budget Income, as set in the Event Budgets tab.
- Income, from the credit transactions entered for this event.
The View Detail button allows you to see the underlying transactions for this event. From there you can update individual transactions or add new transactions.
Income
The Income tab is where you plan your income for the fiscal year.
This is the fourth tab on the Budget page reached from Money → Fiscal Years & Budgets.
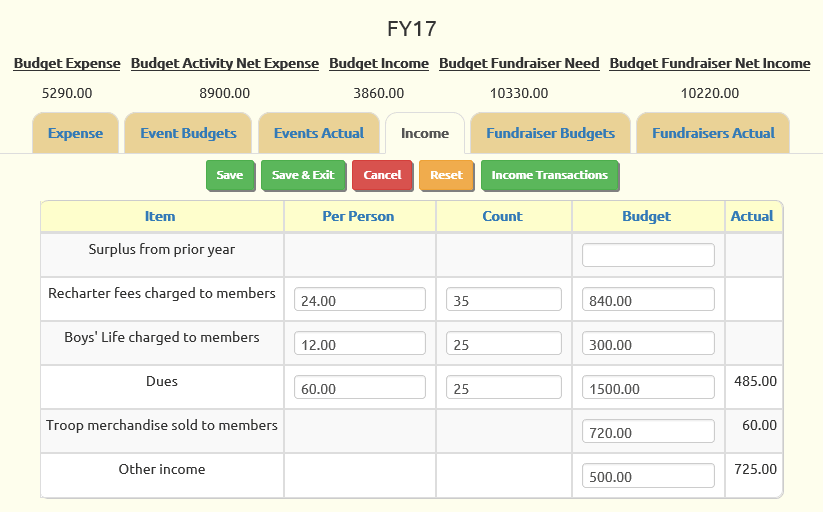
This tab displays all of the income budget items that are not linked to fundraising events, as determined by the settings in the budget template.
If the budget item is configured for "per person" computation, you will be able to enter a per person amount and count on that row, and the system will compute the total budget.
For other items you can just enter the total budget amount.
To save your changes on any of the tabs in this page, you can:
- Click Save
- Click Save & Exit
- Click on another tab
The Actual column displays the total of all transactions that are assigned to this budget item whose transaction dates fall within this fiscal year.
You can assign the budget item for transactions by pressing the Income Transactions button.
![]()
This will display all of the income transactions for this fiscal year that are not associated with fundraising events. Use the drop down list in the budget column to select the budget item for each transaction.
Click Unassigned Transactions Only for an easy way to set the budget items for old transactions which were entered without this information.
Fundraiser Budgets
The Fundraiser Budgets tab allows you to create a budget for each fundraising event planned for this fiscal year. The budget module assumes that you will create an event on your calendar for every fundraiser.
This is the fifth tab on the Budget page reached from Money → Fiscal Years & Budgets.
If you have already completed your work on the first four tabs, the Budget Fundraiser Need displayed at the top of the page should be the total income needed from fundraisers for this year.
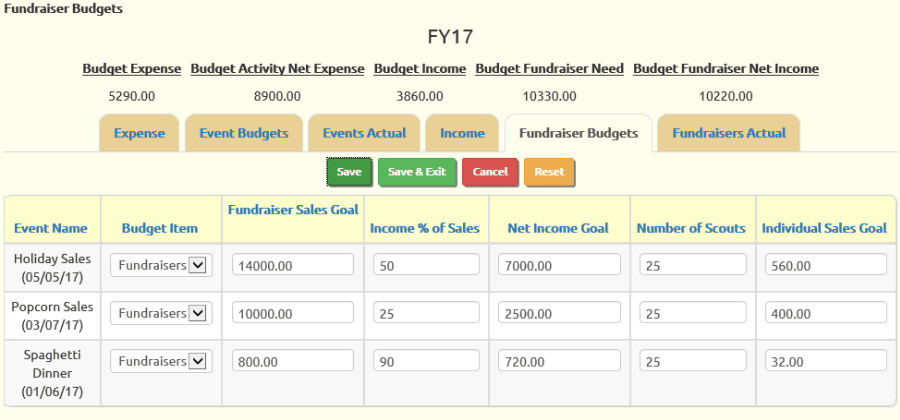
For each fundraiser, you should first select the appropriate Budget Item from the drop down list. This is the budget item into which all of the expenses and income for this event will roll up. The default budget template only has one budget item for fundraisers, so this choice list may only contain one entry.
The Fundraiser Sales Goal should be set to the gross sales goal for this fundraiser.
Income % of Sales is the percentage of the gross sales that you expect the troop to retain as its profit from the fundraiser.
Net Income Goal is the total profit expected from this fundraiser. It will be be automatically computed based on the previous two columns.
The Number of Scouts is the number of scouts you expect to participate in this fundraiser.
The Individual Sales Goal is computed for you. It represents the gross sales needed from each scout to achieve the Fundraiser Sales Goal.
To save your entries:
- Click Save, or
- Click Save & Exit, or
- Click on another tab
Fundraisers Actual
The Fundraisers Actual tab shows you the actual income and expense recorded for each of the fundraising events in this fiscal year.
This is the sixth and final tab on the Budget page reached from Money → Fiscal Years & Budgets.
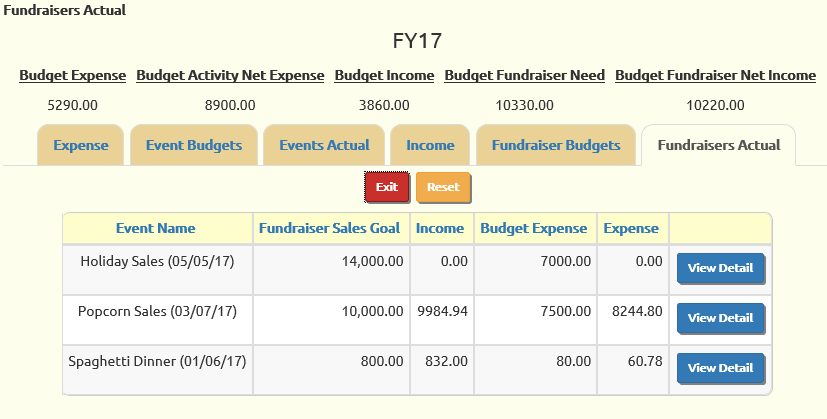
For each fundraiser, it shows:
- Fundraiser Sales Goal, as set in the Fundraiser Budgets tab.
- Income, from the credit transactions entered for this fundraiser.
- Budget Expense, as computed from the Fundraiser Budgets tab.
- Expense, from the debit transactions entered for this fundraiser.
The View Detail button allows you to see the underlying transactions for this event. From there you can update individual transactions or add new transactions.
Fund Accounting
Fund Accounting is an optional feature of the TroopWebHost accounting subsystem which is probably not necessary for most troops. It simply gives you another way to sum up transactions, but at the cost of having to specify a fund on each transaction.
Fund balances are completely independent of troop accounts or member accounts. A transaction that affects a fund balance will not affect any other type of balance, unless the transaction type explicitly calls for it.
Here are a couple of situations in which fund accounting might be useful:
- Your troop maintains a camp scholarship ("campership") fund to help less fortunate families pay for summer camp.
- Your troop wants to categorize expenses associated with campouts and other events.
In an upcoming page, we'll show you how to configure your transaction types to support these two situations. If you think you have another use for fund accounting, please open a Support Ticket for advice on setting it up.
Setting up fund accounting involves these steps:
- Defining fund categories (optional)
- Defining funds
- Modifying the transaction type table to prompt for these funds
Once you've set this up, you will be prompted for the appropriate fund to debit or credit every time you enter a transaction, depending on the transaction type that you've selected.
You can then produce a report that summarizes your fund balances. You can also view the transactions that contributed to a given fund balance.
Fund Categories
Fund categories are an optional way of grouping funds together for reporting purposes.
If you set up fund categories, the Fund Balances Report will be grouped by those categories.
To maintain fund categories, go to Site Configuration → Money → Fund Categories.
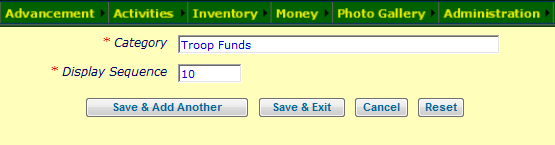 Click Add an Item to begin adding a fund category.
Category is the name you wish to give this group of funds.
Display Sequence is the relative order in which this category should be displayed with respect to other categories.
In our example, we will only have one category: Troop Funds
Click Save & Exit to save your work.
Funds
A Fund represents a subset of the money in your troop accounts.
To set up your funds, go to Money → Account Balances → Funds.
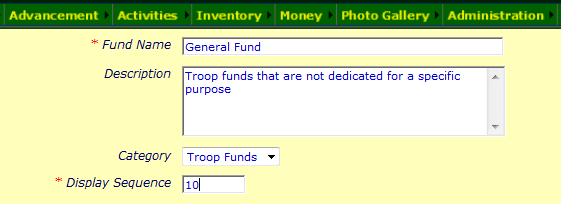 Click Add an Item to begin adding a fund.
Fund Name will appear on reports that show fund balances.
Description tells what this fund represents.
Category is the optional fund category to which this fund belongs.
Display Sequence is the relative order in which this fund will appear with respect to other funds in this category.
Click Save & Exit to save your work.
For our example, we created two funds: General Fund and Troop Equipment.
Transaction Types For Fund Accounting
Transaction Types control the effect of each transaction that is entered into the system, including whether it affects a fund balance.
When your site was initialized, fund accounting was disabled, so only a few transaction types are set up to affect funds, and those may have been disabled.
To reconfigure your transaction types for fund accounting, please go to Site Configuration → Money → Transaction Types.
![]()
Regardless of how you plan to use fund accounting, the following two transaction types should be enabled:
- Starting Fund Balance
- Transfer Between Funds
To do this, update the transaction type and remove the checkmark from the Disabled checkbox.
The remaining changes will vary based on how you plan to use fund accounting. We will work through two possible scenarios here.
Scenario #1: Tracking Camp Scholarship Money
This anticipates a limited use of fund accounting, solely for the purpose of tracking money set aside by the troop for camp scholarships. This example assumes that you have only created one fund to represent the current amount of money available for camp scholarships.
In this scenario, you probably won't be entering many transactions that affect the scholarship fund. So rather than modifying the existing transaction types, we recommend that you create several new transaction types specifically to work with the fund:
- Deposit To Scholarship Fund. This transaction type will be used for deposits of donations to the scholarship fund.
It should enable these options:- Income Budget Item Required (only if using budgets)
- Credit Fund Required
- Troop Credit Required
- Transfer To Scholarship Fund. This will be used for transfer of existing troop money to the scholarship fund.
Enable these options- Credit Fund Required
- Award Scholarship To Scout. This will be used to assist a scout to pay for camp using scholarship money.
Enable these options- Expense Budget Item Required (only if using budgets)
- Debit Fund Required
- Person Credit Required
This approach assumes that the scout will be charged the full amount for summer camp. An "Award Scholarship To Scout" transaction would be created to increase the balance in his account to cover all or part of this charge.
An alternative approach would credit the event instead of the person, and reduce the charge to the scout in the amount of the scholarship.
There is no way to have the scholarship award transaction type affect both the scout and the event.
Scenario #2: Categorizing Camping Expenses
If you are using budgets, then you are already categorizing your expenses. However, since event expenses are lumped together under one budget item, this does not allow you to break down the expenses involved with campouts.
This approach assumes that you would create a fund for each category of camping expense, such as:
- Campground fees
- Food
- Transportation
- Fundraiser Expense
(This last fund is needed to handle expenses associated with fundraisers, since we will be changing transaction types that are also used for fundraisers. The alternative would be to create additional transaction types for fundraisers that do not reference funds.)
You would then modify the transaction types that are used to record expenses for events, to enable the Fund Debit Required option. This would include:
- Troop Expense Paid By Troop Member For Event
- Troop Expense Paid From Troop Account For Event
Individual Transactions
Select Individual Transactions from the Money menu to view all transactions and enter new transactions.
![]()
This grid initially displays the most recent transactions in your database. Use the Search button to select a different set of transactions, or use the paging controls in the upper right corner of the grid to advance through the list.
Click Update to update that row; click Delete to delete that row.
Click Add a New Item to enter a new transaction, as shown below.
![]()
Click on the Transaction Type field to view a list of the available transaction types, as shown above.
![]() Each transaction type describes its effect on troop, member, and/or event accounts.
Each transaction type describes its effect on troop, member, and/or event accounts.
Before you select a transaction type, you will not see any fields prompting for a troop account, member account, event, fund, or budget item, as shown at right.
After you select a transaction type and use your mouse or tab key to move to another field, you will see one or more account selection boxes appear in that portion of the screen.
In the example shown below, the selected transaction type requires you to select a troop account and a troop member, each of which will have its balance increased by the amount of the transaction.
![]()
Deposit Date is the date that you expect to deposit this check. This allows the system to display a total of all deposits made on that day when you reconcile your bank statement.
The Description field could be set to the name of the person or entity who made the deposit. For other types of transactions it should be a concise description of the transaction.
Reference can be the check number.
The Amount will usually be a positive number, unless you are trying to reverse the effect of an earlier transaction.
Credit Troop Account is the troop account to which you deposited the check.
Credit To Person is the member whose account balance will be increased by the amount of the check.
Credit Subaccount is the personal subaccount affected by this deposit.
Credit Fund is the fund whose balance will be increased by this amount.
Click Save & Add Another to save this transaction and add another. This is an easy way to quickly enter a series of transactions.
Transaction Audit Trail
TroopWebHost saves a copy of each transaction every time a transaction is inserted, updated or deleted.
You can view this audit trail by going to the Individual Transactions page and clicking the View Audit Trail button at the top of the page.

This will display the most recent activity at the top of the grid.
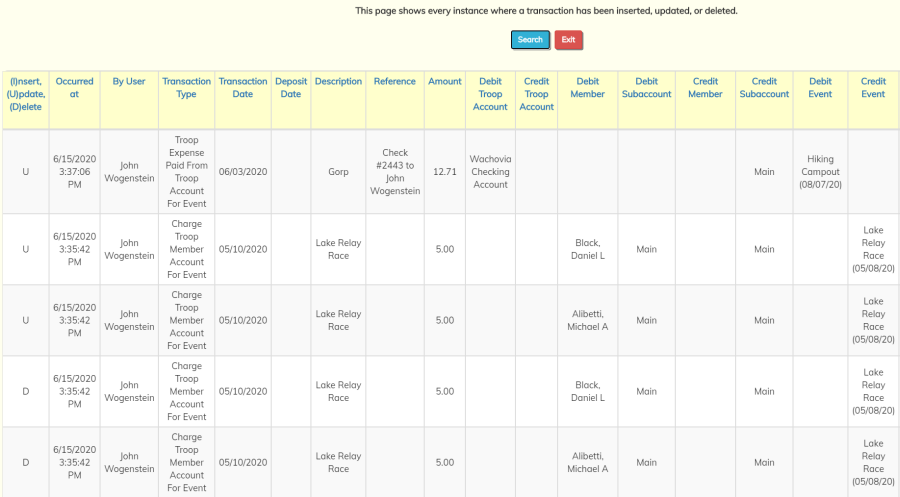
Use the Search button to filter the list to find what you're looking for.
Use the Open In Excel button at the bottom of the grid to export this information to an Excel spreadsheet.
The audit trail for an individual transaction is displayed when you select that transaction from the Individual Transactions page.
Group Transactions
Group Transactions provide an easy way to quickly enter the same transaction for a group of troop members.
This comes in handy for:
- Charging scouts their monthly dues
- Charging troop members for their share of a campout
- Crediting troop members for their share of fundraiser proceeds
Select Group Transactions from the Money menu.
Then select Add a New Item to see the page shown below.
![]()
The top part of the screen is similar to the Individual Transactions entry page.
Select the appropriate transaction type, then enter a transaction date, description, reference, and amount.
Then select the members for whom you wish to create this transaction by clicking in the checkbox next to their name in the list in the lower portion of the page.
Use the Select All Scouts button to select all of the scouts in the list.
If you need to specify an amount for a member that is different from the amount specified at the top of the page, you may enter that amount in the Override Amount field for that person. This will cause the transaction for that individual to be created with the override amount.
Similarly, use the Reference Override to enter a different Reference note for a particular individual.
Click on the checkbox in the header row of the grid to select all members. Click it again to unselect all members.
Scroll to the bottom of the page to click the Save & Exit button when you are ready to create the transactions.
Group transactions will appear in the Individual Transactions grid, but they cannot be modified from that page. You must return to the Group Transactions page to make any changes.
Automatically Charge Event Participants
TroopWebHost can be configured to automatically charge members when they sign up for an event. This will cause up to three group transactions to be generated for that event: one for scouts, one for adults, and one for guests.
You can specify a different amount to charge per person for scouts, adults, and guests.
If an event is configured to auto-charge participants, the associated group transactions will be updated automatically as the event and event participants change, until attendance is finalized for the event by checking the Attendance Finalized box on that event. Do not attempt to update these group transactions directly in any way until attendance is finalized, since your changes may be undone by the auto-charge logic.
To be absolutely clear, do not try to edit the group transactions that were generated by the auto-charge feature until attendance is finalized for the event.
One other thing: you should always take attendance for any event that has the auto-charge feature enabled.
Setting Up An Event To Automatically Charge Participants (step 1)
First you must configure one or more Event Types to support this feature. To do this, go to Site Configuration → Event Types. Update an event type for which you want to enable auto-charging, then scroll down the page to the "Financial" section.
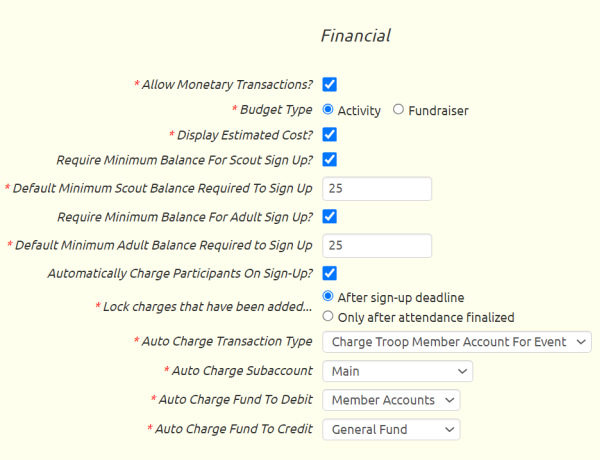
You must have Allow Monetary Transactions enabled to auto-charge participants.
Then check the box for Automatically Charge Participants On Sign-Up. This will cause additional fields to be displayed, all of which are required.
Lock charges that have been added... determines when the system will stop automatically removing the charges for members who signed up for an event earlier, but later withdrew. If you choose "After sign-up deadline", then members who withdraw after the sign-up deadline will still be charged for the event. Regardless of which option you select, no changes to participant charges will occur automatically after attendance has been finalized for the event.
Auto Charge Transaction Type. Select the transaction type to be used when the system generates group transactions to charge the participants on an event.
Auto Charge Subaccount. This should usually be set to "Main". This is the personal subaccount that will be used when the participants are automatically charged for the event, unless a subaccount was specified in the Subaccount For Participant Balances for that event.
Auto Charge Fund To Debit. If the selected transaction type is configured to debit a fund, select the fund to be automatically debited when participants are automatically charged.
Auto Charge Fund To Credit. If the selected transaction type is configured to credit a fund, select the fund to be automatically credited when participants are automatically charged.
Setting Up An Event To Automatically Charge Participants (step 2)
Once you have configured the event type to support auto-charging participants, you are ready to set an upcoming event to auto-charge participants.
Go to Calendar → Maintain Events and update an event that has an event type for which auto-charging is enabled. On the Event Details tab, scroll down to find the Automatically Charge fields, shown circled below.
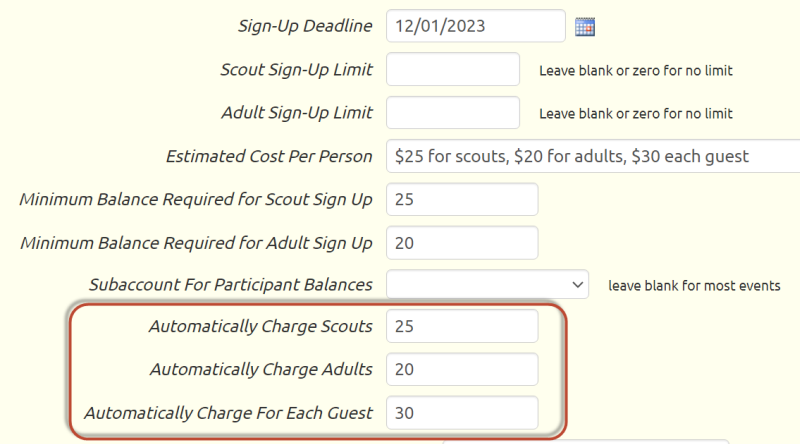
All of the auto-charge fields are optional. If you leave them all blank (or zero), nobody will be automatically charged when they sign up for the event.
If you want to only auto-charge scouts, you can leave the adult and guest fields blank, and just enter the amount you want to charge scouts. Similarly, if you only want to auto-charge adults, just leave the other fields blank.
Once you enter values into any of these three fields and save your changes, the system will generate the appropriate group transactions.
The group transaction for scouts will have each scout who signed up for the event automatically selected. The group transaction for adults will have each adult who signed up for the event selected. The group transaction for guests will have any member who has one or more guests.
But what about those other fields that are also about money and charges?
Estimated Cost Per Person is just a comment. You may leave it blank, or you can enter text that describes how you've set the auto-charge values.
Minimum Balance Required for Scout Sign Up does not have to match the amount (if any) you entered to automatically charge scouts. If a scout's balance is less than the minimum required for the event, they will not be able to sign up for the event, and thus will not be automatically charged. Similarly, Minimum Balance Required for Adult Sign Up does not need to match the amount you are charging adults. Adults will not be allowed to sign up for an event if their current balance is below this amount.
If a value is selected for the Subaccount For Participant Balances, it will override the Auto Charge Subaccount that you selected on the Event Type when the auto-charge group transactions are created..
Event Sign Up And Withdrawals
Once an event is configured for auto-charging, as shown above, any scout who signs up for the event will be added to the scout group transaction for that event. Any adult who signs up for the event will be added to the adult group transaction for that event. And anyone who signs up for guests will be added to the guest transaction for that event.
Anyone who withdraws from the event will be automatically removed from the group transactions for that event - unless:
A) The sign-up deadline has passed, AND the "Lock charges that have been added..." option on the Event Type was set to "After sign-up deadline", or
B) Attendance has been finalized for the event.
Once attendance is finalized, all of the automatic updates to the group transaction will stop. Only then is it safe to edit the group transactions directly.
Finalizing Attendance
You should always finalize attendance on any event that is configured to automatically charge participants. This will lock the existing group transaction so that it is no longer affected by changes in the participation status for this event. You can still modify the charges by editing the group transactions that were created by the auto-charge feature, which will allow you to add and remove members from the transaction and override the amount.
Use the Take Attendance page to finalize attendance. It is available from the main menu at Calendar --> Take Attendance --> Take Attendance. Update the participation status of each member to accurately reflect what happened, then click the Finalize Attendance button, as circled below.
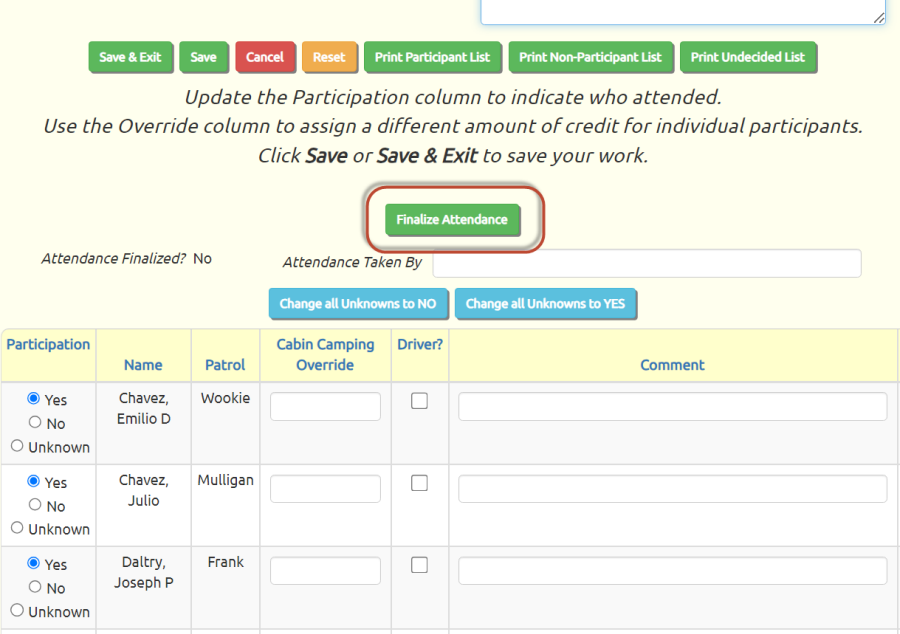
If the event was configured to automatically charge participants, finalizing attendance will cause the Take Attendance page to be locked; it will not allow you to make any further changes in the participation status for this event.
However, authorized users will still be able to make changes to attendance from the Maintain Events page on the "Sign-up List" tab. But once attendance has been finalized for an event, further changes will NOT affect the billing for this event.
Individual Accounts
Go to Money → Account Balances → Individual Accounts to view the current balances for all active troop members.
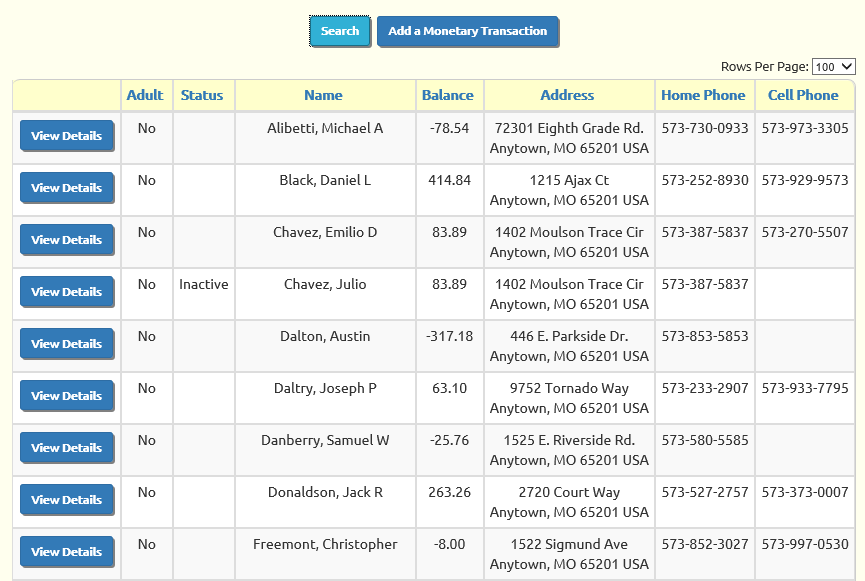
Use the Search button to filter this list. You can also click on any column heading to sort the list using that column.
Click View Details to view the transaction history for that person. This will display a page like the one shown below.
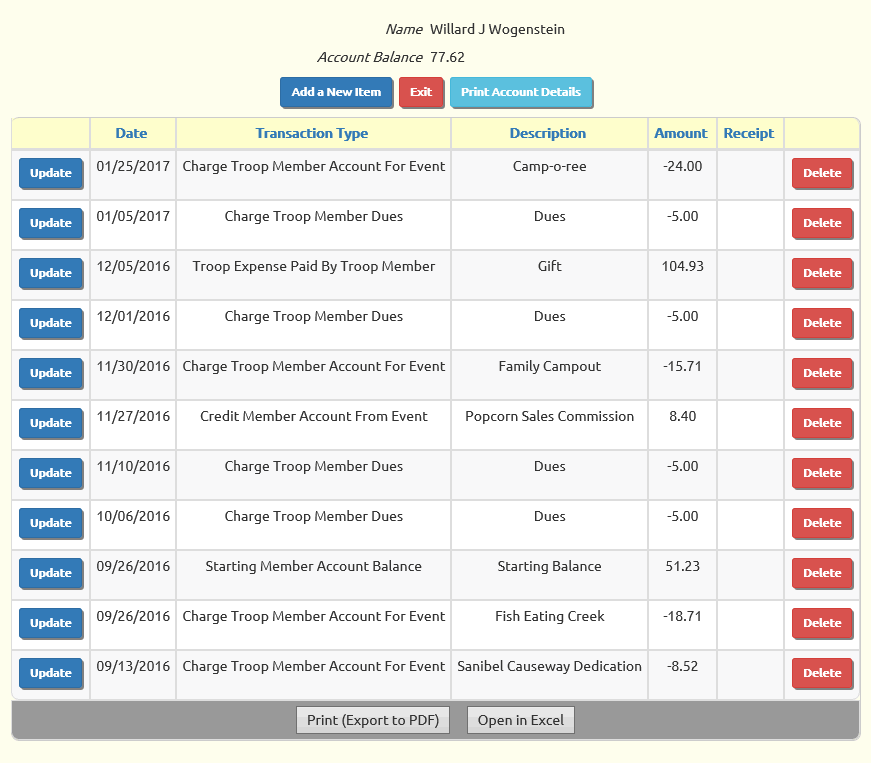
The member's current balance is displayed at the top of the page, followed by a summary of all transactions that affected this account.
Notice that you can update or delete transactions from this list. You can also add new transactions by clicking Add a New Item.
Click Print Account Details to produce the Individual Account Detail report for this person.
Click the Exit button to return to the previous screen.
Sending Account Balances
The members of your troop can check their account balance and transaction history at any time by going to the My Stuff menu and selecting My Account.
Parents can see the same information for their scouts by clicking the Account Detail button on the My Scouts page.
But some of your troop members probably won't get around to doing that. That's where this function comes in handy.
As treasurer, you have the ability to send a personalized e-mail to each member of your troop that provides their current account balance.
Go to Money → Account Balances → Email Account Balances to see a page like the one shown below.
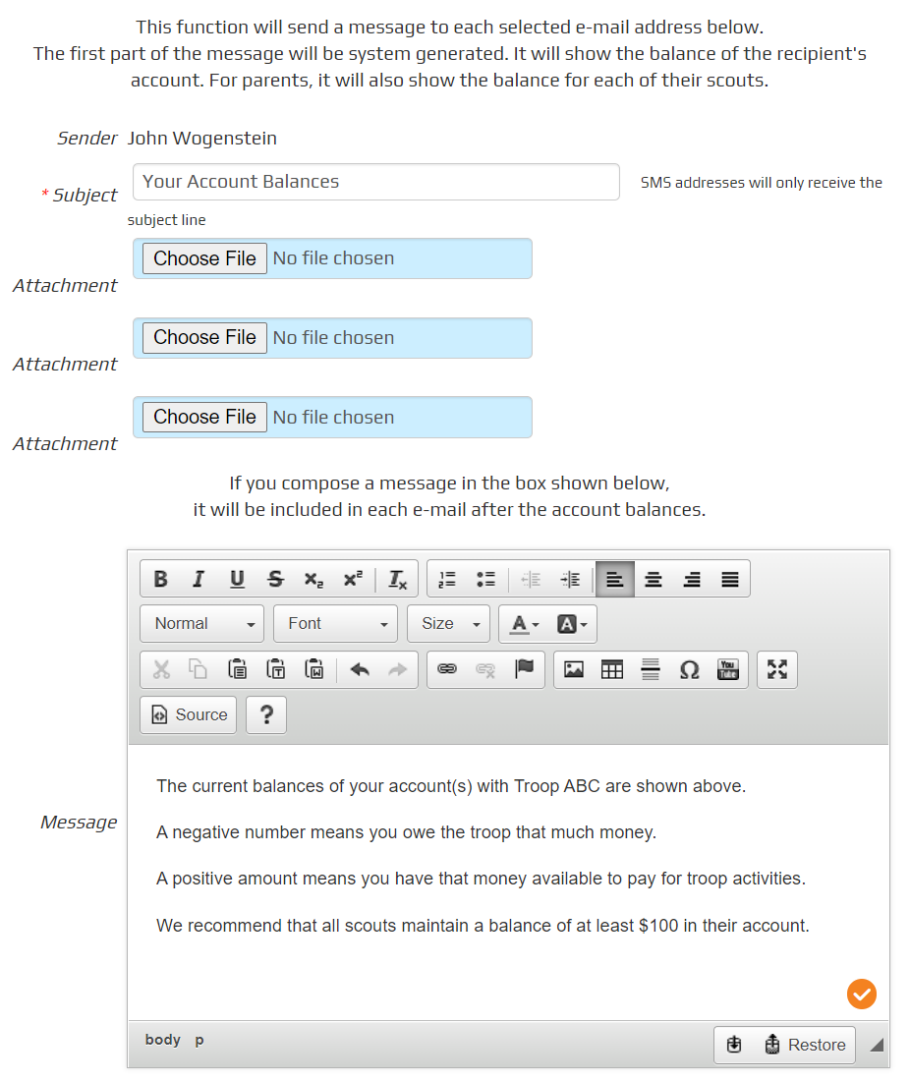
This is a specialized e-mail function only available to the treasurer.
You must enter in a subject line, as shown above.
You can also enter an optional message in the text box. If you do, this will appear below the list of account balances that will automatically be inserted in every message.
You should then select the members to whom you wish to send this message.
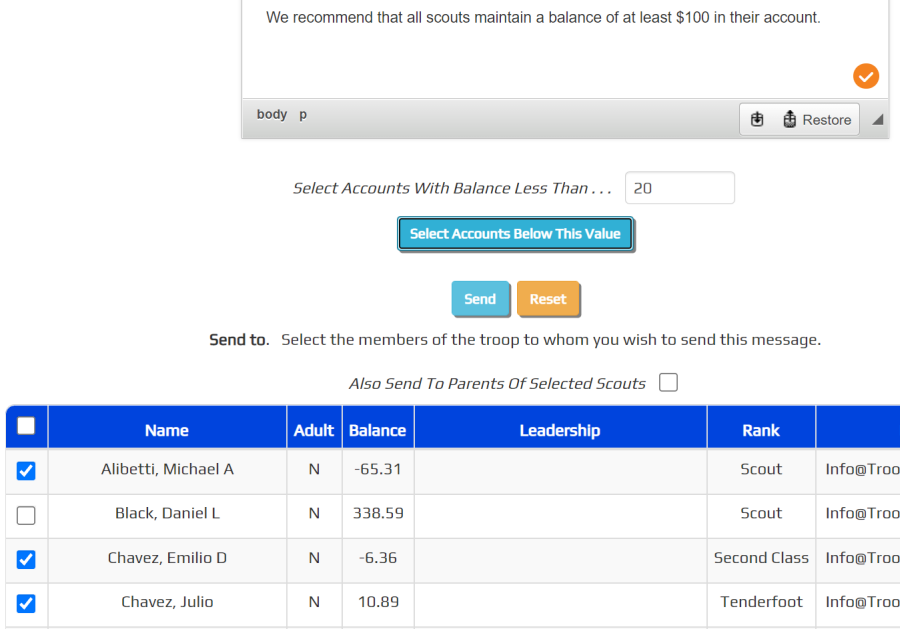
One way to do this is to put a checkmark next to each member to whom you wish to send this message.
But it may be much faster to use the Select Accounts Below This Value button to automatically put a checkmark next to each account with a value less than what you entered in the Select Accounts With Balance Less Than... field. This will de-select anyone with a balance greater than or equal to the amount entered.
Or, if you want to send it to everyone, put a check in the checkbox in the heading row, as shown below. That will select all members. If you click a second time, it will un-select all members.
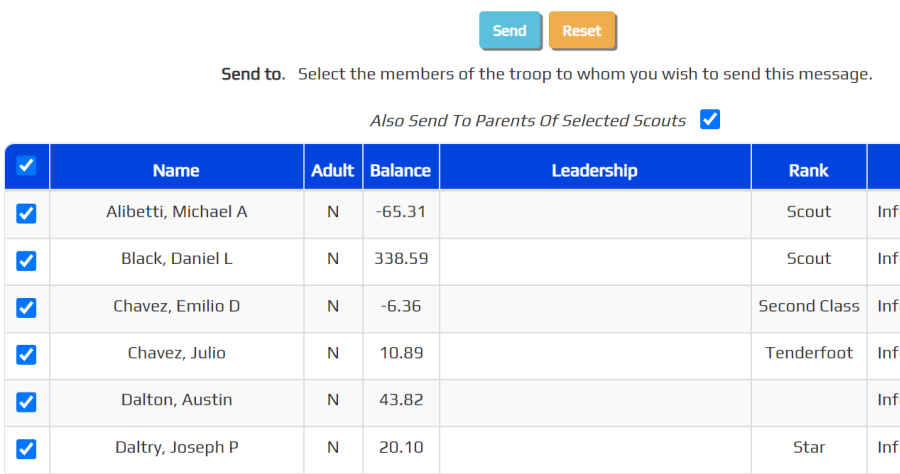
Put a checkmark next to Also Send To Parents Of Selected Scouts to add the parents.
Then scroll to the bottom of the page and click the Send button to send this message to all selected troop members.
The message will appear like this:
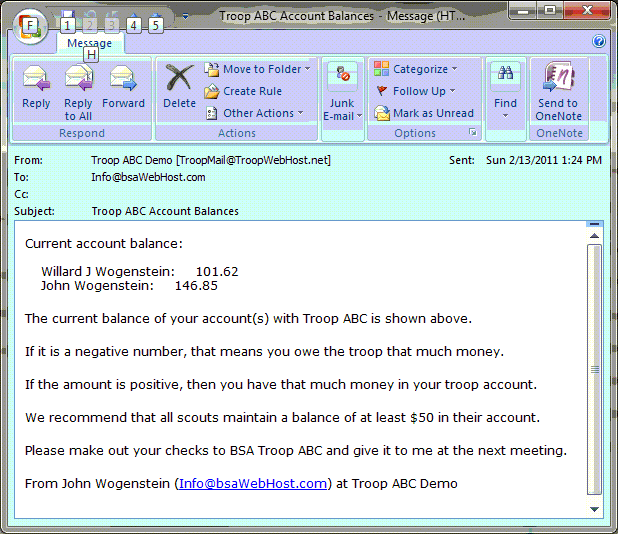
As shown above, parents will see their own account balance and the balances of each of their scouts.
The parent will always see the balances for all of their scouts, even if you used the Also Send To Parents Of Selected Scouts option.
Personal Subaccount Balances
Please go to Money → Account Balances → Personal Subaccount Balances to view the Personal Subaccount balances for each active member of your unit.
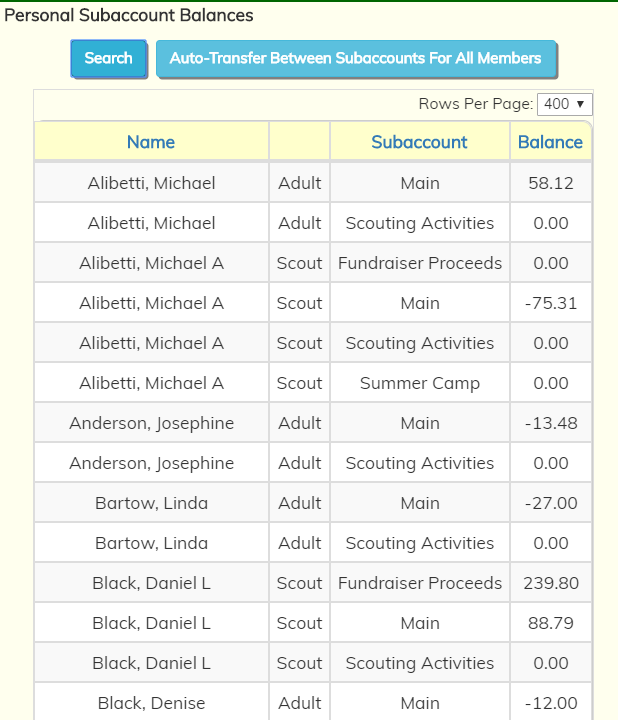
If you have defined at least one Personal Subaccount Transfer Rule, the system will display a button Auto-Transfer Between Subaccounts For All Members. This will generate transactions based on those rules, which will attempt to clear negative balances in selected subaccounts.
Troop Account Balances
Go to Money → Account Balances → Troop Accounts to view the current balances for each troop account.
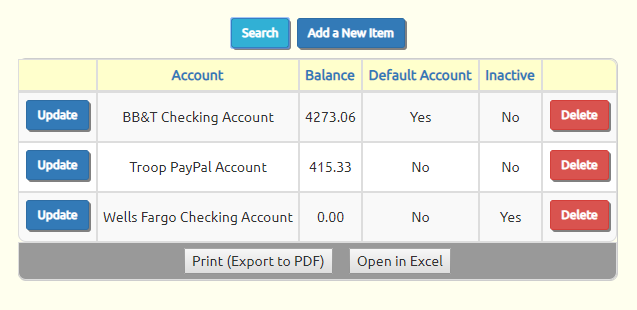
Use the Search button to filter this list. You can also click on any column heading to sort the list using that column.
Click Update to view the transaction history for an account. This will display a page like the one shown below.
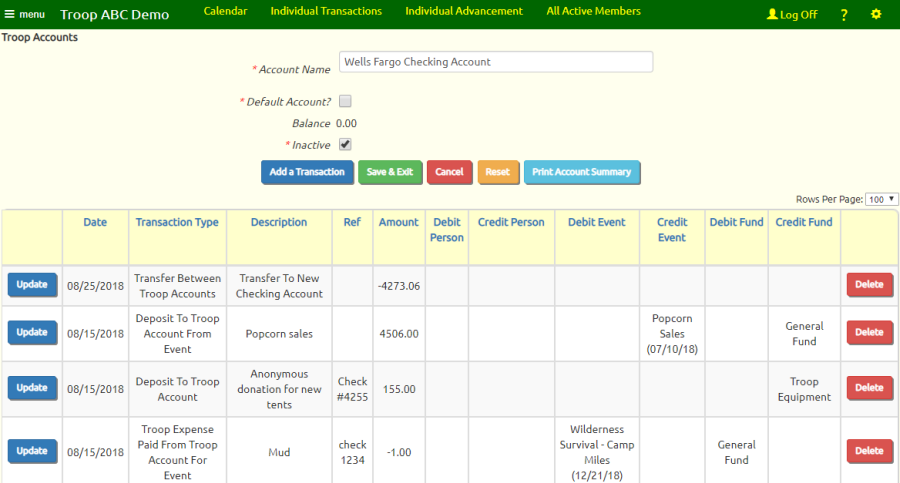
The current balance for this account is shown at the top of the page, followed by a summary of all transactions that affected this account.
Notice that you can update or delete transactions from this list. You can also add new transactions by clicking Add a New Item.
You can also produce a PDF report of this same information by clicking on Print Account Summary. That report will look like this:

Event Balances
Go to Money → Account Balances → Event Balances to view the current balances for all events for which the event type allows monetary transactions.
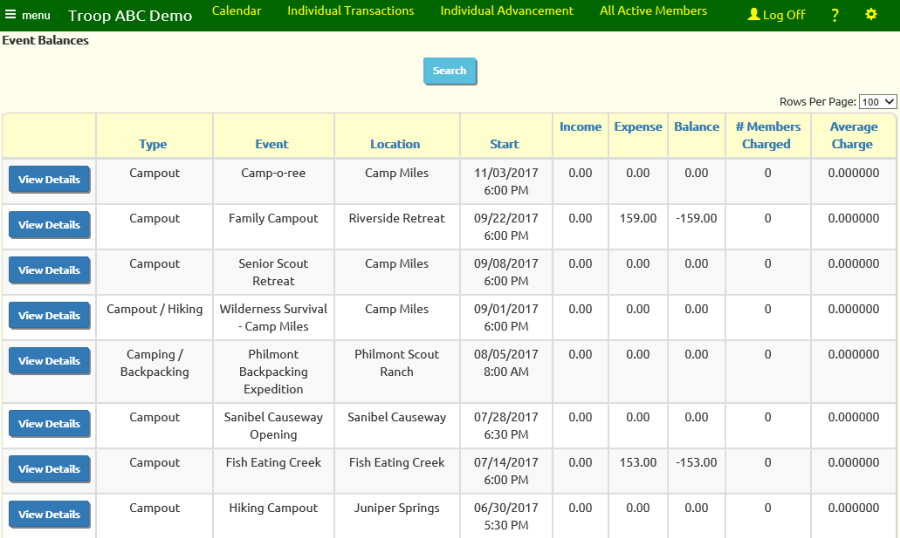
Use the Query button to filter this list. You can also click on any column heading to sort the list using that column.
Click View Details to view the transactions for this event. This will display a page like the one shown below.

The total income, expense and balance for this event are shown at the top, followed by a list of all transactions that were posted to this event.
If you are authorized to maintain financial information, you will see these buttons:
- Add Transaction will allow you to add one or more individual transactions, which may be related to this event (but do not have to be related).
- Add Group Transaction To Charge Participants will allow you to enter a group transaction, with the event participants to be charged pre-selected.
- Add Group Transaction To Credit Participants will allow you to enter a group transaction, with the event participants to be credited pre-selected.
- Update will allow you to update the selected transaction.
- Delete will allow you to delete the selected transaction.
Click the Exit button to return to the previous screen.
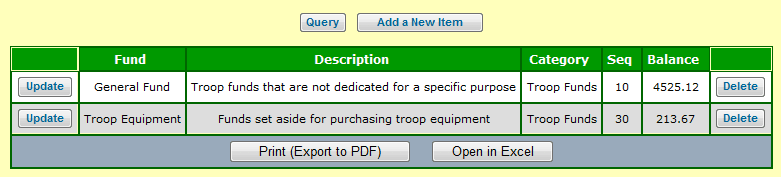
Fund Balances
If you are using the optional fund accounting feature, you can view your fund balances by going to Site Configuration → Money → Funds.
Click the Update button to view the details for a given fund.
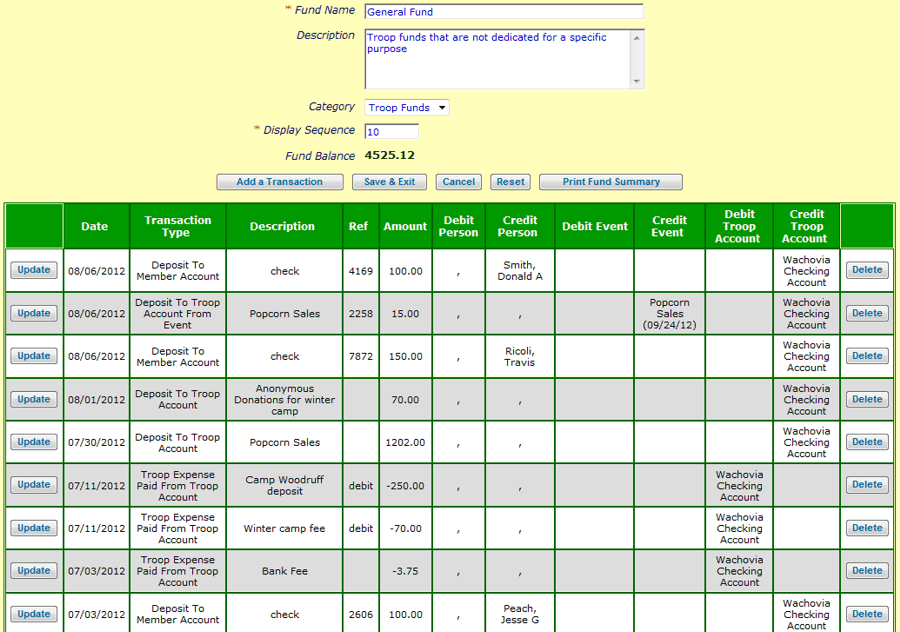
The current balance for this fund is shown at the top of the page, followed by a summary of all transactions that affected this fund.
Notice that you can update or delete transactions from this list. You can also add new transactions by clicking Add a Transaction.
You can also produce a PDF report of this same information by clicking on Print Fund Summary. That report will look like this:
![]()
Accepting On-LIne Payments
TroopWebHost allows you to configure your site to accept on-line payments from scouts and their parents. Your members can initiate these payments from the On-Line Payments page. Once they complete a payment it will be automatically posted to their account.
TroopWebHost currently supports two on-line payment vendors:
- Square™ allows you to accept on-line payments via ACH, credit and debit cards.
- PayPal™ allows you to accept on-line payments from PayPal accounts as well as via credit and debit cards.
If you like, you can offer both options to your users, and let them decide which they prefer. Or you can keep it simple and just choose whichever vendor you are most comfortable with.
You will need to set up an account with each vendor before you can accept payments using their service. This will be done on that vendor's website, and will involve providing them the bank routing information for your troop's checking account where you plan to deposit the funds.
The benefits of using Square include:
- Easy initial set up
- Fast, convenient payment process for your users
- All payments are automatically transferred to your troop's checking account within 2 business days
- Option of accepting ACH bank transfers, which have a significantly lower fee for large payments
- Accept in person payments to member accounts using the Payment Collector
The benefits of using PayPal include:
- Option to make payments directly from a user's PayPal account
- Lower processing fee if you can provide documentation to PayPal of your charter organization's 501(c)(3) status
- Payer receives an email receipt from PayPal after each payment
Setting up your site to use PayPal is a bit more complicated than Square, but we will walk you through the process in the next few pages.
Square is a bit easier to configure, which you can learn about here.
Accepting Payments On-Line With PayPal™
 TroopWebHost makes it easy for your troop to accept payments from troop members on-line using PayPal™.
Some important facts before you get started:
- Your troop must have a PayPal™ business account (there is currently no charge for this).
- Troop members do NOT need to have a PayPal™ account to use this function.
- PayPal™ will deduct their usual fees from most payments.
- TroopWebHost does not receive any portion of those fees.
- TroopWebHost is not involved in the actual transfer of funds.
When a troop member wants to make a payment to the troop using PayPal, they begin by selecting On-Line Payments from the My Stuff menu. This allows them to indicate the amount of the payment and the account to which it should be deposited.
The system then takes them to the PayPal™ website to make the payment.
When the payment is approved, we receive notification from PayPal™ and a transaction is created to post the deposit to the member's account. The deposit is also posted to your troop account.
To set up your troop to accept PayPal™ payments, you will need to:
- Set up a business account at PayPal, if your troop does not already have one.
- Log on to your troop's account at the PayPal website. From there you will need to:
- Find and copy your PayPal Merchant ID.
- Find the current balance of your PayPal™ account.
- Set the IPN Listener URL to point to TroopWebHost.
- Create a Troop Account for your troop's PayPal™ account and set the starting balance.
- If desired, create a Transaction Type specifically for PayPal™ deposits.
- Fill out the PayPal Configuration form.
- Assign the Make On-Line Payment task to all User Roles
Your treasurer can receive an e-mail whenever a PayPal™ transaction is processed.
Authorized users can view recent PayPal™ transactions and see the status changes on each.
The next few pages will show you how to set up your troop to use PayPal™.
Finding Your PayPal™ Merchant ID
If your troop wants to accept payments on-line, you will first need to set up a business account at PayPal™, by going to their web site at www.PayPal.com
If your charter organization qualifies as a 501(c)(3) tax exempt organization, you can obtain a lower transaction rate if you provide PayPal™ with the necessary documentation.
PayPal™ will require you to identify and confirm your troop's checking account, a process that may take several days to complete.
Once you have a business account, the next step is to identify your PayPal Merchant ID.
 While you are logged on to the PayPal™ web site,
click on the cog icon in the upper right corner to open the Profile menu.
Then select "Account Settings" from that menu. This will open a new page.
While you are logged on to the PayPal™ web site,
click on the cog icon in the upper right corner to open the Profile menu.
Then select "Account Settings" from that menu. This will open a new page.
Click Business Information on the menu on the left to display your PayPal Merchant ID, as shown below.
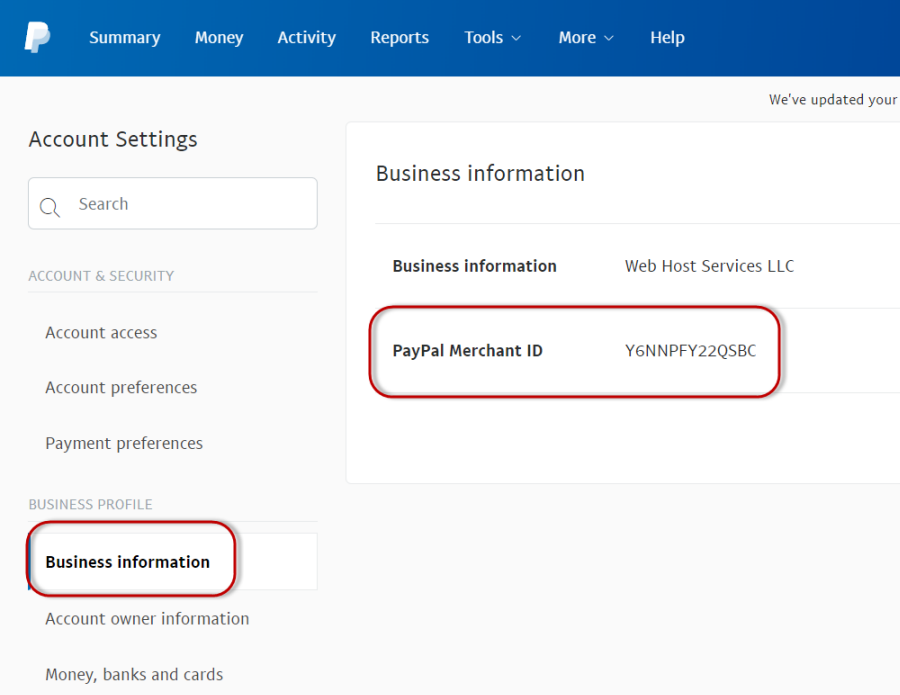
You will need to know this PayPal Merchant ID when you get to the PayPal Configuration page later on, so make a copy of this value.
You should also note the current balance of your PayPal™ account for when you set your starting balance.
PayPal™ Instant Payment Notification URL
PayPal™ offers a service called Instant Payment Notification, or IPN, which can electronically notify a payment recipient with the status of a transaction.
This service requires the recipient to have a "listener" page to which PayPal™ can send these notifications. TroopWebHost has developed a listener page that will use these notifications to update your database.
You need to tell PayPal™ where to find this page.
While you are logged on to the PayPal™ web site, click on the cog icon in the upper right corner to open the Profile menu. Then select "Account Settings" from that menu. This will open a new page.
Click Notifications on the menu on the left. When this page displays, look for "Instant payment notifications" and click the Update button on that row, as shown below.
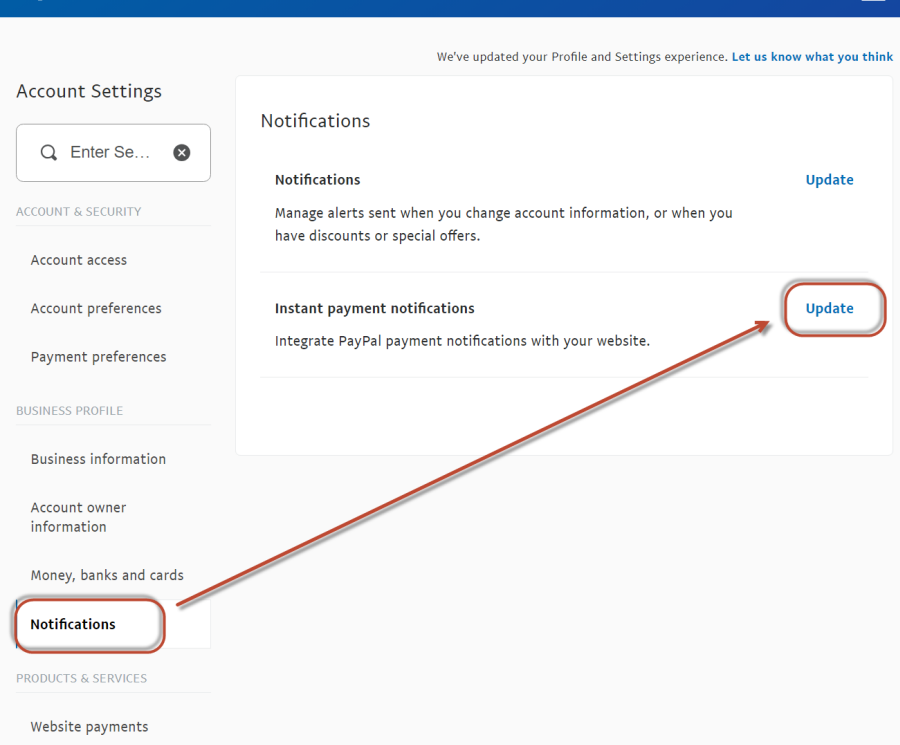
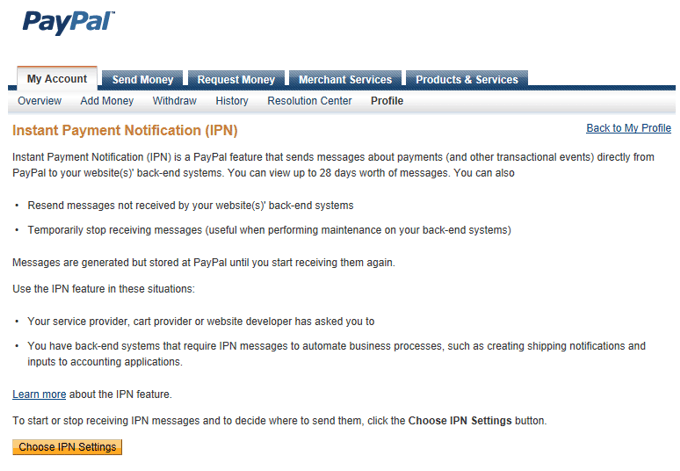
This will display the page shown at right.
Click the Choose IPN Settings button to continue.
You should then see the page shown below.
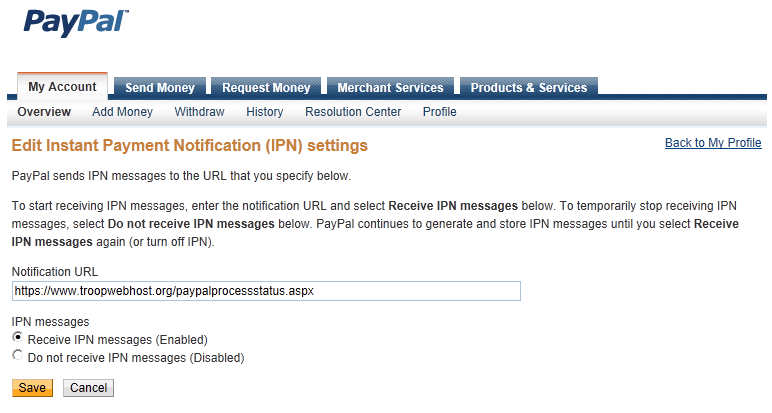
Copy the following text into the Notification URL field:
https://www.TroopWebHost.org/PaypalProcessStatus.aspx
Click on the radio button labeled Receive IPN messages (Enabled)
Then click the Save button to save your changes.
You are done with the PayPal™ part of this process.
Configuring Your Site For PayPal™
Once you've obtained your PayPal Merchant ID and set your PayPal Instant Payment Notification URL, you are ready to configure your TroopWebHost site to communicate with PayPal™.
First, set up a Troop Account to represent your PayPal™ account. This will allow you to use Statement Reconciliation to monitor the deposits and withdrawals from this account.
If your PayPal™ account currently has a non-zero balance, enter a Starting Troop Account Balance for this account from the Individual Transactions page.
You may also want to create a special Transaction Type to be used specifically for PayPal™ deposits. If you do this, we recommend the following settings:
| Transaction Type: | PayPal Deposit To Member Account |
| Deposit Date Required? | no |
| Fund Debit Required? | no |
| Fund Credit Required? | depends on whether you are using fund accounting |
| Troop Debit Required? | no |
| Troop Credit Required? | YES |
| Person Debit Required? | no |
| Person Credit Required? | YES |
| Event Debit Required? | no |
| Event Credit Required? | no |
Next, go to Money → Manage On-Line Payments → PayPal Configuration. This will display a page containing the following entries:
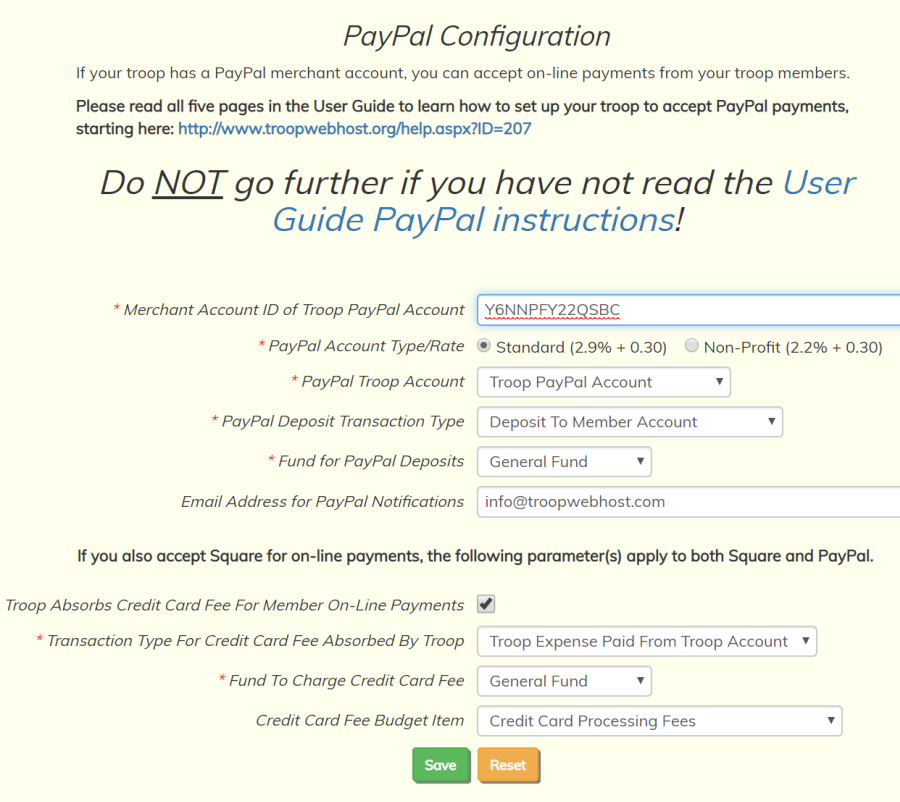
The Merchant Account ID of Troop PayPal Account is the PayPal Merchant ID that you copied from the PayPal™ site earlier.
Choose the PayPal Account Type that matches your PayPal™ account. To qualify for the non-profit rate you must provide PayPal™ with documentation of your charter organization's 501(c)(3) status. Do not select "Non-Profit" if you have not received confirmation from PayPal that you have qualified for the lower rate. Selecting "Non-Profit" on this page only affects how we calculate the PayPal fee; it cannot by itself cause you to get the lower rate.
The PayPal Troop Account is the Troop Account you just created to represent your PayPal™ account. All PayPal™ payments will be credited to this account.
The PayPal Deposit Transaction Type is the transaction type that will be assigned to all PayPal™ payments. If you created a new Transaction Type as described above, select that one here; otherwise, choose Deposit To Member Account.
The Fund for PayPal Deposits must be specified if the PayPal Deposit Transaction Type requires a fund to credit.
Email Address for PayPal Notifications should be the treasurer's e-mail address. An e-mail will be sent to this address each time a PayPal™ notification is received.
By default, the transaction fee which is charged by PayPal will be deducted from the amount deposited to the member's account. So, for example, if a member pays $100 and the PayPal fee is $3.20, only $96.80 will be deposited to the account.
Your troop may choose to absorb this fee, which may encourage more members to make on-line payments to the troop. If you check the box Troop Absorbs Credit Card Fee For Member Payments, a member who pays $100 will see $100 deposited to his account, while the troop will incur an expense of $3.20.
If you check the box Troop Absorbs Credit Card Fee For Member Payments, you will need to select a Transaction Type For Credit Card Fee Absorbed By Troop. This will be the transaction type that will be used to record the expense of the PayPal transaction fee when the troop absorbs the fee.
If the selected transaction type requires a fund to debit, you must select a fund from the drop down list for Fund To Charge Credit Card Fee. If you are using the Budget Subsystem, you should also select a budget item to expense the PayPal fee.
If your troop is also set up to use Square, then the options you select here for handling the credit card processing fee will also apply to payments made via Square.
Click Save to save your work.
Add On-Line Payments To The "My Stuff" Menu
The last step in configuring your site to work with PayPal™ or Square™ will add the On-Line Payments selection to everyone's My Stuff menu.
Go to Administration → Security Configuration → Assign Tasks To Roles to see a page like the one shown below.
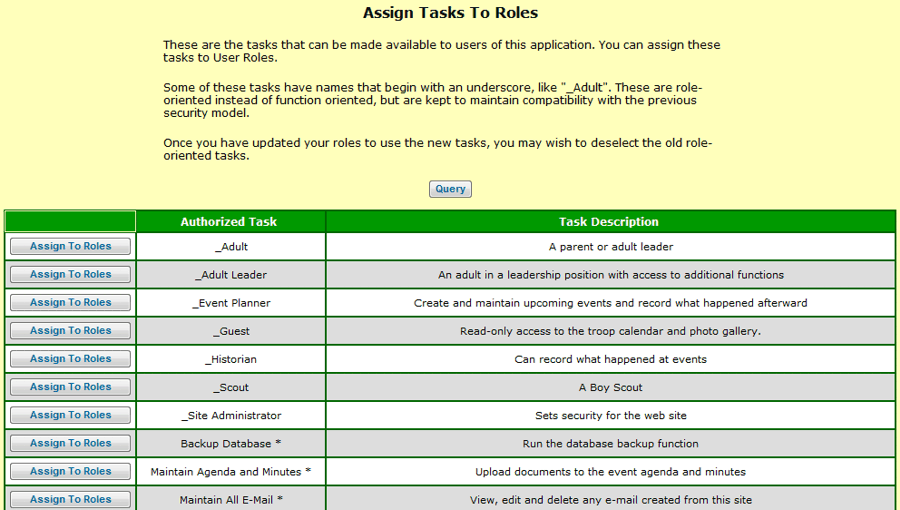
Scroll down this page until you see the entry for Make On-Line Payments. Click the button Assign To Roles to update this task, as shown below.
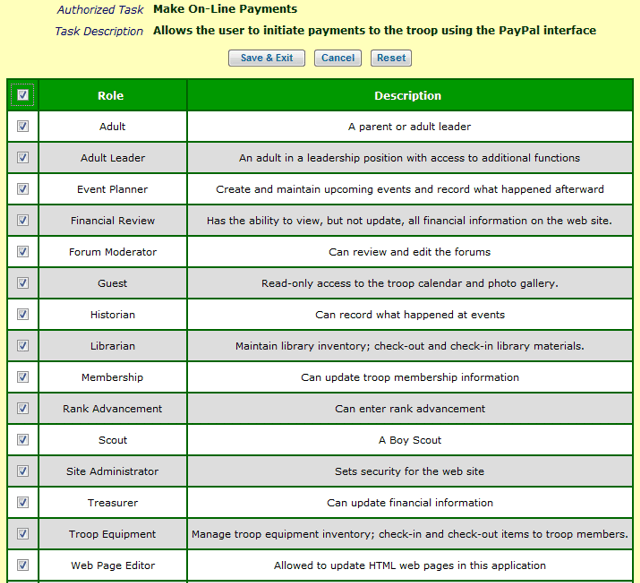
Check all of the boxes, then Save & Exit.
You should now see On-Line Payments on your My Stuff menu.
You are ready to begin using PayPal™ or Square™.
Troubleshooting PayPal Payments
When you click on the Buy Now button, why doesn't PayPal display the name of your troop?
This is an indication that you haven't entered your PayPal account number correctly on your TroopWebHost PayPal Configuration page. Go back to that page and verify that your account ID is an exact copy of the account ID from the PayPal site.
When you complete a payment on PayPal, why does the status of your payment in TroopWebHost continue to be "Initiated"?
The most likely answer is that you did not copy our PayPal notification URL into your PayPal account correctly. Review these instructions and make sure your PayPal account has this exact value for the PayPal Notification URL: https://www.TroopWebHost.org/PaypalProcessStatus.aspx
Payments should post immediately after the PayPal payment has been completed.
If your Notification URL is set correctly and payments are still not being posted to TroopWebHost, you may need to resend the Instant Payment Notification for any transactions that did not post correctly.
Log on to your account, and click on the Profile icon in the upper right corner of the page, as shown below. This will expose the Business Profile menu. Click on Profile and settings.
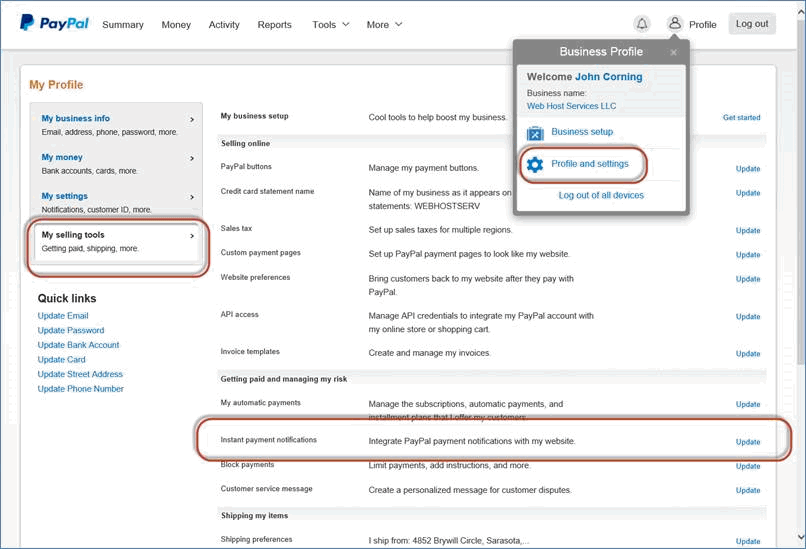
Then on the menu on the left side of the page, click on My Selling Tools. A page will then display which has a row labeled Instant Payment Notification. Click the Update link on that row to proceed.
On the next page you’ll see a link to the “IPN History page”, as circled below. Click on that link:
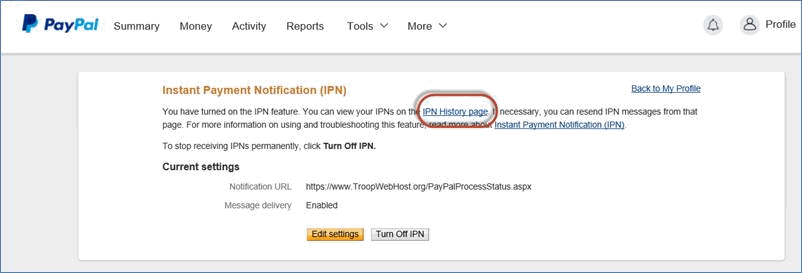
You should then see the page shown below. If necessary, use the Search tool to find your payment transaction. Then click on the checkbox by that transaction and click the “Resend Selected” button, as circled below.
This will cause the Instant Payment Notification to be retransmitted to TroopWebHost.
If the payment still shows a status of "Initiated", please open a Support Ticket. Please include specific details of the transaction which failed to post.
Accepting Payments On-Line With Square™
Square™ is much easier to set up than PayPal™ and provides a faster, easier way to accept payments. It also offers the option of performing ACH bank transfers, which have a significantly lower fee for large payments.
To configure your site to accept payments via Square, please go to Money → Manage On-Line Payments → Square Configuration.
The first time you visit this page it will look like this:
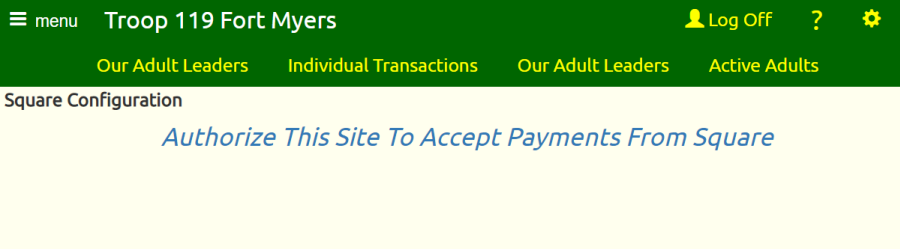
Click on the link that says "Authorize This Site To Accept Payments From Square" to begin the process.
This will take you to a page that looks like this:
If your troop already has an account with Square, you can log on to that account from here.
If you do not yet have a Square account, you can create one by clicking the "Sign Up" link.
Either way, you will eventually be asked to authorize your TroopWebHost site to accept payments on your behalf using Square. Once you give your approval, you will return to the Square Configuration page which now looks like this:
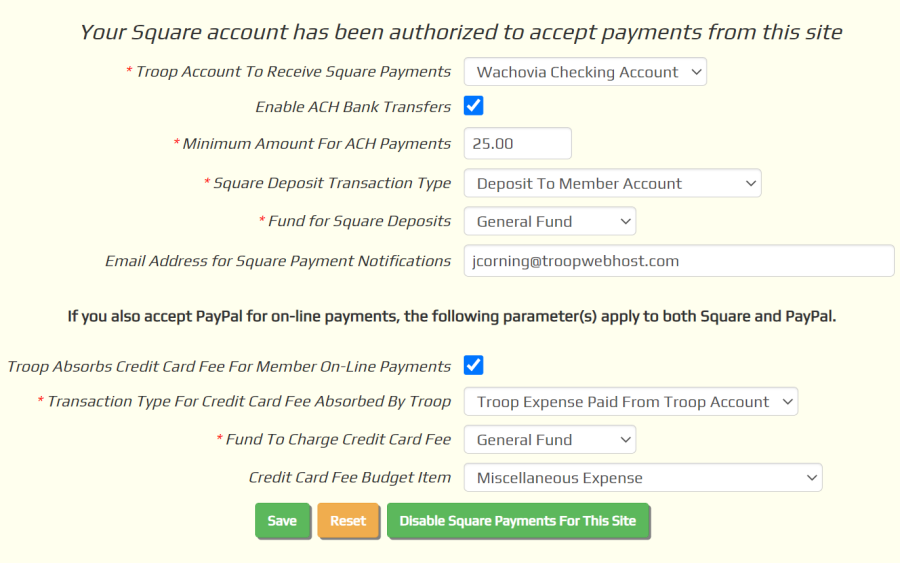
You must fill out this form before you can begin to accept Square payments on your site.
The Troop Account To Receive Square Payments should be the Troop Account that represents the bank account to which you've told Square to deposit your payments. Square will automatically transfer payments to that account on a daily basis.
Enable ACH Bank Transfers will be enabled by default. This will give your members the option of making payments to the troop directly from their bank account, which will incur a significantly lower fee than other payment options, especially for large payments. Remove the checkmark from this box if you wish to disable this option.
The Minimum Amount For ACH Payments allows you to prevent your members from making small payments with the ACH option, especially if your troop is absorbing the fee. There is a minimum $1 fee for ACH transfers, so for payments under $25 the fee will be higher than if they use a credit card.
The Square Deposit Transaction Type is the transaction type that will be assigned to Square payments to member accounts. Deposit To Member Account is a good choice, unless you want to create a transaction type specifically for Square.
The Fund for Square Deposits must be specified if the Square Deposit Transaction Type requires a fund to credit.
Email Address for Square Notifications should be the treasurer's e-mail address. An e-mail will be sent to this address each time a Square payment is completed.
By default, the transaction fee which is charged by Square will be deducted from the amount deposited to the member's account. So, for example, if a member pays $100 and the Square fee is $3.20, only $96.80 will be deposited to the account.
Your troop may choose to absorb this fee, which may encourage more members to make on-line payments to the troop. If you check the box Troop Absorbs Credit Card Fee For Member Payments, a member who pays $100 will see $100 deposited to his account, while the troop will incur an expense of $3.20.
If you check the box Troop Absorbs Credit Card Fee For Member Payments, you will need to select a Transaction Type For Credit Card Fee Absorbed By Troop. This will be the transaction type that will be used to record the expense of the Square transaction fee when the troop absorbs the fee.
If the selected transaction type requires a fund to debit, you must select a fund from the drop down list for Fund To Charge Credit Card Fee. If you are using the Budget Subsystem, you should also select a budget item to expense the credit card fee.
If your troop is also set up to use PayPal, then the options you select here for handling the credit card processing fee will also apply to payments made via PayPal.
Click Save to save your work. Do this even if you've selected all of the default values, to ensure that these values are saved to your site.
Once you've completed this page, you should then authorize your users to access the On-Line Payments function, unless you've already done this for PayPal.
Configure the Payment Collector
The Payment Collector is a special module within TroopWebHost that allows your Treasurer to quickly collect money from members at meetings. It is optimized for touch sensitive screens on smart phones and tablets. It allows you to accept cash and checks, as well as credit card payments if you have configured your site to use Square.
Before you can use the Payment Collector, you'll need to do two things:
- Complete the Payment Collector configuration page described below
- If you wish to accept credit card payments, configure your site to use Square
To complete the first step, please go to Site Configuration → Money → Payment Collector.
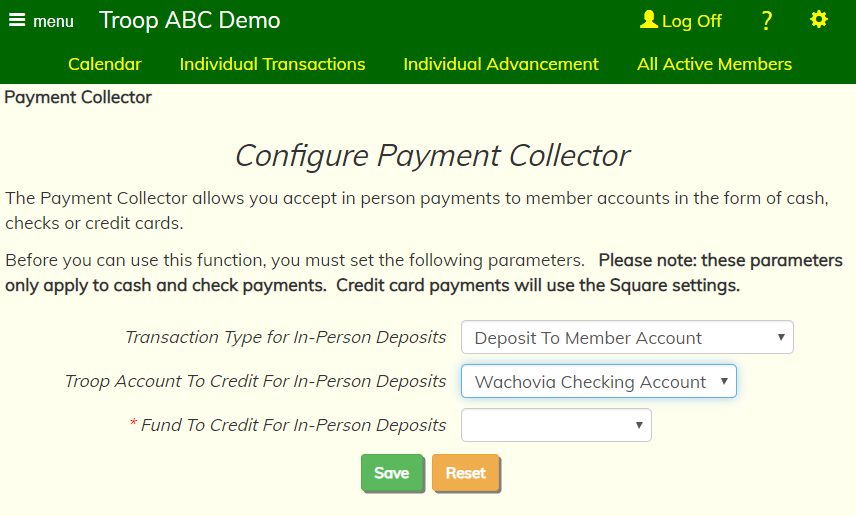
The parameters on this page only affect cash and check payments. Credit card payments will use the Square configuration settings.
Choose the Transaction Type for In-Person Deposits that the system should use for each cash or check deposit transaction that will be generated by the Payment Collector.
Choose the Group Account To Credit For In-Person Deposits that represents the bank account where you will be depositing cash and checks received from members.
If the transaction type you selected requires a fund, you will also be prompted for the fund to be used on these transactions.
Click Save to save your settings.
Using the Payment Collector
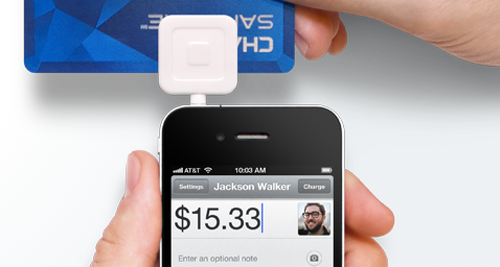 Your treasurer will love the Payment Collector!
It makes collecting money at meetings so much easier.
Your treasurer will love the Payment Collector!
It makes collecting money at meetings so much easier.
All you need is an Internet-connected smartphone or tablet.
If you want to accept credit and debit card payments, you will also need to:
- Install the free Square POS app on your Android or iOS device
- Obtain a free credit card reader from Square
You'll also need to complete the Payment Collector Configuration and the Square Configuration pages.
To begin collecting payments, please go to Money → Payment Collector. This will pop open a new browser tab without the standard headings and menus.
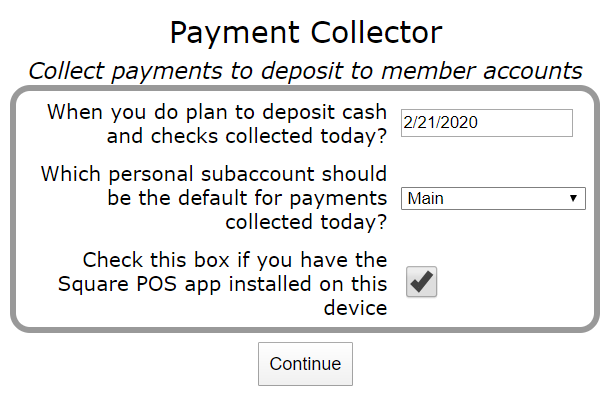
Every time you start the Payment Collector, you'll be asked:
- The date you plan to deposit the cash and checks you are collecting today. This will usually default to tomorrow's date, except on Saturday when it will default to the following Monday.
- The default subaccount for payments collected today. This will usually be "Main", unless you expect to collect a number of payments for summer camp or Philmont.
- Whether you have the Square POS app and a Square credit card reader installed on this device.
Make the appropriate choices, then tap Continue. You're ready to accept your first payment!
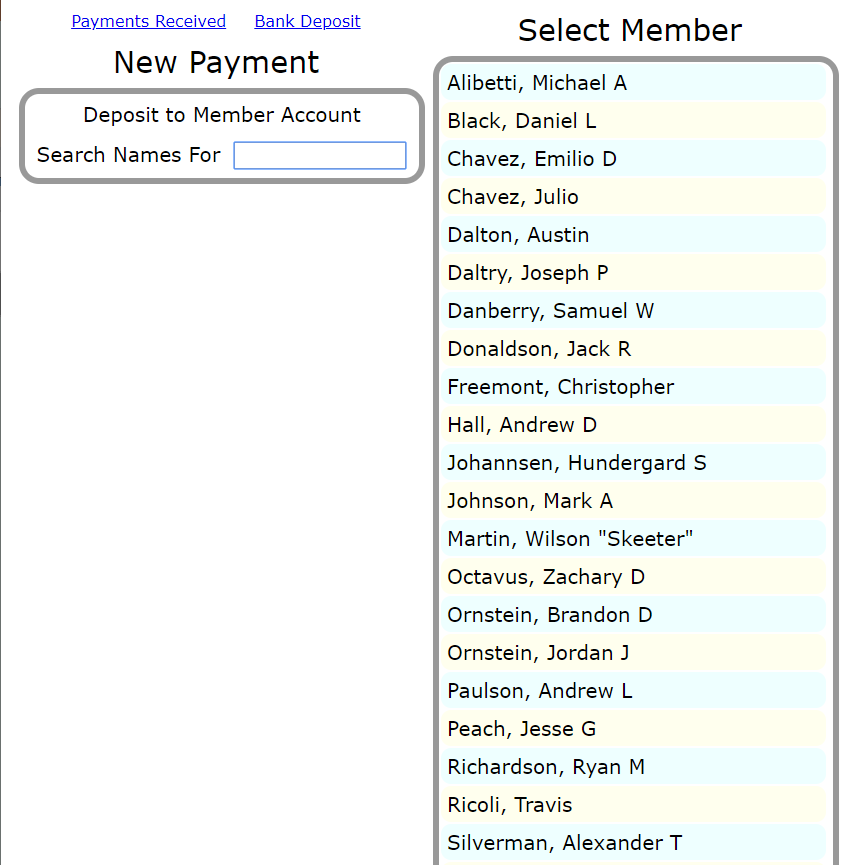
Tap on the name of the person to whose account this payment will be deposited.
If you don't see it on the list, type a few letters from any part of their name - first name, last name, whatever - into the Search box.
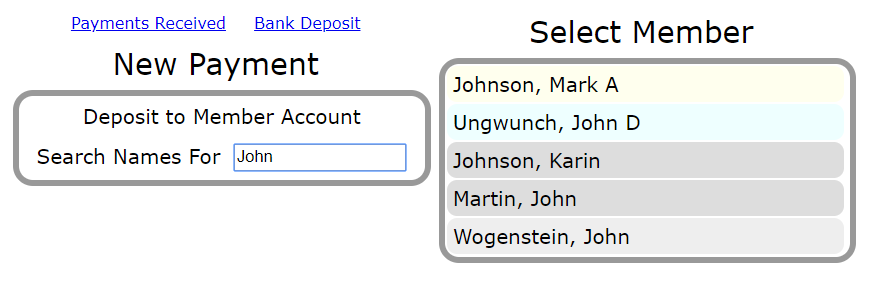
The list will shrink with every letter you enter, only showing those names that contain that series of letters.
Tap on the name to select it.
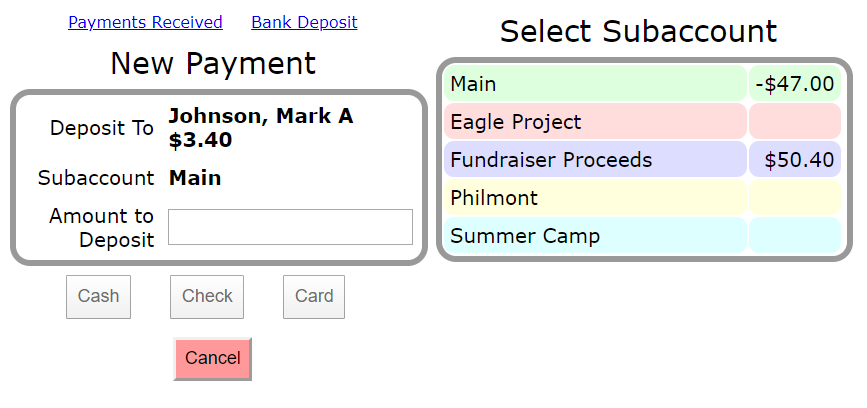
The system displays the selected name along with their current balance.
Subaccounts now appear on the right, with the selected member's balance shown in each subaccount.
If you wish to select a different subaccount for this deposit, tap on that subaccount name. In the example below, we tapped on "Philmont".
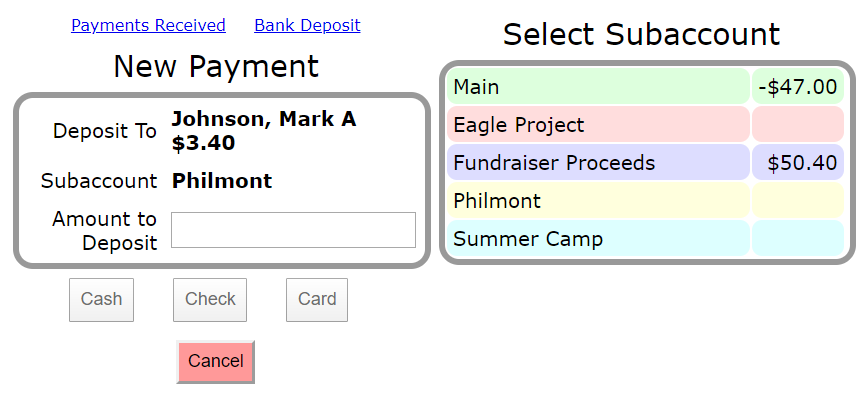
Enter the amount of the payment.
Tap on the button for the type of payment: cash, check, or credit card.
If you select Cash...
Tap Submit Payment to complete the payment...unless you need to make change. Click on one of the values below "Cash Payment", or manually enter the amount received into the Cash Received field. The system will display the correct Change. Tap Submit Payment when you're ready to move on.
If you select Check...
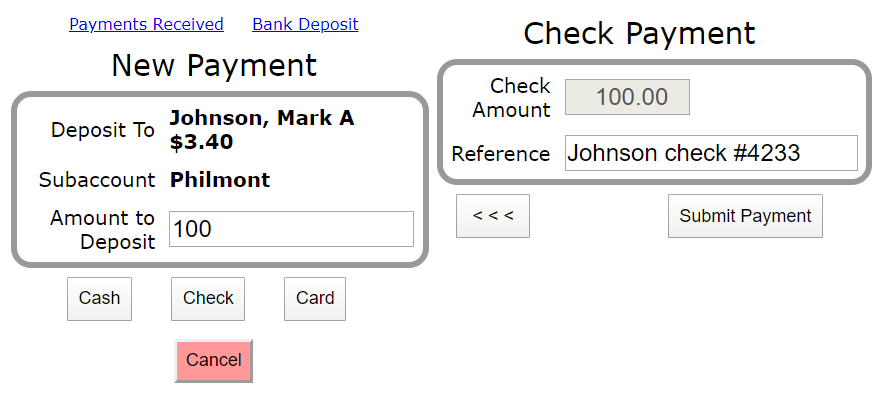
Enter the check number and any other useful information into the Reference field. This will be saved in the Reference field of the monetary transaction that will be generated for this payment. It is not required.
Tap Submit Payment to complete this payment.
If you select card...the Square POS app will load. It may take a few seconds to detect the card reader.
If your troop does not absorb the credit card fee for on-line payments, the amount shown in the Square POS app will be higher than the amount that you entered in Payment Collector, since it includes the estimated fee.
Scan the credit card in the Square reader. It may take a few tries to get it right.
Ask the cardholder for their signature, then tap Done.
Tap No Thanks to continue without a receipt. Square will display one last confirmation page, then return you to the Payment Collector.
Summary Pages
Did you notice the two links at the top of every Payment Collector page?
Tap Payments Received to see all of the payments collected with the current Deposit Date.
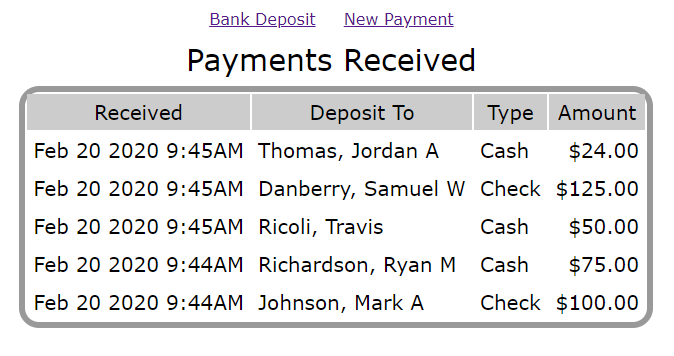
Tap Bank Deposit for the information you'll need to fill out your deposit slip.
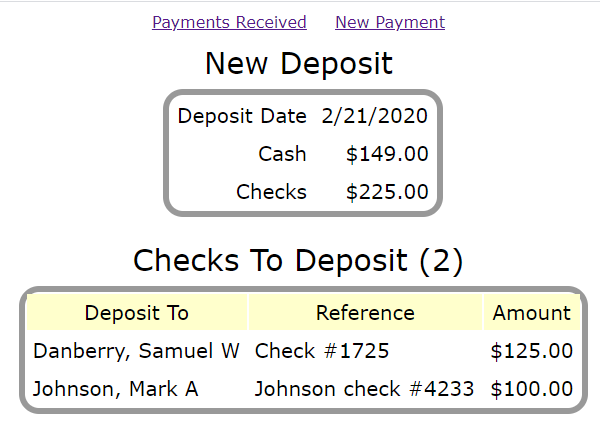
There is no need to enter any monetary transactions when you make your deposit. All of the transactions are already there, one for each payment.
Configure Expense Reimbursements
You can configure your site to allow members to submit requests for reimbursement of expenses incurred on behalf of the troop. Once you've set this up, members will be able to use the Request Expense Reimbursement page on the My Stuff menu to enter their request and view the status of prior requests.
Your treasurer will receive e-mail notification of new requests and will be able to approve or reject pending requests. When a request is approved, the system automatically generates a monetary transaction for the reimbursement.
To set this up, go to Site Configuration → Money → Expense Reimbursements.
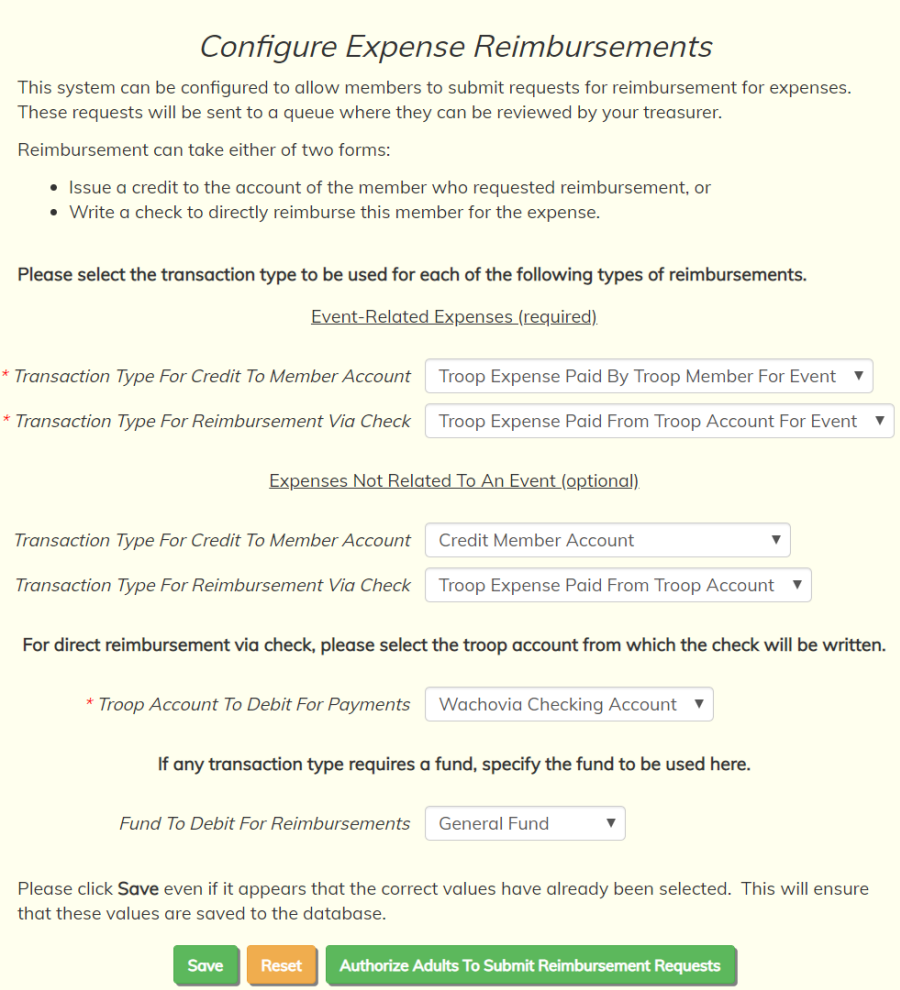
When a member submits a request, they can choose either to
- Have their account (or the account of a family member) credited for the expense, or
- Receive direct payment from the troop for the expense.
The first set of fields on the configuration page shown above let you set the transaction type that will be used for these two situations:
- Transaction Type For Credit To Member Account will be the transaction type used when you apply a credit to their individual account
- Transaction Type For Reimbursement Via Check will be the transaction type when you pay the member directly for the expense, typically by writing them a check.
You must specify both of these transaction types for expenses related to events. If you want to allow members to request reimbursement for expenses that are not related to events, you must specify both transaction types for those expenses as well.
Troop Account To Debit For Payments selects the troop account from which the reimbursement checks will be written.
Fund To Debit For Reimbursements will be used by either type of transaction, if the transaction type requires a fund.
Click Save to save these selections.
Security Settings To Implement This Process
The ability to request expense reimbursements was not enabled for most users when your site was created. You must update your security settings to make it available.
This can be done by authorizing one or more User Roles for the "Submit Expense Reimbursement Requests" task.
You can do this for the Adult user role by clicking Authorize Adults To Submit Reimbursement Requests on the page shown above.
Review Requests For Expense Reimbursement
Once you've configured your site to allow members to submit requests for expense reimbursements, those members may begin submitting such requests.
You will be notified of such requests via e-mail messages like the one shown below.
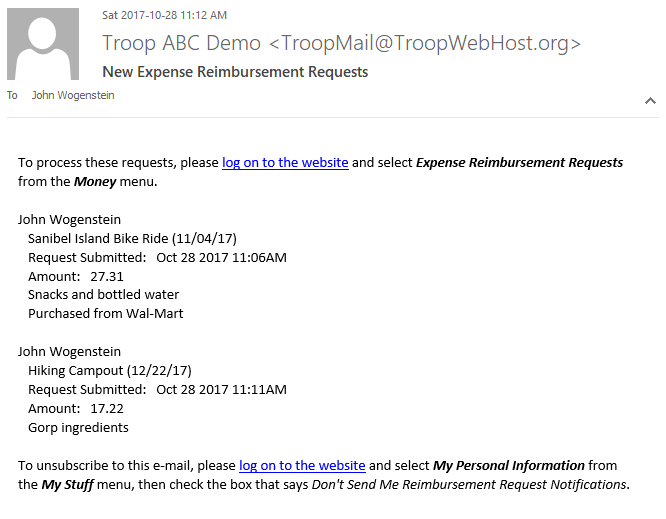
These messages will be sent to all users in your troop with the "Treasurer" user role, or who have user roles that are authorized for "Maintain Financial Information" or "Review Expense Reimbursement Requests". If you do not wish to receive these messages, please log on to the site and go to My Stuff → My Personal Information and check the box Don't Send Me Reimbursement Request Notifications.
To process these requests, go to Money → Expense Reimbursement Requests.
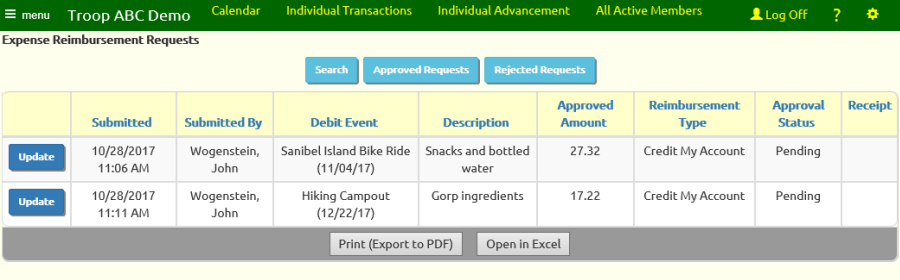
This page lists all pending requests. If you wish to see those requests that you previously approved, click the Approved Requests button at the top of the page. To see requests that have been rejected, click Rejected Requests.
Click Update next to a pending request to approve or reject it.
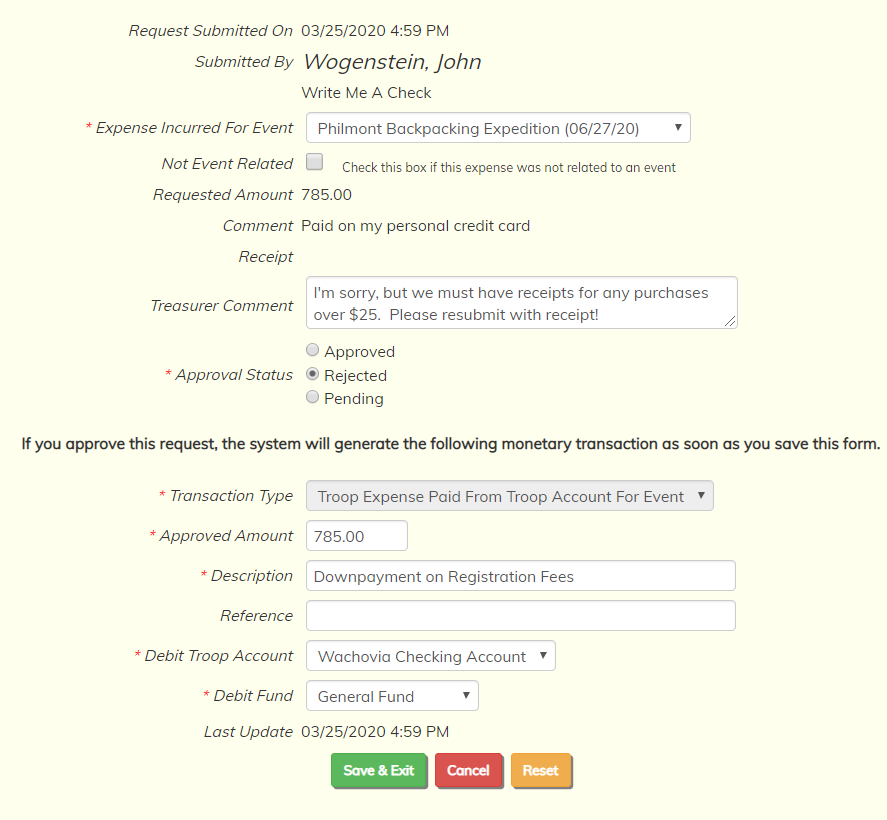
This page shows all of the information from the original request.
Click on the Approved radio button to approve the request. This will automatically generate a monetary transaction with the attributes shown in the lower half of this page. You can modify some of these values as needed before you approve it.
Click on the Rejected radio button to reject this request. You should also enter an explanation into the Treasurer Comment field, which the requestor will be able to see.
If you approve the request, you should verify the Approved Amount and make sure the Description is what you'd like to see on the monetary transaction.
If you issued a payment, you should enter the check number in the Reference field.
If the transaction type requires a fund, you will need to select the appropriate fund from the drop down list.
For expenses not linked to an event, you may be asked to select an expense budget item.
Click Save & Exit to update this request and generate the transaction if you approved it.
Personal Subaccount Transfer Rules
If your unit uses Personal Subaccounts to track fundraiser proceeds that were credited to individual scouts, then you are probably charging those subaccounts for participating in troop events. This can cause some subaccounts to go negative, requiring that you transfer funds from the scout's "Main" personal subaccount.
Similarly, if you created reserve subaccounts for summer camp or Philmont, you can run into the same situation when you charge those subaccounts for that event. Some subaccounts may go negative, requiring a transfer from the fundraiser subaccount or "Main" subaccount.
Rather than do this manually, you can set up Personal Subaccount Transfer Rules to define how these transfers should be performed. You can then push a button to apply these rules to all members, or to one specific member.
Please go Site Configuration → Money → Personal Subaccount Transfer Rules and click Add a New Item to begin adding a rule.
![]()
The Order of Evaluation determines the order in which this rule will be applied, relative to the other rules. The lowest number goes first. The numbers do not have to be sequential. We recommend that you leave room between the numbers, so the first might be 100, followed by 200, etc.
The From Subaccount is the subaccount that will be debited for this transfer.
The To Subaccount will be credited by the transfer transaction that is generated. A transfer transaction will only be generated when this subaccount has a negative balance. The goal of this process is to clear out this negative balance and return it to zero.
Normally, the transfer will be limited to the amount of money in the FROM account. So if the balance in the FROM account is $10, the system won't transfer more than $10 from that account, regardless of how much is needed in the TO account.
However, if you enable the option Reduce Debt To Zero Regardless of FROM Account Balance, the system will bypass this limit and transfer as much as is needed to get the TO account balance to zero. This could cause the FROM account to go negative.
The Transaction Type For Transfer is the transaction type that will be assigned to all transactions generated by this rule. You are only allowed to select transaction types that debit and credit member accounts, and have no effect on other accounts (with the exception of funds.)
The Transaction Description will be written to all transactions generated by this rule.
The system will also prompt you for funds if the selected transaction type requires funds.
Click Save & Exit to save your rule.
![]()
Once you've added at least one rule, you will see a button Apply Transfer Rules To All Members. Press this button to run a procedure that will generate transactions based on the rules you've defined.
There is a similar button on the Personal Subaccount Balances page.
You can apply the rules just for one particular person by going to Money → Account Balances → Individual Accounts and clicking View Details for that individual. If you have at least one rule defined, the detail page will have a button Auto-Transfer Between Subaccounts that will run this procedure just for this individual.
Reconciling Your Bank Statement
 By the time your bank statement arrives each month,
you should have already entered all of the transactions reflected on that statement into your system.
By the time your bank statement arrives each month,
you should have already entered all of the transactions reflected on that statement into your system.
All you have to do is check off the items that appear on the statement.
To begin, go to Money → Statement Reconciliation.
This will take you to a page like the one shown below.
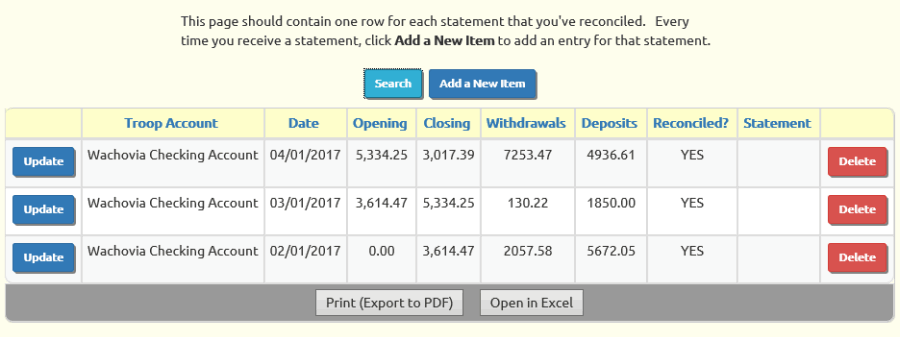
Click Add a New Item to enter the information for your latest bank statement.
You should add a new record for each new statement.
Do NOT use the same record for more than one statement.
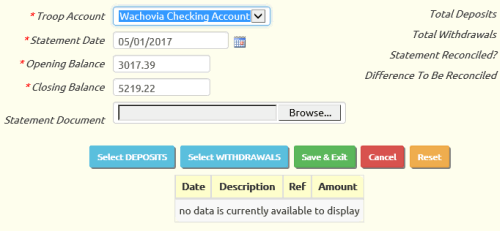
Enter Statement Totals
Find the following information on your bank statement and enter it into this screen:
- Statement Date. This is usually the last day of the month which this statement covers.
- Opening Balance. Your account balance at the beginning of the month.
- Closing Balance. You account balance at the end of the month.
Click Select Deposits to continue to the next step.
Check Off Deposits
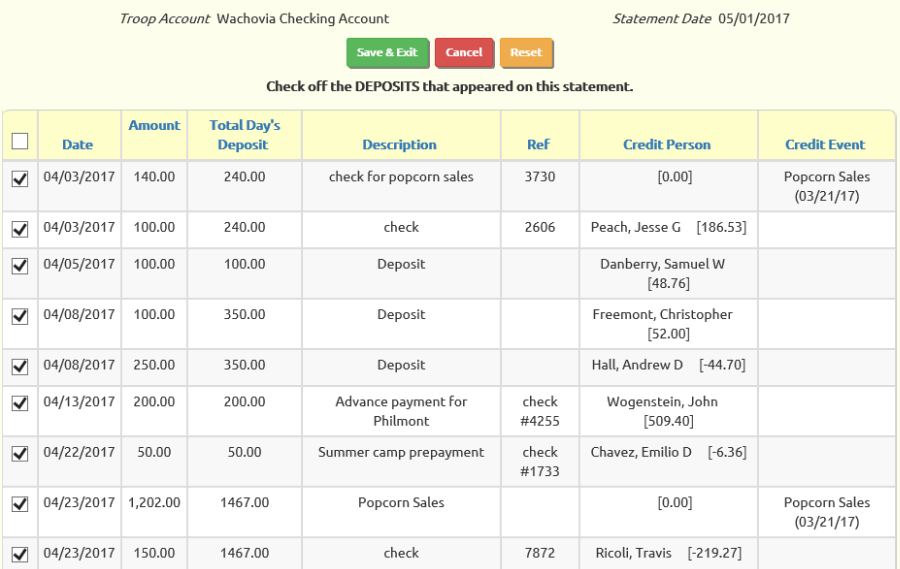
This screen shows you all of the deposits to this troop account that have not previously been reconciled.
Check off the items that appear on your current statement by clicking in the box next to that item.
Note that the Total Day's Deposit column shows the sum of all deposits you made that day. This makes it easy to find all of the individual transactions that made up that deposit.
You may find it helpful to write in a checkmark on your bank statement as you do this, to keep track of the items that you have reconciled.
When you are done, you should have checked off all the items on your bank statement. If that is not the case, you need to determine why it is missing.
It is possible that you accidentally entered this transaction to a different account. Or you may never have entered it at all.
You can leave this screen by clicking the Save & Exit button and return after you've entered or corrected the necessary transactions.
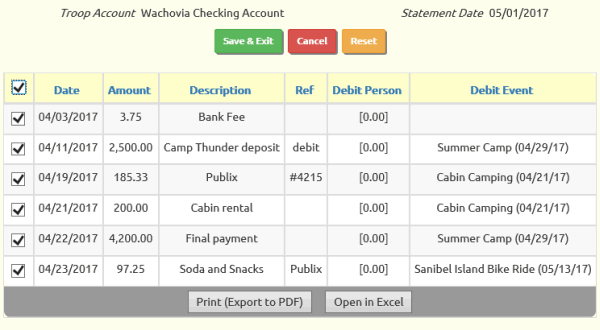
Check Off Withdrawals
From the first screen, click Select Withdrawals to reconcile checks and debit card transactions.
This screen shows you all withdrawals from this troop account that have not previously been reconciled.
Just like on the deposits page, check off the items that appear on your current statement by clicking in the box next to that item.
And the same way you did with deposits, you may want to put marks on your bank statement to keep track of the items that you have reconciled.
Any missing items will have to be researched and corrected before you are done.
Click Save & Exit to return to the main screen.
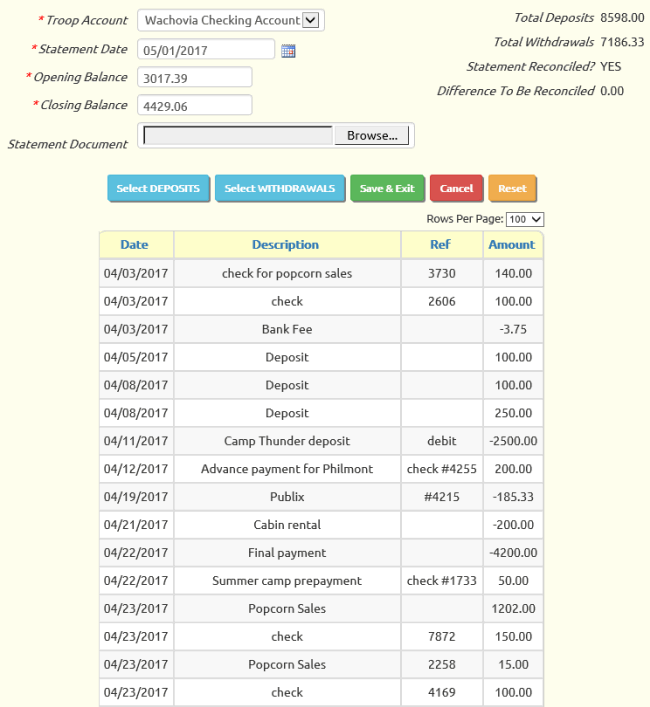
Statement Reconciled
If you see Statement Reconciled? YES
as shown at left, then you've completed the reconciliation process.
Congratulations!
As your reward, next month you get to do it all over again!
Accounting For Deposits
There are three types of deposits:
- Deposit to a Member Account
- Deposit to a Troop Account
- Deposit to a Troop Account from a Fundraiser
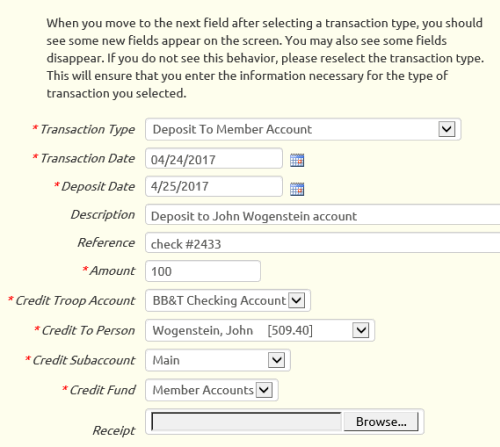 Deposit To Member Account
The example on the left shows a "Deposit To Member Account" transaction.
This is how you should handle any funds received from a troop member, regardless of whether the purpose is to pay for past expenses or to add to their account to cover future expenses.
The Transaction Date is the date you received this payment from the troop member.
The Deposit Date is when you expect to deposit this payment in your troop bank account.
The Description should indicate the name of the person as a cross-check for the Credit To Person selection.
Reference is a good place to enter the check number.
Amount is the amount of the deposit.
Credit Troop Account should be set to the bank account to which you plan to deposit this payment.
This payment will also credit this member's account, which you select under Credit To Person.
Credit Subaccount will default to the default personal subaccount.
If you are doing fund accounting, you should also select the Credit Fund whose balance will be increased by the amount of this deposit.
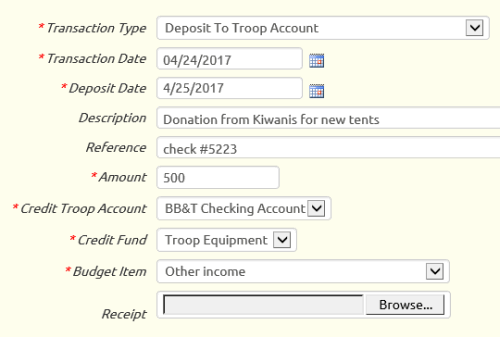
Deposit To Troop Account
Sometimes your troop will receive funds from an outside source, like a donation.
When these funds are deposited, they should only credit the troop account, not any individual members.
As shown at right, use a "Deposit To Troop Account" transaction to record this deposit.
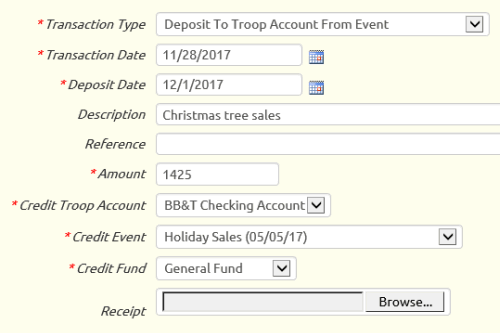
Deposit To Troop Account From Fundraiser
When you receive funds from a fundraiser, those deposits should be posted both to your troop checking account and to the fundraising event.
Use the "Deposit To Troop Account From Event" transaction type to record this deposit, as shown at left.
Deposits For Summer Camp
Summer camp and special outings like Philmont can be very expensive. Many troops try to collect money in advance for the scouts who are planning to attend these events.
Installment Charges
One approach is to charge the attendees in installments in the months leading up to the event, e.g. charge $100 in January, another $100 in February, etc.
You can charge the first installment automatically by configuring the event to charge participants when they sign up. After that, each installment can be charged by manually creating a group transaction. This can be done from the calendar detail page for that event by clicking the Add Group Transaction To Charge Participants button. This will create a group transaction with all of the participants pre-selected.
With this approach, you might want to set the sign-up deadline for the event to the date on which you plan to charge the second installment. That will lock in the sign-up list so you won't have to make adjustments later on.
Reserve Accounts
Another approach is to create a personal subaccount to set aside payments that are intended for summer camp. This creates a "reserve account" for each member of your troop, where they can accumulate money for this specific purpose.
This is what this personal subaccount would look like, when you add it from Site Configuration → Money → Personal Subaccounts.
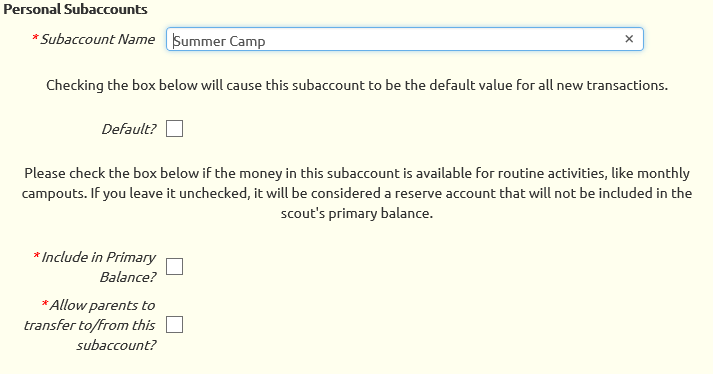
Do not create personal subaccounts for a specific event. I.e., do not create a "Summer Camp 2024" personal subaccount. Instead, use a generic name, like "Summer Camp" or "High Adventure", so the same subaccount can be used year after year. This feature will be easier to use if you keep the total number of subaccounts to just a handful.
In the above example, please note that the Include in Primary Balance option is not selected. This means that deposits to this subaccount will not be reflected in the scout's primary balance, which can be displayed on the event participant list for most events. You should never check this box when creating a reserve account.
Once this personal subaccount has been defined, you can reference it when you deposit money into a member account. This can be considered a reserve account for this individual.
This is what a deposit to this personal subaccount would look like:
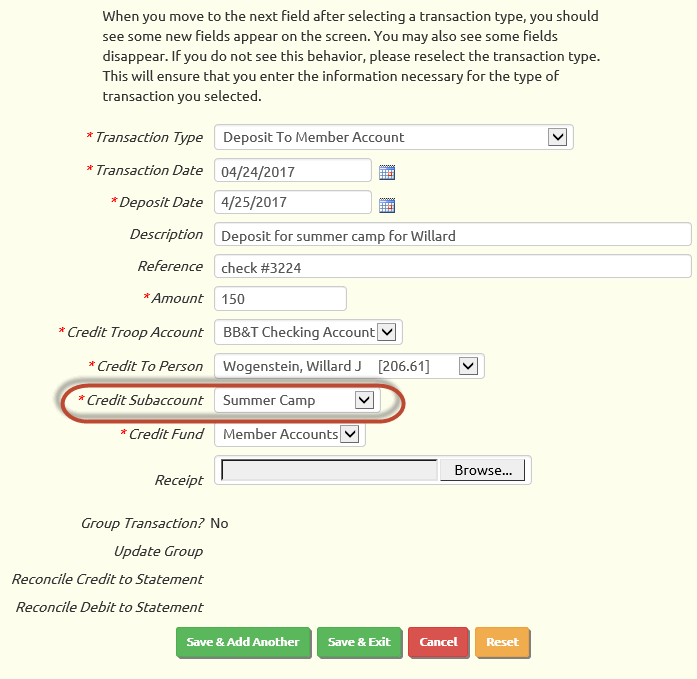
When you charge your scouts for summer camp, the group transaction should reference this same personal subaccount. This will reduce the balance of this reserve account for all of the scouts who attended summer camp.
Dues
Many troops charge their scouts monthly or weekly dues. These funds help the troop cover on-going expenses.
With TroopWebHost, dues can be charged to the scouts' accounts. This transfers money from their individual account to the troop.
The best way to do this is by creating a Group Transaction, as shown below.
![]()
Go to Money → Group Transactions and click Add a New Item to begin.
Select "Charge Troop Member Dues" as your Transaction Type.
Enter the beginning of the month (or week) as your Transaction Date.
Enter something like "February Dues" as your Description.
Enter the amount of the dues being collected from an individual scout in the Amount field.
Click Select All Scouts to select all active scouts in the list below.
Then scroll to the bottom of the page to click the Save & Exit button when you are ready to create the transactions.
Transfer Funds
From time to time you may need to transfer money between accounts. This can take three forms:
- Transfer money from one troop member to another
- Transfer money from one troop account to another
- Transfer money from one fund to another
![]() Transfer Between Troop Members
Transfer Between Troop Members
If a family has several members in the troop, they may ask you to rebalance their accounts by shifting money from one to another.
You can do this by using the Transfer Between Member Accounts transaction type, as shown at left.
Select the person from whom the money is being transferred as the Charge To Person account.
Select the person who will receive the money as the Credit To Person.
![]() Transfer Between Troop Accounts
Transfer Between Troop Accounts
If your troop has more than one troop account, you may need to occasionally move money from one to another.
In the example shown at right, money was transferred from the troop's PayPal account to the troop checking account.
![]() Transfer Between Troop Funds
Transfer Between Troop Funds
If you are doing fund accounting, you may need to occasionally move money from one fund to another.
In this example, the troop set aside $500 to use for future purchases of troop equipment.
Accounting For A Campout
 Accounting for a campout can involve these steps:
- Estimate the cost per participant and post it to the event in advance
- Enter the expenses associated with the event
- Charge the cost to the participants
Some troops wait until after the event to determine the total expenses that were incurred, and then charge the actual cost back to the participants.
Other troops estimate the cost in advance and charge that amount to everyone who signed up.
TroopWebHost can support either approach.
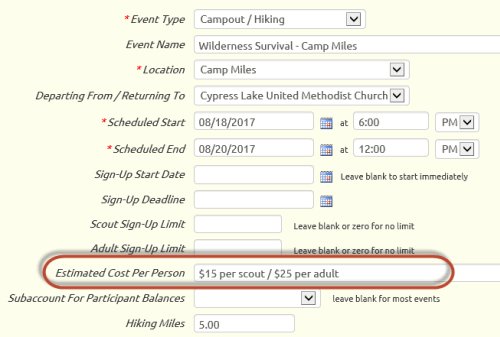
Post Estimated Cost
If it is possible to estimate the cost of an activity in advance, you can include that information on the Event record. Your troop will appreciate knowing the cost when they sign up.
Go to Calendar → Maintain Events. If you do not have access to this function, ask your site administrator to post this information for you.
Select the event you wish to update. You should see a page like the one shown at left.
Enter the estimated cost into into the Estimated Cost field and click Save & Exit to save your work.
The estimated cost does not have any impact on any accounts. It is for informational purposes only.
 Enter Expenses
Some troop expenses will be paid directly out of your troop checking account, either by check or debit card. This includes items purchased by troop members who were reimbursed directly by check.
To enter these transactions, go to Money → Individual Transactions and click Add an Item.
Select "Troop Expense Paid From Troop Account For Event" as your transaction type, as shown at right.
The Transaction Date should be the date the purchase occurred, not the date of the event.
Select the appropriate troop account as the Debit Troop Account, and select the campout from the Debit Event selection box.
Click Save & Exit to save your work, or Save & Add Another to keep on going.
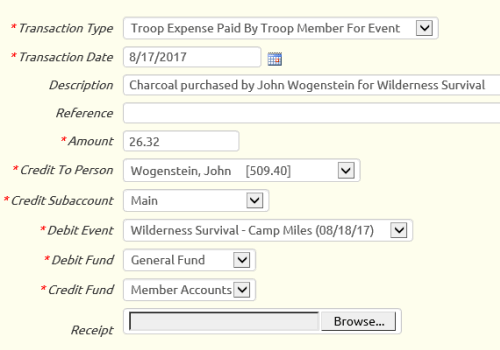 Expenses can also be incurred by troop members who would like the amount to be credited to their member account.
This sample shows how to create this type of transaction.
Select "Troop Expense Paid By Troop Member For Event" as your transaction type.
Select the person who incurred the expense in Credit To Person, and select the campout from the Debit Event selection box.
Either of the above transaction types can be generated by the system if you implement the Expense Reimbursement feature. This allows members to submit requests for reimbursement which can be reviewed by the treasurer. If approved, the appropriate expense transaction will be created.
Charge The Participants After The Event
This approach is very easy and guarantees that every participant pays their fair share of what the event actually cost. The drawback is that the exact amount to be charged to each participant won't be known until the event is over. The alternative is to charge participants when they sign up for the event, which we describe in the next section.
If your troop charges back the actual cost of the campout to the participants, you need to start by determining the total expenses incurred.
Go to Money → Account Balances → Event Balances to view a list of all events. Click View Details to see a page like the one shown below.
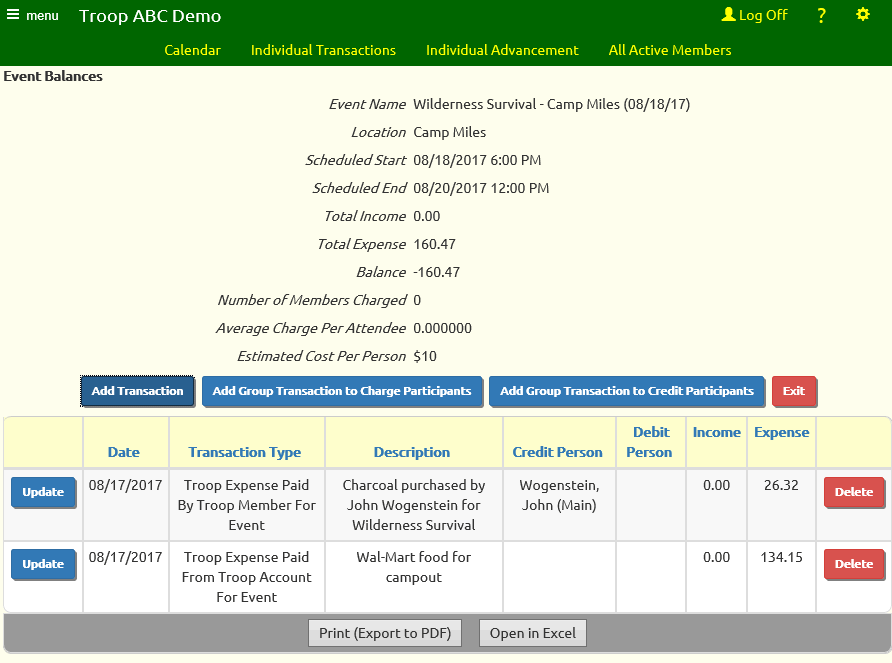
Verify that all of the expenses are accounted for, and then use this information to calculate the cost per participant.
Once you know the charge per person, you need to create one transaction for each participant.
The easiest way to do this is by creating a Group Transaction.
From the Event Balances page (shown above), press the button Add Group Transaction to Charge Participants.
This will take you to a page like the one shown below.
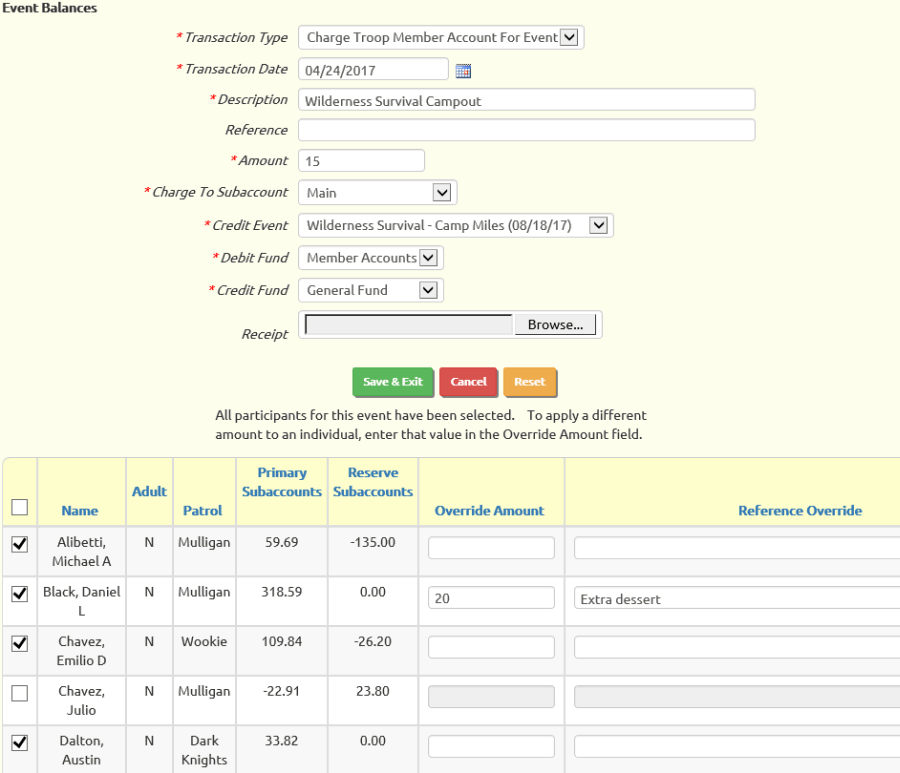
Select "Charge Troop Member Account For Event" as your Transaction Type.
The Transaction Date should be the date of the campout.
The Description should include the name of the campout.
The Amount should be the amount to charge each participant. You can override this value for an individual participant by filling in a different value in the Override Amount column next to his/her name.
Select the campout from the Credit Event selection box.
The troop members who attended should already be selected, but you may change the selections by clicking on the checkbox next to each name.
Click Save & Exit to create a transaction for each of the selected individuals.
If you now return to the Event Balances page you will see that these charges have been posted to the event as income. The balance for the event should now be close to zero. It is not necessary for event balances to be exactly zero.
Charge The Participants When They Sign Up
Some troops prefer to charge participants for an event beforehand, when they sign up for the event. This requires you to estimate the expenses accurately so that a fair price can be established.
Require A Minimum Balance To Sign Up (optional)
This is an optional step that lets you make sure that anyone who signs up for an event has sufficient funds to cover the expected cost. To implement this step, you first have to configure the Event Type to require a minimum balance, as shown below.
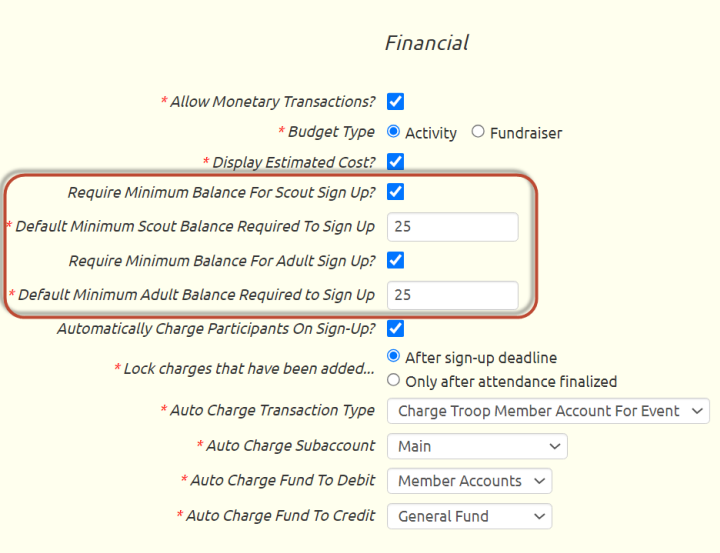
The default minimum balances establish a standard cost per event, but you can - and probably should - override these values on each specific event. This can be done by going to Calendar → Maintain Events, where you will see the fields circled below.
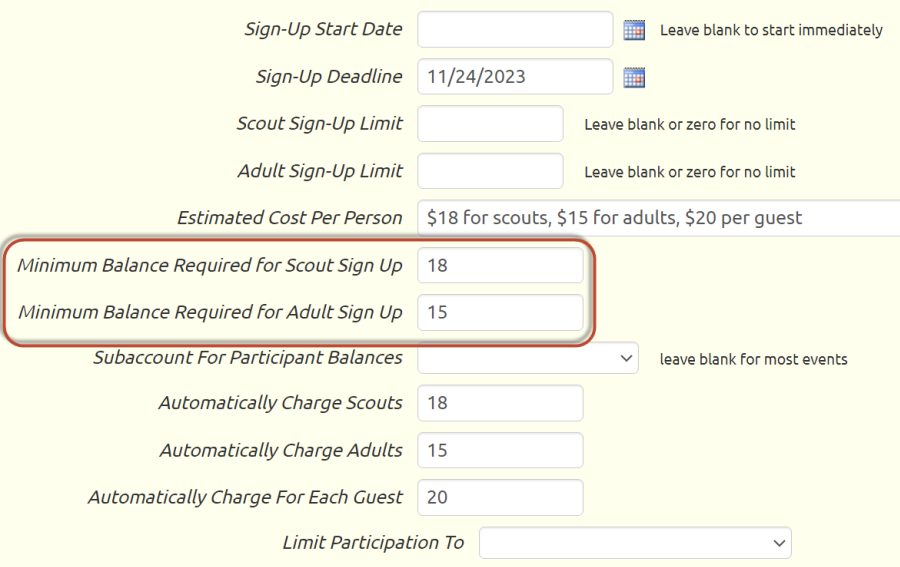
This will set the actual minimum balance required for a scout or adult to sign up for this event.
Automatically Charge Participants
Events can be configured to automatically charge participants when they sign up. This feature also begins with the Event Type. You may have noticed, two screenshots above, there was a checkbox in the Event Type "Automatically Charge Participants On Sign-up". Checking this box will open up additional fields.
The actual amounts to be charged must be set on each individual event. Look at the above screenshot for the following fields:
- Automatically Charge Scouts
- Automatically Charge Adults
- Automatically Charge Each Gues
You do not have to fill in a value for all three. Filling in a value in any of these fields will cause the system to generate a group transaction to charge all participants of that type. Up to three group transactions can be automatically generated for each event:
- A group transaction to charge scouts
- A group transaction to charge adults
- A group transaction to any scout or adult who indicated they were bringing a number of guests
The members who are included in each group transaction will change as members sign up for the event or withdraw from the event. These group transactions will only be completed locked once attendance is finalized for the event. Only then should you feel free to edit these group transactions directly.
Adjusting Charges For Individuals
Not everyone has to be charged the same amount for a given event. Once attendance has been finalized for the event, you may edit the group transactions to override the amount charged to individual participants, as shown below.
![]()
Accounting For A Fundraiser
 Practically all troops sell popcorn every fall.
Most troops hold other fundraising events throughout the year to raise money for troop activities.
Each of these activities should be entered as an Event on your calendar.
You can then post expenses and income to that event.
We recommend that you also create a sales campaign to manage the fundraiser.
When you have everything tallied, you can distribute the proceeds according to the policy set by your committee.
Create The Event
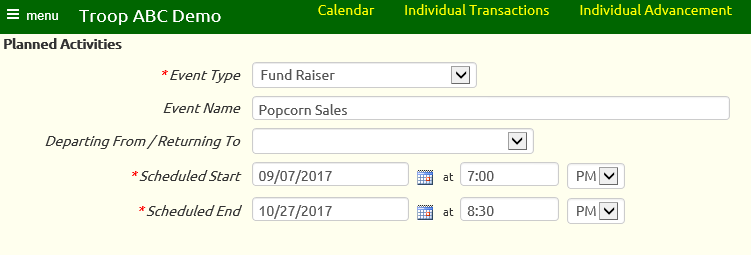
Go to Calendar → Maintain Events to create the Event record for your fundraiser. If you do not have access to this function, ask your site administrator to post this information for you.
As shown above, the Event Type should be set to "Fund Raiser".
For one day events, the Scheduled Start and Scheduled End times should be just that.
For fundraisers that span several weeks - like Popcorn Sales - you could have the Scheduled Start be the opening day and the Scheduled End be the final day. This will cause the event to show up on your calendar every day between those two dates.
If that's not to your liking, you could just set both dates to be the final day of the fundraising event. If you take that approach, you might want to set the description to something like Popcorn - Final Day To Report Sales.
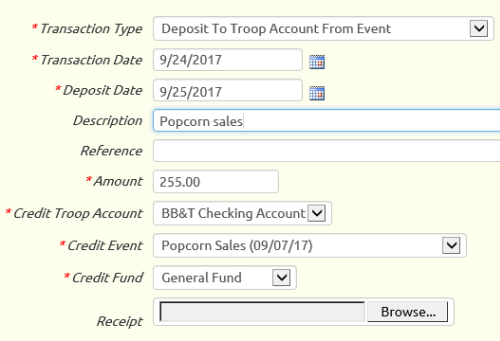
Enter Income
As the money rolls in, record your bank deposits using the "Deposit To Troop Account From Event" transaction type.
The Transaction Date should be the day you made the deposit, so it matches your bank statement.
Select the fundraiser as the Credit Event, as shown at right.
If you created a sales campaign to manage your fundraiser, you can use the Payments For Public Orders page to enter these deposits and, at the same time, link them to the orders so they are marked as paid.
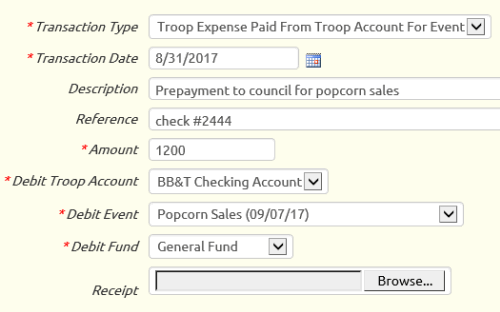
Enter Expenses
The expenses you incur for a fundraiser should be posted to that event.
Choose one of these transaction types for the expenses:
- "Troop Expense Paid From Troop Account For Event" if the expense was paid for directly from a troop account
- "Troop Expense Paid By Troop Member For Event" if a troop member paid for it and wanted it credited to his account
Be sure to select the fundraising event as the Debit Event.
View Your Net Profit
After you've recorded all of the income and expenses for this fundraiser, it's time to see what you made.
Go to Money → Account Balances → Event Balances to view a list of all events. Click View Details for your fundraiser to view a page like the one shown below.
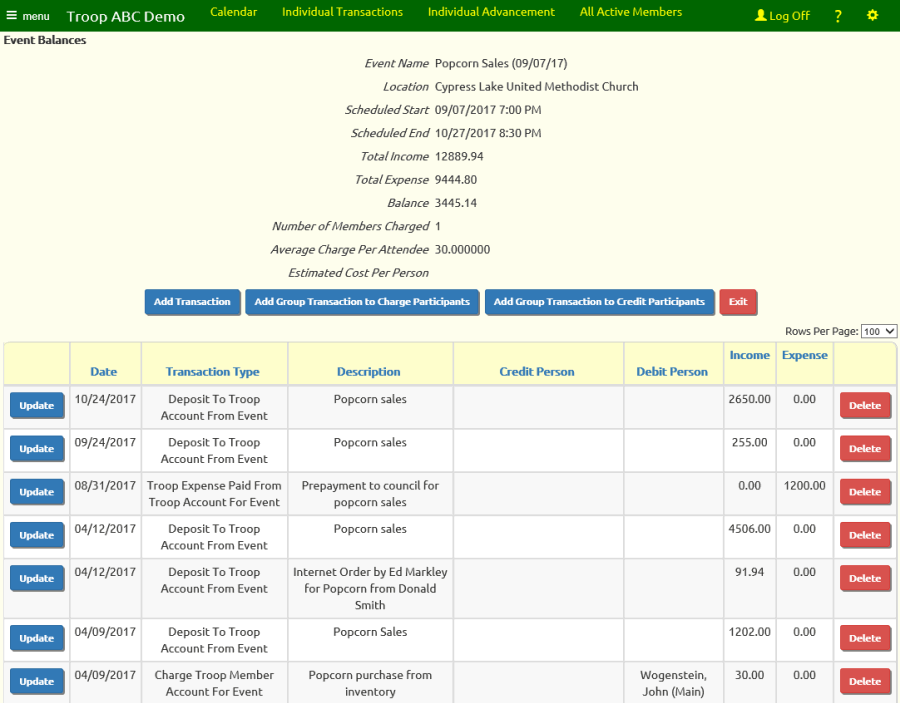
You should see all of the income and expenses in the grid at the bottom of the page. Verify that nothing is missing.
The summary at the top of the page shows you the Total Income and Total Expense for the fundraiser.
The Balance is your net profit.
Distribute The Proceeds
Some troops distribute some of the profits from fundraisers to the scouts, based on their sales. You should be aware that the BSA discourages troops from doing this as it is a potential violation of IRS regulations for non-profit organizations.
If you plan to do this, the easiest way is to use the Create Group Transaction to Credit Participants button on the event balances detail page.
Consider creating a personal subaccount to segregate these funds. This will help ensure this money is only used for approved purposes.
Use the "Credit Member Account From Event" transaction type. This will increase the balance of that member's account.
Use the Override Amount column to enter the amount being distributed to each scout, as shown below.
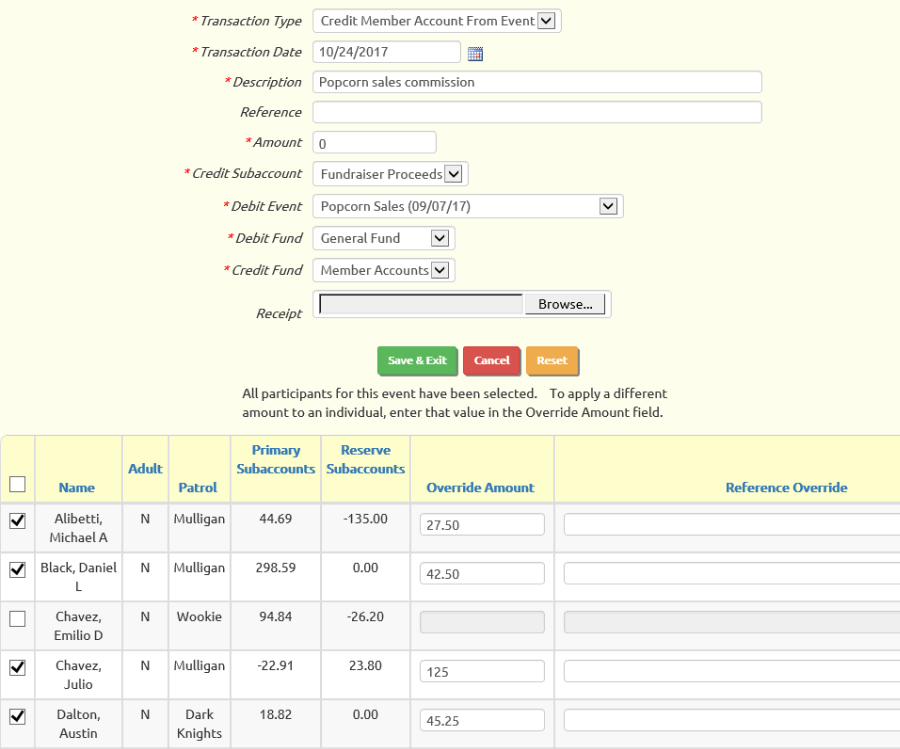
If you choose not to distribute proceeds to your scouts, you can simply leave the fundraising event with a positive balance. This money adds to the share of the troop account that "belongs" to the troop, i.e. that is not being held on behalf of individual members. You can use this money to reduce the cost of troop outings - like summer camp - for all of your scouts, or to purchase equipment for the troop.
Noting Payments For Events
As seen on the accounting for deposits page, when you deposit funds to a member's account it increases the balance of that member's account and to the selected troop account.
Some troops believe that they need to also indicate the event for which the payment was intended. While we provide the ability to do this - as we are about to describe - we do not recommend this approach. Linking payments to events creates more work for your treasurer, and it is not necessary even if your goal is to require scouts to have sufficient funds in their account to pay for their next campout.
The approach we are about to show you will not cause payment transactions to affect the balance of that event. It serves as a memo that simply indicates the intent to use this payment to cover the cost of that event, nothing more.
If you want to configure your system to allow this, start by modifying the deposit transaction types that credit a person's account, like "Deposit To Member Account".
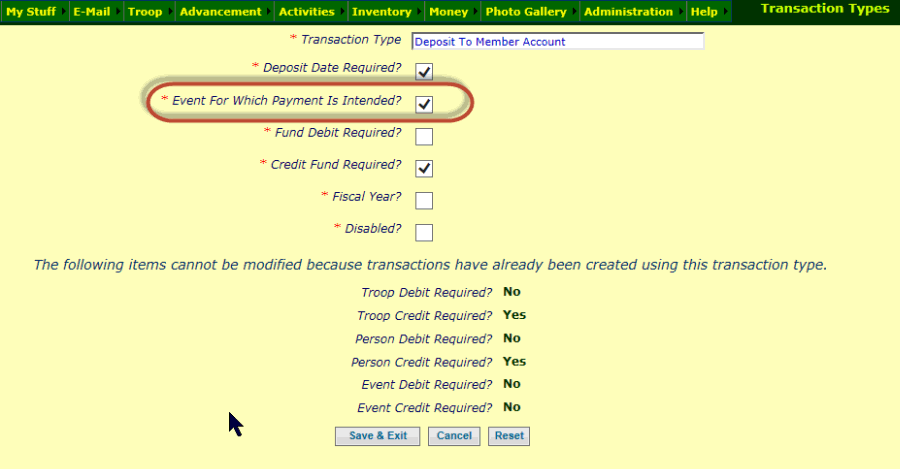
Check the box labeled Event For Which Payment Is Intended, then click Save & Exit to save your work.
This will cause these transaction types to prompt for Payment Intended For Event as shown below.
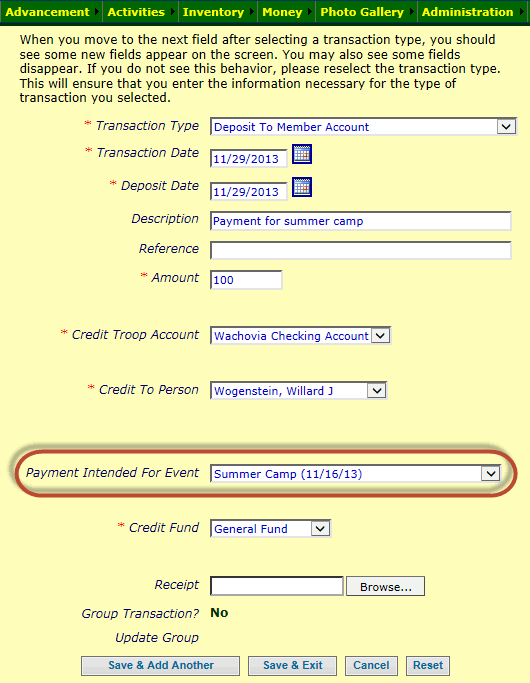
If you have configured your site to accept PayPal payments, if you make this change to the transaction type associated with PayPal payments it will cause the On-Line Payments page to display an additional prompt as shown below.
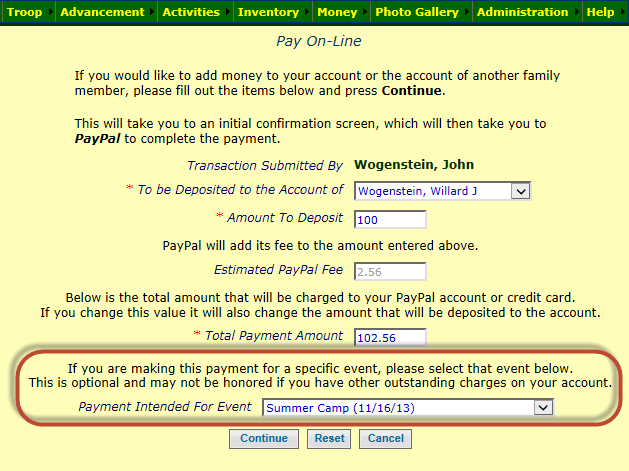
The other configuration steps have to do with the security configuration for the users who should be allowed to see member balances when viewing the participants for an event.
Even if you do not choose to configure your transaction types as described above, you may still want to make the first of these changes.
Select Assign Tasks To Roles from the Security Configuration subment of the Administration menu, then scroll down the list until you find the authorized task named "View Participant Individual Balances on Event", as shown below. Click on the Assign To Roles button for that item.
Check the boxes next to the user roles that should be allowed to see member account balances when viewing the participants on an event.
When the users who have been assigned these roles select an event from the Troop Calendar and scroll down to view the participants, they will now see each participant's current balance.
If your troop has a policy requiring members to have a positive balance to be allowed to attend an event, this can help you enforce that policy.
If you have configured your deposit transactions to allow the selection of the event for which the payment was intended, there is one more configuration step.
Select Assign Tasks To Roles from the Security Configuration subment of the Administration menu, then scroll down the list until you find the authorized task named "View Participant Payments Toward Event", as shown below. Click on the Assign To Roles button for that item.

Check the boxes next to the user roles that should be allowed to see each member's total payments designated for this event when viewing the participants on an event.
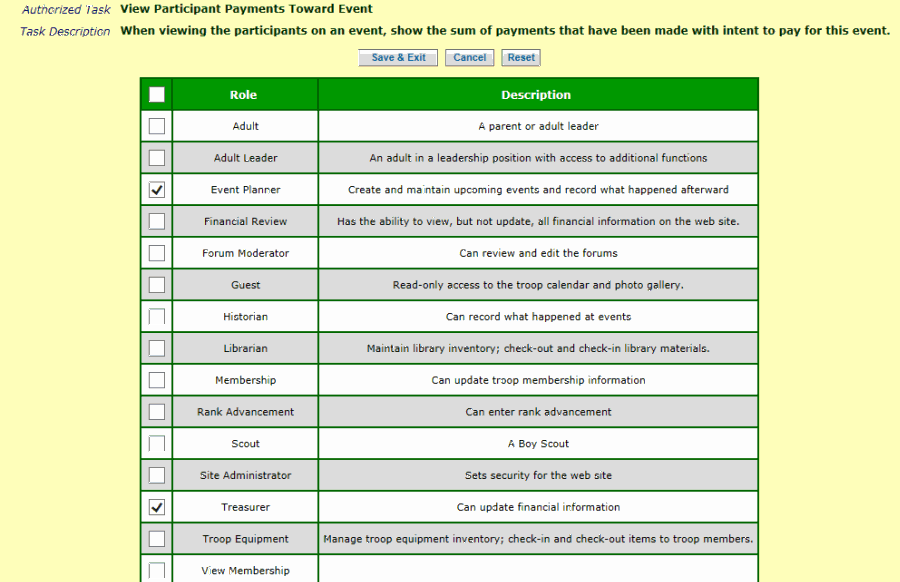
When the users who have been assigned these roles select an event from the Troop Calendar and scroll down to view the participants, they will now see the participants' payments for that event.
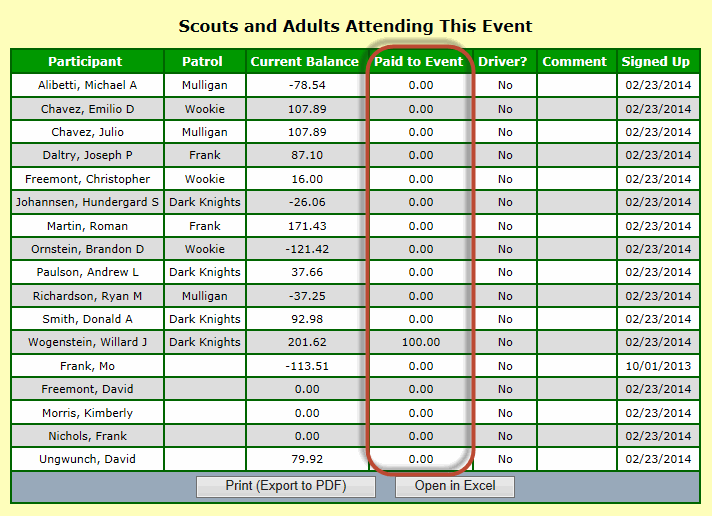
We recommend that you review your troop's policies regarding payments and event participation before implementing these changes.
How will you handle a situation where a member has made a payment toward an event, but currently has a negative balance overall? Should the member still be allowed to attend that event?
Report Account Balances
The Account Balances report can be found at Money → Financial Reports → Report Account Balances.
This is an excellent report for the Treasurer to present at Committee meetings.
It has three parts. The first, shown directly below, provides a summary of troop accounts.
It also analyzes the individual member accounts, showing how many are in arrears and the sum of their balances, and the same for those with positive balances.
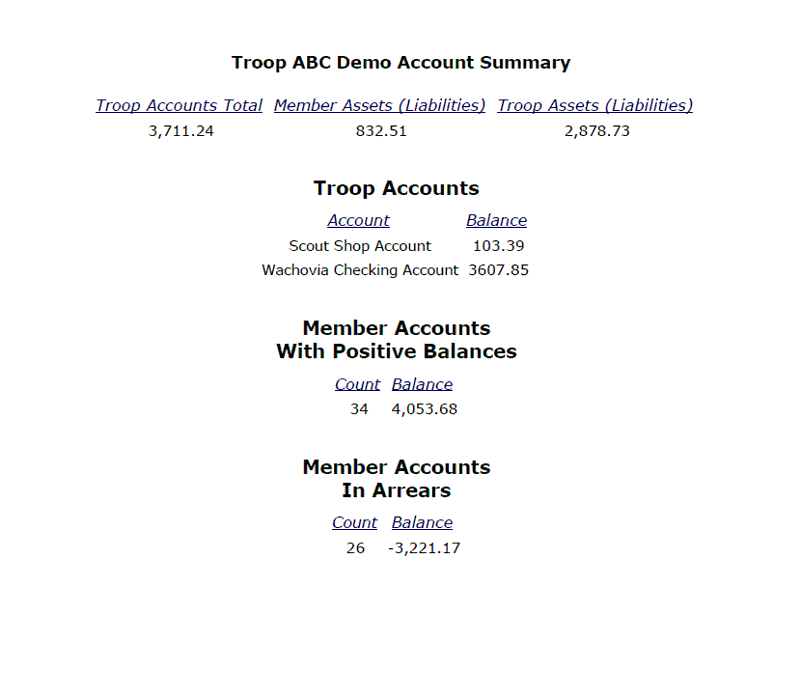
The next section shows the account balances for all active scouts along with any adults and inactive members with a non-zero balance. Adults with a zero balance are omitted to reduce the length of this section.
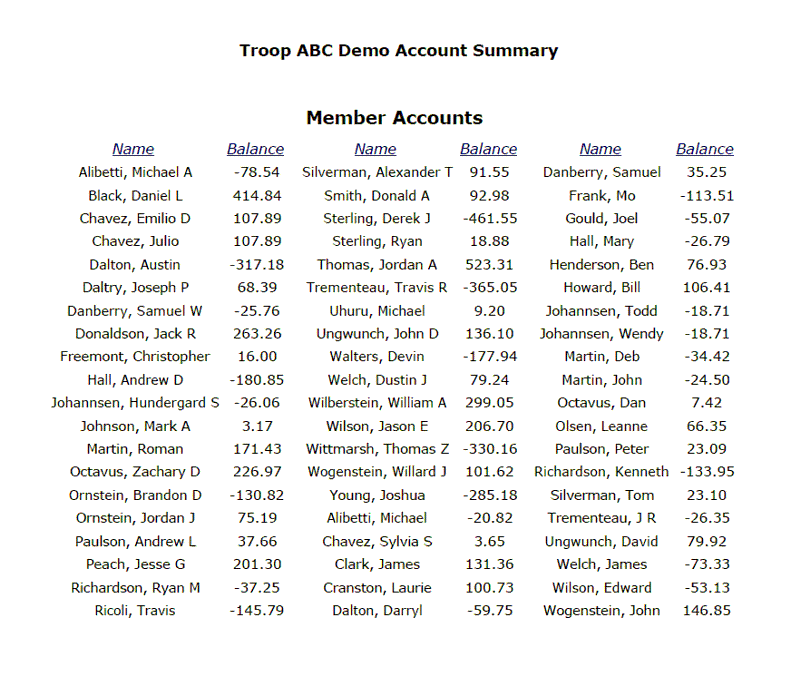
A final section shows the balances of any events from the past year that had monetary transactions.
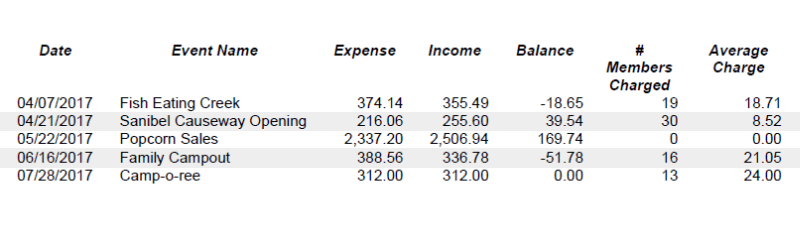
Report Financial History
 The Financial History Report summarizes the transactions for a period of time that you specify.
This report is available at Money → Financial Reports → Report Financial History.
Begin by entering a Start Date and End Date for the report, as shown at right.
Then click Continue to produce the report.
The first two sections of the report summarize all transactions entered during this period, by transaction type.

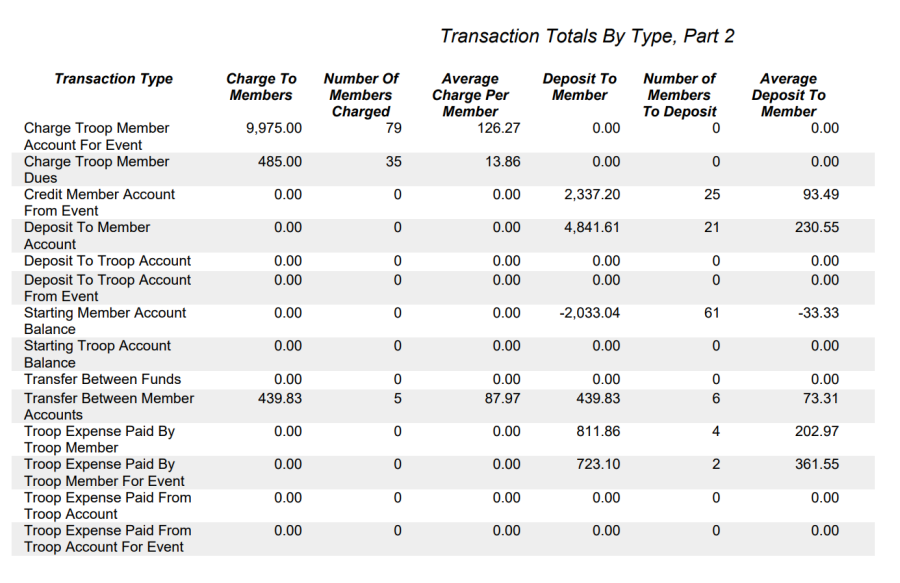
The third section summarizes all events which occurred during this period.
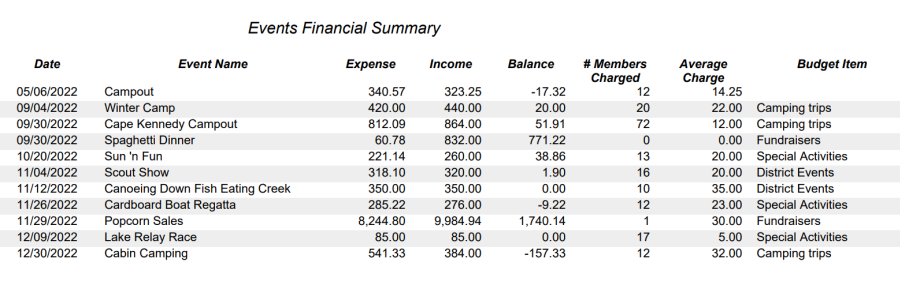
The fourth section shows all miscellaneous expenses - not related to events - that were incurred by the troop during this period.
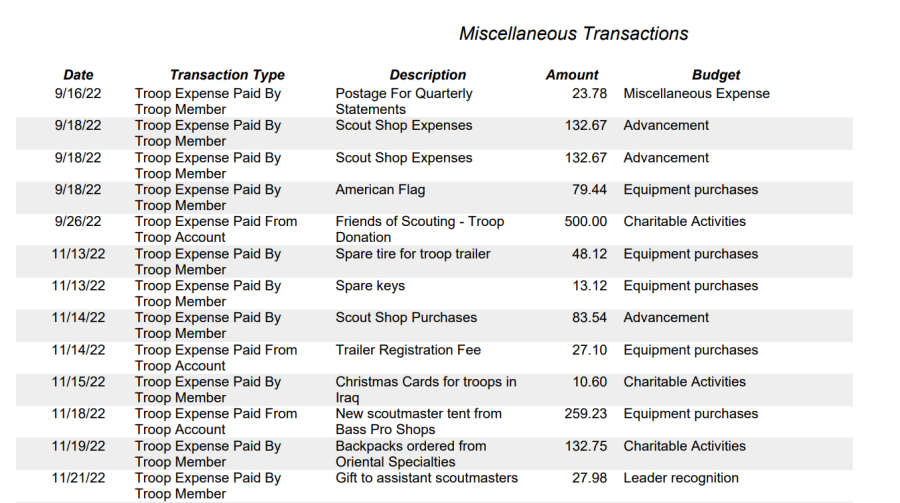
Budget Report
The Budget Report shows the budget for a selected fiscal year compared to actual results.
This report can be run from the Fiscal Years & Budgets page by clicking the Report button for the desired fiscal year.
This will produce a report that looks like this:
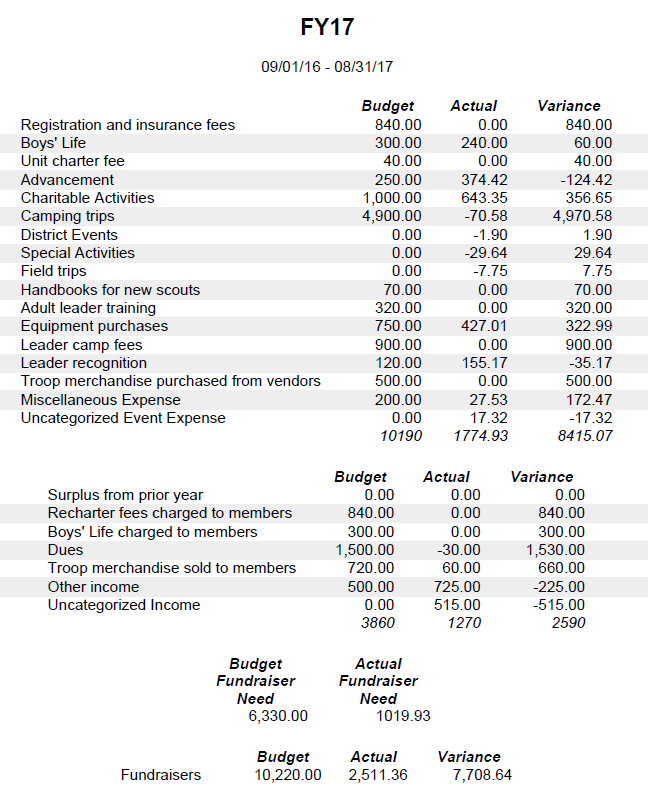
The first section of the report shows the Expense part of the budget. For the selected fiscal year, it shows the budget for each item along with the actual results based on all transactions that affected that budget item with a transaction date that falls within the fiscal year. The variance is the difference between those two columns.
The second section shows the Income portion of the budget.
The report then shows the shortfall that needs to be made up by fundraising, followed by the Fundraising budget.
Individual Accounts Summary
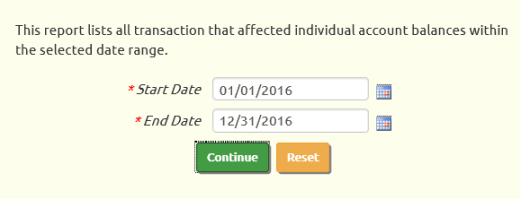 The Individual Accounts Summary shows each member account and the transactions that affected it
during a specified period of time.
The Individual Accounts Summary shows each member account and the transactions that affected it
during a specified period of time.
This report is available at Money → Financial Reports → Individual Accounts Summary.
Begin by entering a Start Date and End Date for the report, as shown at right.
Then click Continue to produce the report.
The first line for each person shows their name, current balance, and the net effect of their transactions within the selected date range.
This is followed by a list of the transactions that affected this person's account during this period.
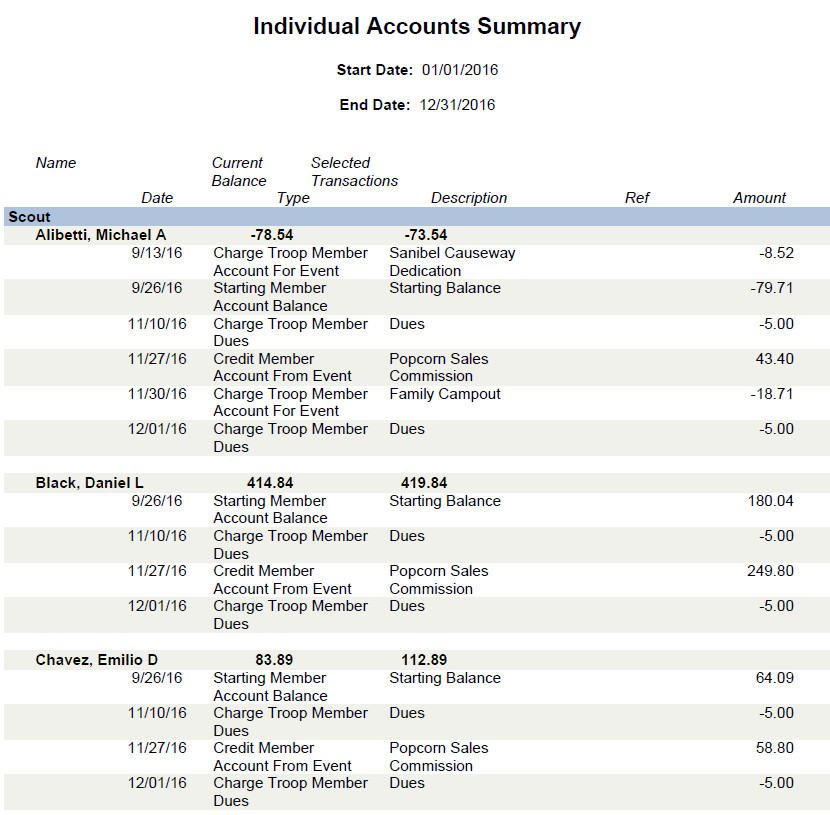
Fund Balances Report
The Fund Balances Report shows the current balance of each fund, grouped by fund category.
Go to Money → Financial Reports → Fund Balances to produce this report.
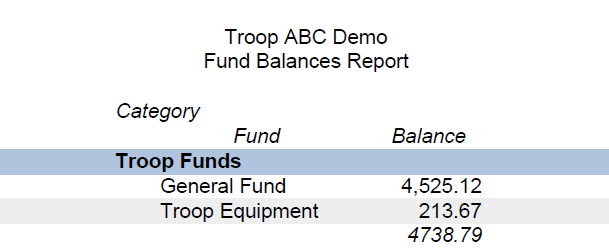
Fund Balances By Fiscal Year
The Fund Balances By Fiscal Year Report summarizes the transactions that affected each fund in each fiscal year.
Go to Money → Financial Reports → Fund Balances By Fiscal Year to produce this report.
Subtotals are provided within each category and for each fiscal year.
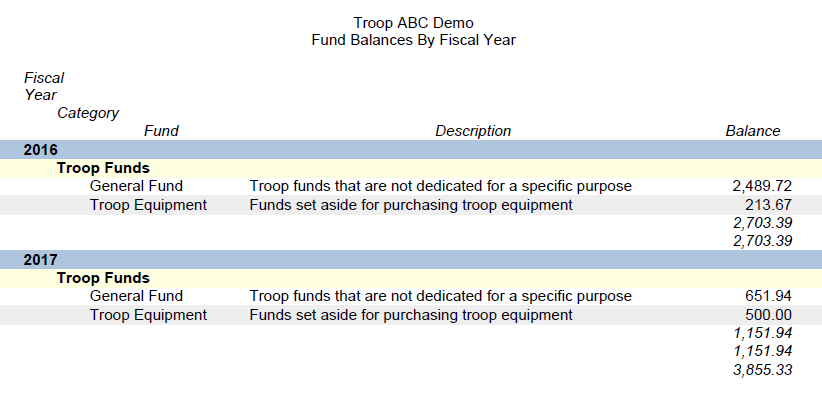
Fund Balances On Effective Date
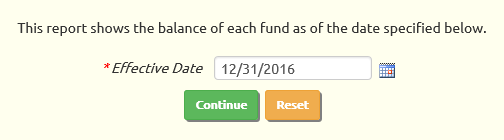 The Fund Balances On Effective Date Report shows what the balance of each fund would have been on the specified date.
In other words, it summarizes all of the transactions for each fund that have a transaction date on or before the date entered on this page.
This report is available at Money → Financial Reports → Fund Balances On Effective Date.
Enter the effective date, then click Continue to produce the report.
Individual Account Detail
You can view the transaction history for an individual member from the Individual Accounts page.
Click View Details to see this scout's information, then click Print Account Details to produce the report shown below.
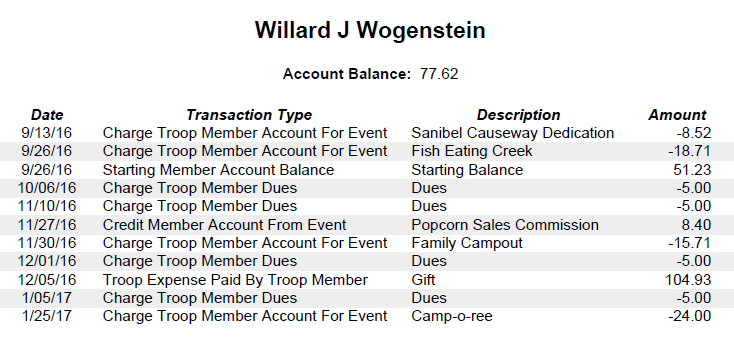
Recent Deposits To Member Accounts
The Recent Deposits To Member Accounts report lets you list all transactions after a specified date that credited a specified troop account. The transactions are grouped by the sex of the recipient.
This report is primarily intended for organizations that manage a girls troop and a boys troop from one TroopWebHost site. If the two troops have separate checking accounts, they can easily set up a separate troop account for each unit and select the appropriate troop account when entering transactions.
But when payments are made on-line, the transaction always credits the troop account specified for on-line payments. Some of those payments may need to be transferred to the other checking account.
That's where this report becomes useful.
To produce this report, go to Money → Financial Reports → Recent Deposits To Member Accounts.
In the first field, enter the starting date for this report. It will select all deposit transactions with a transaction on that date or later.
Then select the troop account that was credited with these transactions. It will only include deposit transactions that credited that account.
You may also select the transaction type, which may be helpful if you created a transaction type specifically for on-line payments.
The report will first show all transactions credited to adults, since those could belong to either troop. It then shows all transactions credited to scouts, broken out by girls and boys.
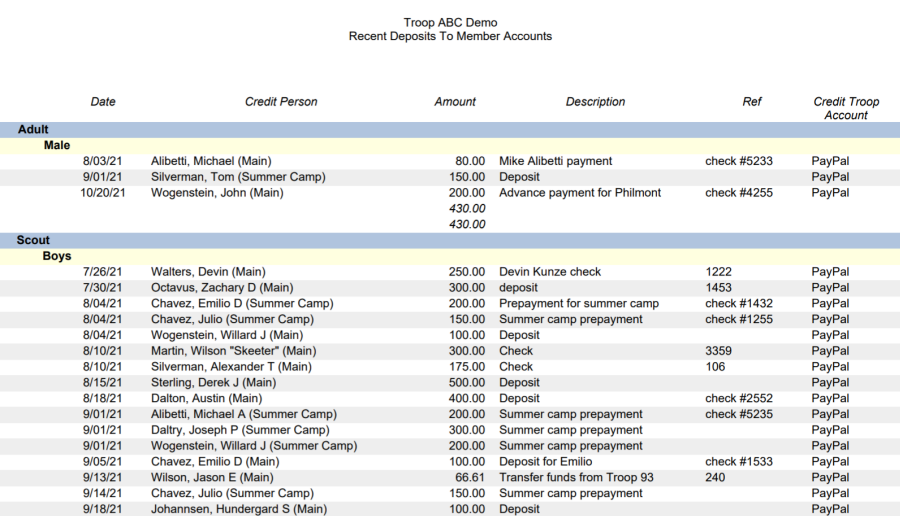
Accounting FAQ
 How do I keep track of what event a particular scout paid for when they make a deposit?
Deposits to member accounts are not linked to events. When you charge a scout for attending an event, it reduces the value of his account by that amount. When the scout makes a payment to the troop, that deposit increases his balance.
An individual member account is like a credit card account. When you make a payment to Visa, you don't pay for a specific item on your bill; your payment simply reduces the total amount you owe on that credit card. In the same way, payments from troop members do not get posted directly to an event, but simply increase the funds available to that member (or reduce the amount he owes the troop).
We do provide the option of noting the event for which a payment was intended. This does not post affect the balance of the event, but serves as a "memo" to indicate the intent to pay toward that event.
But my troop requires that all scouts pay for an event before the event occurs. How do I handle that?
If you require scouts to pay for an event in advance, create a Charge Troop Member Account For Event transaction for each scout who plans to attend. This will reduce each scout's balance by the cost of the event. Payments can then be received and deposited into each scout's account. If you then view Individual Balances or Report Account Balances, you can see which scouts have negative balances and thus have not yet paid for the trip.
You can also view the current account balances for each participant in an event from the Troop Calendar by configuring your User Roles to be authorized for the "View Participant Individual Balances on Event" task.
As noted above, you can also configure transaction types to allow deposits to reference the event for which they are intended. This does not affect the balance of the event, but these payments can then be viewed when you display the participants from the Troop Calendar. If you use this feature, you will need to set a policy that determines whether a member should be allowed to attend an event if they have a negative balance in their account (i.e., they owe the troop money) but made a payment intended for that specific event.
How do we use the system to keep track of troop assets, like the value of merchandise we are selling for a fundraiser?
Most troops do not need to track assets and liabilities. After all, a troop is not a business. When you need to buy a few new tents, you hold a fundraiser or ask the members to chip in, and that's that.
However, it is possible to use the fund accounting feature to set up various asset accounts. While we do not encourage this, with enough creativity you may be able to define the necessary categories, funds, and transaction types to make this work.