Membership
 Keeping your membership records up to date is critically important.
Membership information is maintained from the Membership menu.
Keeping your membership records up to date is critically important.
Membership information is maintained from the Membership menu.
Membership records are essential to many TroopWebHost functions:
- Advancement
- Event sign-up
- Troop accounting
- Inventory check-out/check-in
If you are moving from TroopMaster™ you may be able to upload your scouts and adults using files exported from that program. If you are using other software to maintain troop records, it may be possible to upload that information by creating CSV files in the correct format.
Otherwise, you can enter each scout and his parent into the system using the New Scout Registration page. Additional parents and adult leaders may be entered from the Active Adults page.
Once you have all of your troop members loaded into the system, they will be able to keep their information up to date using the My Stuff → My Personal Information page.
But you will still need to do your part to add new members and update existing members when they leave the troop or transition from scout to adult.
Membership Hub
The Membership Hub is an excellent place to manage your roster, training, leadership and other membership information. It is available to any user who has a role that is authorized for the "Maintain Membership Information" or "Membership Hub" tasks. You'll find it at Membership → Membership Hub.
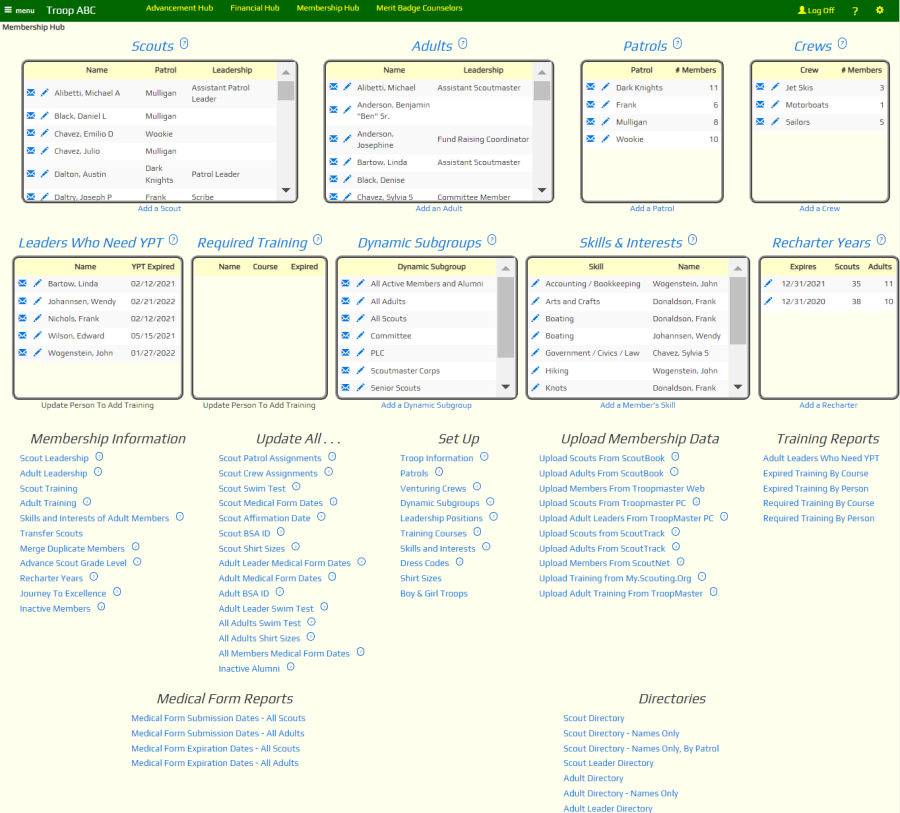
Like all hubs, you can edit the Membership Hub to fit your troop's requirements. This allows you to remove widgets you don't need - like the "Journey To Excellence" data window if you don't submit JTE reports. You may also add or replace widgets.
You can choose from the following Data Window widgets:
| Widget Name | Displays | Links To |
|---|---|---|
| Data Window - Membership - Active Scouts | All scouts. | The heading links to the Active Scouts page. |
| Data Window - Membership - Active Adults | All adults. | The heading links to the Active Adults page. |
| Data Window - Membership - Inactive Members | Former members. | The heading links to the Inactive Members page. |
| Data Window - Membership - Patrols | Patrols. | The heading links to the Patrols page. |
| Data Window - Membership - Crews | Venturing crews. | The heading links to the Venturing Crews page. |
| Data Window - Membership - Scout Leadership | Current scout leadership. | The heading links to the Scout Leadership page. |
| Data Window - Membership - Adult Leadership | Current adult leadership. | The heading links to the Adult Leadership page. |
| Data Window - Membership - Recent Scout Training | The most recent training courses completed by scouts, in reverse order by when they were entered into the system. | The heading links to the Scout Training page. |
| Data Window - Membership - Recent Adult Training | The most recent training courses completed by adults, in reverse order by when they were entered into the system. | The heading links to the Adult Training page. |
| Data Window - Membership - Adult Leaders Needing YPT | Adults currently holding leadership positions or who are merit badge counselors, whose Youth Protection training has expired or is about to expire. | The heading links to the Adult Training page. |
| Data Window - Membership - Required Training | Training courses that are needed based on each member's current leadership position. | The heading links to the Adult Training page. |
| Data Window - Membership - Dynamic Subgroups | Dynamic subgroups. | The heading links to the Dynamic Subgroups page. |
| Data Window - Membership - Skills and Interests | Skills and interests of your adult members. | The heading links to the Skills and Interests page. |
| Data Window - Membership - Recharter Years | Annual recharter submissions. | The heading links to the Recharter Years page. |
| Data Window - Membership - JTE Years | Journey To Excellence reports. | The heading links to the Journey To Excellence page. |
Unless otherwise specified above, the  icon will allow you to update that row,
and the
icon will allow you to update that row,
and the  icon
will allow you to send a message to that person or group.
icon
will allow you to send a message to that person or group.
The Membership Hub may also include these Menu widgets:
| Widget Name | Contains |
|---|---|
| Menu - Membership - Membership Functions | Functions that let you enter membership information. |
| Menu - Membership - Upload Membership Information | Functions that let you upload membership data from other systems. |
| Menu - Membership - Update All | Pages that allow you to update specific information for all scouts or adults. |
| Menu - Membership - Directories | Reports that list members. |
| Menu - Membership - Medical Form Reports | Reports showing medical form submission status. |
| Menu - Membership - Training Reports | Reports that show training status. |
| Menu - Membership - Set Up | Supporting tables. |
New Scout Registration
The best way to add a scout and his parents to the troop roster is the New Scout Registration form. You'll find it at Membership → View / Maintain Members → New Scout Registration.
 This will display the page shown at right.
This page follows the order of the BSA™ Youth Application form, with some additional items.
Enter the information into the fields, using the TAB key to move from one field to the next.
Check the Transfer From Another Unit checkbox only if this scout transferred from another Scout troop this year. This will cause this scout to show up as a transfer when you recharter.
Check the Pays Recharter Fee In Another Unit only if this scout also belongs to a Venturing crew which pays his recharter fee.
The system will automatically generate a User ID and password for the scout and each parent that you enter.
You must enter at least one parent on this form.
If the parent is already in the database - possibly because they already have another scout in the database - you do not have to re-enter their information. You can simply select the parent's name from the drop down list labeled Adult.
If the parent is not in the database, you can enter their information here.
Click on the checkbox Address same as scout to copy the scout's address and home phone number into this parent's record.
The second parent is optional. You can also select this parent from the drop down list if he or she is already in the troop database. Or you can enter a new record for this parent as well.
Click the Save & Add Another button to save this scout and parents. The screen will redisplay with empty fields, ready to add another scout.
Transfer Scouts To / From Other TroopWebHost Sites
If there are Cub Scout packs in your area who are using TroopWebHostCS, it is easy to transfer their information into your system when scouts cross over to your troop.
Similarly, if a scout transfers into your unit from a troop or crew that is using TroopWebHost, you can easily transfer their information into your system.
Conversely, if one of your scouts moves to a different troop that is using TroopWebHost, you can allow them to electronically transfer that scout's information into their system.
To do any of the above, please select Transfer Scouts from the Membership menu.
![]()
If any scouting units have authorized your troop to import their scout's data, you will see their names listed in the Pending Transfers In section, as shown above.
If you have scouts that are moving to another troop, you can authorize that troop to import their data by clicking Authorize Transfer To Another Unit. You will then see their name in the Pending Transfers Out grid, at least until they complete the transfer on their end.
Click View Transfer History to see a record of transfers in and out of your troop that have either been completed or declined.
![]() When you Select a scout from the Pending Transfers In list
you will see a page like the one shown at right.
When you Select a scout from the Pending Transfers In list
you will see a page like the one shown at right.
Click Import Scout Data to import this scout's information into your database. Click Decline Transfer if you do not wish to import this scout's data.
When you import a scout's data from a Cub Scout pack, it will:
- Copy his membership record.
- Copy his parents' membership records.
- Create relationships between the scout and his parents.
- Issue User IDs and passwords for the scout and his parents.
If the parent already exists in your database, it will update any blank fields in the parent's record with information from the pack's database.
When you import a scout's data from another crew or troop, it will do all of the above, plus:
- Create Credit For Other Activity records for participation in that unit's events.
- Copy all completed awards.
- Copy all merit badges and check off the completed requirements.
- Copy all completed rank requirements.
When you authorize the transfer of a scout's information to another unit, you will see a page like this.
![]()
Select the scout from the first drop down list, then select the troop to which he is going from the second list. Click Save & Exit to complete the authorization.
Please note that authorizing the transfer does not automatically make the scout inactive in your system. You will still need to inactivate this scout in your system.
Upload My.Scouting Roster Report To Update BSA Registration Expiration Dates
Beginning August 1, 2023, new scouts and adult leaders will register for one year. The first year fee will no longer be pro-rated. Their registration will expire one year after the day they registered.
You need to know when every member's registration expires, so you can be sure everyone attending an event is covered by BSA insurance.
Fortunately, you can produce a report from the My.Scouting.org website that has this information for all members of your unit. This can then be uploaded into TroopWebHost.
This process should be performed on a regular basis to keep your information up to date.
Begin by logging on to your account at My.Scouting.org, then select your unit.
Click on "Roster" on the left side of the page, then select "Export Roster".
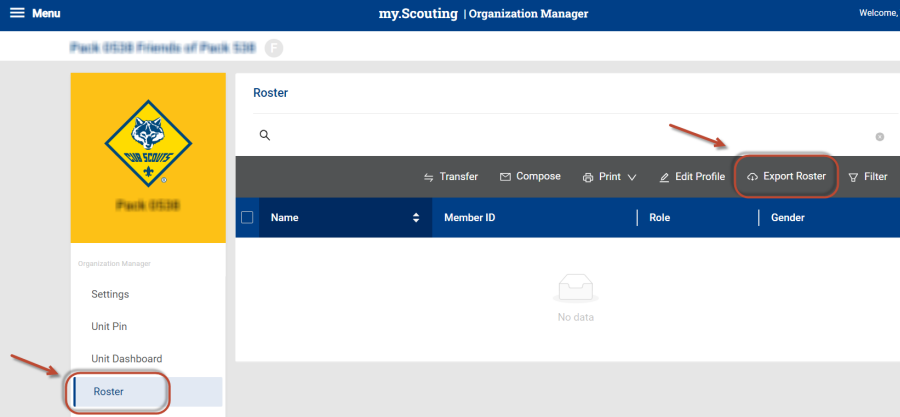
Then click on "Export to CSV".
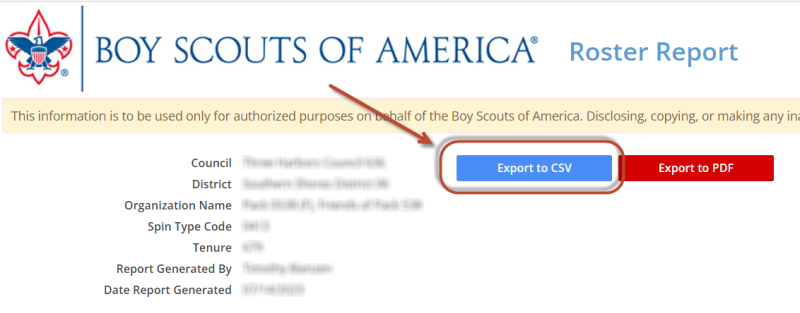
This will produce a CSV file containing one row for each active member of your troop. Save this to your local storage device.
Then log on to TroopWebHost, and from the Main Menu go to Membership → Upload Members → Upload Roster From My.Scouting.
You should see the screen shown here:

Click the Browse or Choose File button to find the Roster Report file that you exported from My.Scouting.org.
This upload program will always update existing records, but you can limit the extent by checking the first box, Update BSA Registration End Date Only?. This should be the normal routine, when you are just trying to keep the registration end dates up to date. You should only leave this un-checked when you are sure the contact information (mailing address, phone number, email address) in My.Scouting.org is more current than the same information in TroopWebHost.
The roster file does not contain much information, and thus is not a good source for adding new members into your system. But, if you have no other options, you can check the option Add Member If Not Found? and it will add a membership record for any person for whom an exact match cannot be found on name or BSA ID.
If you decide to use that last option to add new members, then be sure to select a Default Sex. This will be used if the gender field in the file is blank or missing.
Always check the box for Trial Run the first time you upload a new file. This will allow you to see the effect of the upload without actually committing the new data to your database. Once you are sure that the correct information will be transferred, run it again, this time with Trial Run unchecked.
Click Upload Roster Report to upload your file.
If you add any members, be sure to check their membership record to see if you need to correct or add any relationships.
If there are any problems, please open a Support Ticket and attach the file you attempted to upload.
Active Scouts
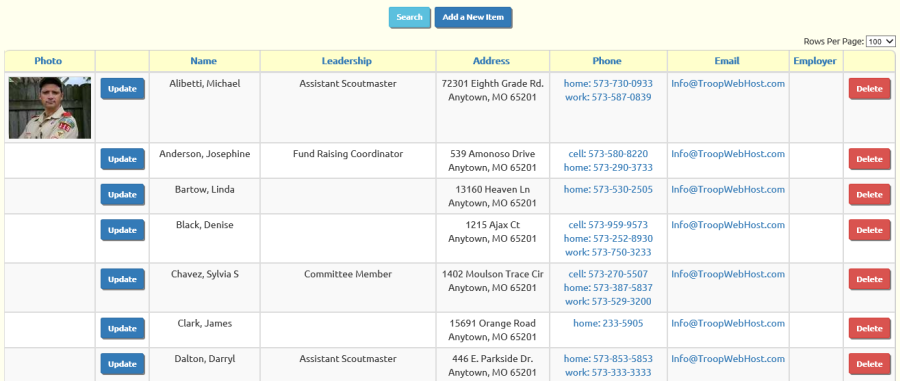
Go to Membership → View / Maintain Members → Active Scouts to view all of the active scouts in your troop.

Click on Add a New Item to add a new scout to the troop. This is not the recommended approach. You should always use the New Scout Registration page to add a new scout.
The Active Scouts page allows you to enter additional information about individual scouts in your troop.
Click the Update button next to the scout you wish to update. This will bring up the page shown below.
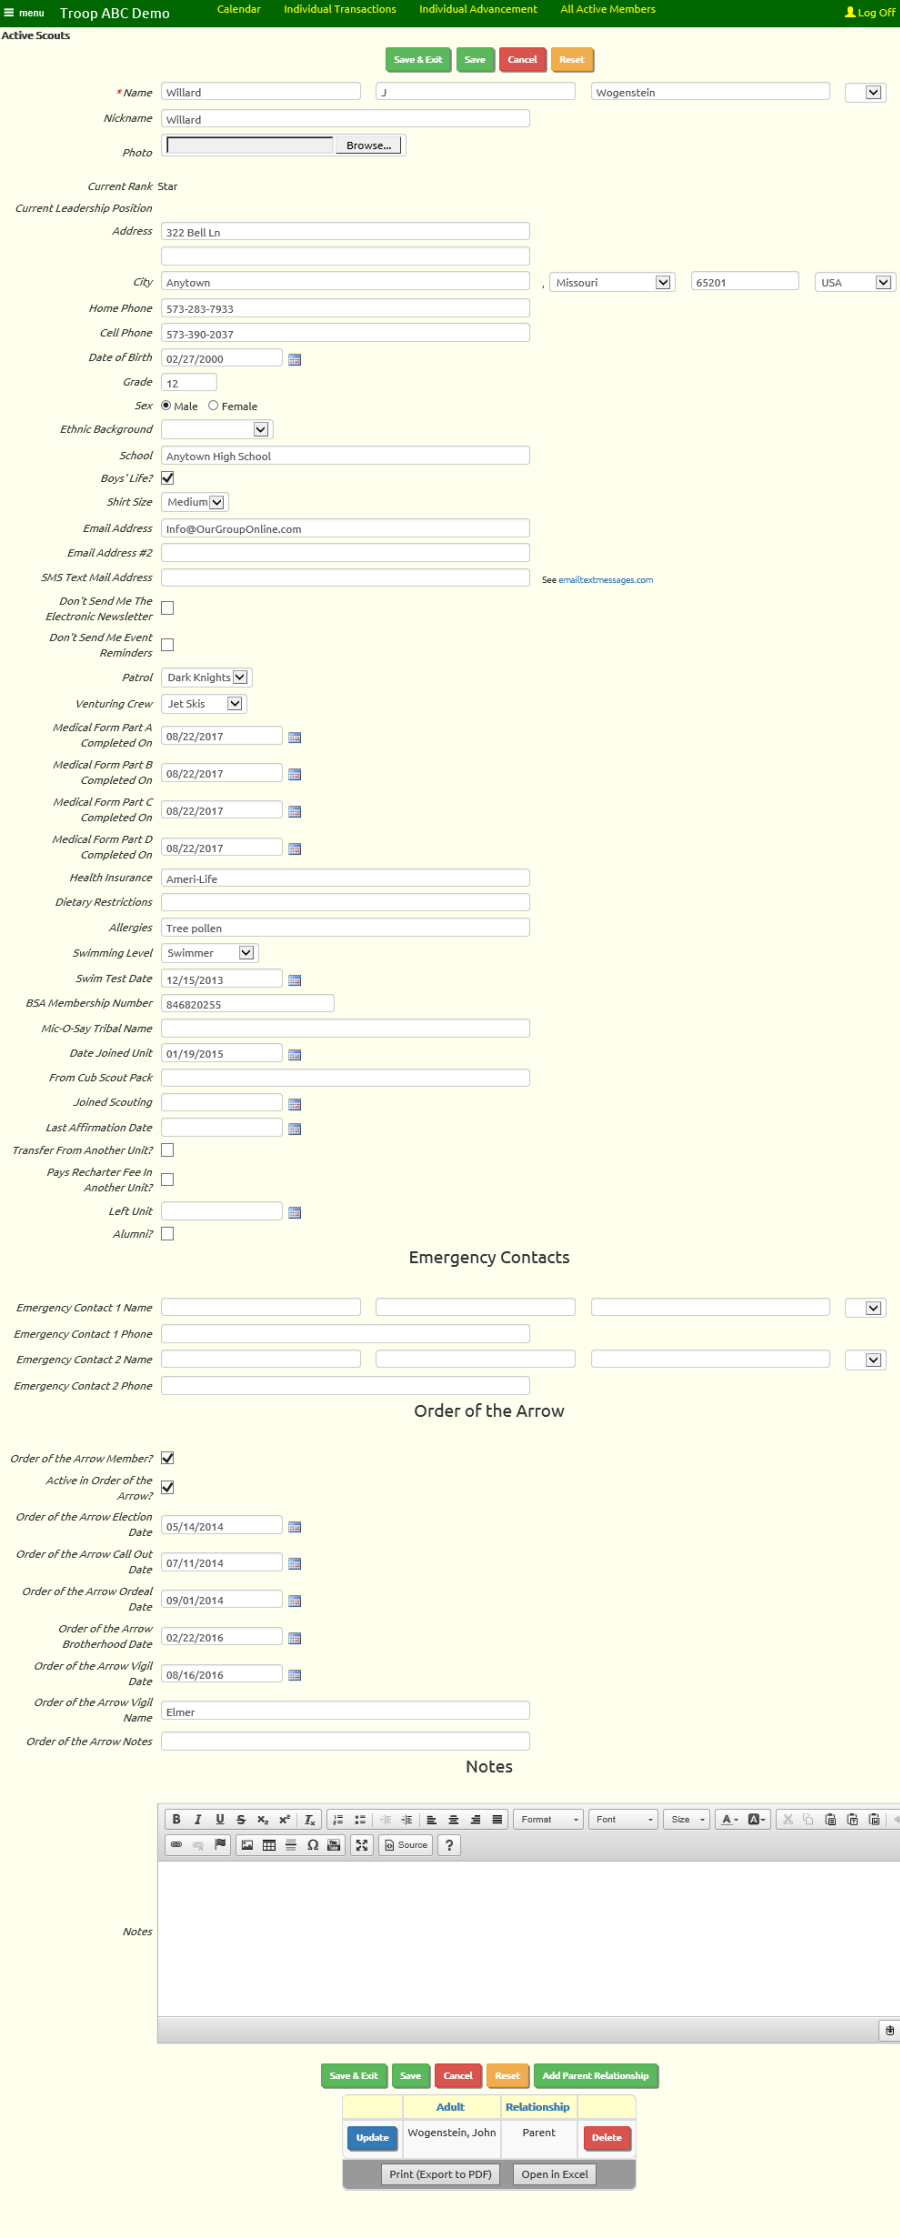
As you scroll down the page you will see many fields that were not available on the New Scout Registration page.
Each scout can have two e-mail addresses, plus an SMS text mail address. SMS text mail addresses look like an e-mail address, except that the first portion is the person's cell phone number. You can find a full explanation of SMS addresses at https://en.wikipedia.org/wiki/SMS_gateway If you enter a cell phone number and select the cell phone carrier from the drop down list, the system will automatically generate the correct SMS address for this user..
There are spaces to fill in the most recent date that each part of the medical form was submitted.
The Emergency Contacts section allows you to provide the name and phone number of two people to contact if there is a problem.
If this scout is a member of the Order of the Arrow, the Order Of The Arrow section allows you to maintain the history of his participation. This is where the Order of the Arrow Advancement Dates report pulls its information.
Use the Notes section to enter any other information that doesn't fit in any other fields.
If this scout's parents have been entered in the system, they should appear in the Relationships grid at the bottom of the page.
Click Save & Exit at the bottom of the page to save your work and return to the summary page.
Active Adults
Go to Membership → View / Maintain Members → Active Adults to view all of the active parents and adult leaders in your troop.
Click on Add a New Item to add a new adult member. This is how you enter additional parents or adult guardians. It is also how you add adult leaders who are not parents of scouts in the troop.
Adding a member through this function will automatically generate create a User ID and password for that member.
Use the Update function to add additional information about parents and adult leaders. This will bring up the page shown below.
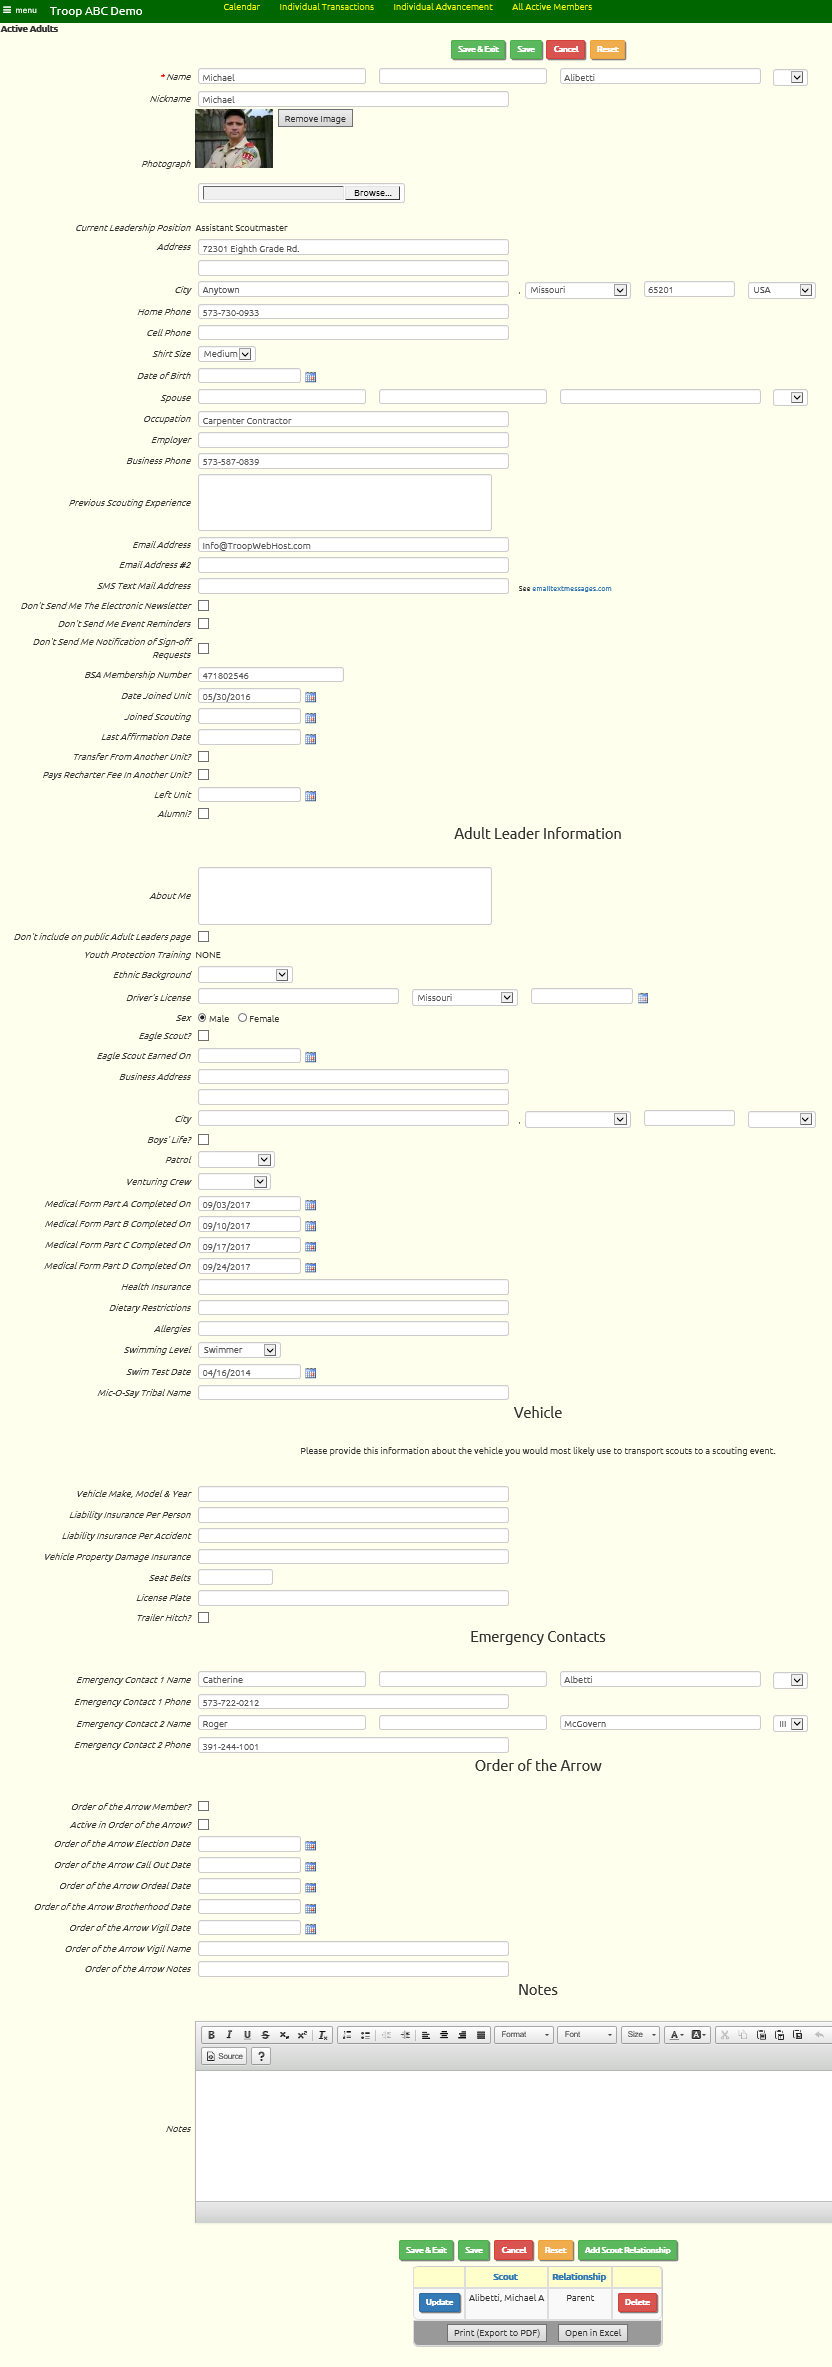
You'll notice that you can add a photograph for adult members. This is a great way to learn who's who in your troop. This photo will be displayed on the Adult Leaders page for the current leaders of your troop.
Click the Browse button to search your local disk for a photo you would like to upload.
If you need to replace an existing photo for a member, please follow these steps:
- Click the Remove Image button next to the current photo.
- Click Save. This will delete the existing image, which allows you to add a new image.
- Click Browse to find the new image.
- Click Save or Save & Exit to save the new image.
Notice there is room for three telephone numbers: home, cell phone, and business.
Each adult can have two e-mail addresses, plus an SMS text mail address. SMS text mail addresses look like an e-mail address, except that the first portion is the person's cell phone number. You can find a full explanation of SMS addresses at https://en.wikipedia.org/wiki/SMS_gateway. If you enter a cell phone number and select the cell phone carrier from the drop down list, the system will automatically generate the correct SMS address for this user.
The Adult Leader Information is only needed for adult leaders.
The contents of the About Me field will be displayed on the Adult Leaders page for this leader. You might want to describe this person's background and role in the troop.
The Adult Leader section includes the dates on which each part of the medical form was last submitted, along with health insurance and allergies.
The Vehicle section collects information about the vehicle this adult will use if he is transporting scouts.
This information will appear on the Tour Permit Worksheet when this adult signs up as a driver for an event.
The Emergency Contacts section allows you to provide the name and phone number of two people to contact if there is a problem.
If this person is an adult member of the Order of the Arrow, the section at the bottom allows you to maintain the history of his participation.
At the very bottom of the page is a list of the scouts to whom this adult is currently linked as parent or guardian.
This allows this adult to view information about these scouts on the My Scouts page.
And when you send e-mails with account balances, this adult will be sent the account balances for these scouts in addition to his own balance.
If you need to add a relationship, click Add Scout Relationship and select the scout from the selection list that will be presented.
Click Save & Exit at the bottom of the page to save your work and return to the summary page.
Relationships
If you use the New Scout Registration page to add new scouts to your site, those scouts will automatically be linked to their parents. Likewise, if you use one of the upload programs to transfer membership data from another unit management system (other than Scoutbook), the upload program will use the information in the input files to link scouts to parents.
There are, however, three cases in which scouts will NOT be automatically linked to their parents:
- If you upload scouts and adults from ScoutBook
- If you enter new scouts from the Active Scouts page instead of the New Scout Registration page
- If you enter new adults from the Active Adults page
The membership files available from ScoutBook do not identify which scouts belong to which adults, so we cannot automatically create these links.
While the Active Scouts and Active Adults pages both have the ability to link scouts to parents, they do not force you to create those links.
We call the links between parents and scouts "relationships". A relationship links the parent to their scouts' records.
Once a parent is linked to their scouts, when they log on to the site they can:
- View all of their scouts from the My Scouts page
- Update their scouts' contact information
- View their scouts' current balance and transaction history
- Add money to their scouts' accounts via On-Line Payments
- View their scouts' advancement status to see what requirements are needed to complete the next rank or merit badge
- Sign up their scouts for upcoming events or shifts
- Grant electronic permission for the scouts to attend an upcoming event
Relationships make all of this possible. If a parent cannot access their scouts records, it may be because they do not have a relationship that links them to their scouts.
Relationships can be created from either the Active Scouts and Active Adults pages. Update the scout or parent, then scroll to the bottom of the detail page to find the Add Parent Relationship button (on the scout page) or the Add Scout Relationship button (on the adult page). This will take you to a page like this:
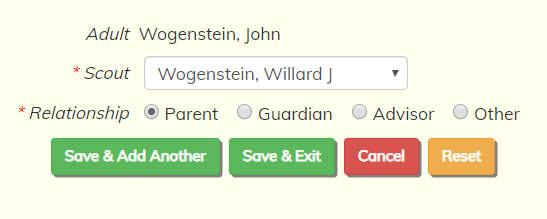
Select the related individual from the drop down list and select one of the relationship types.
The "Advisor" relationship has somewhat less access to the related scouts. Specifically, the advisor cannot transfer money to/from the accounts of these scouts, and cannot grant electronic permission for them to attend an event. Other than that, there is no functional difference between the different types of relationships.
Click Save & Exit to save this new relationship, or Save & Add Another to save this relationship and add another one.
Common Relationship Scenarios
To add a parent relationship to a Scout, please take the following steps:
- Go to Membership --> View / Maintain Members --> Active Scouts
- Find the Scout
- Click Update
- Scroll to the bottom of the Scout membership record
- Click Add Parent Relationship
- In the Adult field, select the "Adult members" from the dropdown field list.
- Select the appropriate Relationship
- Click Save & Add Another or Save & Exit
To remove a parent relationship from a Scout, please take the following steps:
- Go to Membership --> View / Maintain Members --> Active Scouts
- Find the Scout
- Click Update
- Scroll to the bottom of the Scout membership record
- If a relationship row needs to be updated, you can use the Update button.
- If a relationship row needs to be deleted, you can use the Delete button - This will not affect the membership record for the related member. It just removes the link between the members.
- Click Save & Exit
To add a Scout relationship to an adult, please take the following steps:
- Go to Membership --> View / Maintain Members --> Active Adults
- Find the Adult
- Click Update
- Scroll to the bottom of the Scout membership record
- Click Add Scout Relationship
- In the Scout field, select the "Scout" from the dropdown field list.
- Select the appropriate Relationship
- Click Save & Add Another or Save & Exit
To remove Scout relationship to an adult, please take the following steps:
- Go to Membership --> View / Maintain Members --> Active Adults
- Find the Adult
- Click Update
- Scroll to the bottom of the Scout membership record
- If a relationship row needs to be updated, you can use the Update button.
- If a relationship row needs to be deleted, you can use the Delete button - This will not affect the membership record for the related member. It just removes the link between the members.
- Click Save & Exit
This does not work when selecting a member from the Membership --> View / Maintain Members --> All Active Members menu as this screen contains both Scout and adults and therefore some fields are not displayed when you click the Update button as the field is specific to a Scout or an Adult.
Deactivate Entire Family
When a scout leaves the troop and there are no siblings remaining, you usually want to deactivate all members of his family who have been active members.
You can do this in one step by updating a scout or adult and clicking the Deactivate Entire Family button at the top of the page, as shown here:
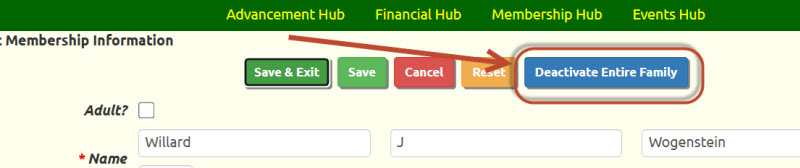
This will take you to this page:
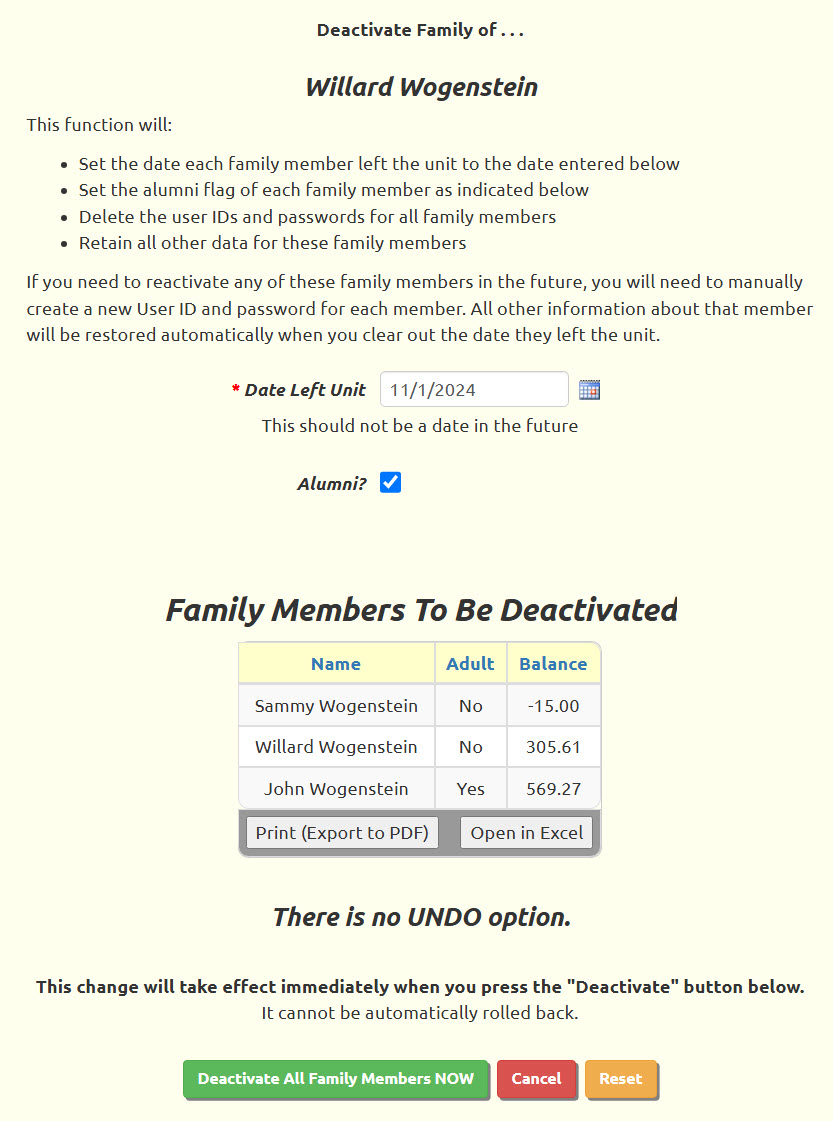
As noted on the page, this function will:
- Set the date each family member left the unit to the date entered
- Set the alumni flag of each family member if selected
- Delete the user IDs and passwords for all family members
- Retain all other data for these family members
The Date Left Unit should usually be set to a date in the past. If you set it to a future date, the user IDs for all members will still be deleted immediately, but the members will otherwise still appear on lists of active members until the date you provided.
The Family Members To Be Deactivated grid lists all of the members who will be affected by this function. Note that it shows the current account balance for each member. You should let your treasurer know when you deactivate members with a non-zero balance. They can still enter transactions for those accounts after the members are inactive.
There is no UnDo option. Do not try this out on your data unless you are prepared to manually restore it.
When you press Deactivate All Family Members NOW, it will immediately take effect. There is no "Are you sure?" prompt.
Update All...Active Scouts Patrol Assignment
The Update All functions allow you to update the same information on a group of records in one operation.
Update All...Active Scouts Patrol Assignments allows you to change the patrol assignments for all active scouts
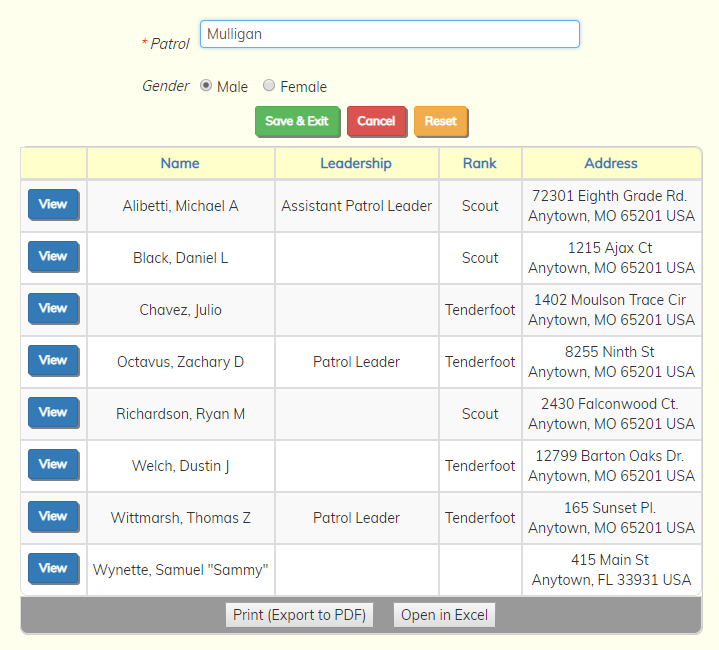
Select Active Scouts Patrol Assignments from the Update All submenu on the Membership menu to see a page like the one shown below.
Select the new patrol for each scout using the drop down list next to his name.
Then click the Save button to save your work.
If you need to change the list of patrols available, select Patrols from the Patrols, Crews & Ships submenu.
Update All...Scout Crew Assignments
The Update All functions allow you to update the same information on a group of records in one operation.
Update All...Active Scouts Crew Assignments allows you to change the crew assignments for all active scouts
Select Active Scouts Crew Assignments from the Update All submenu on the Membership menu to see a page like the one shown below.
Select the new crew for each scout using the drop down list next to his name.
Then click the Save button to save your work.
If you need to change the list of crews available, select Venturing Crews from the Patrols, Crews & Ships submenu.
Update All...Scout Ship Assignment
The Update All functions allow you to update the same information on a group of records in one operation.
Update All...Active Scouts Ship Assignments allows you to change the Sea Scout ship assignments for all active scouts.
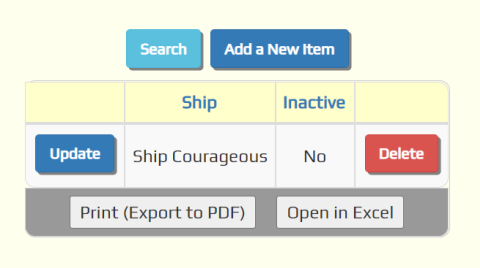
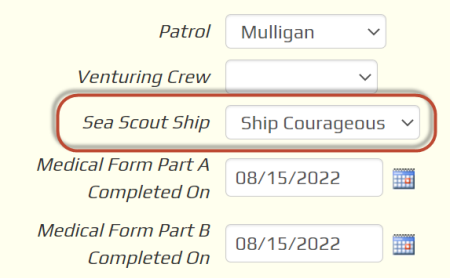
Select Active Scouts Ship Assignments from the Update All submenu on the Membership menu to see a page like the one shown below.
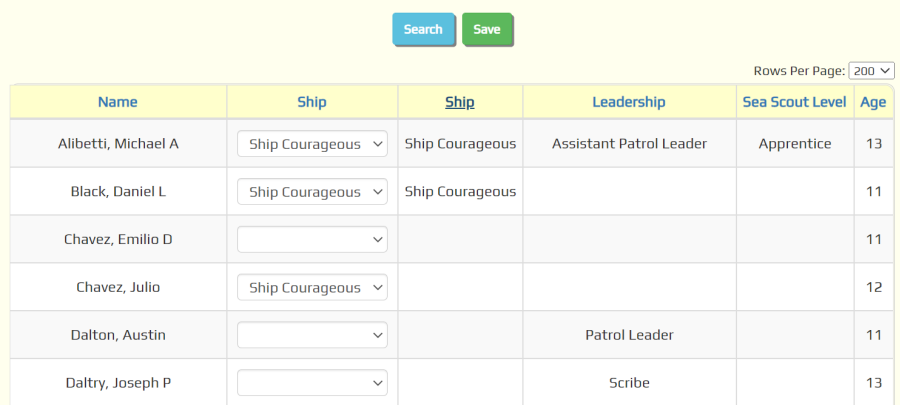
Select the new ship for each scout using the drop down list next to their name.
Then click the Save button to save your work.
If you need to change the list of ships available, select Sea Scout Ships from the Patrols, Crews & Ships submenu.
Update All...Active Scouts Swim Test
The Update All functions allow you to update the same information on a group of records in one operation.
Update All...Active Scouts Swim Test allows you to record the swim test results for all active scouts
Select Active Scouts Swim Test from the Update All submenu on the Membership menu to see a page like the one shown below.
Enter the latest swim test results for each scout, then click the Save button to save your work.
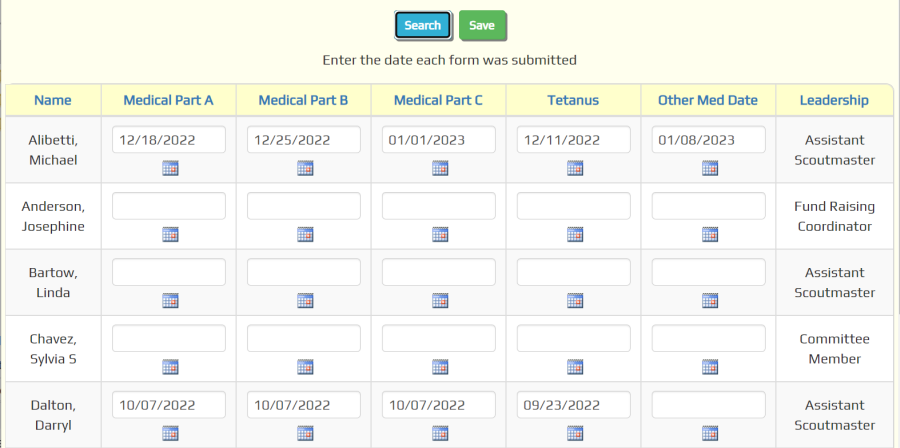
Update All...Active Scouts Medical Form Dates
The Update All functions allow you to update the same information on a group of records in one operation.
Update All...Active Scouts Medical Form Dates allows you to record the most recent dates on which the medical forms were submitted for all active scouts
Select Active Scouts Medical Form Dates from the Update All submenu on the Membership menu to see a page like the one shown below.
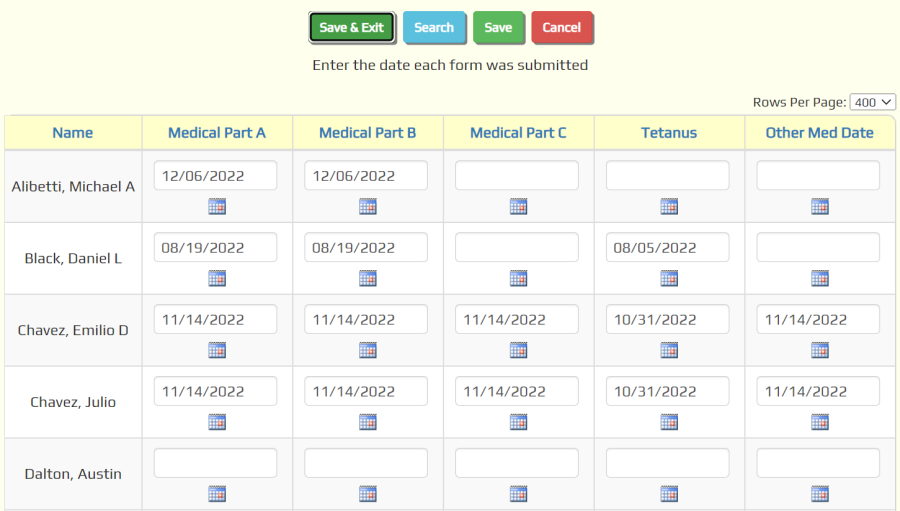
Enter the dates on which each part of the medical form was submitted for each scout, then click the Save button to save your work.
Update All...Scout Affirmation Date
The Last Affirmation Date allows you to track the last time a scout or the scout's parents signed off on documents required by the troop.
Update All...Scout Affirmation Date allows you to update this value for all active scouts
Select Scout Affirmation Date from the Update All submenu on the Membership menu to see a page like the one shown below.
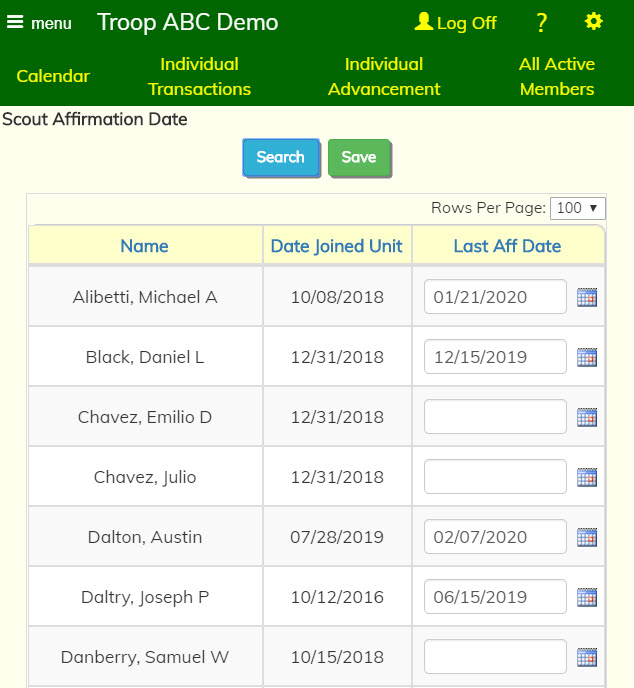
Enter the Last Affirmation Date for each scout in the field next to their name.
Then click the Save button to save your work.
Update All...Scout BSA ID
The Update All functions allow you to update the same information on a group of records in one operation.
Update All...Scouts BSA ID page allows you to enter the BSA ID numbers and registration end dates for all active scouts
Select Scouts BSA ID from the Update All submenu on the Membership menu to see a page like the one shown below.
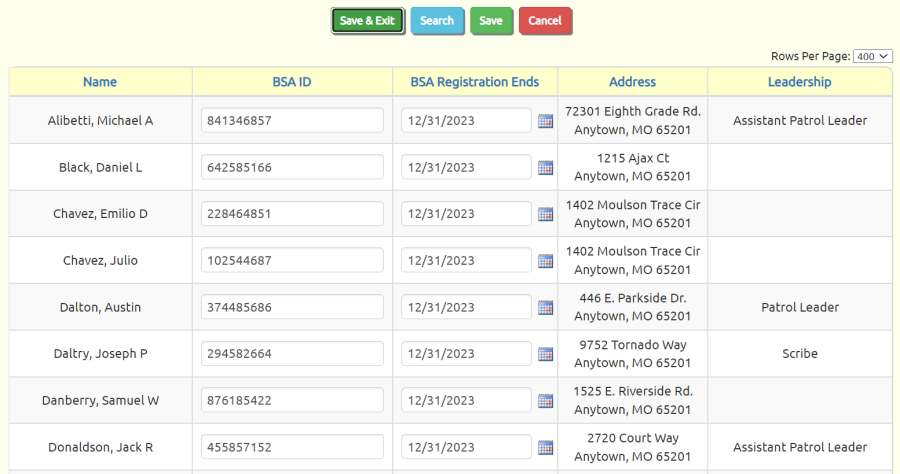
Enter the BSA ID and registration end date for each scout in the fields next to their name.
Then click the Save button to save your work.
Update All . . . Scout Shirt Sizes
The Update All functions allow you to update the same information on a group of records in one operation.
Update All...Active Scout Shirt Sizes allows you to change the shirt sizes for all active scouts.
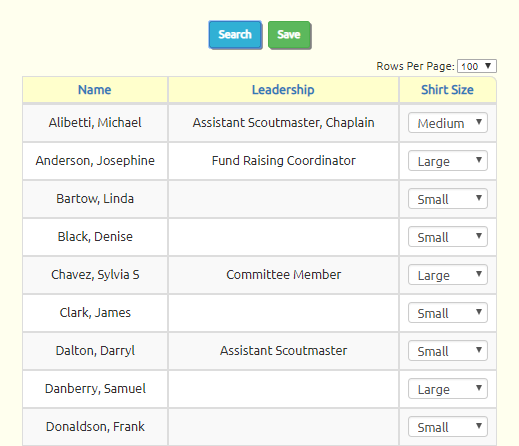
Select Active Scout Shirt Sizes from the Update All submenu on the Membership menu to see a page like the one shown below.

Select the shirt size for each scout using the drop down list next to his name.
Then click the Save button to save your work.
If you need to add to the list of available shirt sizes, go to Shirt Sizes from the Site Configuration menu.
Update All...Adult Medical Form Dates
The Update All functions allow you to update the same information on a group of records in one operation.
Update All...Active Adults Medical Form Dates allows you to record the most recent dates on which the medical forms were submitted for all adult members.
Select Active Adults Medical Form Dates from the Update All submenu on the Membership menu to see a page like the one shown below.
Enter the dates on which each part of the medical form was submitted for each adult, then click the Save button to save your work.
Update All...Adult Leader Medical Form Dates
The Update All functions allow you to update the same information on a group of records in one operation.
Update All...Adult Leader Medical Form Dates allows you to record the most recent dates on which the medical forms were submitted for all adult leaders.
Select Adult Leader Medical Form Dates from the Update All submenu on the Membership menu to see a page like the one shown below.
Enter the dates on which each part of the medical form was submitted for each leader, then click the Save button to save your work.
Update All...All Members Medical Form Dates
The Update All functions allow you to update the same information on a group of records in one operation.
Update All...All Members Medical Form Dates allows you to record the most recent dates on which the medical forms were submitted for all active members.
Select All Members Medical Form Dates from the Update All submenu on the Membership menu to see a page like the one shown below.
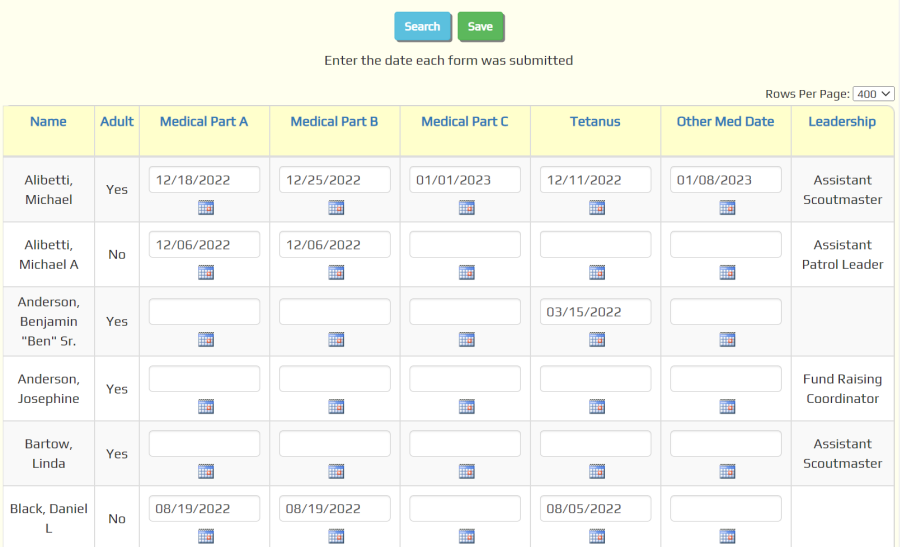
Enter the dates on which each part of the medical form was submitted for each member, then click the Save button to save your work.
Update All...Adult BSA ID
The Update All functions allow you to update the same information on a group of records in one operation.
Update All...Active Adults BSA ID allows you to enter the BSA ID numbers for all active adults
Select Active Adults BSA ID from the Update All submenu on the Membership menu to see a page like the one shown below.
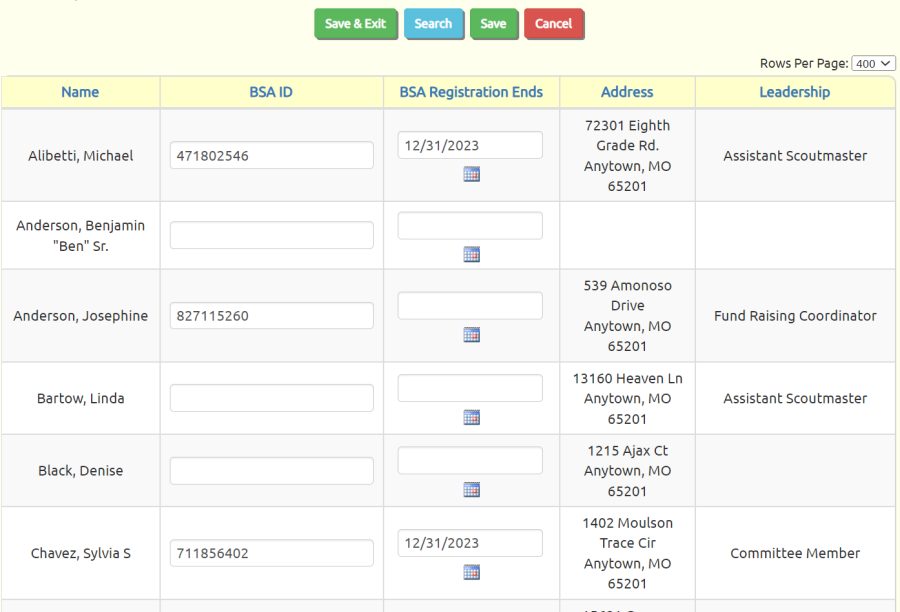
Enter the BSA ID for each adult in the field next to their name. If they are currently registered with the BSA, enter the expiration date for their current registration in the BSA Registration Ends column.
Then click the Save button to save your work.
Update All...Adult Leader Swim Test
The Update All functions allow you to update the same information on a group of records in one operation.
Update All...Adult Leader Swim Test allows you to record the swim test results for all adult leaders.
Select Adult Leader Swim Test from the Update All submenu on the Membership menu to see a page like the one shown below.
Enter the latest swim test results for each leader, then click the Save button to save your work.
Update All . . . All Adults Shirt Sizes
The Update All functions allow you to update the same information on a group of records in one operation.
Update All...All Adults Shirt Sizes allows you to change the shirt sizes for all active adults.
Select All Adults Shirt Sizes from the Update All submenu on the Membership menu to see a page like the one shown below.
Select the shirt size for each adult using the drop down list next to their name.
Then click the Save button to save your work.
If you need to add to the list of available shirt sizes, go to Shirt Sizes from the Site Configuration menu.
Update All...Inactive Alumni
The Update All functions allow you to update the same information on a group of records in one operation.
Update All...Inactive Alumni displays all of your inactive members and allows you to designate those who are considered to be alumni.
Alumni members can be included in a dynamic subgroup, which allows you to send them e-mail and include them in events.
Select Inactive Alumni from the Update All submenu on the Membership menu to see a page like the one shown below.
Click the Alumni checkbox next to each inactive member who is an alumni of the troop.
Then click the Save button to save your work.
Patrols
Go to Membership → Patrols, Ships & Crews → Patrols to maintain a list of your troop's patrols.
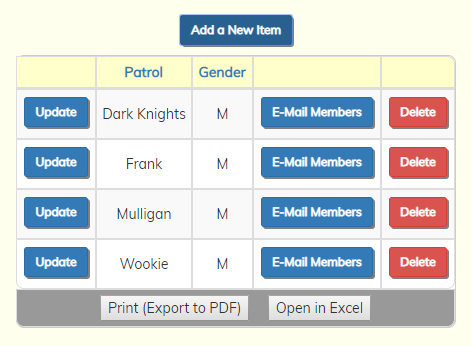
Click on Add a New Item to add a new patrol.
There's not much to it, as you can see below. Just enter the name of the patrol and indicate whether this patrol is for boys or girls, then click Save & Add Another to begin adding the next one.
Assigning Scouts To Patrols
The easy way to assign all scouts to a patrol is to use the Update All function for Patrol Assignments. This will allow you to update the patrol assignments for all scouts in one operation.
You can update the patrol assignment for one scout by selecting Active Scouts from the Troop menu and selecting the scout you wish to update.
Halfway down the Active Scouts update page, you'll see a choice list for Patrol.
Click on the choice list and you should see all of the patrols you've entered for the troop.
Select the patrol to which this scout belongs, then click Save & Exit.
Then go on to the next scout.
When a patrol changes its name - but not its membership - you can simply go back to the Patrols page and update the patrol names that changed. The same scouts will still belong to the patrol under its new name.
The E-Mail Members button on the Patrols page will take you to the Compose E-Mail page with all of the patrol members pre-selected.
You can then add or remove other troop members to the email before you send it.
Go to Membership → Patrols, Ships & Crews → Patrol Rosters to see a list of active scouts, sorted by patrol.
Venturing Crews
Go to Membership → Patrols & Crews → Venturing Crews to maintain a list of your venturing crews.
Click on Add a New Item to add a new venturing crew.
Simply enter the name of the crew and click Save & Add Another to begin adding the next one.
Assigning Scouts To Crews
You can update the crew assignment for one scout by selecting Active Scouts from the Troop menu and selecting the scout you wish to update.
Halfway down the Active Scouts update page, right below the Patrols field, you'll see a choice list for Venturing Crew.
Click on the choice list and you should see all of the active venturing crews for the troop.
Select the crew to which this scout belongs, then click Save & Exit.
Then go on to the next scout.
When a crew changes its name - but not its membership - you can simply go back to the Venturing Crews page and update the crew names that changed. The same scouts will still belong to the crew under its new name.
The E-Mail Members button on the Venturing Crews page will take you to the Compose E-Mail page with all of the crew members pre-selected.
You can then add or remove other troop members to the email before you send it.
Select Crew Rosters from the Troop menu to see a list of active scouts, sorted by crew name.
Sea Scout Ships
Go to Membership → Patrols, Crews & Ships → Sea Scout Ships to maintain a list of your unit's ships. You may choose to create just one entry in this list to represent everyone in your unit who participates in the Sea Scout program, or create multiple ships as needed.
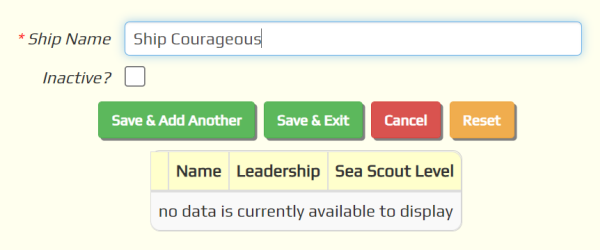
Click on Add a New Item to add a new ship, as shown below. Just enter the name of the ship, then click Save & Add Another to begin adding the next one.
Assigning Scouts To Ships
The easy way to assign all scouts to a ship is to use the Update All function for Ship Assignments. This will allow you to update the ship assignments for all scouts in one operation.
You can update the ship assignment for one scout by selecting Active Scouts from the View / Maintain Members submenu and selecting the scout you wish to update.
Halfway down the Active Scouts update page, you'll see a choice list for Sea Scout Ship.
Click on the choice list and you should see all of the ships you've entered for the troop.
Select the ship to which this scout belongs, then click Save & Exit.
Then go on to the next scout.
When a ship changes its name - but not its membership - you can simply go back to the Sea Scout Ships page and update the ship names that changed. The same scouts will still belong to the ship under its new name.
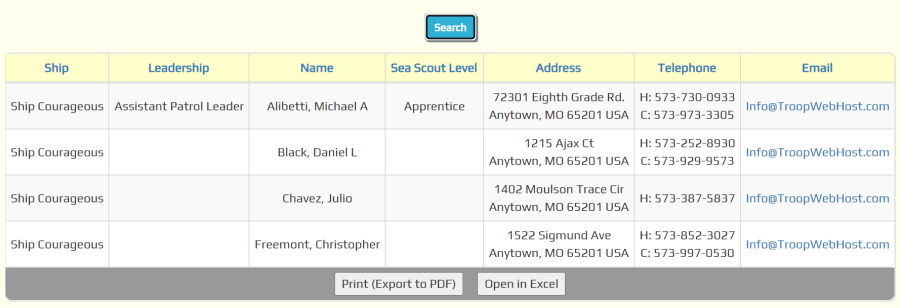
Select Ship Rosters from the Patrols, Crews & Ships submenu to see a list of active scouts, sorted by ship.
Boy and Girl Troops
If your charter organization has added a girl troop, one of your options is to manage both the girl troop and the boy troop within the same TroopWebHost site. If you are taking that approach, you should create an entry in the Boy & Girl Troops page to represent each of these units.
Go to Site Configuration → Boy & Girl Troops as shown below.
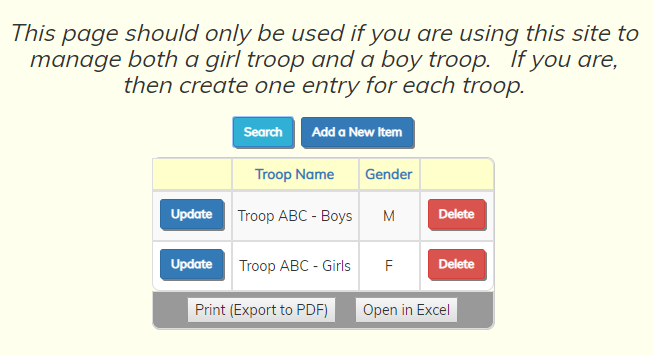
Click on Add a New Item to add a new troop.
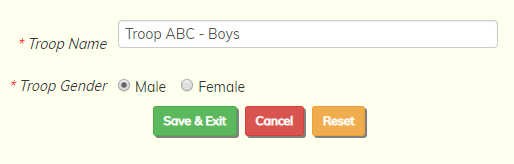
All you need to do is enter a name and select the gender of the scouts who will be in this troop.
Click Save & Exit to save this troop to the database. It will now be available when maintaining adult leadership.
Leadership Positions
The Leadership Positions page allows you to view and define the leadership roles held by adults and scouts in your troop. It is located at Site Configuration → Leadership Positions.
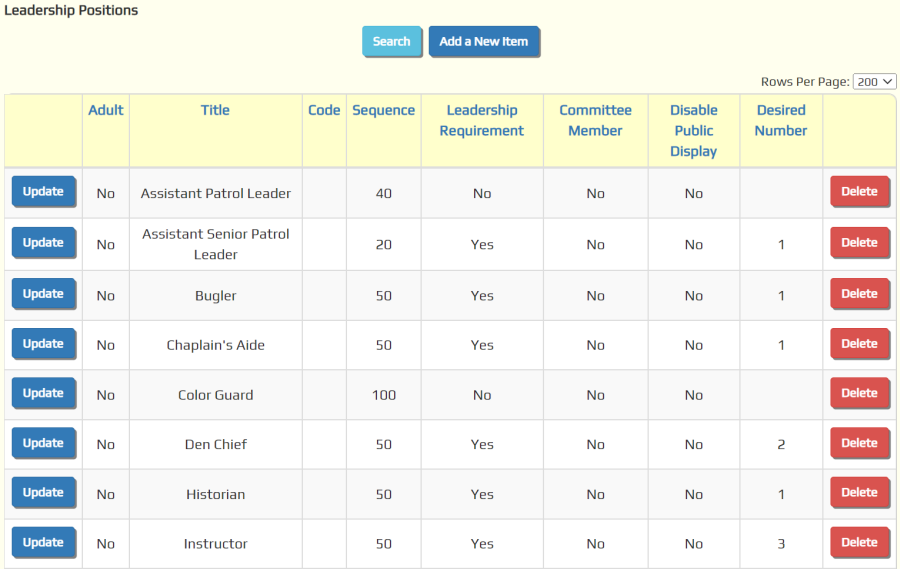
Authorized users can add, delete and edit positions. Existing positions can be edited by clicking their respective Update buttons, and a new position can be created by clicking the Add a New Item button.
The Update and Add buttons will both take you to the page shown below:
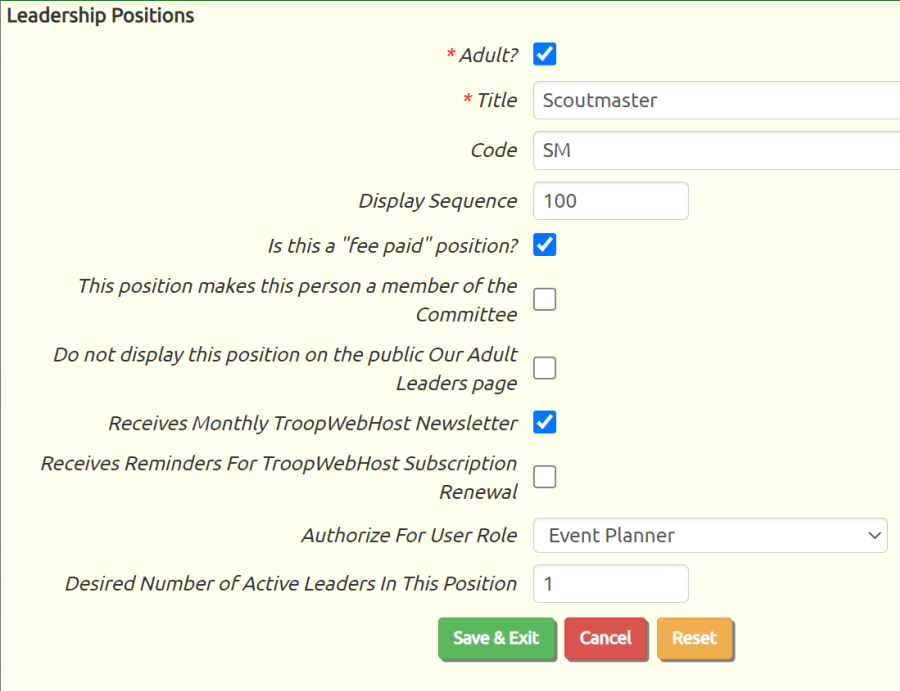
Adult? indicates whether this position is held by adults. Leave this unchecked for scout leadership positions.
Title is the name of this position.
Code is the BSA code for this position.
Display Sequence determines the order in which members with these positions will appear on some pages, such as the public Our Adult Leaders page. Positions with a lower number display sequence will appear before those with higher numbers.
Qualifies For Leadership Requirement? (only applies to scout leadership positions) - Check the box "Qualifies For Leadership Requirement?" if this is a scout leadership position that qualifies for the leadership requirement for Star and Life ranks. This option determines whether this position will be considered when computing the leadership requirements in the Leadership Rank Requirement Status Report. Note that the Bugler position does qualify for Star and Life, but not Eagle; this exception is hard-coded into the program.
Is this a "fee paid" position? (only applies to adult leadership positions) - Check the box if a BSA registration fee is required for this position.
This position makes this person a member of the Committee (only applies to adult leadership positions) - Check the box if this position is considered part of the Troop Committee for the purpose of Journey To Excellence objective #11.
Do not display this position on the public Our Adult Leaders page (only applies to adult leadership positions) - Checking the box will prevent leaders from this position from being included on the Our Adult Leaders page, unless they also hold another position which has not been excluded.
Desired Number of Active Leaders In This Position - Enter the number of people you would normally expect to fill this position at any point in time. This can be left empty for positions that are considered optional. For most positions, it should be set to 1. You might set it to a higher value for positions like Assistant Scoutmaster, Committee Member, or Patrol Leader, just to give a few examples.
Site administrators will see three additional fields on this page:
- Check the box for Receives Monthly TroopWebHost Newsletter to ensure that anyone who currently holds this position will receive the monthly email announcing the TroopWebHost newsletter.
- Check the box for Receives Reminders For TroopWebHost Subscription Renewal to allow anyone in this position to receive email reminders when your TroopWebHost subscription is due for renewal.
- Authorize For User Role allows you to link this position to a User Role. The system will automatically assign this user role to anyone who currently holds this position; when they leave the position, the role will be removed.
Scout Leadership
The Scout Leadership page displays a history of the scout-held leadership positions in your troop. It is accessed through Membership → Leadership → Scout Leadership.
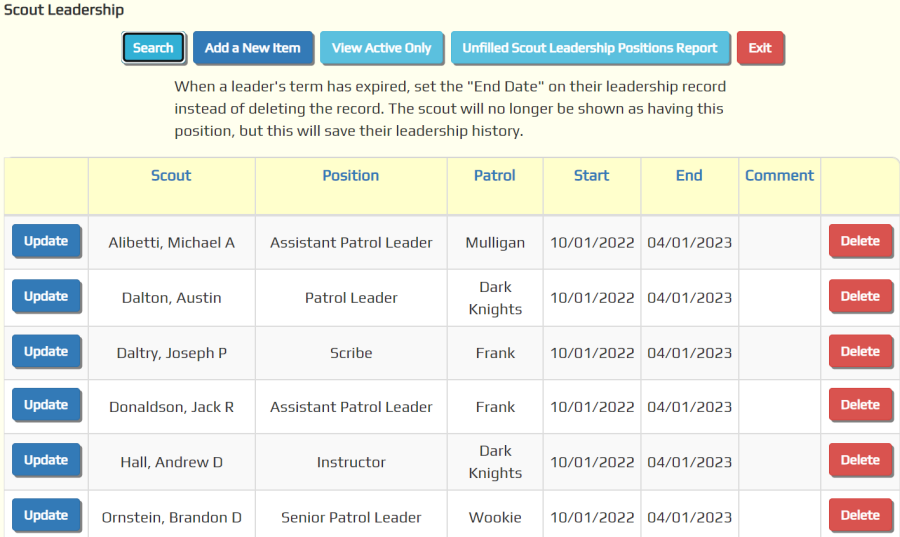
On the right side of the table, you will see two columns that contain start and end dates, respectively. The start date represents the beginning of when the scout held that position, and the end date indicates when the term expires. For long-term positions, the end date may be left blank.
Leadership positions are automatically sorted by end date. Positions that have expired will therefore appear at the bottom of the page. You should not delete the records of expired positions. Leaving the records in the database allows you to see what positions scouts have held in the past, both on this page and in the Scouting History Reports.
Each record connects a scout to a leadership position. It is possible for one scout to hold multiple positions at the same time, or for multiple scouts to hold the same position.
Click View Active to filter out past positions which are no longer active.
Click Unfilled Scout Leadership Positions Report to produce the Unfilled Scout Leadership Positions Report.
Clicking the Add a New Item allows you to add a new leadership record. This will not allow you to add a new scout to the troop; to do that, you should use the New Scout Registration page.
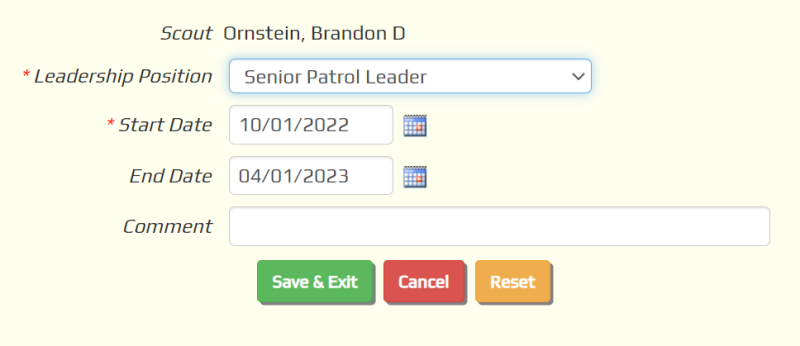
When adding a new record, you must choose a leadership position that has been defined on the Leadership Positions page. You can use that page if you want to add new positions.
The Start Date is when the scout began serving this term.
The End Date is when the term of this position will end. It may be entered in advance of that date. The scout will be considered to be active in this position until after the specified date.
Scout Leadership Mass Update
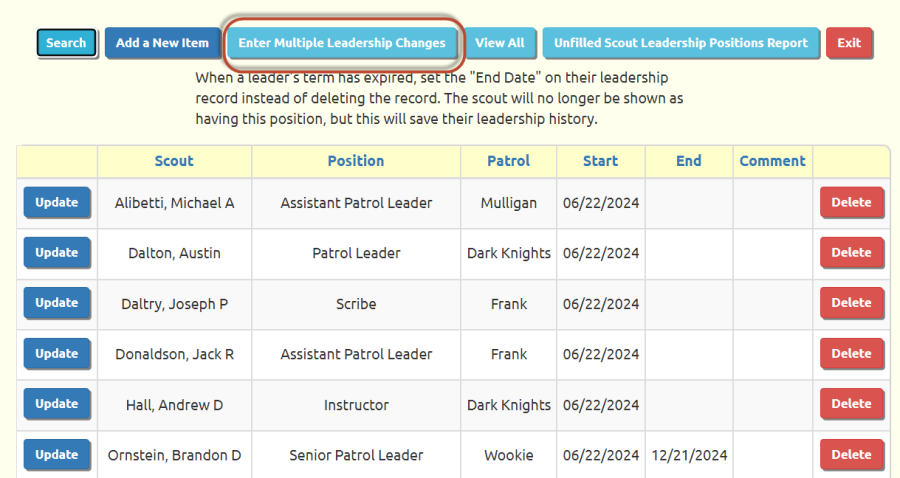
Many scouting units elect youth leaders twice a year for six month terms. As we've seen, each leadership term is stored as a separate entry in the Scout Leadership table. TroopWebHost makes it easy to enter all of these leadership changes from one screen.
Begin by going to the Scout Leadership page. Then press the button Enter Multiple Leadership Changes, as circled below:
This will take you to a page that allows you to do one or both of the following:
- Close out any current scout leadership positions that do not have an end date
- Enter new leadership positions for any active scout
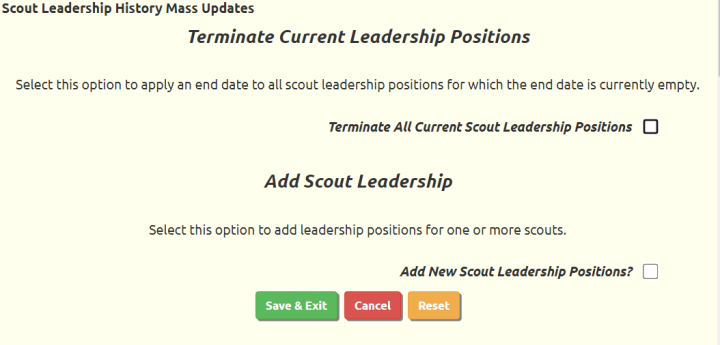
The first section, "Terminate Current Leadership Positions", will only appear if you have any open ended scout leadership positions, i.e. positions that do not have an end date.
Put a checkmark in the Terminate All Current Scout Leadership Positions box to enable this function. It will then prompt you for an end date.
The second section, "Add Scout Leadership", will always appear. Put a checkmark in the Add New Scout Leadership Positions box to enable this function. It will then prompt you for a start date and end date, and display a list of all active scouts.
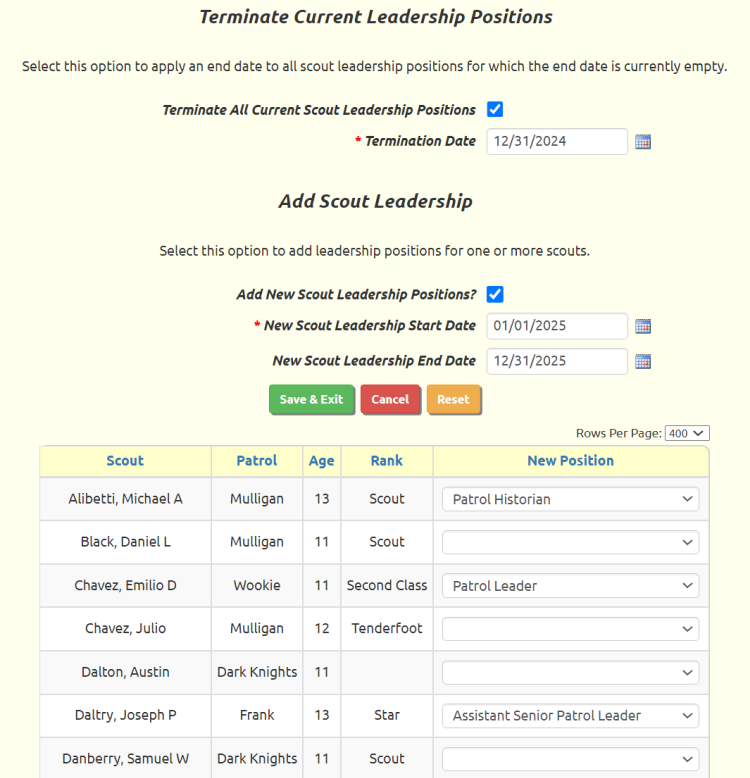
The New Scout Leadership Start Date is required. This is the start date that will be assigned to all of the leadership positions that you are about to add.
The New Scout Leadership End Date is optional. This is the end date that will be assigned to all of the new leadership positions.
You can assign one position to each scout by selecting that position from the drop down list next to their name. If a scout has more than one leadership position, you can come back to this screen to enter the additional positions.
Note that you can sort the list of scouts by clicking on any of the column headings.
Be sure to click Save & Exit to save your work. When you click Save & Exit, the system will:
- Update any existing leadership positions that don't have an end date (if you enabled the first function)
- Insert leadership positions for any scouts for whom you selected a new position (if you enabled the second function)
- Clear all of these selections, so that when you return to this page, you can enter a new set of changes
Adult Leadership
The Adult Leadership page displays a history of the adult-held leadership positions, such as Scoutmaster or Committee Chairman, in your troop. It is accessed through Membership → Leadership → Adult Leadership.

On the right side of the table, you will see two columns that contain start and end dates, respectively. The start date represents the beginning of when the adult held that position, and the end date indicates when the term expires. For long-term positions, the end date may be left blank.
This page displays a history of adult leadership positions within the troop. Click View Active Only to only see the current leaders.
You should not delete the records of expired positions. Leaving the records in the database allows you to see the history of leadership in the troop.
Click Unfilled Adult Leadership Positions Report to produce the Unfilled Adult Leadership Positions Report.
Click Add a New Item to add a new leadership record. This will not allow you to add a new adult to the troop; to do that, you should use the Add a New Item buttons on the Active Adults page.
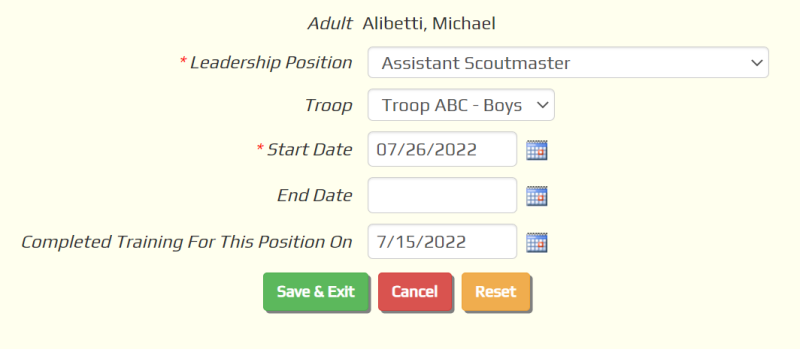
When adding a new record, you must choose a leadership position that has been defined on the Leadership Positions page. You can use that page if you want to add new positions.
You will only see the Troop drop down list if you are using this site to manage both a boy troop and a girl troop. Even then, it is not a required field, since some positions may be shared between the two troops.
The End Date should only be entered if you know for sure that this person will stop serving in this position by a certain date. Otherwise, it should be left empty.
Completed Training For This Position On is the date on which this person completed all required BSA training for this position. It is used when compiling the Journey To Excellence report.
Dynamic Subgroups
Dynamic Subgroups allow you to define subsets of your membership roster that are dynamically computed whenever you use them, based on the current attributes of your members.
Once you've created a dynamic subgroup you can use it to:
- Send an e-mail message to that group
- Create events specifically for that group
- Make a training course required for all members of the group
Select Dynamic Subgroups from the Membership menu to create and maintain your list of subgroups.
 Click Add a New Item to add a new dynamic subgroup.
The Subgroup Name should be descriptive of the group you are defining.
You can set up an Email Relay Address for this group by checking the box Create an email relay address for this subgroup?. This will allow members of your troop to send messages to this group without logging on to the site.
If you enable this option, two more fields will appear. Email Relay Address Prefix will become the first part of the e-mail relay address for this group. So, for example, if I enter "Committee" as my Email Relay Address Prefix and my site name is "Troop999Sarasota", then this subgroup will have the following e-mail relay address: Committee.Troop999Sarasota@twh.email.
Send Relayed Message To determines whether the relayed messages will be sent to e-mail addresses, sms addresses, or both.
If you are using one TroopWebHost site to manage both a girl troop and a boy troop, you will have the ability to filter the selected scouts based on gender, by selecting "Include...Boys Only" or "Include...Girls Only". This criteria will not add anyone to the subgroup on its own, but once you add other criteria to to select scouts it will filter out those who are not of the selected gender.
Similarly, the next attribute, Include active parents of selected scouts?, will not add anyone to the subgroup on its own. However, once you add other criteria that cause scouts to be added to the group, it will cause their parents to be included as well.
All of the remaining attributes will add members to the group. They do not act as filters; each attribute is additive. Any member who meets ANY of the criteria you specify will be added to the group.
So, for example, if you select Include all active members of Order of the Arrow? and First Class scouts and patrol leaders, the group will include ALL active members of Order of the Arrow PLUS all First Class scouts PLUS all patrol leaders.
Include all active scouts this age or older will select all active scouts who are that many years old or older.
Include all active scouts this age or younger will select all active scouts who are that many years old or younger.
If you enter a value in both of these fields it will select all active scouts who are within that range of ages.
Include all members of Order of the Arrow? will select any member whose membership record has the Order of the Arrow Member box checked.
Include all active members of Order of the Arrow? will select any member whose membership record has the Active in Order of the Arrow box checked.
Include all alumni will include all members whose Alumni box is checked, including inactive members.
The Membership Category grid can be used to select ALL active scouts or ALL active adults. If you select both, it will select all active members.
Current Scout Rank will select all scouts who currently hold the selected ranks. It does not select scouts who previously held the selected rank. If you only select First Class, it will not select scouts who are currently at Star, Life, or Eagle (unless they are included based on other selection criteria).
To select new scouts who have not yet earned a rank, check the New Scouts (no rank) box.
Patrol will include the members of the selected patrols.
Venturing Crew will include the members of the selected venturing crews.
Leadership will include those members who currently hold the selected leadership positions.
E-Mail Group will include the members of the selected e-mail groups.
Training
TroopWebHost allows you to track the training completed by scouts and adult leaders.
Configuring Training Courses
The Training Courses page allows you to create and edit the types of training available to scouts and adults. It is accessed from Site Configuration → Training Courses.
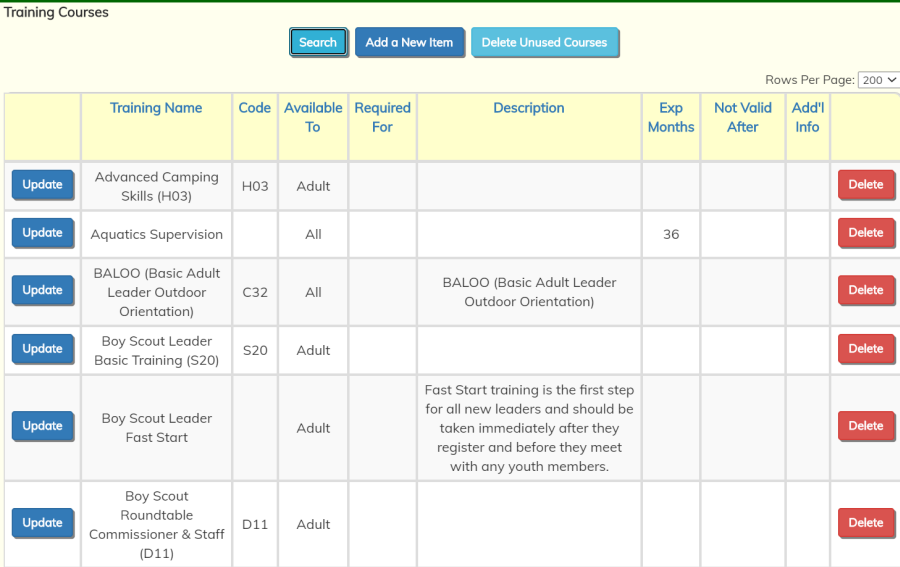
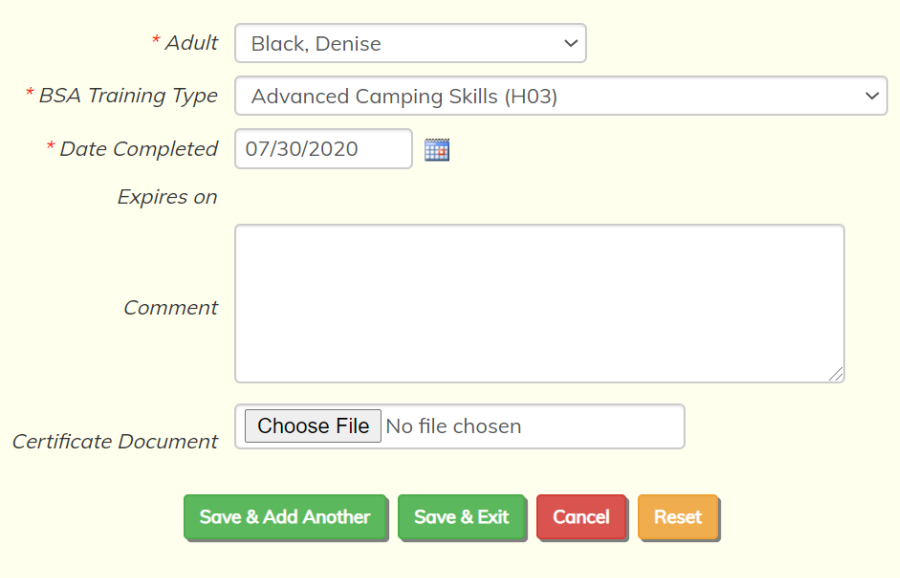
Click Add a New Item to begin adding a training course to the list. This will display a page that looks like this:
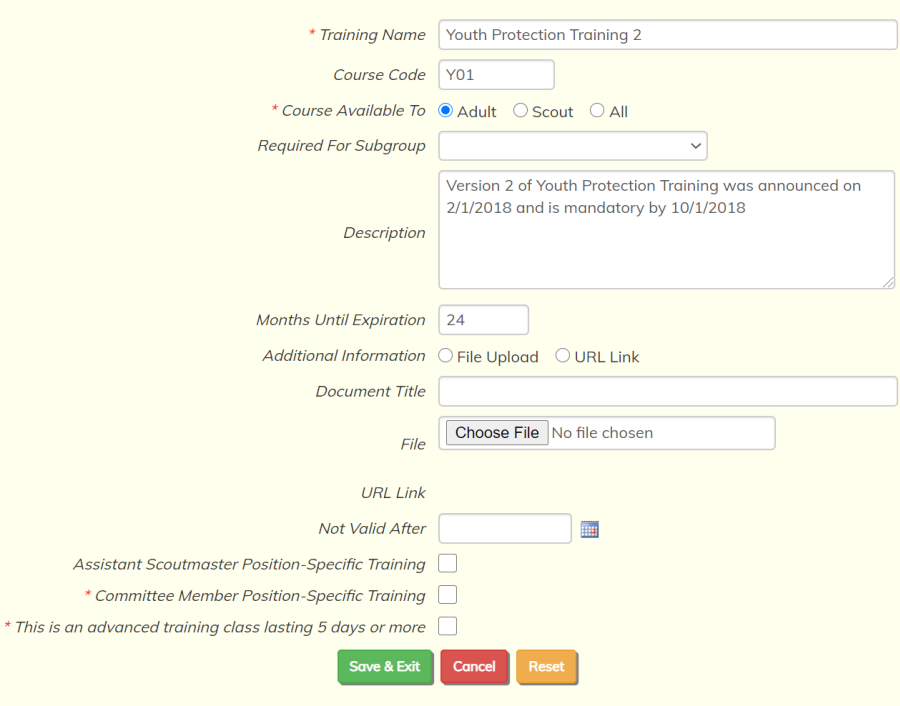
The Training Name is the name of the course or certification.
Course Code is the BSA's three character code for this class.
Course Available To allows you to limit this class to adults or scouts, or allow it to be recorded for all members. Additional fields will appear at the bottom of this form when you select "Adult" or "Scout".
Required For Subgroup allows you to select a Dynamic Subgroup whose members are required to take this course.
The Description tells what this course covers.
The Months Until Expiration is for classes that have to be taken again after a period of time. This is the number of months between when the training is completed and when it expires. If this is left blank, TroopWebHost will assume that the training never expires.
Additional Information allows you to upload a document or provide a link to a web resource that has more information about this course. Be sure to enter the Document Title, as this will be the text that appears in the link. If you leave it blank you won't see a link to this document.
Enter a date into the Not Valid After field to indicate that this course has been discontinued as of this date.
If the course is available to "Adult", you will see these additional fields, all of which are used by Journey To Excellence:
- Check the Assistant Scoutmaster Position-Specific Training checkbox if this course qualifies for this JTE requirement.
- Check the Committee Member Position-Specific Training checkbox if this course qualifies for this JTE requirement.
- Check This is an advanced training class lasting 5 days or more if this course qualifies for this JTE requirement.
If the course is available to "Scout", you will see one additional checkbox, Qualifies for JTE scout advanced training requirement. If a scout completes a course with this designation, it will score that requirement on this year's JTE.
Record Training Completed By Adults
The Adult Training page allows you to record which adults have received which training courses. It is accessed through Membership → Training → Adult Training.
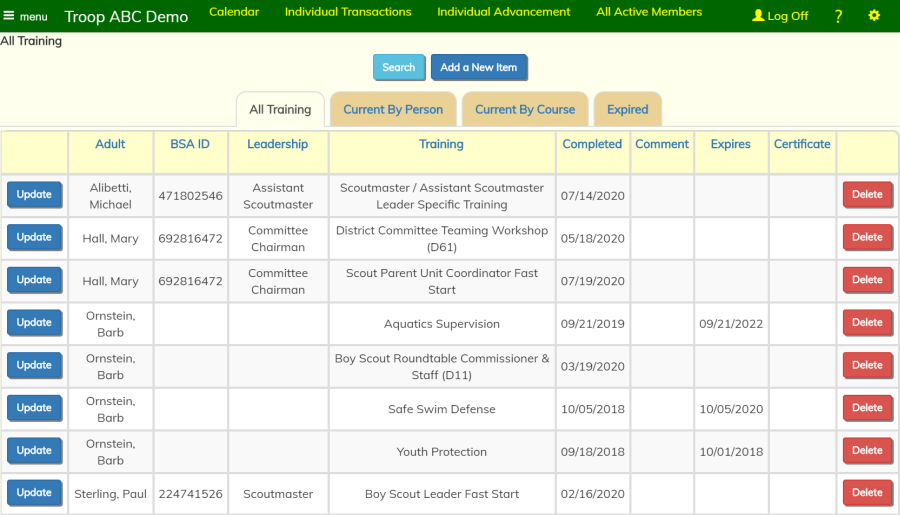
Every time an adult completes a training course, you should add a new item to this list. If they've taken the course previously, do NOT update the record of their previous course; instead, click Add A New Item to add a new entry. This will create a history of all course completions.
First select an adult leader and link them with a training type that they have completed.
Each record in this table also contains a completion and expiration date. The completion date indicates when the training was completed by the adult leader in question. Expiration dates are filled in automatically based on the Months Until Expiration field in the Training Courses form. Training types without an expiration date will never expire.
It is not recommended that you delete expired training records. Training records that are not deleted are available to view on an adult leader's My Training History page.
Training that is about to expire will appear on the Automated Newsletter for the individual who took the class.
Record Training Completed By Scouts
The Scout Training page allows you to record which scouts have completed training courses. It is accessed fromMembership → Training → Scout Training.
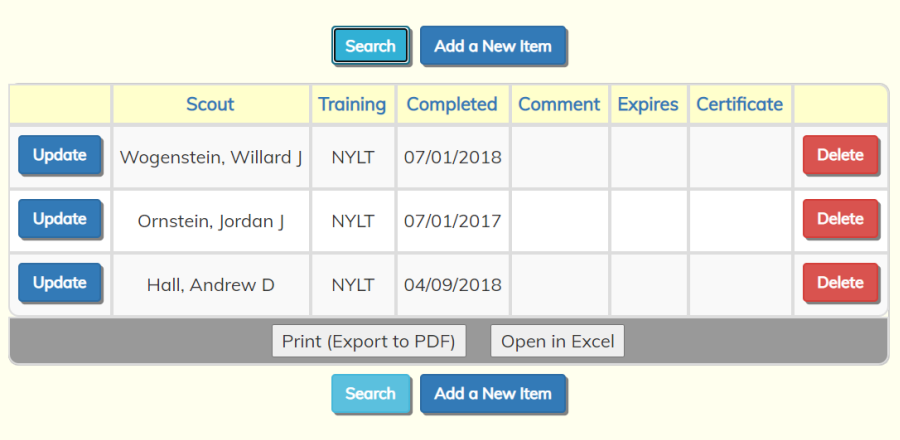
Click the Add a New Item button to select a scout and the training course that he completed.
You should also enter the date the course was completed. If the course expires after a certain number of months, the expiration date will be calculated for you automatically.
Scout training history will be included in the Scouting History report.
Safeguarding Youth Training
On May 15, 2025, at the National Annual Meeting, Scouting America announced a new training course that replaces Youth Protection. This new course is called Safeguarding Youth Training, or "SYT".
The Scouting America data systems recognize these two courses:
- Safeguarding Youth Training (SCO_3014) - NOT USED FOR TRACKING CERTIFICATION
- Safeguarding Youth Training Certification (Y01)
It appears that Scouting America intends to track training compliance using the Certification (Y01) entry, which is good for 12 months. We will use that same entry when we compute each member's SYT (formerly "YPT") status. We will NOT use the Safeguarding Youth Training (SCO_3014) to track completion of this requirement.
Scouting America also released a new training report, the Safeguarding Youth Training Aging Report, which includes past YPT training as well as the new SYT training. We now support this new report in our Upload Training From My.Scouting page.
All grids and reports that show YPT information have been relabeled "SYT", as shown here:
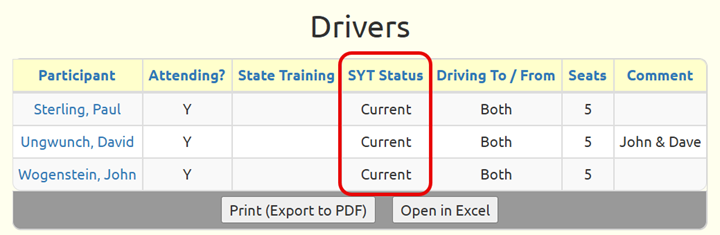
If a leader has not yet completed Safeguarding Youth Training, then their status in this column will be based on when they last took Youth Protection Training 2. This training will expire no later than May 31, 2026, regardless of when it was completed.
Once a leader completes Safeguarding Youth Training, this certification will expire in 12 months, even if their earlier YPT certification (which may have been for 2 years) has a later expiration date.
Upload Training From My.Scouting.Org
All official training activities are logged with the BSA™ and can be accessed from the My Scouting™ website.
You may be able to transfer this data to your TroopWebHost site, assuming you can access the necessary export function on the My.Scouting.Org site.
These My Scouting export functions have changed over time and not all of them may be available at any given time. That is why TroopWebHost supports multiple formats, in the hope that you can access one or more of them.
The formats currently supported are:
- Position Training Requirements Report (CSV)
- Leader Training Completed Report (CSV)
- Members Having Specific Training Report (CSV)
- Training Manager Youth Report (CSV)
- Safeguarding Youth Training Aging Report (CSV)
- YPT Aging Report (CSV)
- Unit Training Tracking (CSV)
Further down this page we will provide guidance on producing these files.
Once you have a compatible file, please go to Membership → Training → Upload Training From My.Scouting.Org.
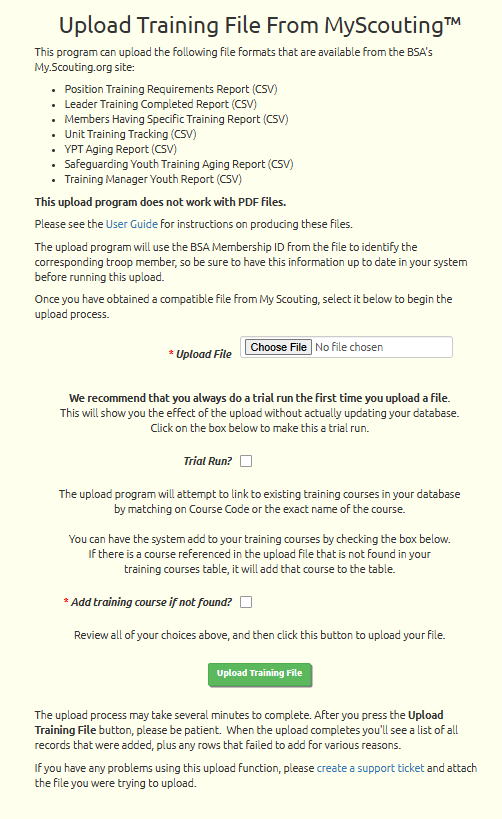
Select the file that you downloaded from the MyScouting site using the Upload File control.
We recommend that you always do a trial run the first time you upload each file. This will allow you to see the effect of the upload without actually updating your database.
You may then want to make some changes to your data before you upload the file for real - which you do by leaving the Trial Run box unchecked.
When you do the trial run, you may find that some of the people in the report could not be found in your TroopWebHost database. The upload program looks up each person using their BSA Membership ID, so it is best to have all of your BSA IDs up to date before starting this process, which you can do using Update All...Active Adults BSA ID.
The system will try to find each training course that is referenced in the file in the training courses table. It will match on Course Code or Training Name. If it cannot find a match, it will not be able to load that training record...unless you check the box Add training course if not found? That option will cause the system to add new training courses to your list of available courses when they are found in the file.
Press the Upload Training File button when you are ready to process the file. Be patient, as this may take a few minutes to complete, depending on the size of your file.
The rest of this page describes how to produce these files from the My Scouting site. While we will do our best to keep this information up to date, please understand that the BSA may change their site at any time, which may change the process or eliminate it altogether.
Do not open any of these files in Excel! This may change the format in ways that will prevent it from loading. Always save these files directly to disk.
Position Training Requirements Report
The good thing about this report is that it can include all of your adult leaders in one file.
The drawback is that it only includes those courses that are required for their current position. So if they've taken other courses that are not required for their position, those courses will not show up in this report.
To produce this report, please log on to the My Scouting site and select Training Manager from the main menu.
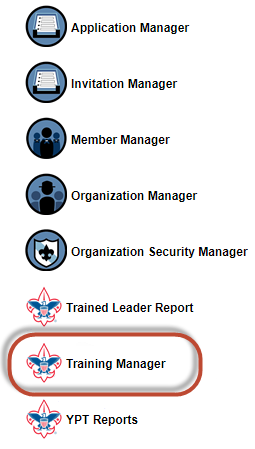
This will take you to the Training Manager Dashboard, as shown below.
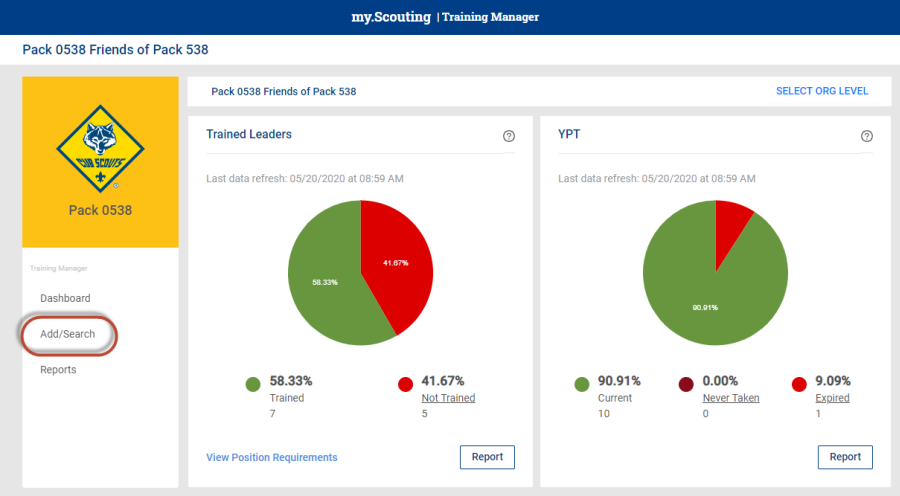
Select Add/Search from the left side of this page....
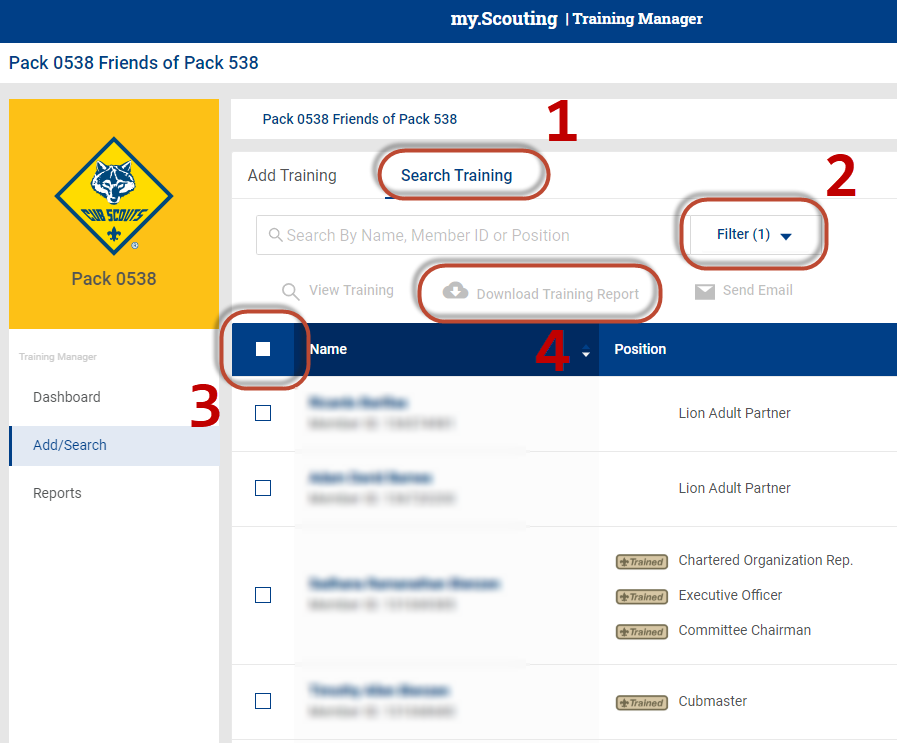
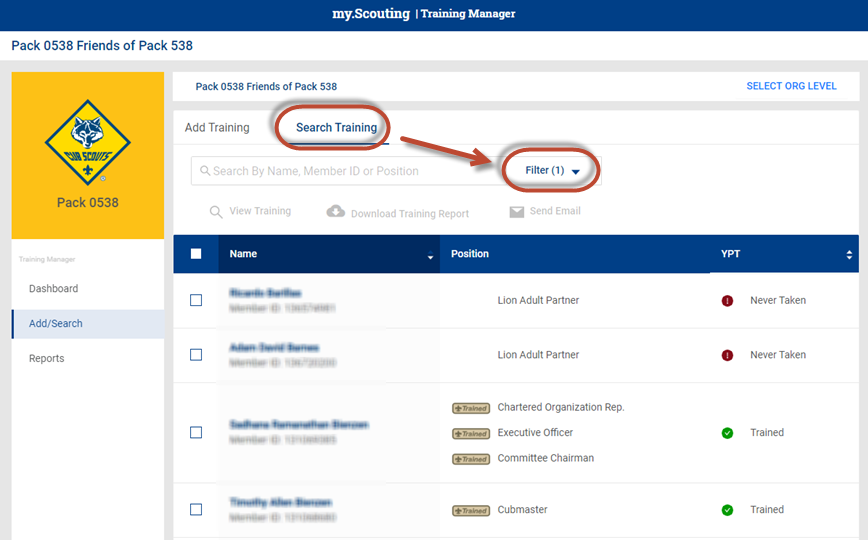
Select the Search Training option at the top of the page, then use the Filter option to select only adult members.
Scroll to the bottom of the members list, click on the "rows per page" control and set it to the highest value. The export will only include the people who are shown on the current page.
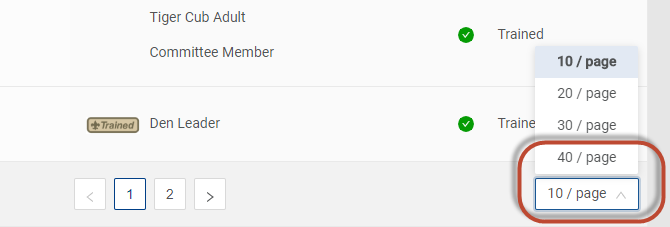
Then scroll back up and click on the first checkbox at the top of the grid to select all. This will enable the Download Training Report button, which will produce the file.
Select the CSV format and save directly to disk, without opening in Excel. Do not select PDF.
Leader Training Completed Report
This report includes all of the training courses completed by a given leader.
The drawback is that it can only be produced for one leader at a time.
To produce this report, log on to the My Scouting site and go to the Training Manager page.
Select Add/Search from the left side of this page....
Click Search Training, then Filter.
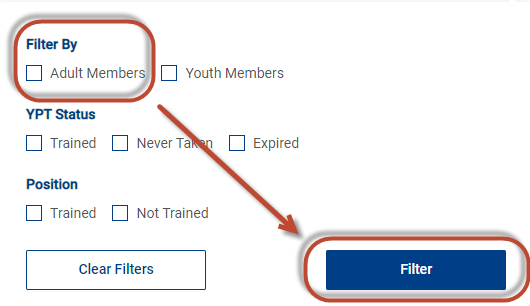
Filter by Adult Members.
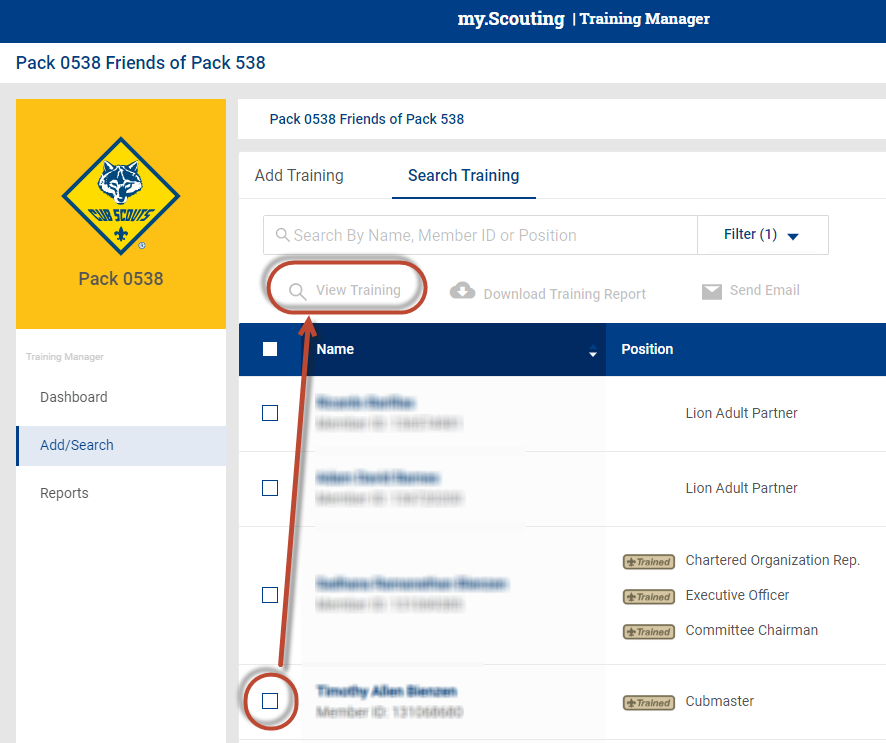
Then click in the checkbox next to the name of the person for whom you wish to run the report, then click View Training.
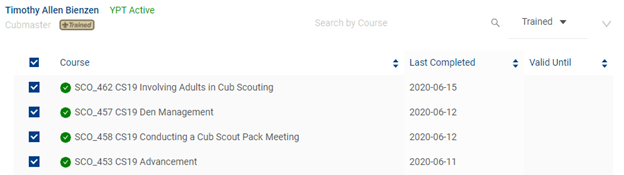
Click the checkbox in the header row to select all of the training courses, then scroll to the bottom of the page and click on Training Report.

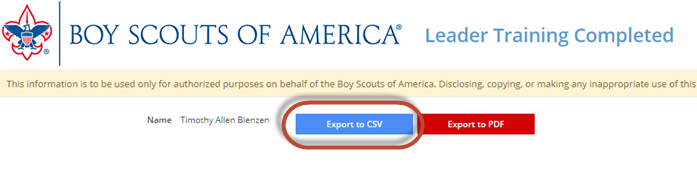
On the Leader Training Completed page, click Export to CSV. Save the file directly to disk, without opening in Excel.
Members Having Specific Training
This report includes all of the members who have completed a specific training course.
The drawback is that you must select the specific training courses you want. You cannot simply request all courses.
To produce this report, log on to the My Scouting site and go to the Training Manager page.
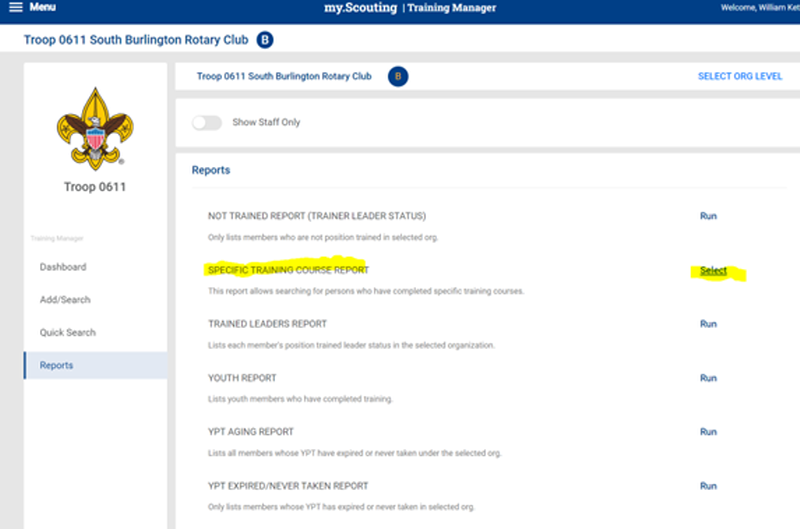
Press Select to the right of SPECIFIC TRAINING COURSE REPORT to pop up this window....
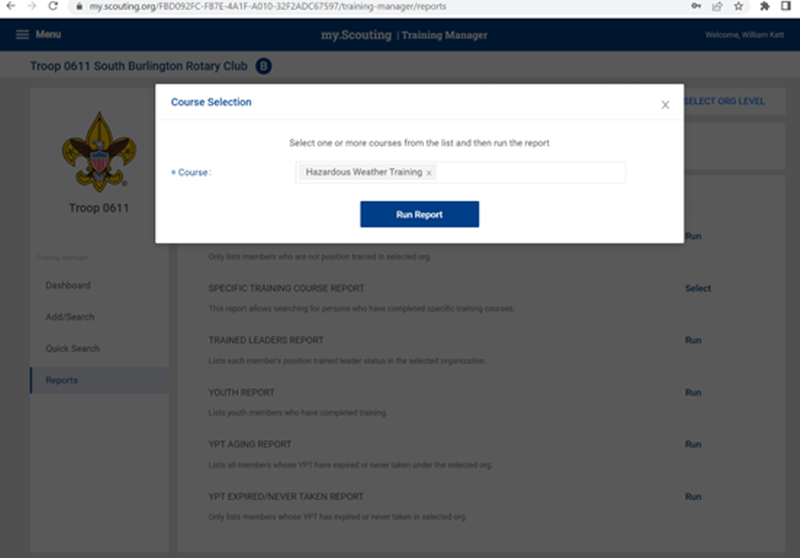
Select the training course (you may be able to select more than one) from the drop down list, as shown above. Then click Run Report.
Be sure to select CSV as the output format. This file may then be uploaded to the Upload Training From My.Scouting.Org page.
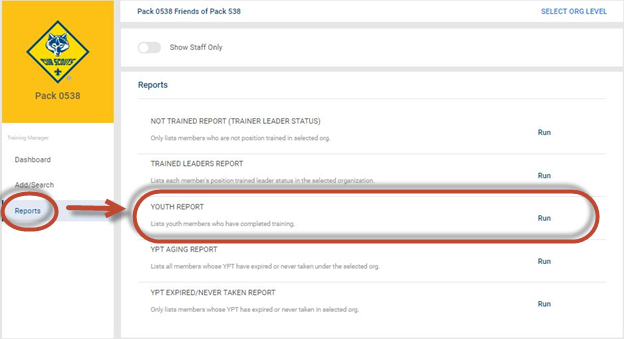
Training Manager Youth Report
This report shows youth training completed by scouts.
To produce this report, log on to the My Scouting site and go to the Training Manager page as shown above.
Click on "Reports", then select "Training Manager Youth Report", as shown below. Choose the CSV format.
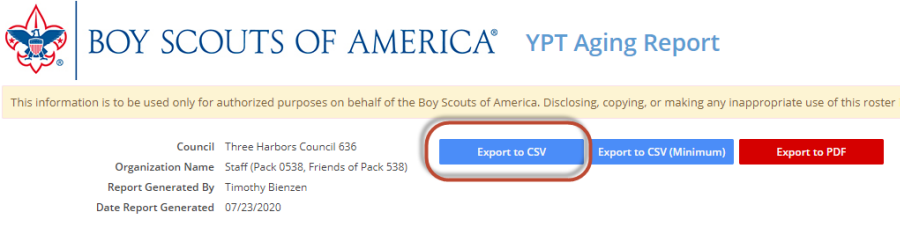
Safeguarding Youth Training Aging Report
This report shows the latest SYT and YPT completion for all adult members. It does not include any other training, just SYT and YPT.
This report can be selected directly from the My Scouting main menu.
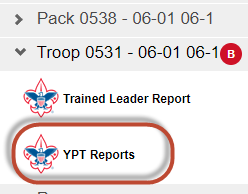
Select YPT Reports to go to this page.

Click Export to CSV and save the file directly to disk, without opening in Excel.
YPT Aging Report
This report shows the latest YPT completion for all adult members. It does not include any other training, just YPT.
This report can be selected directly from the My Scouting main menu.
Select YPT Reports to go to this page.
Click Export to CSV and save the file directly to disk, without opening in Excel.
Unit Training Tracking
This report shows all training completed by all members.
Unfortunately, very few people are able to access this report anymore. We don't know why.
But if you're one of the lucky few, please log on to the My Scouting site and open the main menu, as shown below.

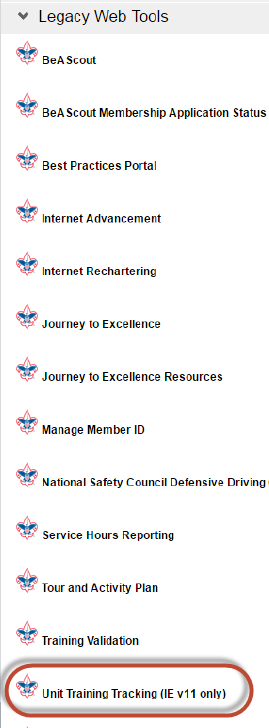
Select Legacy Web Tools from this menu to open the Legacy Web Tools menu, as shown at right.
You may need to be a "Key 3" or "Key 3 Delegate" to access this menu item. If you do not have the necessary access rights for this function on the My Scouting site you might try to persuade your District Executive to obtain a copy of the file for you.
Note that you can only use this function with Internet Explorer version 11 or with FireFox. It will not work with Chrome or with earlier versions of Internet Explorer.
Select Unit Training Tracking (IE v11 only) from this menu.
You may also be able to go directly to this page - after you've logged on - using this link: https://myscouting.scouting.org/pages/UnitTrainingTrackingReport.aspx
The system will then display the Unit Training Tracking Report page, as shown below.
![]()
Notice the drop-down list that says Select a format.
Select CSV from this list, and then click the Export link directly to the right of that control.
This will create a CSV file that you can save to your local disk.
Do not open this file with Excel! Use the Save As option to save it directly to your local disk.
If you open this file in Notepad, the first row should look like this:
UNIT_NAME,MEMBER_ID,NAME,POSITION_CODE,COURSE_CODE,COURSE_NAME,DATE_COMPLETED
While it may contain additional columns, it is mandatory that it contains the following column headers, spelled exactly as shown below:
- MEMBER_ID
- NAME
- COURSE_CODE
- COURSE_NAME
- DATE_COMPLETED
Upload Adult Training From TroopMaster
Troops migrating to TroopWebHost™ from TroopMaster™ can use this function to transfer their adult training history.
First you will need to export the adult training data from TroopMaster:
- Select adult training records
- Check the box that says "include field names as the first line of export"
- Set the delimiter to be a comma
- Select "MM/DD/YYYY" as your date format
Do not open this file in Excel, but instead save it directly to disk.
If you open this file in Notepad, the first row should look exactly like this:
Last Name,Nickname,Middle Initial,Suffix,Training Course,Training Course Code,Course Date
If the first row does NOT look like the row shown above, please try exporting the file again.
To load the file into TroopWebHost, go to Membership → Training → Upload Adult Training From TroopMaster. This will display the page shown below at right.
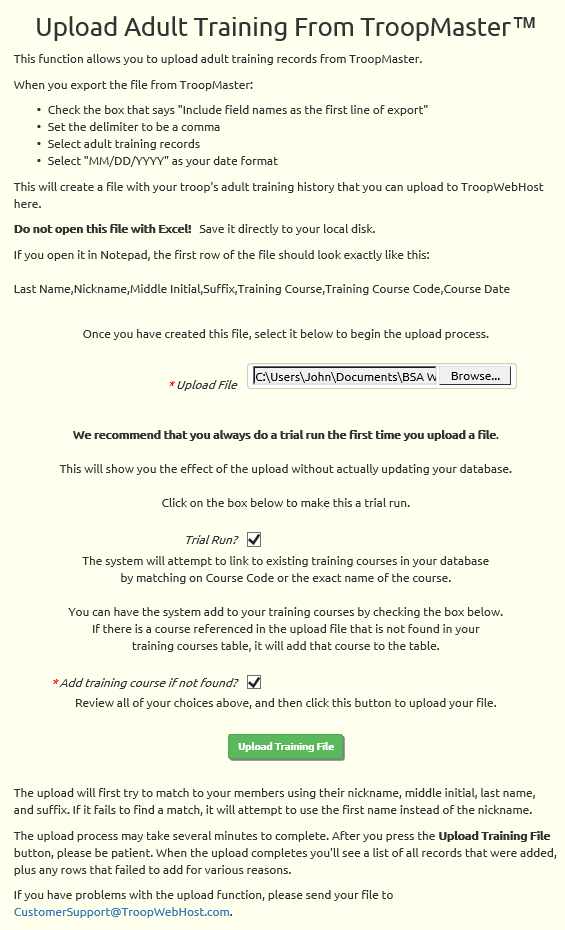
Use the Browse button to find the file that you exported from TroopMaster.
We recommend that you always do a trial run the first time you upload each file.
This will allow you to see the effect of the upload without actually updating your database.
You may then want to make some changes to your data before you upload the file for real - which you do by leaving the Trial Run box unchecked.
The system will try to find each training course that is referenced in the file in the training courses table.
It will match on Course Code or Training Name.
If it cannot find a match, it will not be able to load that training record...unless you check the box Add training course if not found?
That option will cause the system to add new training courses to your list of available courses when they are found in the file.
Press the Upload Training File button when you are ready to process the file.
Skills and Interests
TroopWebHost can help you inventory the skills and interests of the adults in your unit. This can help you identify potential volunteers for positions in your unit, such as:
- Merit Badge Counselors
- Eagle Project Mentors
- Assistant Scoutmasters
- Committee Positions (treasurer, fundraiser chair, etc.)
You'll find the list of Skills and Interests at Site Configuration → Skills and Interests.
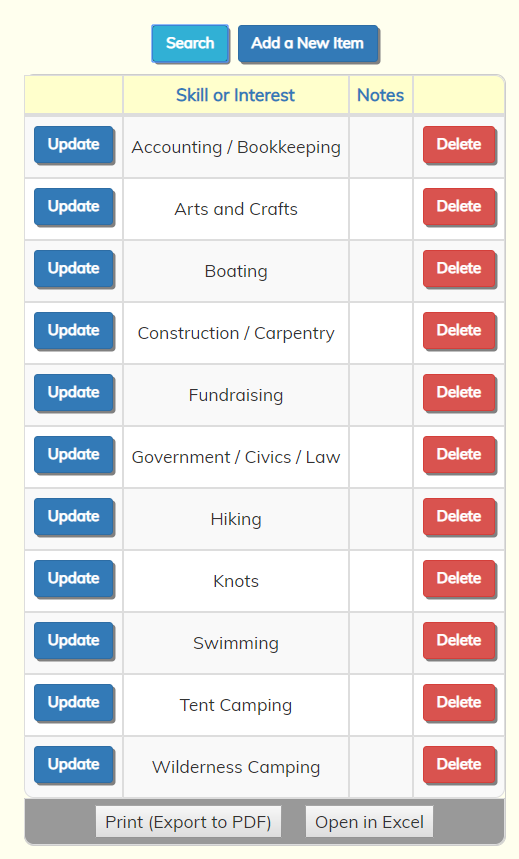
Feel free to rename or delete any of the items already on the list, which we simply provided as examples.
Once the list is complete, you can encourage the adults in your unit to go to My Stuff → My Skills and Interests to check off the items that apply to them, plus add any pertinent comments.
You can then view everyone's skills and interests by going to Membership → Skills and Interests.
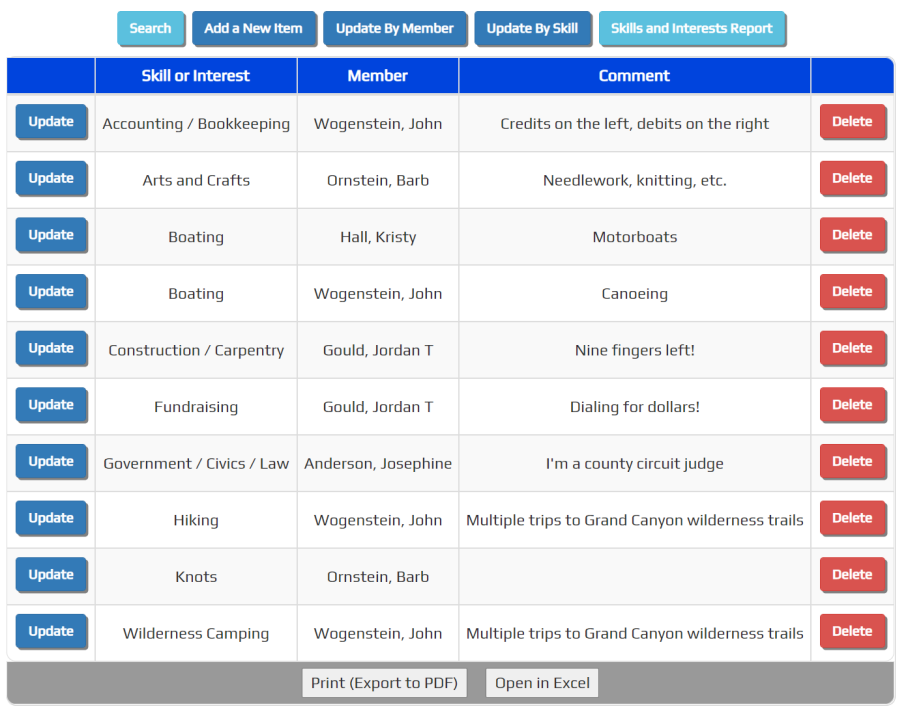
Click Update By Member to display a list of your adult members. You can then click on any member to view the skills list for that member, where you can check or uncheck the skills that apply to this member.
Update By Skill is very similar, but begins by displaying the list of skills. For any skill, you can then view a list of adults and put a checkmark next to each member who has that skill.
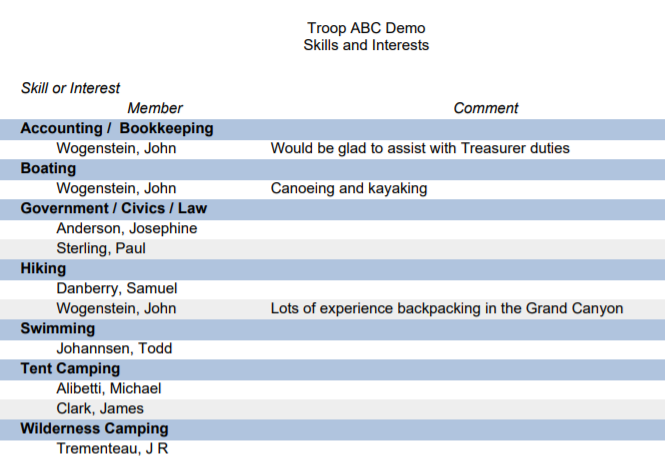
To print a report (as shown below) grouped by skill, click the Skills and Interests Report button.
Access to this feature is controlled through the following security tasks, which can be assigned to user roles using the Assign Tasks To Roles page:
- My Skills and Interests allows the user to go to My Stuff → My Skills and Interests to check off their own skills and interests (but noone else's).
- Maintain Skills and Interests allows the user to go to Membership → Skills and Interests to view and update the skills and interests of anyone in your troop.
- View Skills and Interests allows the user to go to Membership → Skills and Interests to view (but not update) the skills and interests of anyone in your troop.
Shirt Sizes
You can record the shirt size for each member of your troop on their membership record. Members can update their own shirt size on the My Personal Information page.
You can configure the list of available shirt sizes for your troop by going to Site Configuration → Shirt Sizes.
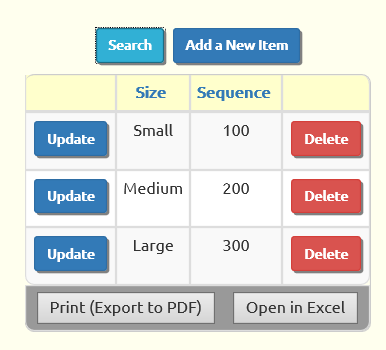 Your system came pre-configured with three shirt sizes, but you can add or remove sizes using this page.
If you delete a shirt size that members have already selected, the shirt size field on their record will be cleared out.
Press Add a New Item to add a new size to the list.
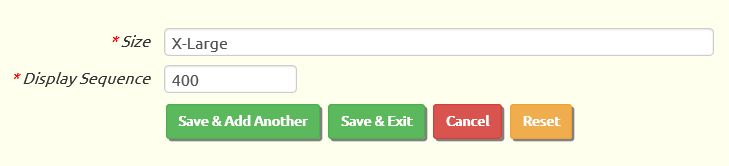
The Size is the name for this size that will display on the choice list.
The Display Sequence controls the order in which this item will appear on the list. Smaller numbers appear at the top; larger numbers appear lower down.
Click Save & Exit to save this entry.
Advancing Scout Grade Level
The scout registration form lets you record each scout's current grade level in school.
At the beginning of each school year, you can automatically increment the grade for every scout in your troop.
Go to Membership → Update All → Advance Scout Grade Level to see a screen like the one shown below.
Press the Continue button to update all of your scouts' grade level by the number you specified.
When A Scout/Adult Leaves The Troop
Do not try to delete a member from your roster when they leave the troop. Instead, mark them as inactive.
Deleting a membership record is problematic because of all the other information that is linked to their record: monetary transactions, event participation, advancement, etc. Deleting this related information will create gaps in your troop's history and can cause other problems.
By making them inactive, you preserve all of their history. This history can be easily restored if they rejoin the troop.
Before you make a troop member inactive, ask your treasurer to clear out their balance. This can be done by going to the Individual Balances page to view their current balance. You may then enter the appropriate transaction(s), the exact nature of which will depend on your troop's financial policies. Many troops simply enter a transaction that sets their balance to zero without affecting any other troop or member accounts. If they have a positive balance, this could be a "Charge Member Account" transaction; if they have a negative balance, this could be done with a "Credit Member Account" transaction.
You should also delete the User ID of any member leaving the troop. This can be done by your troop's site administrator.
If the scout is moving to another troop or crew that uses TroopWebHost, you should authorize that troop to import their data before you make them inactive in your system.
Once all of this is done, you can proceed as follows:
- For scouts, update their membership record from the Active Scouts page.
- For adults, update that adult from the Active Adults page.
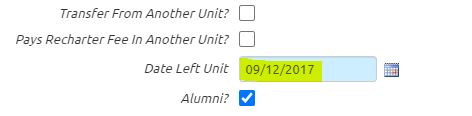
Then scroll down the page until you see the Left Unit field as shown below.
Enter the date this person left the troop. If you wish to include this person in your alumni group, click the Alumni checkbox. Click Save & Exit to save your work
This person will no longer appear on lists of active troop members.
You can still see this person by selecting Inactive Members from the View / Maintain Members submenu on the Membership menu.
If this person's entire family is leaving the unit, you can use the Deactivate Entire Family button to mark all related members inactive in one operation. This will also delete their user IDs at the same time.
When A Scout/Adult Returns To The Troop
One of the advantages of deactivating a member by entering the date they left the unit - instead of deleting their membership record - is that it makes it very easy to restore their information if they ever come back.
All deactivated members can be found by opening the main menu to Membership → View / Maintain Members -→ Inactive Members. To reactivate a member, find their record on this list and click the Update button on that row. Then remove whatever value was entered in the Date Left Unit field, as shown below, so that it is now empty. Then click Save & Exit to save this change. This person will no longer appear on the Inactive Members page, but will appear on the active member pages.
Once you have restored a member in this way, all of their past history - advancement, event participation, monetary transactions - will be visible again. The one exception may be their User ID.
When you make a member inactive, we recommend that you delete their user ID. Reactivating a member does not automatically restore their User ID. Instead, you will need to add a new User ID for this person.
To do this, please go to Administration → Users & Passwords and click Add a New Item.
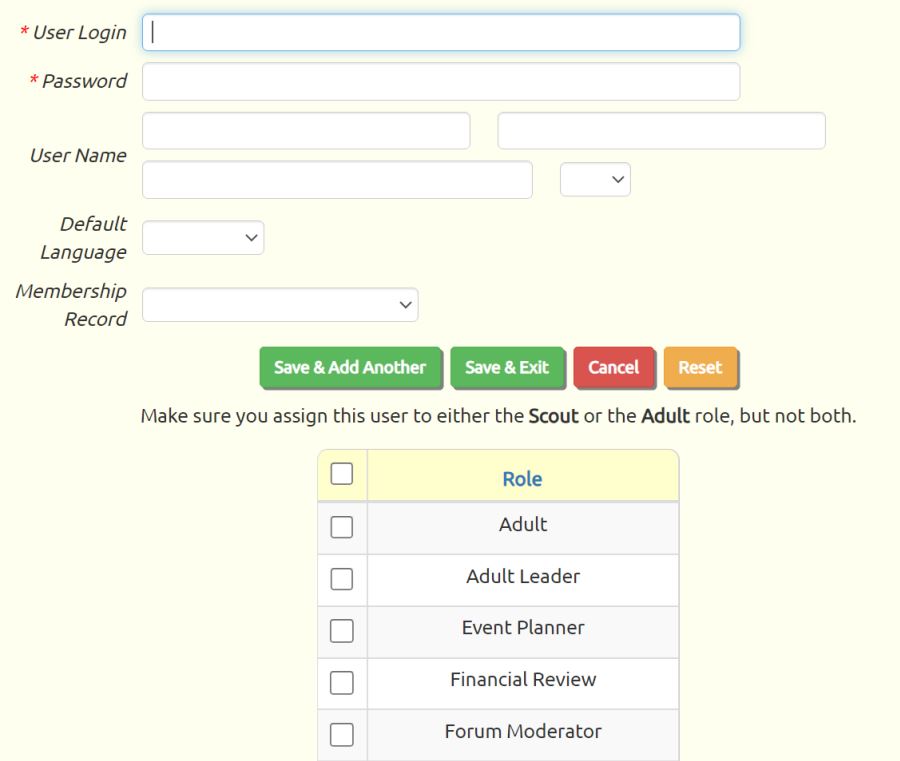
The User Login can be any text, but as a standard convention, we recommend constructing it from the person's first initial and full last name. The User Login must be unique, so if that same User Login already exists, you may need to make it unique by adding a number to the end.
Enter something like "Password1234" as the Password - it doesn't matter what you enter, since the system will generate a new temporary password when you send it to them.
The User Name should be the person's full name, beginning with their first name in the first field, followed by middle name, last name, and suffix.
You must select this person's name from the drop down list for Membership Record. This links this user ID to this person's membership record, so when they log on to the site they will be able to view their own information.
On the list of user roles, be sure to put a checkmark next to "Scout" for a Scout and "Adult" for the adult, plus any others that are appropriate for their position. Then press Save & Exit to save this record.
You can then go to Administration → Send User IDs and Passwords and select this name on the list of recipients. The system will generate a new, temporary password when it sends them the message. They will then be required to enter a new password the first time they log on.
When A Scout Becomes An Adult Member
When a scout turns 18, he has the option of staying with the troop as an adult member.
To make this change, select All Active Members from View / Maintain Members on the Membership menu.
Find this scout on the summary page and click Update to view a page like the one shown below.
Simply click on the checkbox labeled Adult to change this member to adult status.
If you want to remove his relationships to his parents (to prevent them from receiving copies of his messages going forward), scroll to the bottom of this page and delete those relationships from the relationships grid.
Then click Save & Exit to save your work.
This member should no longer appear on lists of active scouts, but will appear on lists of active adults.
Security
You also need to update this person's User ID using the Users & Passwords page on the Administration menu.
Find his User ID on the list and click the Update button on that row.
On the list of roles for this user, uncheck the "Scout" user role, and select the "Adult" user role, plus any other roles that are appropriate for his new status.
Then click Save & Exit to save your changes.
This user will now have the appropriate access rights for an adult member of your troop.
Merge Duplicate Members
If you forget to use the Trial Run feature when uploading members into the system, you can create duplicate records for members who were already in your TroopWebHost database. This can happen if the spelling of any portion of their name is different, or if the scout's date of birth is different.
Once you discover these duplicates, determine which membership record has the most complete information, i.e. which record you wish to keep. You can do this by reviewing both records in the Active Scouts or Active Adults page.
Update the person's name on the record you don't want to keep, perhaps by changing the middle name to "DUPLICATE". This will make it easier to select the records correctly when you merge them.
To merge the records, go to Membership → View / Maintain Members → Merge Duplicate Members to see a page like this:
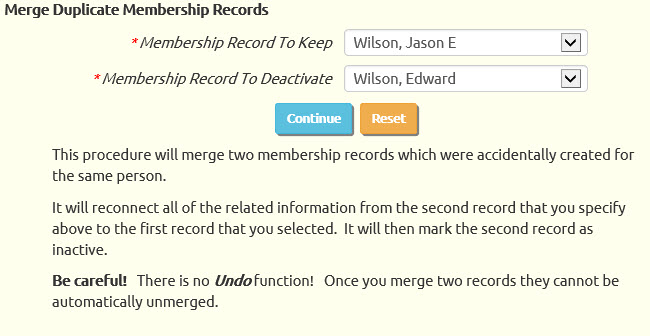
Be very careful when selecting the names for the records you wish to merge!
There is no "Undo" function. Once you merge these records it will be difficult to change them back.
The first name that you select will be kept as an active member.
The second name that you select will be set to inactive status, by putting a value in the "Left Unit" date.
Any related information from the second record will be connected to the first record, unless it would create duplicate entries.
So, for example, any completed rank requirements from the second record will be moved to the first record, unless that requirement was already marked complete for the first record.
Click the Continue button to complete the merge.
After merging the duplicates, you can delete the inactive record at Membership → View / Maintain Members → Inactive Members.
Export Roster to Excel
Export Roster to Excel will create an Excel spreadsheet containing all of your active members, sorted by name.
The spreadsheet will contain a column for every field in your membership record.
To create the spreadsheet, go to Membership → Export Membership Data → Export Roster to Excel.
If you have software on your PC that is compatible with Microsoft Excel, your browser will prompt you to open the file with that program.

Export Roster to Troop Awards
TroopAwards™ is a company that develops specialized printing software for scout troops.
Their software is available at www.TroopAwards.com. TroopAwards is not affiliated with TroopWebHost, but we have worked with TroopAwards to provide a solution for printing a troop directory from your TroopWebHost data.
The TroopAwards troop directory gives you the option of including photos of individual members in the report without making those photos available on the troop website.
Begin the process by selecting Export Roster To Troop Awards from Export Membership Data on the Membership menu. This will display a screen like the one shown below.
 Troop Directory
You can download a file that is compatible with the TroopAwards directory function. Simply press the Download Troop Directory File button.
The file will contain the contact information for each active member in your troop. It can be merged with individual photos on your local computer.
Membership Reports
There are three main categories of membership reports.
Troop Directories are general purpose reports that list some or all of your troop members:
- Scout Directory lists all of your active scouts.
- Scout Directory - Names Only can be used for sign-up sheets.
- Scout Leader Directory lists all of your scouts who currently hold leadership positions.
- Adult Directory lists all of your active adults.
- Adult Leader Directory lists all the current adult leaders of your troop.
- Adult Leaders By Position is organized by troop (if you are managing both a boy troop and a girl troop from one TroopWebHost site), then by leadership position, showing the current leaders in each position.
- Troop Contact List lists all active members of your troop.
- Emergency Contact List lists each member with their emergency contacts.
- Patrol Roster lists the current members of each patrol.
- Patrol Roster w/Contact Information lists the current members of each patrol with their contact information.
- Merit Badge Counselors By Name lists your merit badge counselors and the badges each counselor supports.
- Merit Badge Counselors By Badge lists the badges for which you have merit badge counselors and the names of the counselors for each badge.
- Swim Test Results shows the outcome of each scout's most recent swim test.
- Scout Parent Cross Reference lists the parents for each scout.
- Scout Parent Cross Reference WIth Contact Info lists the parents for each scout, with the parents' contact information.
- Parent Scout Cross Reference lists the scouts for each parent.
- Birthday List - Scouts shows which of your scouts have a birthday each month.
- Birthday List - Adults shows which of your adults have a birthday each month.
- Scouts By Age groups your scouts by their current age.
Medical Form Reports help you identify those members who need to submit new medical forms:
- Medical Form Submission Dates - All Scouts shows the dates on which each active scout last submitted each part of the medical form.
- Medical Form Submission Dates - All Adults shows the dates on which each active adult last submitted each part of the medical form.
- Medical Form Expiration Dates - All Scouts shows the dates on which each part of the medical form expires for each active scout.
- Medical Form Expiration Dates - All Adults shows the dates on which each part of the medical form expires for each active adult.
Training Reports help you identify those leaders who need to take or renew a training course:
- Adult Leaders Who Need YPT identifies adult leaders who have never taken YPT or whose YPT has expired or is about to expire.
- Expired Training By Course lists the training that has expired, grouped by training course.
- Expired Training By Person lists the training that has expired, grouped by person.
- Required Training By Course lists the required training courses, with the status of each member who is required to take it.
- Required Training By Person lists each person who is required to have training, with the status of each required course.
- NYLT Eligibility Report shows which active scouts are eligible for National Youth Leadership Training.
When you select any of these reports, your browser may display a message like the one shown below.
![]()
Click the Open button to open the document.
You must have the Adobe Acrobat Reader™ to view the PDF document. You can download this free software from the Adobe website at http://get.adobe.com/reader/.
The system will format the report to fit standard sized paper:
- If possible, it will produce the report for 8 1/2 by 11 inch paper in standard "portrait" mode.
- If the report is too wide for that, it will switch the report to "landscape" mode.
- If the report still won't fit, it will switch to legal size (8 1/2 by 14 inch) paper in "landscape" mode.
Before you print your report, make sure you have the appropriate size paper in your printer.
Scout Directory
The Scout Directory lists all of the active scouts in your troop, sorted by name.
To produce this report, go to Membership → Troop Directories → Scout Directory.
Scout Directory - Names Only
The Scout Directory - Names Only can be used to create sign-up sheets. It lists the name of every active scout, with blank space for whatever information you need to collect.
To produce this report, go to Membership → Troop Directories → Scout Directory - Names Only.
Scout Leader Directory
The Scout Leader Directory lists all of the scouts in your troop who are currently in leadership positions, sorted by name.
To produce this report, go to Membership → Troop Directories → Scout Leader Directory.
Adult Directory
The Adult Directory lists all of the active adults in your troop, sorted by name.
To produce this report, go to Membership → Troop Directories → Adult Directory.
Adult Leader Directory
The Adult Leader Directory lists all of the adult leaders in your troop, sorted by name.
To produce this report, go to Membership → Troop Directories → Adult Leader Directory.
Adult Leaders By Position
The Adult Leaders By Position report lists all of the current adult leaders in your troop, sorted by position.
If you are using one TroopWebHost site to manage both a girl troop and a boy troop, this report will show you the leaders in each troop, as well as those who hold leadership positions common to both.
To produce this report, go to Membership → Troop Directories → Adult Leaders By Position.
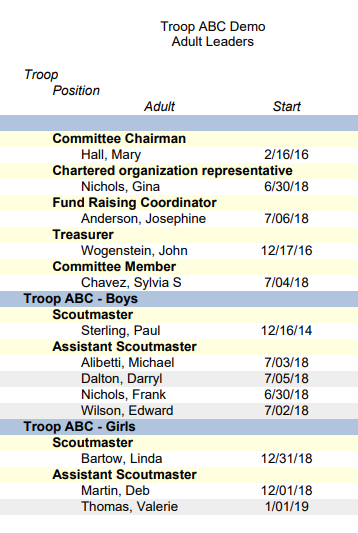
Troop Contact List
The Troop Contact List lists all of the active members of your troop, sorted by name.
To produce this report, go to Membership → Troop Directories → Troop Contact List.
Emergency Contact List
The Emergency Contact List lists each member's phone numbers and their emergency contacts.
To produce this report, go to Membership → Troop Directories → Emergency Contact List.
Patrol Roster
The Patrol Roster lists all the members of each patrol, sorted by patrol name. Within each patrol, the scouts will be sorted by leadership position and name.
To produce this report, go to Membership → Troop Directories → Patrol Roster.
Patrol Roster w/Contact Information
The Patrol Roster w/Contact Information lists all the members of each patrol with their phone numbers and e-mail addresses, sorted by patrol name. Within each patrol, the scouts will be sorted by leadership position and name.
To produce this report, go to Membership → Troop Directories → Patrol Roster w/Contact Info.
Merit Badge Counselors By Name
Merit Badge Counselors By Name lists all of the currently active merit badge counselors, sorted by the name of the counselor. This includes merit badge counselors who are not a member of the troop.
To produce this report, go to Membership → Troop Directories → Merit Badge Counselor By Name.
Merit Badge Counselors By Badge
Merit Badge Counselors By Badge lists all of the currently active merit badge counselors, sorted by the name of the merit badge. This includes merit badge counselors who are not a member of the troop.
To produce this report, go to Membership → Troop Directories → Merit Badge Counselor By Badge.
Swim Test Results
The Swim Test Results report shows the outcome of each scout's most recent swim test, as recorded using the Update All...Active Scouts Swim Test page.
To produce this report, go to Membership → Troop Directories → Swim Test Results.

Members with Allergies or Dietary Restrictions
Members With Allergies or Dietary Restrictions shows all scouts and adults who have anything entered in the Allergies or Dietary Restrictions fields on their membership records.
To create this report, please go to Membership → Troop Directories → Members with Allergies or Dietary Restrictions.
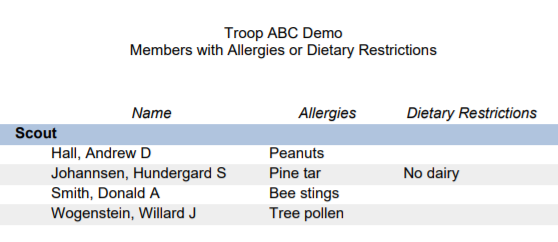
Scout Parent Cross Reference
The Scout Parent Cross Reference Report shows the parents associated with each scout. This is especially helpful when a parent does not have the same last name as the scout.
To produce this report, go to Membership → Troop Directories → Scout Parent Cross Reference.
Scout Parent Cross Reference With Contact Info
The Scout Parent Cross Reference With Contact Info report shows the parents associated with each scout and shows the contact information for each parent.
To produce this report, go to Membership → Troop Directories → Scout Parent Cross Reference With Contact Info.
Parent Scout Cross Reference
The Parent Scout Cross Reference report shows the scouts associated with each parent.
To produce this report, go to Membership → Troop Directories → Parent Scout Cross Reference.
Birthday List - Scouts
Birthday List - Scouts shows which scouts have a birthday each month, sorted by birthday.
To produce this report, go to Membership → Troop Directories → Birthday List - Scouts.
Birthday List - Adults
Birthday List - Adults shows which adults have a birthday each month, sorted by birthday. It only shows those adults who have birthdays on file.
To produce this report, go to Membership → Troop Directories → Birthday List - Adults.
Scouts By Age
Scouts By Age groups your scouts by their current age.
To produce this report, go to Membership → Troop Directories → Scouts By Age.
Shirt Sizes
You can produce a report showing the shirt sizes for each member of your troop by going to Membership → Membership Reports → Shirt Sizes.
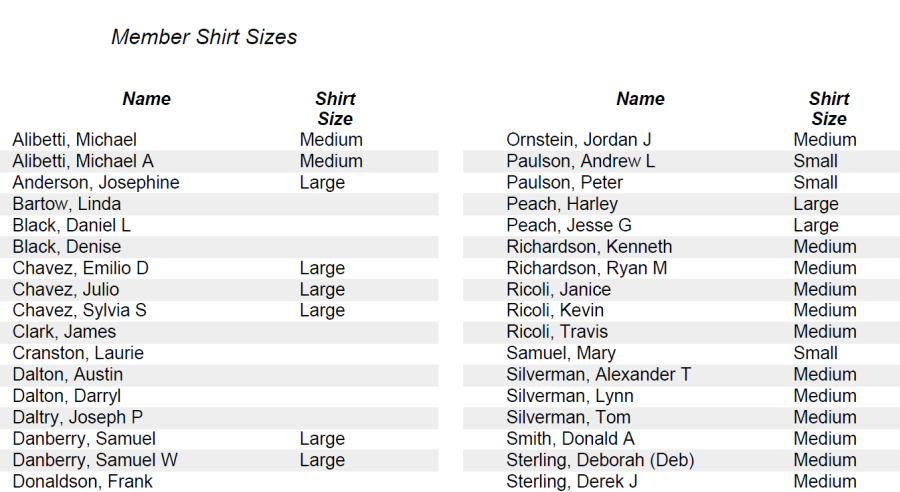
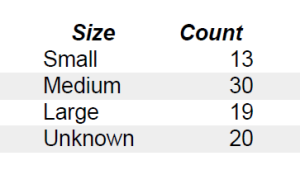 The last page of the report provides a count of active members with each shirt size.
The "Unknown" count is the number of active members for whom a shirt size has not been entered.
Medical Form Submission Dates - All Scouts
Medical Form Submission Dates - All Scouts lists all active scouts with the dates on which each part of their medical form was last submitted, sorted by name.
To produce this report, go to Membership → Medical Form Reports → Medical Form Submission Dates - All Scouts.
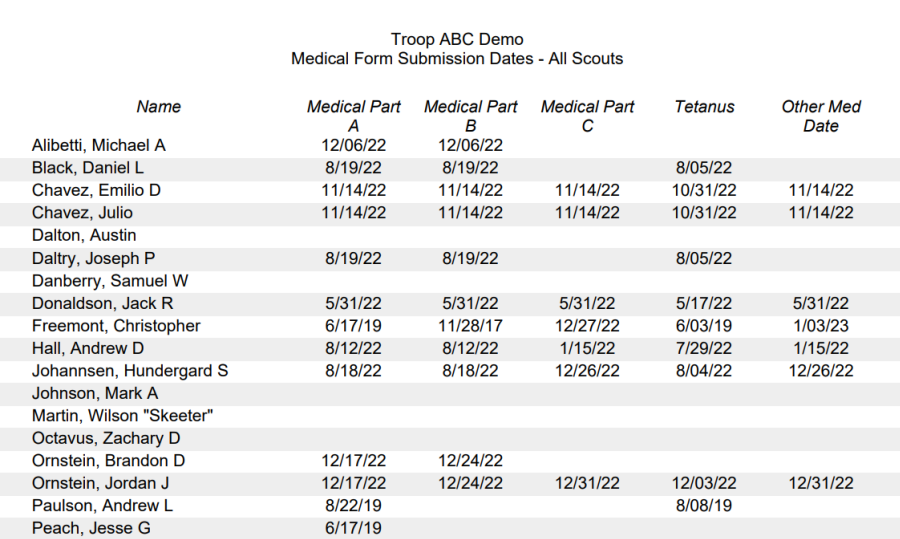
Medical Form Submission Dates - All Adults
Medical Form Submission Dates - All Adults lists all active adults with the dates on which each part of their medical form was last submitted, sorted by name.
To produce this report, go to Membership → Medical Form Reports → Medical Form Submission Dates - All Adults.
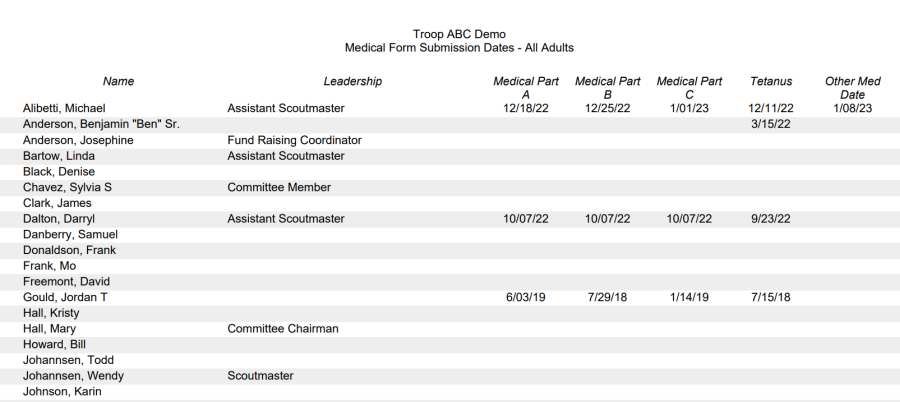
Medical Form Expiration Dates - All Scouts
Medical Form Expiration Dates - All Scouts lists all active scouts with the dates on which each part of their medical form is due to expire, sorted by name.
To produce this report, go to Membership → Medical Form Reports → Medical Form Expiration Dates - All Scouts.
Medical Form Expiration Dates - All Adults
Medical Form Expiration Dates - All Adults lists all active adults with the dates on which each part of their medical form is due to expire, sorted by name.
To produce this report, go to Membership → Medical Form Reports → Medical Form Expiration Dates - All Adults.
Adult Leaders Who Need Safeguarding Youth Training
The Adult Leaders Who Need SYT report lists the adult leaders in your troop who have not taken Safeguarding Youth training or whose SYT has expired or is about to expire. SYT logic is discussed in the User Guide here: Safeguarding Youth Training. We use the "Safeguarding Youth Training Certification (Y01)" course dates to track completion of this requirement.
For the purpose of this report, an adult leader is any adult member of the troop who currently holds a leadership position or is a merit badge counselor.
To produce this report, go to Membership → Training Reports → Adult Leaders Who Need SYT.
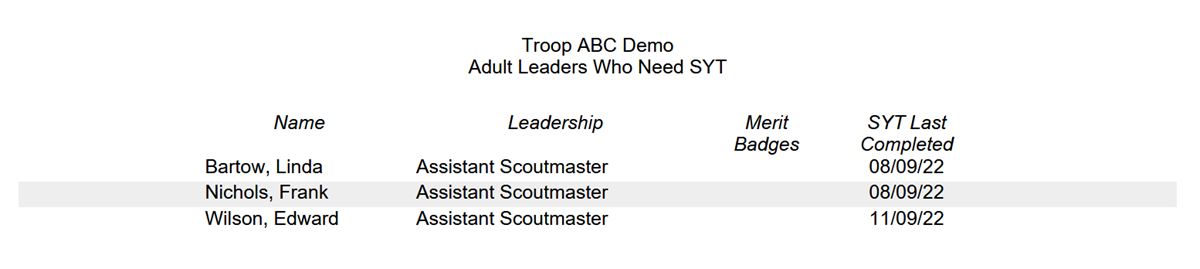
Expired Training By Course
The Expired Training By Course report lists the active members of your troop who took training courses that have now expired or are about to expire in the next 90 days, grouped by course.
To produce this report, go to Membership → Training Reports → Expired Training By Course.
Expired Training By Person
The Expired Training By Person report lists the active members of your troop who took training courses that have now expired or are about to expire in the next 90 days, grouped by individual member.
To produce this report, go to Membership → Training Reports → Expired Training By Person.
Required Training By Course
The Required Training By Course report lists each course which is required for the members of a Dynamic Subgroup. For each such course, it lists the members of that subgroup and shows when they last completed the course, if at all, and when that course expired.
To produce this report, go to Membership → Training Reports → Required Training By Course.
Required Training By Person
The Required Training By Person report lists each person who is required to complete one or more training courses, based on the Dynamic Subgroups to which they belong. For each person, it lists each required class and shows when they last completed it, if at all, and when that training expires.
To produce this report, go to Troop → Membership Reports → Required Training By Person.
NYLT Eligibility Report
The NYLT Eligibility Report shows which of your scouts are eligible to take National Youth Leadership Training.
To be eligible for NYLT, the scout must have:
- First Class rank or higher, and
- Part A, B, and C medical forms up to date, and
- Be at least 13 years of age.
The report is broken into three sections:
- Scouts who have already taken NYLT
- Scouts who are eligible for NYLT
- Scouts who are not eligible for NYLT
To produce the first section, your Training Course for National Youth Leadership Training must have a course code of "S78".
To produce this report, go to Membership → Training Reports → NYLT Eligibility Report.
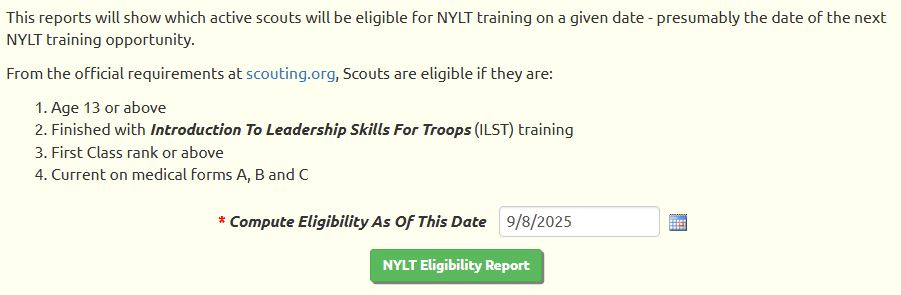
Enter the effective date for which you want to run the report. This will be used for the age calculation and for checking the medical form expiration dates.
Click on NYLT Eligibility Report to produce the report. The report will compute the eligibility of each member based on the date you entered. .
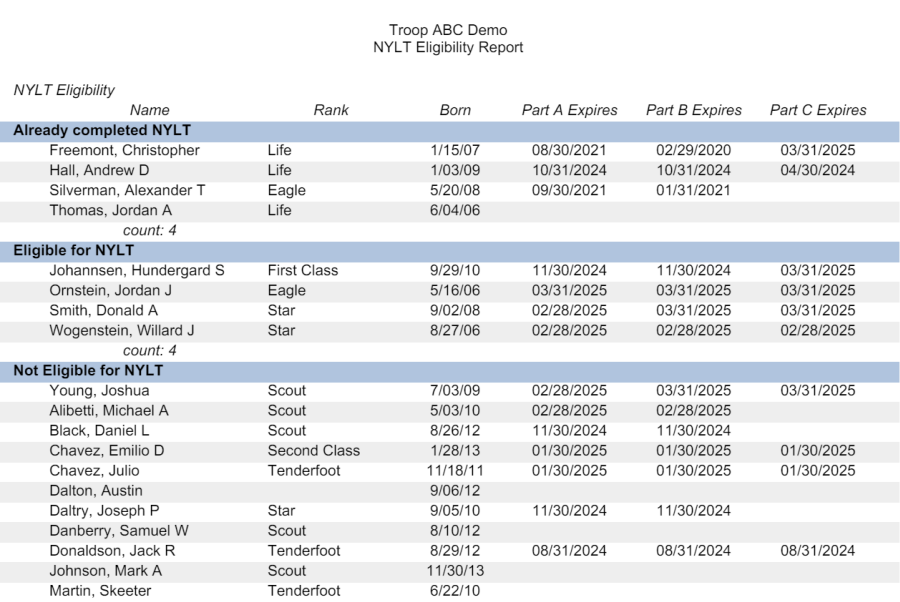
Unfilled Scout Leadership Positions
The Unfilled Scout Leadership Positions report helps you identify leadership positions that are currently open. It is available from the Scout Leadership page.
This report compares the number of scouts currently in each position to the corresponding Desired Number of Active Leaders In This Position defined for the Leadership Position. Only those positions where the current number of leaders is less than the desired number will appear on this report.
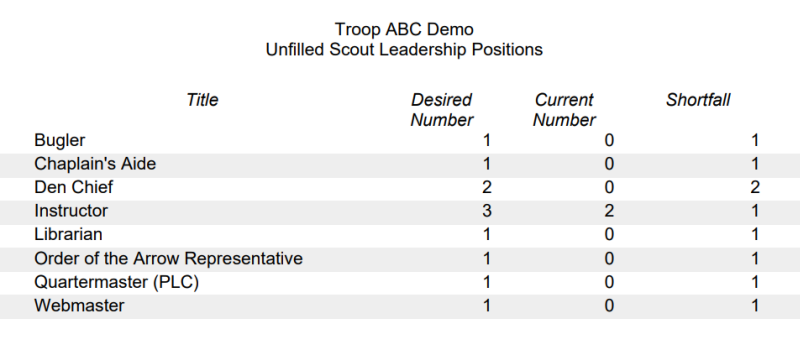
Unfilled Adult Leadership Positions
The Unfilled Adult Leadership Positions report helps you identify leadership positions that are currently open. It is available from the Adult Leadership page.
This report compares the number of adults currently in each position to the corresponding Desired Number of Active Leaders In This Position defined for the Leadership Position. Only those positions where the current number of leaders is less than the desired number will appear on this report.
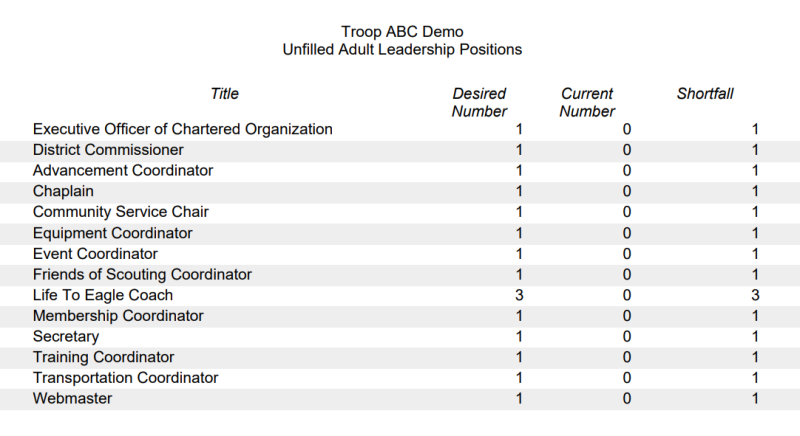
Upcoming BSA Registration Renewals Report
The Upcoming BSA Registration Renewals report shows:
- All adults for whom the BSA Registration End Date field is not empty, and is either in the past or in the next 60 days, and
- All scouts for whom the BSA Registration End Date field is empty or is in the past or in the next 60 days
To be sure you have everyone's current registration end dates, please upload the My.Scouting Roster Report on a regular basis.
To produce this report, go to Membership → Troop Directories → Upcoming BSA Registration Renewals.
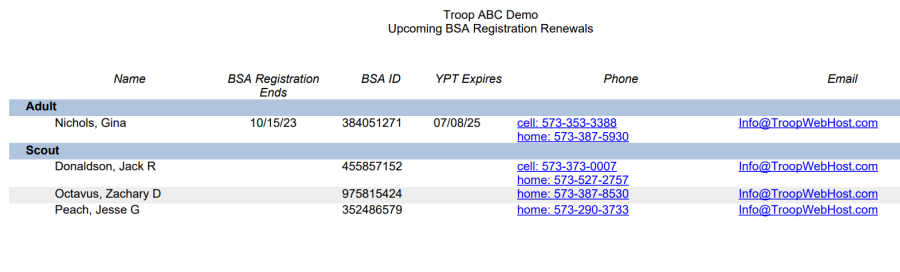
BSA Registrations Report
The BSA Registrations report shows BSA registration information for all active members of your scouting unit.
To be sure you have everyone's current registration end dates, please upload the My.Scouting Roster Report on a regular basis.
To produce this report, go to Membership → Troop Directories → BSA Registrations.
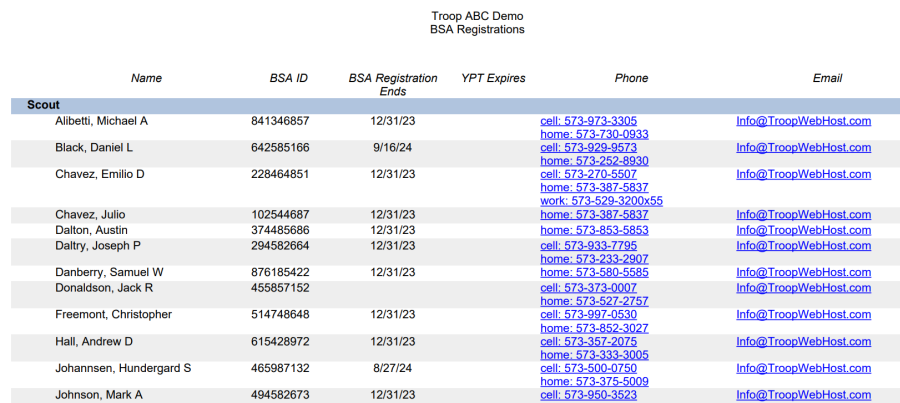
Membership FAQ
 The system is setting the medical form expiration date to the last date of the month for all users, regardless of the actual expiration date. How can we correct this to show the accurate expiration dates?
By calculating the medical form expiration date as the end of the 12th month from the date it was completed, we are following BSA policy.
According to the BSA, the Annual Health and Medical Record “is valid through the end of the 12th month from the date it was administered by your medical provider. For example, a physical administered March 3, 2014, would be valid until March 31, 2015. The AHMR in use before March 1, 2014, will be valid only until April 1, 2015, and only if it was completed before April 1, 2014.”
You’ll find this policy posted on the BSA’s site here: http://www.scouting.org/scoutsource/HealthandSafety/Resources/MedicalFormFAQs.aspx.
One of my adults is now showing up as a scout...OR...one of my scouts is showing up as an adult. How do I fix this?
In either case, you can correct this by going to Membership → View / Maintain Members → All Active Members and updating this person's record. At the top of the detail page you’ll see a checkbox for Adult? Check that box to make this member an adult; uncheck it to make this person a scout. Click Save & Exit to save this change.
This can happen if you've assigned the same user both the "Scout" and "Adult" user roles. This can be corrected on the Users and Passwords page by deselecting the role from this user's list of authorized roles.
Why does the system display an error message when I try to delete a scout?
The system does not allow you to delete a scout or an adult from the system if there is related information about that person in the database. This related information may include financial transactions, rank advancement, merit badges, or participation in troop events.
In most cases, the best way to remove a membership record is to make that member inactive by entering a past date into the Left Troop field. Before you do this, first make sure this member's account balance is set to zero, since you won't be able to enter transactions for this person after you make them inactive. You should also ask your site administrator to delete this member's User ID so they won't be able to log on to your website.
I entered a date into the Left Troop field for a scout, and he still appears on the Active Scouts list. Why is that?
If you enter a future date into the Left Troop field, that scout (or adult) will continue to appear on active member lists until that date is in the past.
If I make a scout inactive by entering a value into the Left Troop field, will all of their information be deleted?
No. Making a troop member inactive does not cause any information to be removed from your database. However, most of this information will no longer be visible. If you need to view information about an inactive member, temporarily blank out the Left Troop field for that member.
If I change a scout to an adult by checking the Adult checkbox, will all of their scouting history be deleted?
No. Changing the status of a member from scout to adult does not cause any information to be removed from your database. However, some of this information - in particular, rank advancement and merit badges - will no longer be visible. If you need to view this information about an adult, temporarily change them back to scout status by unchecking the Adult checkbox on their record.
Can we upload scout medical records to the site?
No. There is a federal law called HIPAA that creates strict rules regarding on-line access to medical information. Rather than risk violating these rules, we recommend that you keep your medical records on paper in a secured storage location.
The BSA strongly discourages troops from creating electronic copies of medical forms. Please see this official blog post: http://blog.scoutingmagazine.org/2015/01/23/say-no-to-digitizing-medical-records/.
You will find the same policy stated on the BSA's FAQ page for medical records: http://www.scouting.org/scoutsource/HealthandSafety/Resources/MedicalFormFAQs.aspx
When I try to print the troop directory the report doesn't display correctly. How can I fix this?
Reports are created as PDF documents, which require Adobe Acrobat Reader™ software to display correctly.
It is possible you do not have this software installed on your computer.
You can download this free software from the Adobe website at http://get.adobe.com/reader/.